


Introduction
The generator sputtered one more time, the noise only slightly louder than the un-Christian commentary coming from my mouth. The quarterly test-run for my generator checkout was not going well.
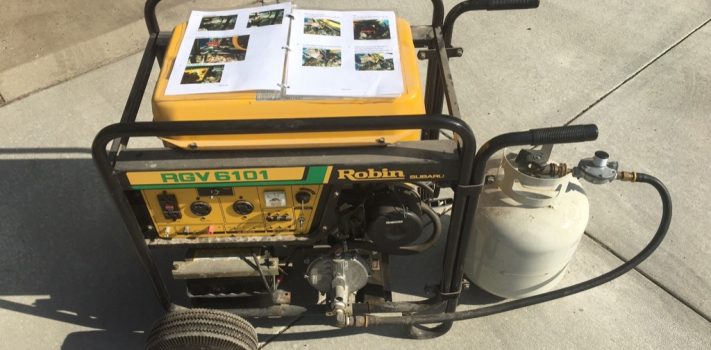
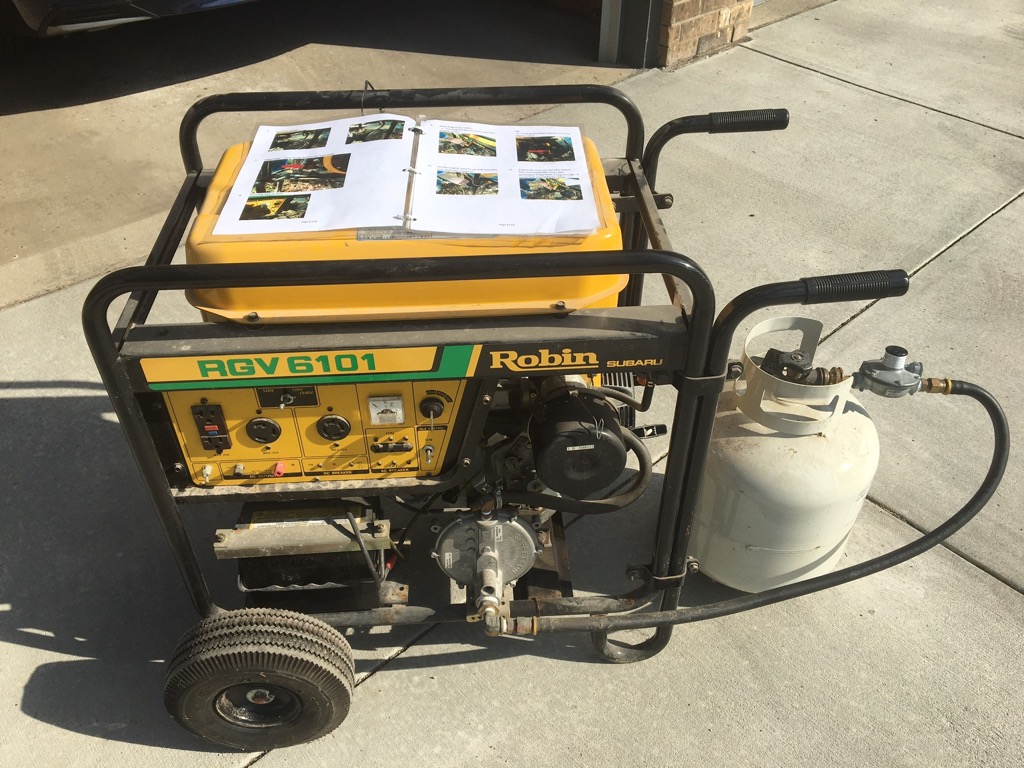
I have a Robin 11 HP generator that provides electrical backup for critical circuits in my house through a transfer switch and separate Circuit Breaker box. I can place the generator outside my garage, connect the cable from the generator to the junction box in the garage, start the generator, change the source isolation transfer switch in the basement circuit breaker box and start turning on the breakers to the circuits I need to power, such as the freezer, well, refrigerator, etc.
IMPORTANT NOTE: When installing a similar system, you must include a transfer switch. If you hook your generator into your house system without cutting the home wiring off of the power service, then with a back-feed, YOU CAN KILL SOMEONE WHO IS WORKING ON FIXING THE LOCAL POWER GRID. I used the services of a licensed electrical contractor for that part of the project. You should, as well.
I had put the system together after a long string of frequent blackouts in my neighborhood culminated in a 4-day shutdown. It was a great success! The local electrical company soon after fixed the overhead lines and local transformer yard. We have had two blackouts in the 15 years since. (I make sure to remind my neighbors that they owe me.) Seriously, it is a great system. It makes getting power where we need it much easier, and much safer.
I usually check it over and run the generator for 15 minutes or so once a quarter to ensure that it is ready for use. My problem during the test run stemmed from the fact that the generator is no longer in its original “stock” configuration. With a variation on “two is one and one is none”, it has been altered with the addition of a bi-fuel system that allows running on gasoline or propane. Propane is my usual fuel. This avoids problems with old gasoline and gives me a dual source of fuel with my gas cooking grill. In addition, propane fuel may be easier to buy in a grid-down situation where the gasoline stations don’t have power.
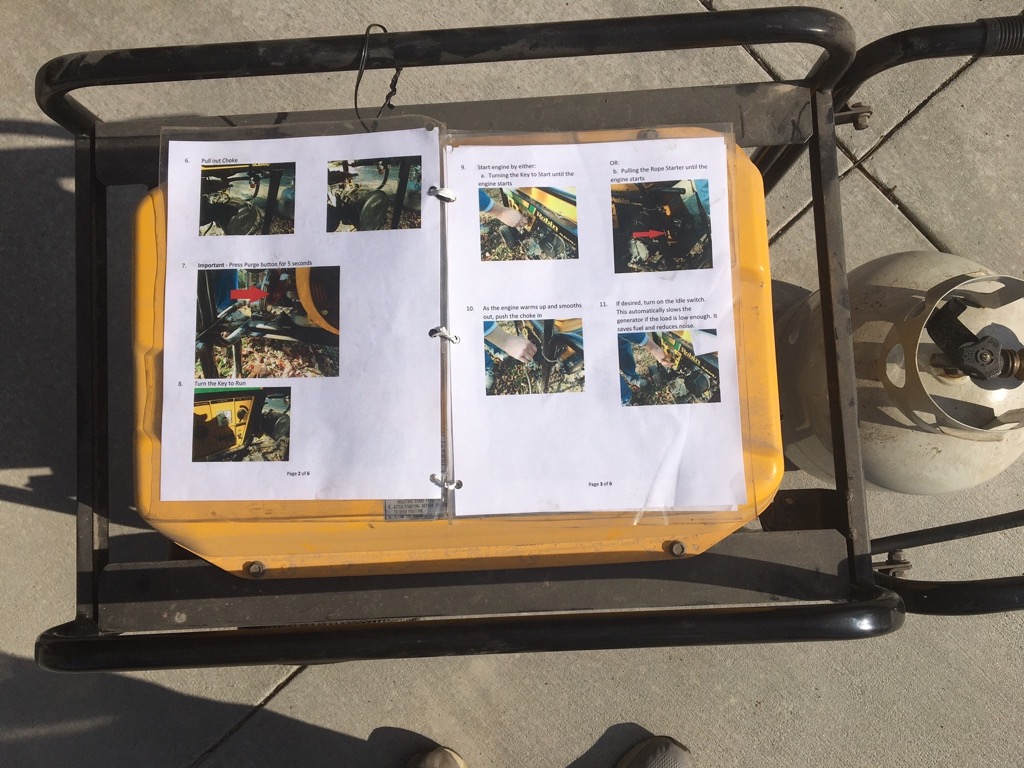
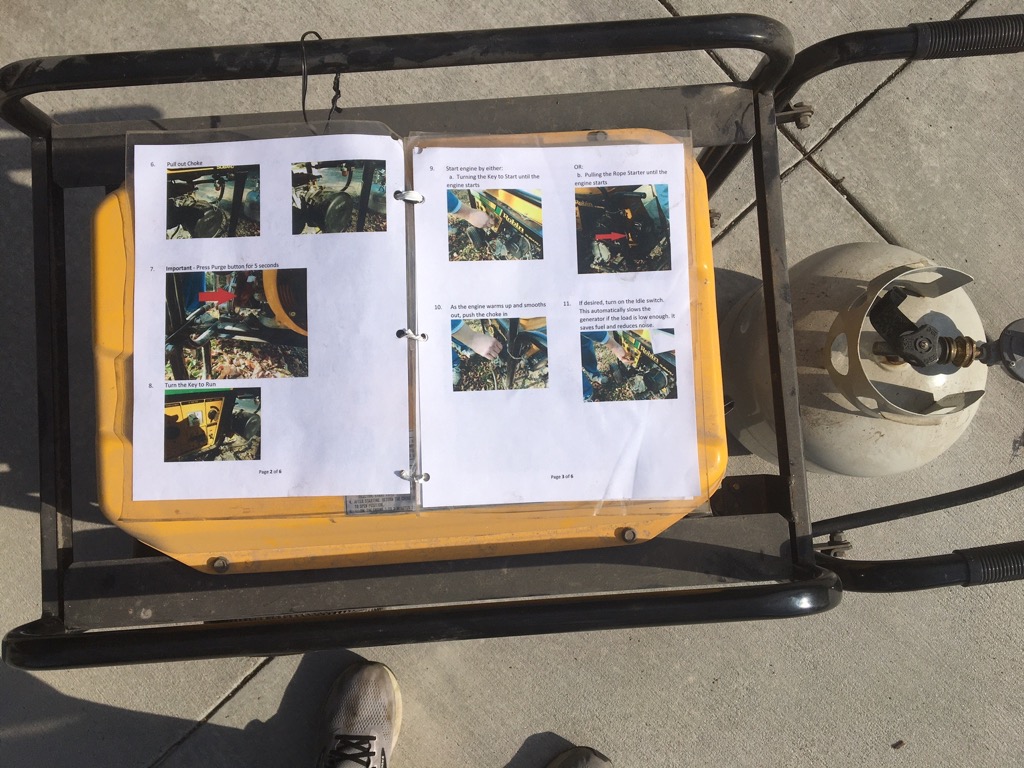
Unfortunately, there are a couple of more steps required to start with propane than with gasoline. I had forgotten one crucial one since my last test, and it resulted in a sore arm from pulling the starter rope and the blue language. After walking away and thinking for a while, it came to me, that I had not purged the system. Five seconds of pushing a non-obvious button, one pull of the starter rope, and the trusty generator roared into life and the quarterly test and check was on its way to successful completion.
Thinking it through
I like to review problems to figure out the implications and potential fixes in a wider context. Earlier in my career, I traveled for my job quite a bit. It hit me that if I could forget the simple but necessary five-second press of the hidden purge button, what would my wife and daughters do if I was traveling? What would my neighbors, my father-in-law, or my brothers do when they came over to help her? I hadn’t discussed the details of my setup with any of them. And while my brothers use generators on the job, theirs are gasoline-based, not propane. While they could get them running with gas, it defeats the purpose and adds the delay from contacting them, getting them to the house and working through the differences in my unit and theirs.
Being an engineering product manager who is responsible for successfully bringing products to market, I know that having good manuals is crucial. I also know that a lot of what goes into a manual is there to keep the lawyers happy and to cover the minutia, so the customer doesn’t call tech support as often. That is not what you need here. You need a clear concise illustrated checklist so that when you are out of town, and your spouse or child needs to get the lights, well, and freezer running, they can get it done quickly and easily.
Developing a manual – step-by-step text
 A good instruction manual is straightforward and concise. It includes all the steps in an easy-to-read format without putting in extraneous info that will get in the way. For a manual intended for an unusual situation, it is very important that is clear and obvious. If the manual is needed, something out of the ordinary, and probably stressful, is happening. Whether it is the need for lights and heat until the power company gets a blown local transformer replaced, or it is a weeklong cleanup with multiple trees down over many power lines, it is unusual and is NOT like testing it on a calm sunny afternoon on the driveway. The ability to read and understand the text and pictures quickly, without having to puzzle through, is important.
Also, remember all the parts of the system involved in using the unit. It doesn’t do much good to have the generator running, with power available to the house, if the user doesn’t know where the circuit breaker box with the transfer switch is, or doesn’t know how to use it when they do find it.
Make it Easy to Read
The first important point: Use large type size and an easy-to-read font. For a generator manual, since power will be out, it will probably be dark when reading the manual. Make it easy to read in the light of a flashlight. I recommend at least 14 point size, larger is better.
Second point: Provide a number system for the step-by-step points. Make it easy for your user to keep track of where they are in the manual and what the next step is.
Third point: Ensure that you have page numbers. Use the “Page x of y” option so your user has a good idea of where they are in the manual. Make it easy for your reader to read, review, perform the step, and then return to the right spot in the manual to find and work on the next step.
You all have seen instruction manuals that fit complex instructions, in multiple languages, on the least expensive, and small as possible, pieces of paper. And you probably commented on the difficulty of use and their limited value as you looked for a magnifying glass. Don’t do that to your readers.
Using Pictures to help find the hidden switch
The main issue that caused my problem is that the side of the component that has the purge button is mounted facing the generator motor, not the outside of the generator. That means it is not obvious, even when you know that you need to find it.
Another problem with my set up is that the Choke wire must be pulled out, but it is not labeled. While more visible than the Purge button, it also is not obvious. And since the Choke itself is not labeled, you know that the starting and running positions are not marked.
The answer to all of these problems is to include pictures in your manual.
Pictures can add context and direction to your instructions, but only if they are understandable. Dark, out of focus, and fine-detailed pictures without any context are not going to help the manual user get your equipment running.
Take your pictures with enough light to illuminate the critical details without hiding things in shadows. You don’t need a studio to do this, just make sure that the important button or switch setting is easily visible in the photo. If your user needs to use a specific setting, ensure that the text needed for that setting is both visible and readable in the photo. Even in good light situations, it is probably a good idea to use the flash to reduce the shadows. Remember, this is a high stress situation for someone doing an unfamiliar task. Help them as much as possible.
Since you are probably using a phone or digital camera, take advantage of the nearly unlimited number of shots. Take one, view it to see if it has problems, delete if it needs improvement and repeat until you have a couple that work. Change the angle and take some more. Take two angles in case you missed something in the first one. It may save you having to go back to repeat that photo session. It also may be that using the pictures from both angles will be what helps your user fully understand the task.
Being out of focus is not as common a problem as it was when I started taking pictures with a film camera. However, it can even happen with a smartphone camera. Again, take the picture, review, and repeat if needed.
Finally, ensure that the detailed photo of the item you are highlighting, the purge button in my case, provides the context so that your reader can find the item! This was a problem in the initial version of my generator manual. The purge button is behind the valve and not visible from the side of the generator. I needed to take a picture rather low from the front of the unit to show the button. The first picture that I used was close enough to see the purge button. Unfortunately, it was so close that it was difficult for the reader to see where the button was on the generator.
One solution is to change the angle and lighting. A different angle that matches what your user will see can make all the difference.
Another tool is to take advantage of the markup capabilities of many programs such as the Snipping Tool available on many computers. A simple arrow or circled area will direct the reader’s eye to the critical info. If you don’t have such a program, using a pen or marker on your printout will do the same thing.
Another third good tool is the use of a sequence of photos. To help locate the purge button, I started with a broad photo of the general area from the front.
Next I zoomed into the specific area showing the component that the button is mounted on. Finally, I took a picture of the edge and back of the component that shared identifying marks with the previous photo and included the Purge switch.
Two sequence pictures solved the problems of the choke. One was paired with text to indicate the starting position and a second showed the running position. Besides showing the operation, these two pictures also clearly indicated the location on the generator.
Remember that this manual will probably be used in a high-stress situation, so make it easy for your user.
Include important accessories.
Parts that are needed, if not attached to the equipment, should be referenced and the location specified. In my case these included the cable from the generator to the wall input plug and the initial and spare propane tanks.
My cable is located with the input plug while the initial tank is with the generator. Spare, filled propane tanks are stored in the shed. All items and locations are specified in the manual. A photo of the cable makes identification easy.
Include the whole system
Also include the other parts of the system. My problem was due to my forgetting the purge switch on the generator itself. However, there is more to the system than the generator.
In my case, my manual includes the cable connection to the input connection plug in the garage wall, the location of the circuit breaker box, how to use the transfer switch, how to use the individual circuit breakers, and how to shut down the system, either for refueling or when the grid power comes back on.
Testing it
Well, you’ve written your masterpiece. The sparkling collection of clarity and master quality pictures is ready for the next time that you are away and a disaster happens! But is it? Just maybe someone else should use the manual as written to make sure auto-correct didn’t put in a wrong work word somewhere.
 In my case, I had my oldest daughter review the manual. And I didn’t just have her read it, I had her actually use it. And contrary to my hopes, she found a couple of sections that were not clear and needed both rewriting and the addition of a photo with more descriptive information. (Actually, I’ve written enough manuals and instruction sheets in my career that I wasn’t surprised that it needed more work.) Having one or more people review the manual is not only needed to ensure it is clear, it also is a good way to have the potential users get experience with both the manual and the equipment. Equipment is necessary, but knowledge to use it is crucial.
A few minutes of typing and the addition of another picture, and it addressed her findings. Now for the next step.
Cover pages for the Hard Copy
Remember that sunlight fades things. Dust lands on top of things. Birds roost and deposit on things.
I recommend using both a cover page and a back page for your manual. While cover and back pages can and should provide useful information such as the title, date, and equipment involved, the main purpose is to prevent your first page of instructions from being washed out by that sunbeam that came through the window and happened to shine on the manual for a year. Or it can eliminate the need for a rag to wipe off the garage dust. Or soap and water to get the bird deposits off of the description of where you stored the starter key.
Keeping it clean by laminating
Paper attracts stuff, whether it is water, oil, dirt, bird droppings, dust, or wahtever. When the checklist is needed, it is not the time to find out that the coffee spill reached that end of the bench and dripped on the manual. A simple, easy and inexpensive protection can be found at your local office supply store or, for a bit more money, your local pharmacy. I found mine at Walgreens.
It is lamination sheets. Placing one on each side of each page will seal your manual from most harm. Another advantage is that it will add some stiffness which makes it easier to use.
A potential difficulty to lamination when using a single sheet is the wrinkles caused by uneven attachment.
A simple flat carpenter’s square can provide both a method to help hold the lamination sheet in place, and measurement markers to start the page at the right spot. Getting the initial margins set up should make it easier to roll the page down onto the lamination sheet. Simply settle the lamination sheet into the corner of the square, use the measurement markings to align the printed sheet at the top and carefully flatten the printed sheet. Once the lamination sheet and manual page are lined up and smoothly flattened together, the square can help guide the second lamination sheet to match the front sheet and cover the back of the page.
Unless you are more careful than I am, the lamination sheets will not line up perfectly. But a simple trim with a pair of scissors and you will be all set.
Binding the Printed Manual
Binding a multipage manual is vital. If not attached together then it will be dropped and the pages will get mixed up. Remember: High-stress situation! Binding doesn’t have to be a complex, expensive operation.
Binding it is easy with a 3-hole punch and simple means to put rings through the holes. First I used the 3-hole punch from my desk. Simple, fast, and consistent. If you don’t have one, your leather punch or pocket knife will work as well.
For binding, a 3 ring binder will work but is probably overkill. My generator manual uses twist-ties, (the paper- or plastic-covered wires used to close plastic bags). Building three rings by running the wires through the holes punched in the manual several times provides plenty of strength for the simple manual and the limited number of times it will be used. Remember it’s not a reference manual you will use every day. If it is used often, then the 3-ring binder, or an even sturdier option, should be used.
Be sure to make the wire rings large enough that the manual can open up and lay flat. You don’t want the reader to have trouble with the manual flopping over or not staying on the page they are working with.
Keeping it handy
 The manual must be handy. In my case, I didn’t want my wife and daughters trying to figure out what obvious storage place, (to me), that I decided to use for the manual. So my generator manual is wire-tied to the frame in a spot that allows it to lay flat on top of the generator. If they have the generator, they have the manual and a flat spot to place it and read it. I attached it so that when reading it, the user stands on the side where the switches and choke are located. It made it easy to compare the pictures in the manual to the actual device.
Summary
I recommend reviewing your home, shop, and equipment to determine where there are potential problems with using critical equipment, especially if only one person usually does that chore or uses that piece of gear. In my case, I ran into a specific issue with the backup power preparations that I had always handled by myself.
If you find a potential issue, one part of the solution is to put together a clear, concise, step-by-step, pictorial manual that provides the information needed. Ensure that the pictures further clarify the instructions, have it reviewed and then bind it so as to be clean and easy to use in a stressful situation.
If you are away, a good manual will make it easier for your family. In my case, it might help me remember where that purge switch is for the next test run!