


(Continued from Part 2.)
Add-Ons
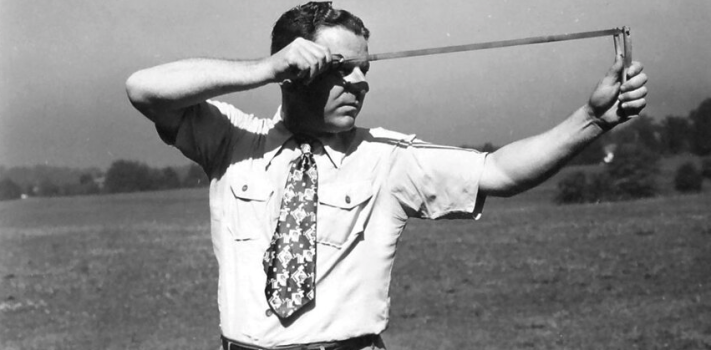
There are dozens of possible additional features that can be built into or added onto a basic slingshot frame to enhance its effectiveness and functionality. One of the most common ones is a wrist brace, which is a rigid extension that attaches to the frame and presses down on the top of your forearm. In regards to my earlier discussion about the lever behavior of a slingshot, a wrist brace helps overcome this problem by transferring the rotating force on your wrist into a downward force on your forearm, which allows you to use stronger bands that you may not have been able to fully draw with wrist support alone. Wrist braces have somewhat of a mixed reputation among the slingshot community – some people deride them as ‘training wheels’ while others swear by them. I’m of the opinion that preparedness isn’t a popularity contest, so anything that could potentially enhance your ability to harvest game or protect yourself should be considered. I use a wrist brace frequently when hunting and fishing as that allows me to use stronger bands without tiring out as quickly, and it allows me to relax my grip on the frame to rest my hand without dropping the slingshot. Be aware that in some locales wrist braces on slingshots (sometimes referred to a ‘wrist rockets’) are specifically called out by law and may be illegal, so do your homework.
A wrist brace is just one of many additional features you can get on or add to a slingshot frame. Some more options include:
- Rotating/swiveling head – The forks are designed to rotate around the center of the handle and/or swivel up and down. This ensures that your pouch is always perfectly centered when you pull it back.
- Swappable head – Some manufacturers provide multiple heads you can swap between for different needs.
- Picatinny rails – Some slingshots include a short section of Picatinny rail somewhere on the frame, allowing you to attach firearms accessories such as flashlights, lasers, sights, etc.
- Sights – Many people use the frame or band for sighting, but you can also find slingshots with built in open, fiber optic and even red dot sights.
- Lasers – Can simplify aiming.
- Flashlights – Having a flashlight on your frame can be useful when hunting or fishing at night.
- Spring arms – These have a spring as part of the fork, which allows you to store additional energy when the bands are pulled back without having to use longer bands.
- Stabilizers – A long rod with a weight attached to the front of the frame. This helps reduce small movements for a more stable shot.
- Extended forks – These are extensions for the frame that move the forks further out in front away from your hand. Since the amount of energy you can store in a slingshot’s bands is proportional to the length of the bands, extended forks allows additional energy.
- Pulleys – Wrapping the bands around a pulley is another way to increase your band length without having to extend the forks out of the front.
- Arrow rest – This can be a whisker biscuit or other type of rest that allows you to shoot arrows with your slingshot (more on that later).
- Ammo storage – Space inside the handle or a magnet attached to the frame for holding spare ammo.
This is just a sample of some of the extra features available. As you gain more experience with slingshots and start to understand your specific style and needs, you’ll be able to make more informed decisions on what features make the most sense for you. My preferred hunting/fishing slingshot kit with options for home base use is the SimpleShot Hammer XT bundle with the optional thumb screws, which includes a wrist brace, arrow support, swappable heads and a Picatinny rail that I’ve attached a flashlight to for night hunting/fishing.
Get a Grip
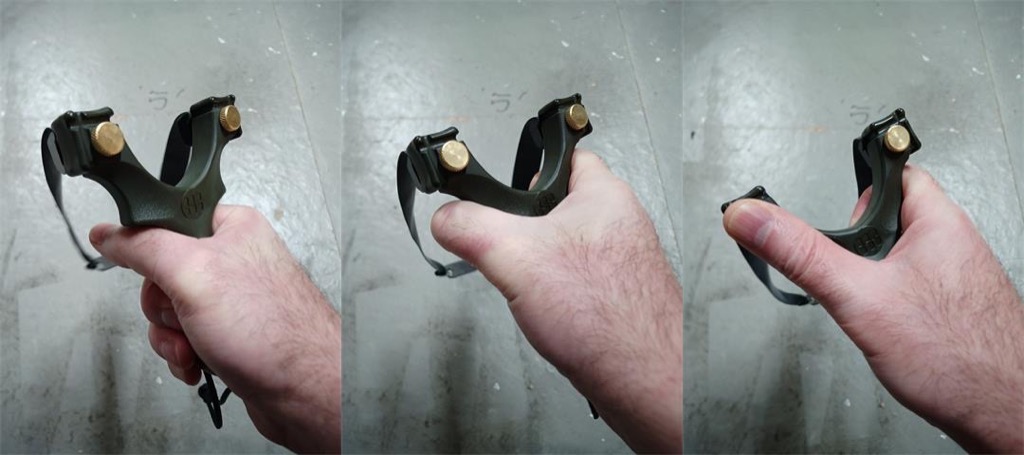
How you hold your slingshot when you shoot can have a big impact on your power, consistency and accuracy. There are generally three styles of grips you can use:
- Hammer – This is where you hold the body frame just like a hammer – all of your fingers and thumb wrapped around the base of the frame.
- Pinch – Your lower three fingers are wrapped around the lower body of the frame, and your thumb and index finger are wrapped around the base of the forks.
- Fork supported – Similar to a Pinch grip, but your thumb is pressed directly against the inside of the fork to provide additional support.
Here’s a picture that illustrates examples of all three grips – from left to right are the Hammer, Pinch and Fork Supported:
Once again, moving your grip higher up on the forks and closer to the bands reduces the length of the lever action against your wrist, allowing you to use stronger bands and reduce the strain on your wrist.
One other point is probably pretty obvious, but it’s worth mentioning – some slingshot frames are designed specifically to only be held with a certain grip style. A good example is the SimpleShot Hammer, which is designed specifically for the – wait for it – Hammer grip. That doesn’t mean you can’t try to use other grips, but doing so will not be nearly as effective or comfortable. Other slingshots like Zachary Fowler’s Sparrow are designed to accommodate a wide variety of grips. When you’re just getting started with slingshots it’s worth trying out several frame styles and grips to see what works best for you.
Banding Together
While the frame of a slingshot acts like your body’s skeleton to hold everything rigidly in place, the bands act like your muscles. As such, the bands of a slingshot have a big impact on how much energy you can provide to your ammo, which determines far you can shoot and how much energy you can potentially deliver to your target. Like the rest of slingshoting there are a lot of band options to choose from with a lot of different factors to consider.
The amount of energy you can store in a band is determined by a number of factors, but one that has the biggest impact is the total volume of material in the band. For example, for two bands of the same material with the same length and width, the thicker one will be able to store more energy but will also be harder to draw and will retract slower than a thinner band (reduced velocity). Everything else being equal, a longer band will be able to store more energy than a shorter one but will require a longer draw to obtain maximum energy. The shape of the band can also make a difference.
The material the band is made from also impacts how much energy it can store. There are two primary materials used for slingshot bands – Natural Rubber Latex (NRL), which is natural rubber that is extracted from the rubber tree, and synthetic rubber, known as thermoplastic elastomer or TPE, which is manufactured by clumping and drying petroleum-based chemicals together. Latex is by far the most popular and is slightly stronger, has more elasticity and works better in colder temperatures, but some people can be allergic to it and it dries out and cracks over time, particularly if exposed to UV rays. Synthetic rubber is non-allergenic and more resistant to degradation from ozone and UV light, but it has less elasticity than latex.
Temperature is another factor that has an impact on the performance of your bands. Very cold or very hot temperatures will reduce the amount of energy you can get out of your bands; the optimal temperature range for most bands is usually somewhere around 60°F-90°F (15°C-26°C). If you’re going to be hunting in cold weather, store your slingshot inside your clothing until you’re getting ready to shoot and stretch the bands a few times before you use them. Your bands also generate heat as you draw them and then start to cool down almost as soon as you reach your full draw length, which starts reducing their available energy. Being able to draw, aim and release quickly increases the available energy by retaining more heat. Like many other preps, being subjected to extreme temperature swings over time can also reduce the useful life of your bands, so store them somewhere with a constant temperature.
Band geometry, material and temperature all combine to determine how a band behaves, and one of the critical behaviors to consider is maximum elongation – how much a given band can stretch. The easiest way to determine this is to stretch the band and measure it – pinch 1” between the thumb and index fingers with both hands, place it over a ruler and measure how far you can stretch it. If you can stretch it to 5” then the band has a maximum elongation of 5X or 500%. Some really beefy bands may only be able to stretch 3X, while some of the thin ones might stretch 8X. The cut length of a band combined with its elongation factor determines how far a band can be pulled back (drawn) when you’re shooting – a 6” band with 5X elongation can be drawn up to a maximum of 30”. The closer to its maximum elongation the more energy you’ll get out of the band; however, the more you stretch a band the shorter its useful life will be. The most commonly used elongation range is around 4X-6X.
It’s useful at this point to discuss the concept of draw length, which is how far back you pull the bands when shooting. There are essentially three different ways to draw a slingshot:
- Anchored – You draw the pouch/ammo back to your cheek or ear.
- Partial/Half Butterfly/Albatross – You draw it back to some point past your head, but the elbow on your drawing arm is still bent.
- Full Butterfly/Albatross – You draw back past your head with the drawing arm fully extended.
The anchored draw is the most common, especially for beginners. The longer butterfly/albatross draw has the advantage of allowing you to use longer bands (more energy), but can be more difficult to master. You can determine your draw length by measuring the distance between where the band connects to the slingshot being held in your outstretched hand and where it connects to the pouch when it’s fully drawn – the easiest way to do this is by holding a tape measure in your hand just like you would a slingshot and drawing the end back to where you want to anchor, or you can use a piece of string and measure. You can then determine the desired length of your relaxed bands (called ‘active’ length) by dividing your draw length (30” for me when anchored on my cheek) by your desired elongation – if I want a 5X elongation my active band length needs to be 6” (30”/5). Active band length is measured between where the bands attach to the pouch and where they come off of the frame, so you’ll need to add a little extra for the attachments at both ends. Here’s a good video showing an example.
Band Profiles
To keep things even more interesting, there are two different forms of bands – tubular and flat. Tubular bands (tubes) are made from rubber or latex tubing, and are the kind most commonly seen on traditional Daisy and Barnett slingshots. Tubular bands tend to have a longer life than flat bands, but they’re generally considered less accurate and slower. They’re available in a lot of different sizes, and are usually measured as a combination of inner and outer diameter. For example, 2050 tubing (one of the more powerful ones) has an inner diameter of 2.0mm and an outer diameter of 5.0mm. Dan Kung has an excellent chart showing the sizes and draw strength of various types of slingshot tubing.
Flat bands are cut from sheets of latex or rubber material, and are considered to provide more power, consistency and accuracy than tubular bands. Flat band material is typically measured by thickness in millimeters, with .5mm being one of the more commonly used. By far the most popular material for making flat bands is Theraband latex exercise bands, with the gold color being one of the most common (commonly abbreviated as ‘TBG’ – Theraband Gold). Flat bands offer a lot of flexibility by allowing you to cut them to your desired width,length and shape based on your shooting needs.
You can tweak the geometry of flat bands to change their behavior – they actually can provide more speed with the same amount of material if you cut them with a taper (wider part attached to forks, narrower part to the pouch). The folks at Sniper Sling Slingshots have done a nice test that shows that a tapered band with the exact same volume of material as a straight band will provide around 15% more speed with the same ammo. In general, the more taper the more speed (up to a point), but the shorter the band life. A mild tapering of around 3:2 is considered an optimal combination for increasing speed while minimizing impact on band life.
Regardless of the type of material there are several things you can do to increase the amount of energy you can store in your bands. The most common one is to use multiple bands together – 2, 3 or even 4 tubes or flat bands stacked together on each side. You can also achieve a similar result by looping the tube or band. Another option with flat bands is to use one that’s wider than the attachment point on your forks and folding it in half lengthwise before attaching it. For tubular bands, Dan Kung has a cocktail band that’s made up of a thinner tube inside a thicker tube. There are lots of debates on using multiple thinner bands vs. a single thicker band, but when you’re getting started I suggest sticking with quality single flat bands, which should meet 90% of your initial requirements.
You also need to consider the life expectancy of your bands. Any given band can provide anywhere from dozens to thousands of shots, and the exact number depends on several factors:
- Stretch – The more you elongate the band when you draw, the sooner it will wear out.
- Taper – The more extreme the taper on flat bands, the shorter the life.
- Use – The more shots you take, the fewer you have left.
- Material – TPE generally lasts longer than latex.
- Quality – Since bands are made from mass produced material, small imperfections in the manufacturing process can impact band life.
- Abuse – Bands that slap against the frame when shooting, sharp edges on frames, etc. can all contribute to premature failure.
- Elements – Exposure to ozone and UV rays will reduce a band’s life expectancy.
- Temperature – Frequent large temperature fluctuations can reduce a band’s life.
- Friction – Bands rub against the frame and themselves as they stretch, which will eventually wear the material out.
- Dirt – Dirt can get into all of the nooks and crannies in your band, which can rub against the material and wear it out.
- Chemicals – Strong chemicals like petroleum-based products and harsh cleaners will cause bands to deteriorate.
- Folds – Sharp creases in a stored band can reduce its life.
Taking a little care with your bands should allow you to get hundreds or even thousands of shots from them. Some people swear that covering your bands with talcum powder can increase their useful life significantly, and other espouse the use of protectants like Armor All, silicone lubricants, etc. for reducing friction and increasing the life of bands. I recommend that you first focus on getting accurate and generating power, and if you start experiencing problems like premature band wear, multiple bands sticking together, etc., then start looking into the various protectant options.
To be continued tomorrow, in Part 4.)