


(Continued from Part 1.)
6. FIGURE-EIGHT KNOT
I use this knot mostly as a “stopper knot” but occasionally for other uses as well. An overhand knot makes a good stopper knot but if it’s too small for the hole size, a figure-eight knot is the next step up. It’s similar to an overhand with one extra loop.
Stopper knots are called that for their use on preventing a rope or cord from passing back out of the hole they’ve been pushed through. I use stopper knots to put handles on various items I make including the gift crate seen in Photo 9.
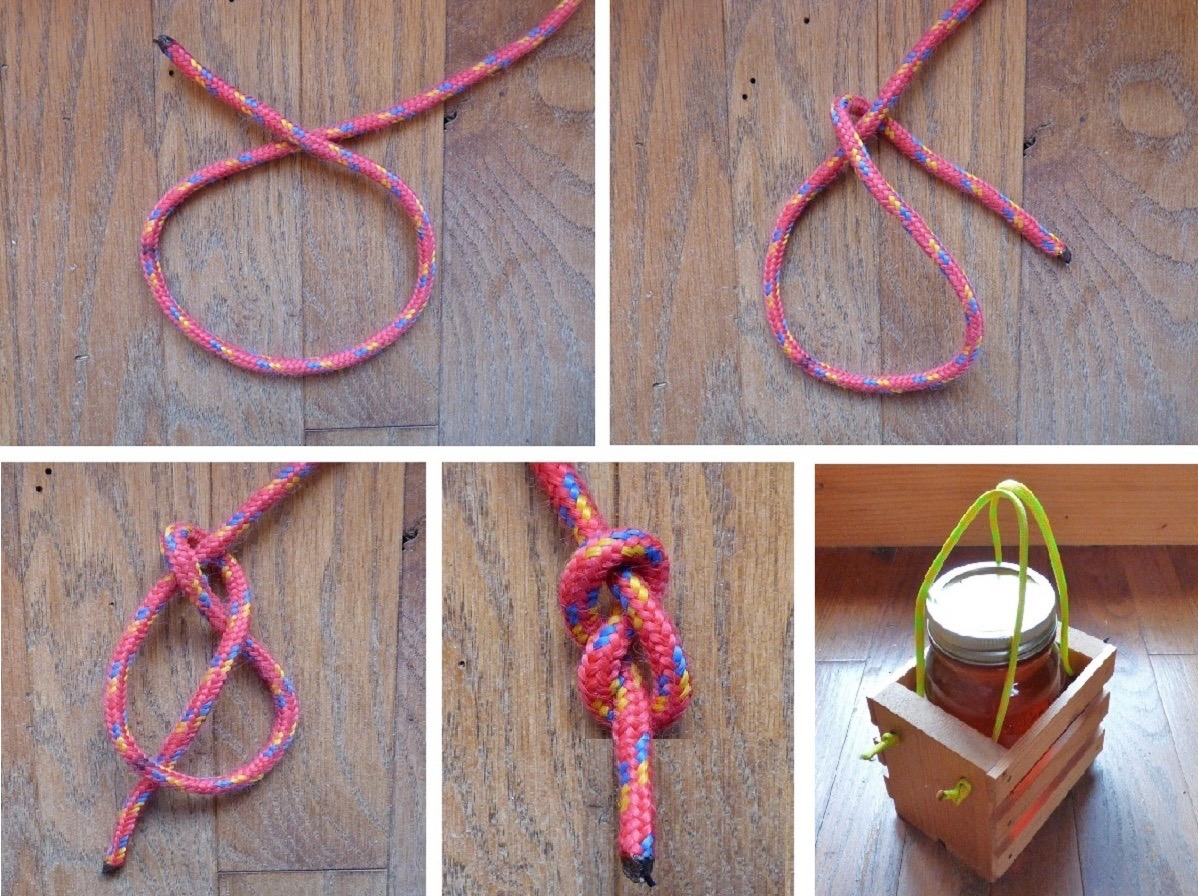
[PHOTO 9 – Figure-Eight Knot]
7. CLOVE HITCH
The clove hitch (Photo 10) is a knot which has very specific applications compared to most other knots. I use it for two main things around my homestead: hanging the hammock in the shade and tying my solar clothes dryer to the trees it’s suspended between. A clove hitch wraps twice around the tree so it remains snug for however long the rope is there. It has the added benefit of being easy to untie.
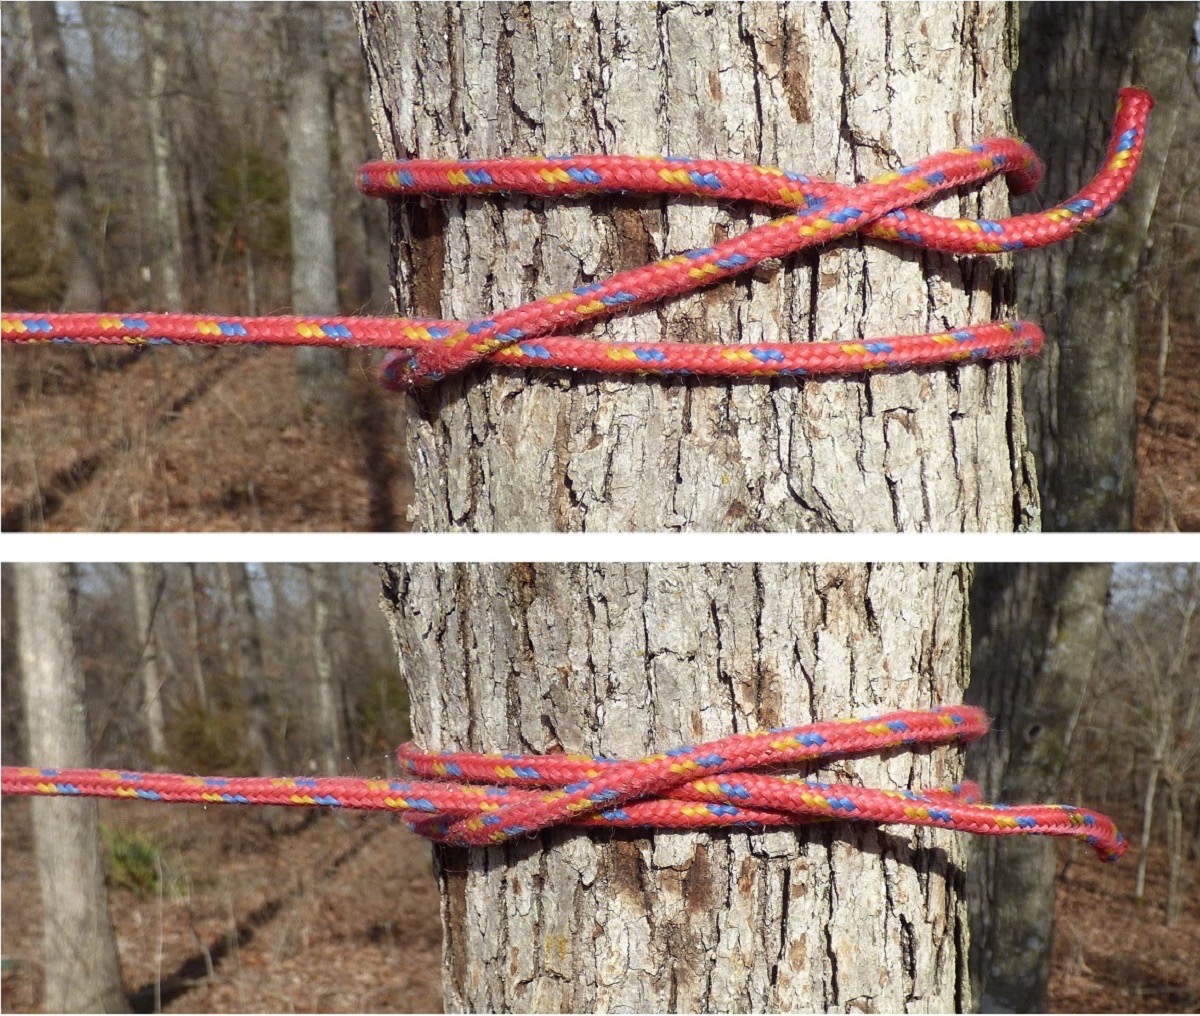
[PHOTO 10 – Clove Hitch]
8. SLIP KNOT
I don’t use slip knots (Photo 11) by themselves too frequently but more often in conjunction with a two-stranded overhand knot as explained with the belt on my beekeeping suit, or as an easy tie for rolled up sleeping bags (Photo 11E.) A quick pull on the end of the slip knot and the knot is untied.
For most applications, it’s imperative to learn how to tie a slip knot using a quick motion without having to manually feed the loose end through the loop as demonstrated in Photo 11b. With just a few minutes of practice you can learn to do it rapidly until it becomes muscle memory.
It also works well with smaller ropes such as bailing twine.
To tie a slip knot, make a loop as seen in (A), then while holding the loose end, reach through the loop and grab the long end and pull it through (B). In (E) a blanket is rolled up and tied using a rope with double-stranded overhand knot to form a loop on one end of the rope (left), and the knot on the right is the slip knot used to tighten the rope and keep it in place to hold the roll.
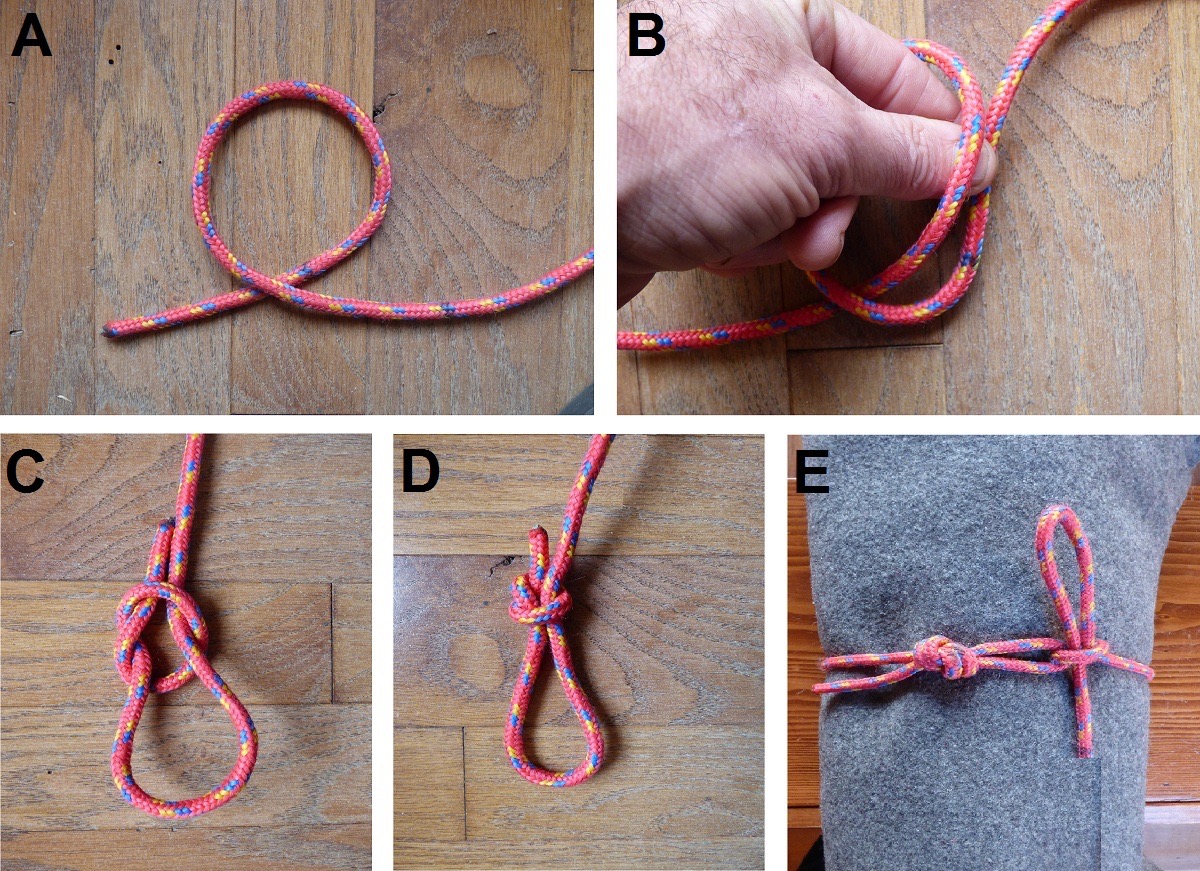
[PHOTO 11 – Slip Knot]
A slip knot is useful by itself for making what I call rock grommets. When you have a tarp or sheet without grommets, you can take a small stone as seen in Photo 12, wrap the corner of the tarp around it, then cinch it in with a slip knot tied in one end of a long cord. Now the rock is acting as a grommet, but stronger, and can be used to tie down a tarp among other things.
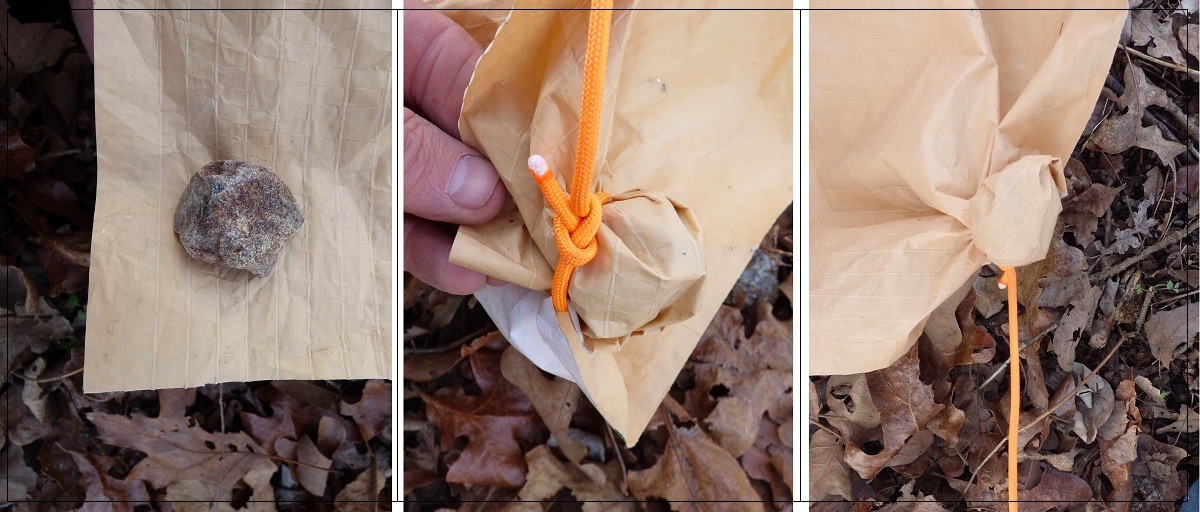
[PHOTO 12 – Rock Grommet]
9. TRUCKER’S HITCH
The trucker’s hitch is not only useful but less expensive than buying ratchet straps and always available to use when your ratchet straps are elsewhere. It’s also as quick and easy as ratchet straps to tie and untie. This is another knot everyone should learn since it has so many different applications. Unlike most knots, this is one of the few adjustable knots to give you just the right amount of tautness for such things as holding down a load on a truck or trailer, tightening a lean-to ridge line, holding a kayak to the roof rack of a vehicle, etc. It can also be tied in narrow webbing. It’s so quick to tie once you get the hang of it you’ll spend more time walking to the other side of the vehicle than it will take to tie a trucker’s hitch.
It took too many photos to explain the knot so I’m using the drawing below with some reference letters and arrows added in. If this were being used to tie down a load on a trailer or truck bed, (A) leads to the other end of the rope which is tied to a D-ring with a bowline. (B) shows how a slip knot is tied, then the loose end of the rope passed through the D-ring on this side of the trailer, followed by passing it through the loop created by the slip knot. Take note that the loose end of the rope in (C) will be the part of the slip knot which moves, otherwise the trucker’s hitch won’t work properly. The rope (D) where the red dot is must be pulled to tighten up the rope before the half hitches (E) are made. At (F) make multiple half-hitch tie-off loops to hold everything in place. Again, the trucker’s hitch is used the same way tie-down straps are used.

[PHOTO 13 – Truckers Hitch 1200]
Photo 14 shows how a trucker’s hitch is used to tie a load to a pallet, flatbed of a truck, etc. The smaller photos show the bowline knot which is used to tie the rope to the first connection point, and the trucker’s hitch to tighten up the load.
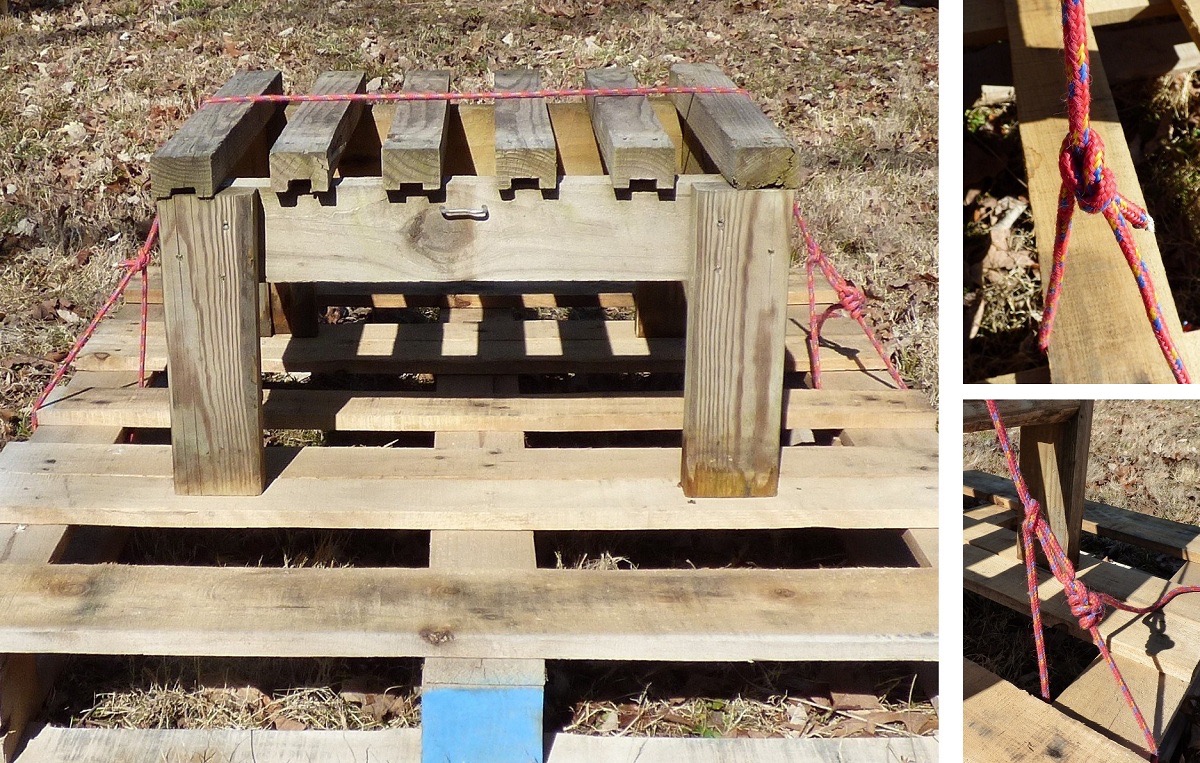
[PHOTO 14 – Truckers Hitch for Load Tying]
Photo 15 shows how I use the trucker’s hitch as a single loop for hanging bee-swarm traps in trees. With the trucker’s hitch being adjustable, it works well with whatever diameter tree I’m hanging the trap in. It holds the trap snugly so it doesn’t tilt out of place while waiting for a swarm to show up. In (A) a loop is tied in one end of the rope using a double-stranded overhand knot, then the loose end is passed around the tree trunk and back through the loop. SK shows where the slip-knot portion of the trucker’s hitch will be tied as shown in (B).
Photo C shows the finished slip-knot loop and the loose end (LE) of the rope. As shown in Photo D, the loose end passes through the slip knot and is then pulled tight. Once the rope is as tight as you need, the loose end is secured in place with several loops of half hitches. Once again, after you’ve tied this knot a few times it becomes second nature.
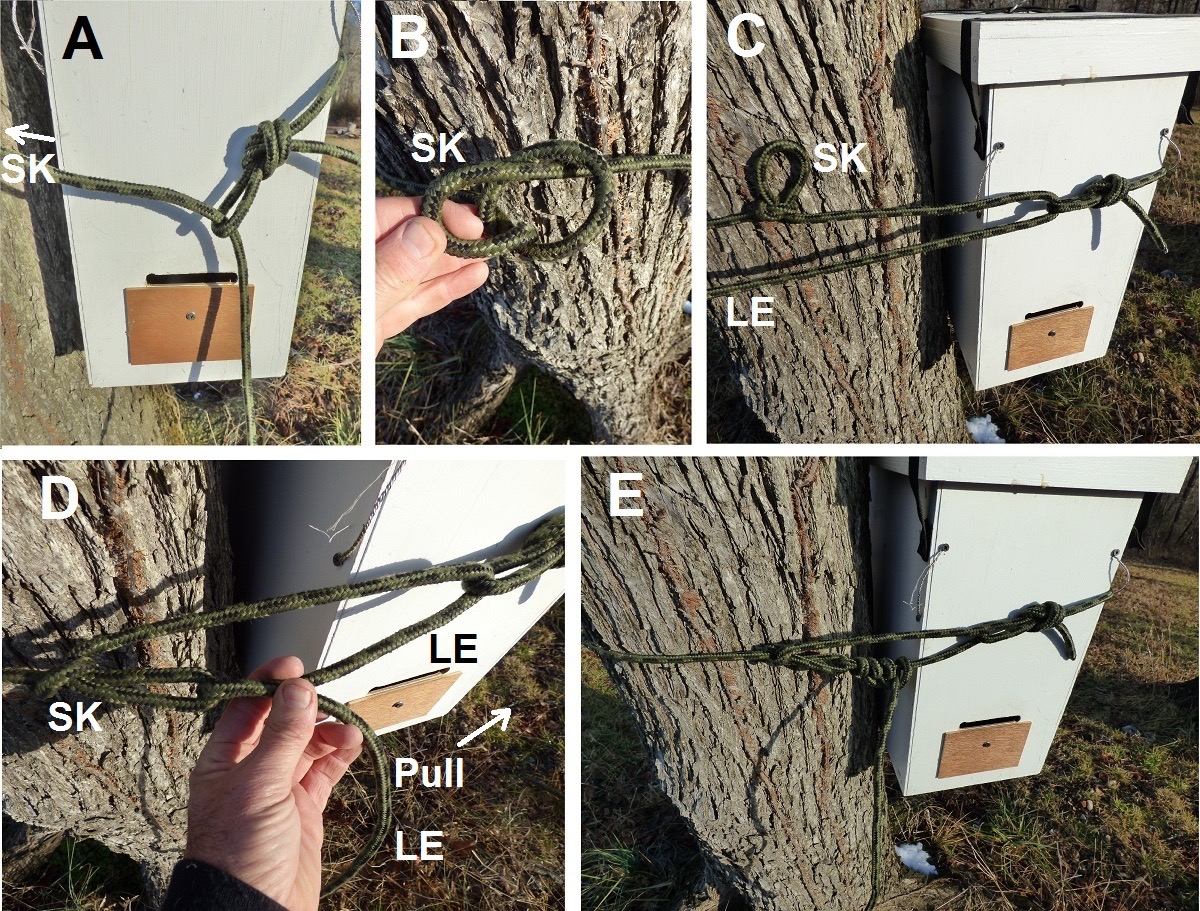
[PHOTO 15 Swarm Trap Truckers Hitch]
When I tied two large tree limbs together to prevent one them from breaking off in the wind and hitting the house, I used a trucker’s knot to adjust the rope as tight as possible between the two limbs, confident knowing it wouldn’t loosen over the time needed for the neighboring shade trees to get taller.
10. KNOTS FOR WEBBING
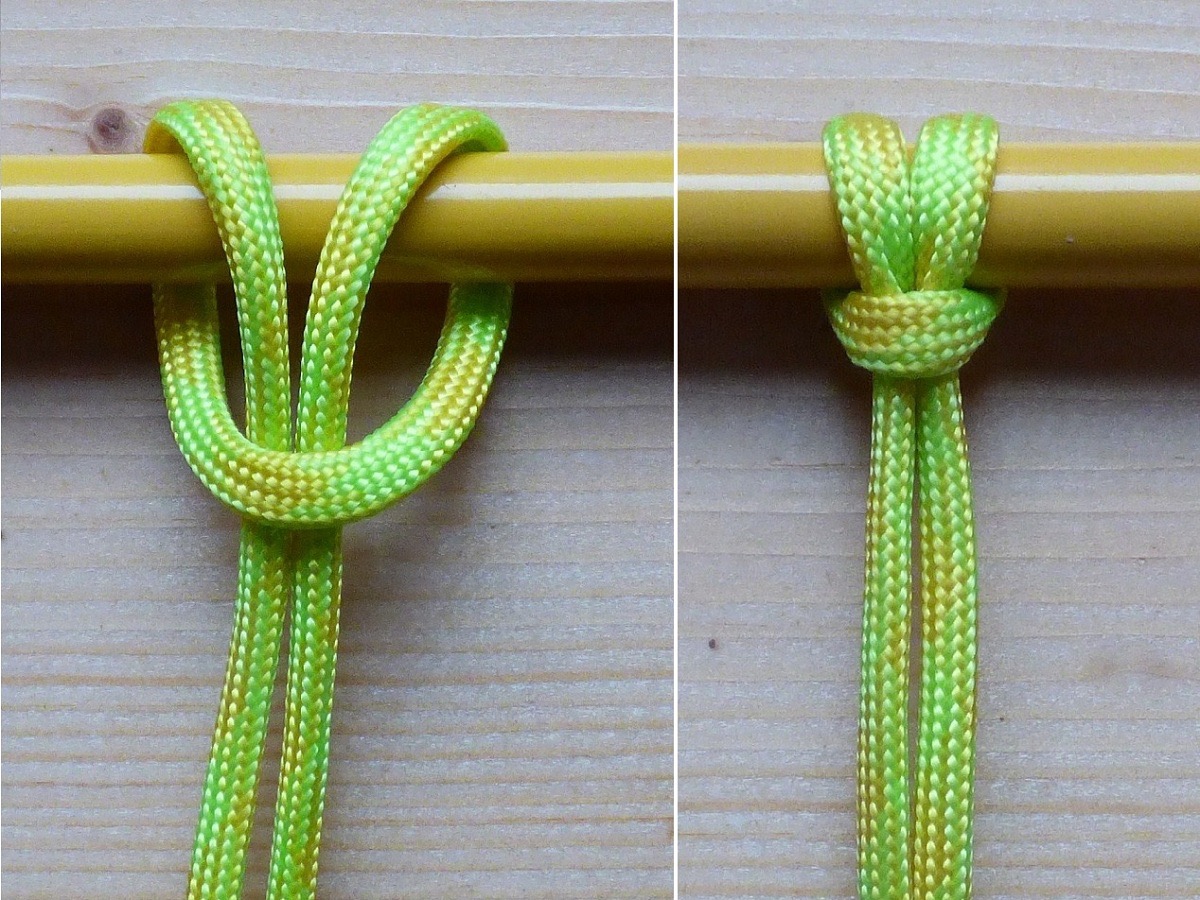
Water Knot – A water knot is used to make a loop of rope or webbing. It has limited applications mostly restricted to webbing where you need a knot to be as flat as possible to prevent it from being too cumbersome. A water knot can be used with any width of webbing to make a loop of any size. This knot is easy to learn since it’s just two intertwined overhand knots, one tied in each end of the webbing. The first knot is tied then the second one is formed by feeding the webbing through the first knot while keeping the webbing parallel as seen in photo 16.
The photo shows two colors to more easily see how the knot is tied but since it uses a single length of webbing, the color will be all the same.
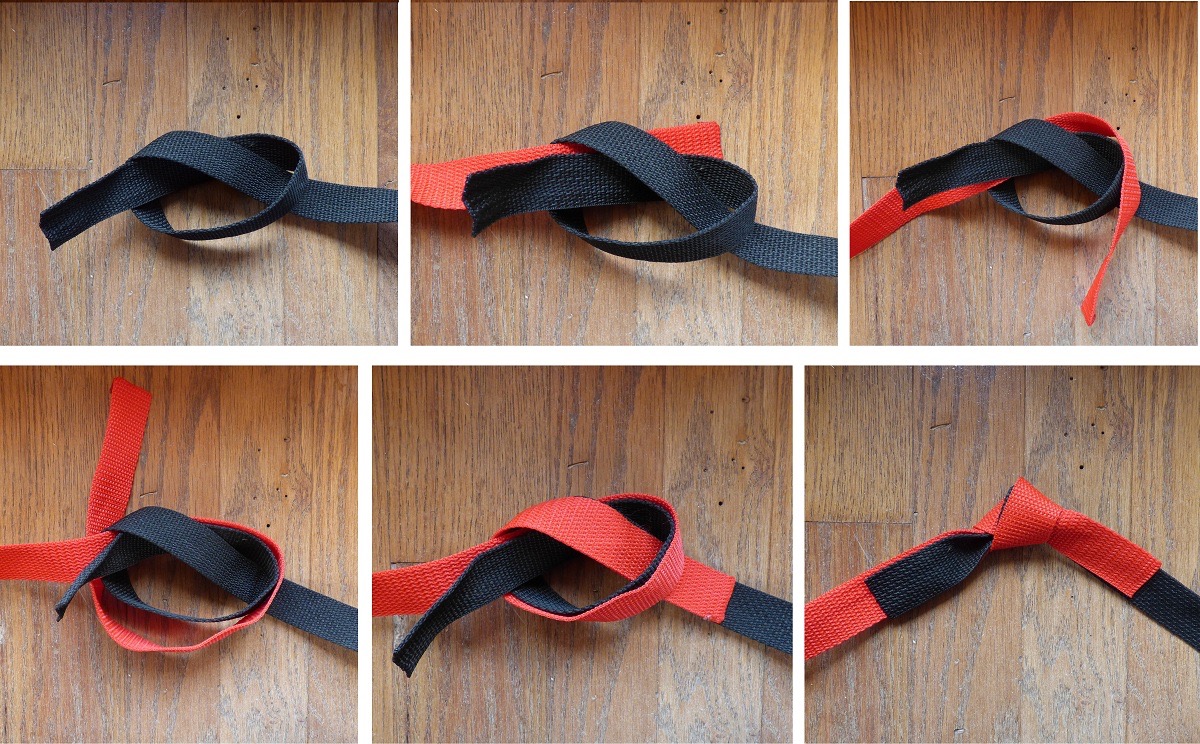
[PHOTO 16 – Water Knot]
I use a water knot with webbing when I need something wider than a rope to prevent cutting through the material being tied. Photo 17 shows how I store my garden hoses for the winter using a loop of webbing tied with a water knot which is then hung using a simple Cow Hitch (aka Lark’s Head) shown in Photo 18. A cow hitch can be used with either rope or webbing and is easily tied in looped or single-strand rope such as horse reins.
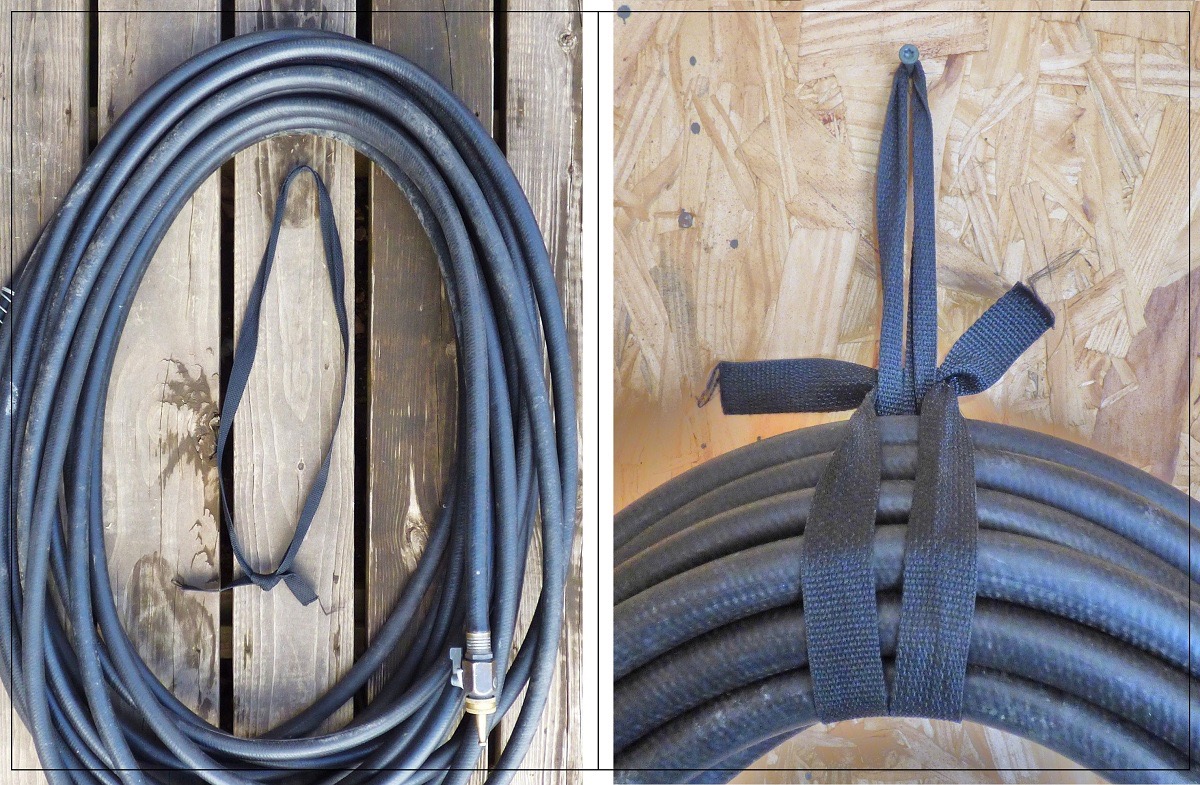
[PHOTO 17 –Water Knot for Hose]
[PHOTO 18 – Cow Hitch]
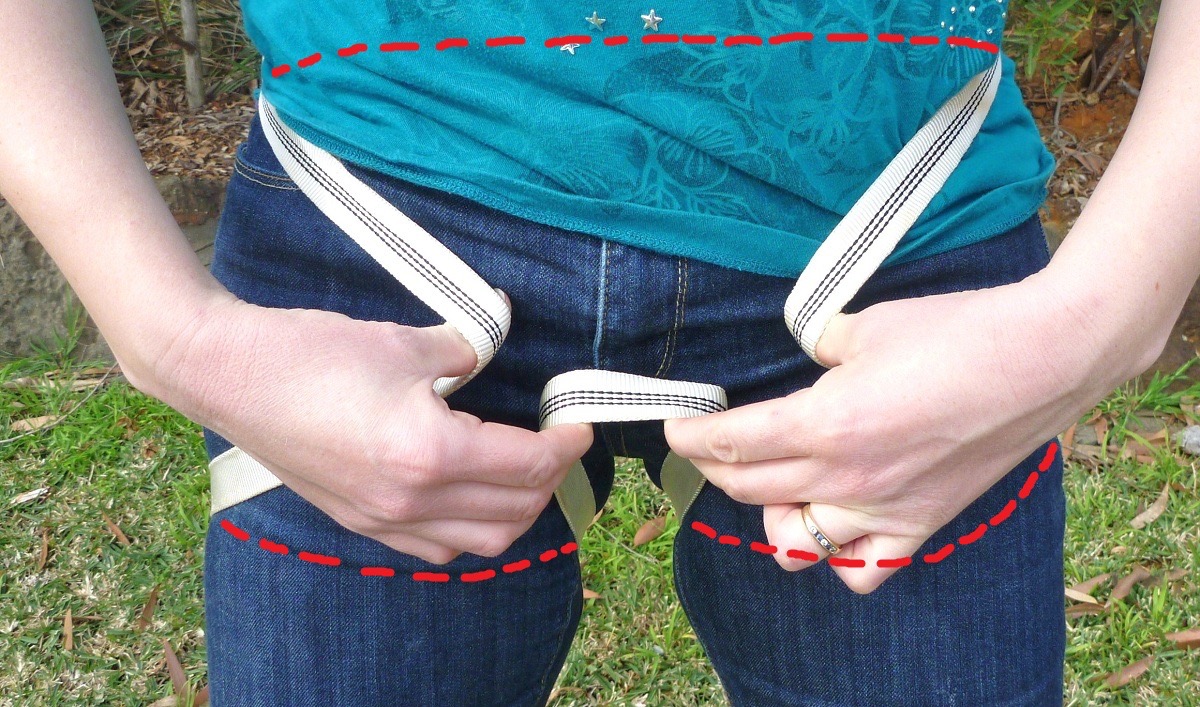
A loop of webbing tied with a water knot makes a super-quick harness, hence the name “hasty harness.” This type of harness (Photo 19) is quick and simple and can used for many purposes such as rappelling or as a safety harness when climbing trees, etc. (If you climb cliffs or trees on a regular basis it’s better to buy a safer pre-made harness–typically stitched heavy duty webbing.)
The photo demonstrates how to quickly make a hasty harness using a single loop of webbing. Stretch the loop behind your back and while holding the two side loops with your thumbs, reach between your legs and grab the bottom of the loop, pull it back through, and connect all three using a carabiner. The fatcanyoners.org web siteshows four different types of hasty harnesses and how to tie each one.
[PHOTO 19 – Hasty Harness]
(To be concluded tomorrow, in Part 3.)