


Several articles posted in SurvivalBlog in the past year have mentioned various cordage, knot books, and knot tying. But as far as I know, nobody has actually demonstrated how to tie the ten most basic knots and how to use each one around the homestead. For those who can’t afford the books but would still like to learn, here are the ten most basic knots I use on a regular basis.
When I was a sprout my interest in knots began when my grandfather gave me a copy of the 1943 Boy Scout Handbook. There were three requirements to become a Tenderfoot and one of them was to become proficient in tying nine different knots, all of which were demonstrated in the book.
I later learned various specialty knots when I did some rock climbing way back when. Then about ten years ago I found a book on clearance that looked almost like a coffee table book: high quality, printed on slick paper with a sewn binding. From that book, The Encyclopedia of Knots and Ropework by Geoffrey Budworth, I learned some interesting specialty knots which I use, like making a carry handle for a jug, and the illustrations made it super simple to teach yourself the knots.
If you have kids or grandkids, teaching them to tie knots is a fun activity and a useful learning experience as well. My grandkids had a lot of fun last year and among other activities, learning to tie knots during their visit will be a memorable experience for them as the years pass. They spent most of their idle moments practicing knots and were so enthused I gave them my knot book when they left.
Knot Applications and Attaining Proficiency
Certain knots are used for specific purposes and once you know the basic ten, you’ll be surprised how often you’ll use them around the homestead and elsewhere. For me, a knot must be useful for a specific application, strong, and in most cases easy to untie but unable to come loose when applied to a given use.
In order to become proficient more quickly, knot tying must be practiced until it becomes muscle memory. You can practice whenever and wherever, watching television, with your morning coffee, etc. If you don’t miss any lines in the movie because you’re tying each knot without looking, you’ve arrived. In taking photos for this article, while tying the knots slowly and stopping to take progressive shots, it was actually harder on some because it’s pure muscle memory and harder to tie when stopping and thinking about it in steps.
Different kinds of activities have their own 10 most common knots, mariners, and rock climbers to name just two. This is my list of 10 and I use them frequently, some more than others, while working around my place.
THE TEN BASIC KNOTS
1. BOWLINE
This knot most likely originated as a knot for tying to the bow of a boat and tying that line to a tree or wharf. The name has evolved over the years and is now pronounced “BO-lin”.
A bowline is not only very handy, but it’s super strong yet easy to untie making it ideal for many uses. If you do rock climbing this is the very first knot you learn to tie. For climbing, you can wrap a rope around your waist and have a bowline tied in 1.8 seconds using a tuck and wrist-twist method.
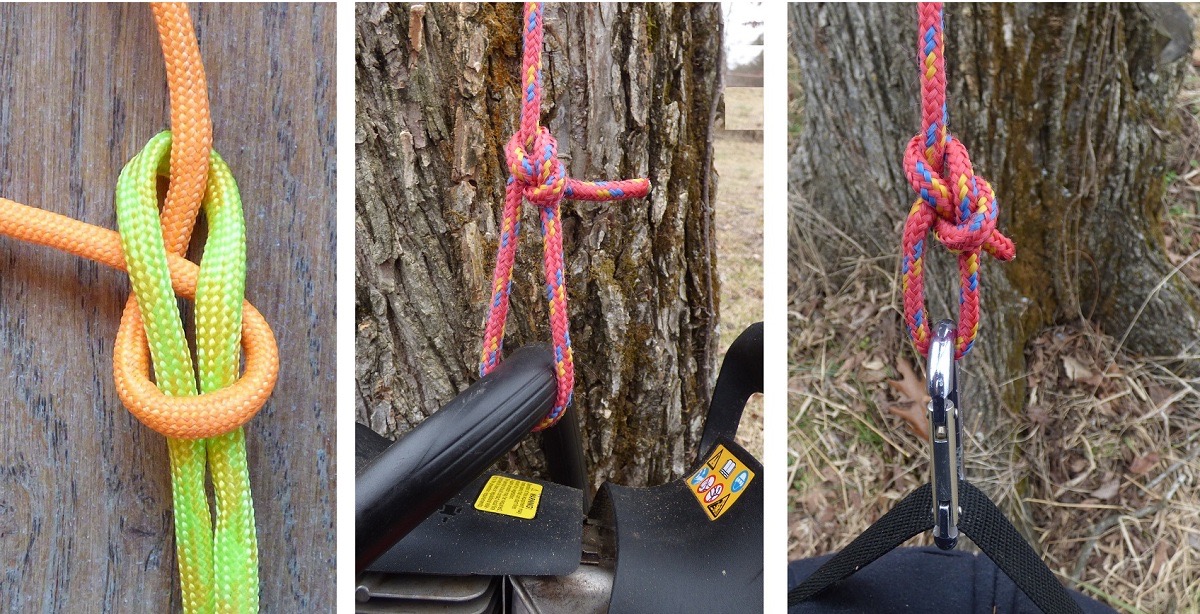
A bowline it used when you need a loop to tie something where the pull on the line will be in one direction. If you’re hanging a tire swing in a tree, the pull will be downwards due to the weight of the tire. If you’re a tree trimmer wearing a harness, the weight of your body will pull the rope downwards. And a boat will only pull on it when waves are trying to push it away from the shore. When using a trucker’s hitch, a bowline is the typical knot to secure one end of the rope to a D-ring.
As kids we learned to tie it when someone showed us the rabbit coming out of the hole, going around the tree, then back down into its hole.
Apologies for the elementary description but in Photo 1 (A) and 1 (B) you’ll see the “t” for tree, “h” for hole, and “r” for rabbit. Notice the tree is behind the loop which makes the hole. This is another knot which can be tied very quickly once you have the muscle memory and won’t be needing the rabbit anymore.
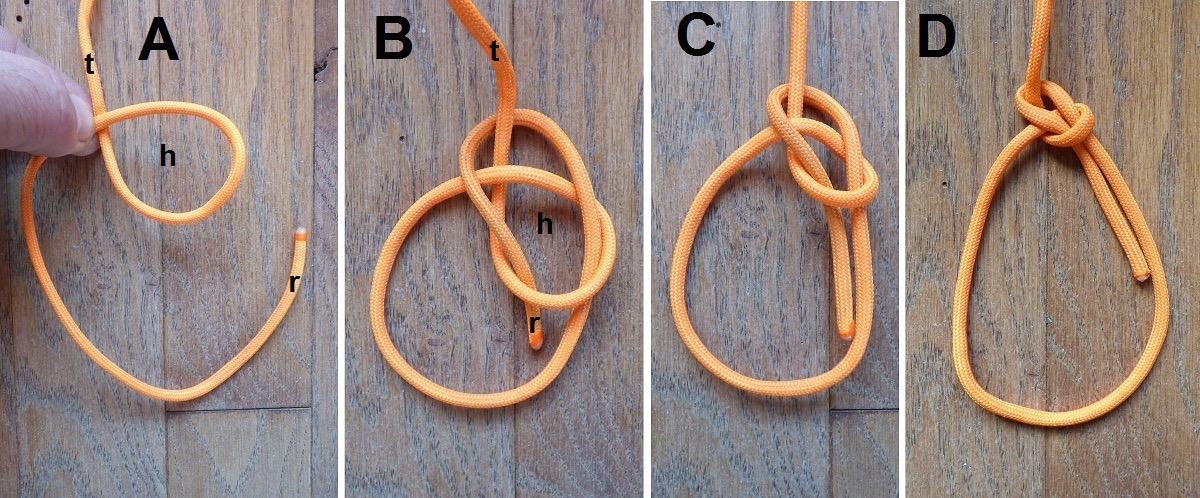
[PHOTO – 1 Bowline]
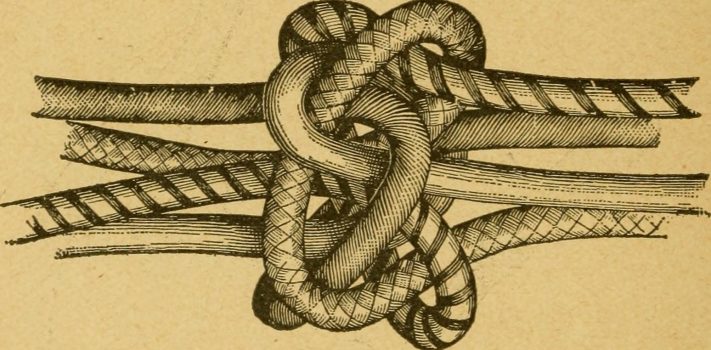
In Photo 2 you can see more clearly how one loop of the line goes around the other. The center and right photos show a bowline in used for hoisting a chainsaw up into a tree and how it’s used to attach to a safety harness. (The harness photo is for demonstration only. You wouldn’t use webbing this small or a non-climbing carabiner.)
[PHOTO 2 – Bowline Combo]
2. DOUBLE OVERHAND KNOT
A simple overhand knot (Photo 3a) has a limited number of uses due to its weakness but there are several versions which are much stronger including the double overhand knot (3b). I only use it for holding something temporarily as part of another job, or for something super lightweight not requiring strength. Just yesterday I used a double overhand to tie some long pieces of folded plastic strapping into a bundle to hold it together long enough to get to the burn pile.
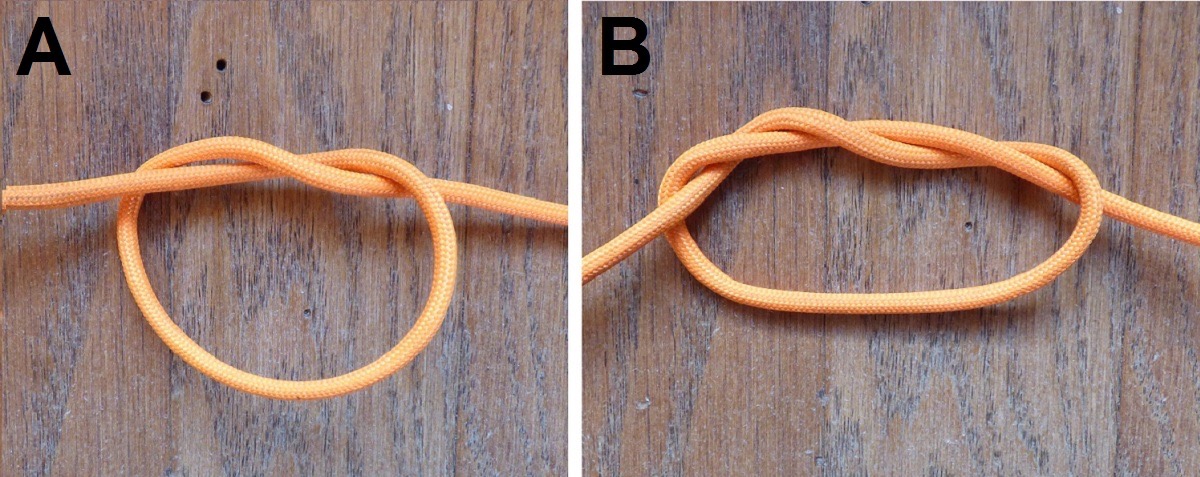
[PHOTO 3 – Single and Double Overhand]
3. TWO-STRANDED OVERHAND KNOT
A two-stranded overhand (Photo 4) is one of the most common knots I use, about half the time by itself and the other half with a slip knot on the free end of the rope. This knot is used to make a very strong a loop on one end of a rope. It’s one of the few exceptions to the easy-to-untie rule so I generally keep one long and one short rope permanently tied with this knot for use with a multitude of projects. It also works well with webbing.
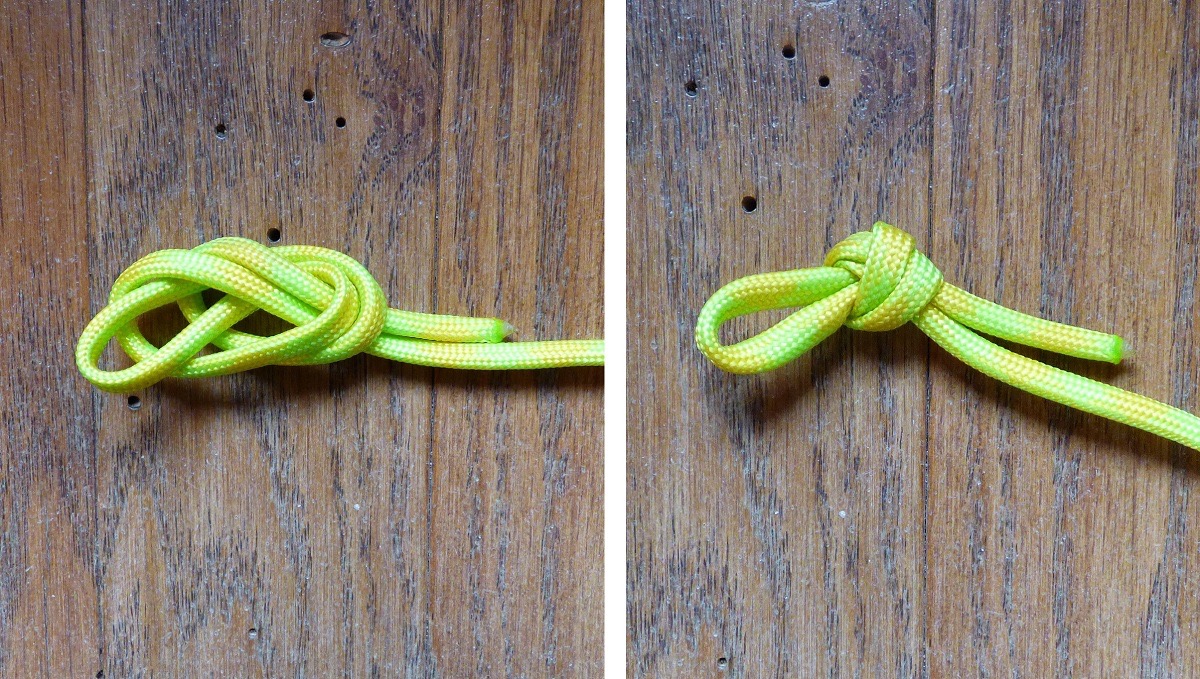
[PHOTO – 4 Two-Stranded Overhand]
One of the longer ropes I use is for dragging tree limbs to the burn pile. The rope, in this case a strap of webbing, is connected to the largest limb by passing the free end through the loop as in (A) below and after cinching it tight, smaller limbs are piled on top and secured by passing the free end of the webbing through a fork in the limb (B). When a large collection has been tied in, it’s easy to pull a lot of limbs to the burn pile in a hurry. I used it to drag 15 cedar poles a few at a time 200’ through the woods from a neighbor’s property to mine. Since the limbs are not actually tied to the strap, it’s a matter of pulling the loose end back through the loop to free the rope from the load of limbs. (Not many limbs are available currently so this is a small load in the photo.)

[PHOTO 5 – Double-Stranded Pulling Limbs]
The belt of my beekeeping suit is a piece of ¼” cord cut to a 40” length with a two-stranded overhand on one end. I wrap the rope around my waist and pass the free end through the loop, then use a slip knot to hold it in place after cinching it up. Combined with the slip knot, the belt comes off with just a quick tug on the cord.
The two-stranded overhand and slip-knot technique also works well for tying rolled items such as sleeping bags, carpets, and field fence.
5. SQUARE KNOT
Most people already know how to tie a square knot but for those who don’t it’s quite simple. It can be used for many lighter jobs, is somewhat decorative as well, and easy to untie. Like all knots, it only has certain applications. As long as the pressure is pulling fairly equally from both sides, the two top ears will remain tight and the knot won’t come untied. Like the double-stranded overhand, a square knot can be used to tie rolled items to prevent them from unrolling.
In the photo the colors are for demonstration only, the square knot is made from a single piece of rope so there is just a single color.
[PHOTO 6 – Square Knot]
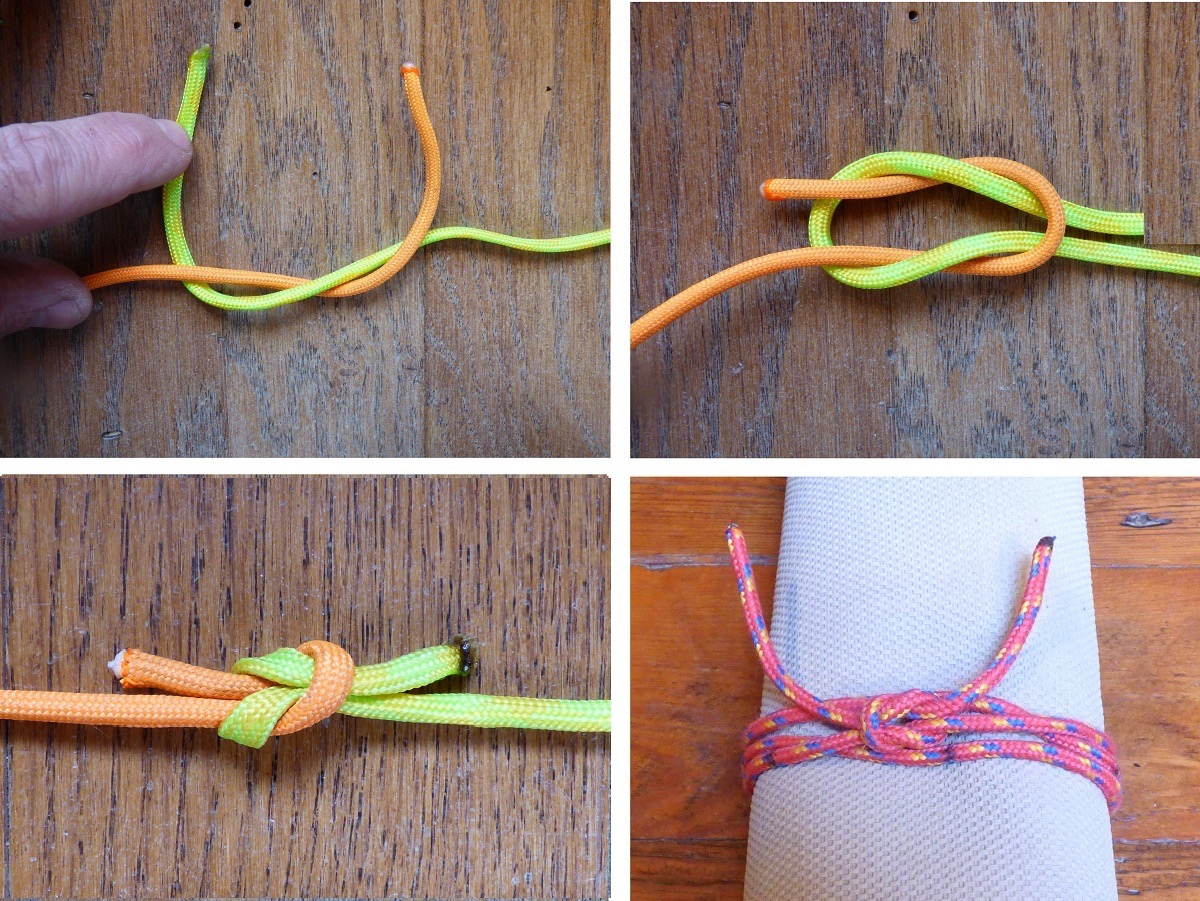
4. FISHERMAN’s KNOT
In real life, I’ve most commonly seen this knot used for homemade necklaces sold at festivals to make them adjustable. It also works great for splicing two ropes of the same size together. This works best with smaller ropes like such as paracord or fishing line as the name suggests but can be used with larger ropes as well.
This fisherman’s knot (Photo 7) is easy to tie, very strong, but not quite as easy to untie. It’s also decorative. The last photo shows how it can be used to adjust a neck cord by pulling the knots outward to shrink it, or closer together to loosen.
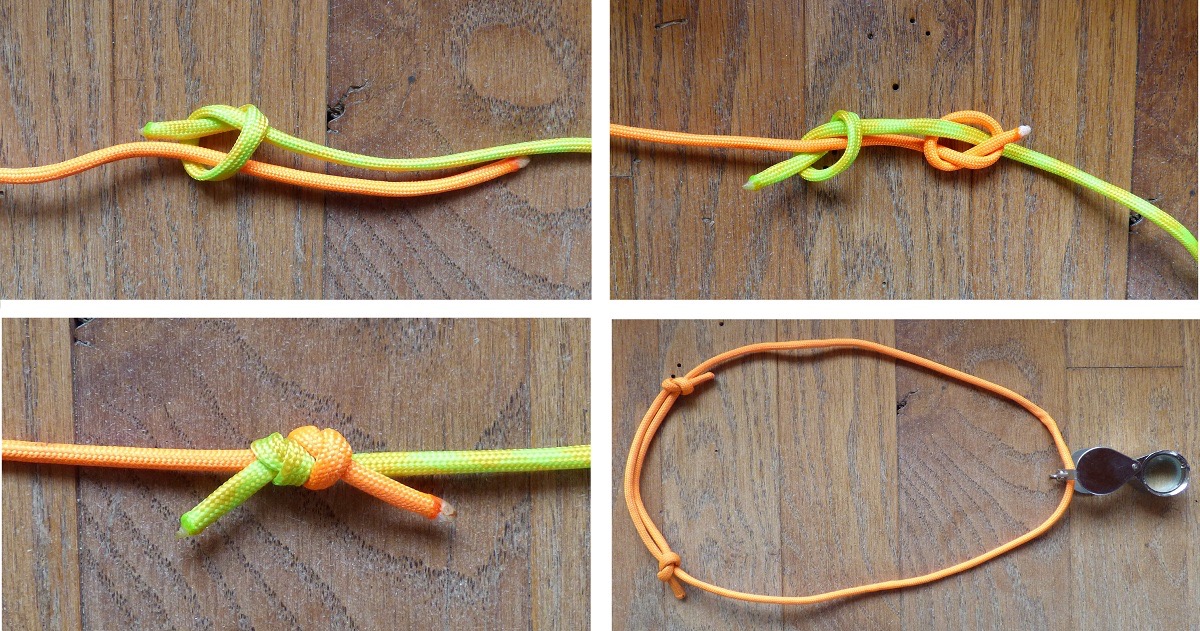
[PHOTO 7 – Fisherman’s Knot]
Here’s a real-life example (Photo 8) of using an adjustable fisherman’s knot if you’re too frugal to buy a pair of eyeglass holders, also an example of combining multiple knots for a single application. In this case, a fisherman’s knot to make the holder adjustable with a small hangman’s noose to make a slip knot tight enough to hold the side pieces of the glasses:
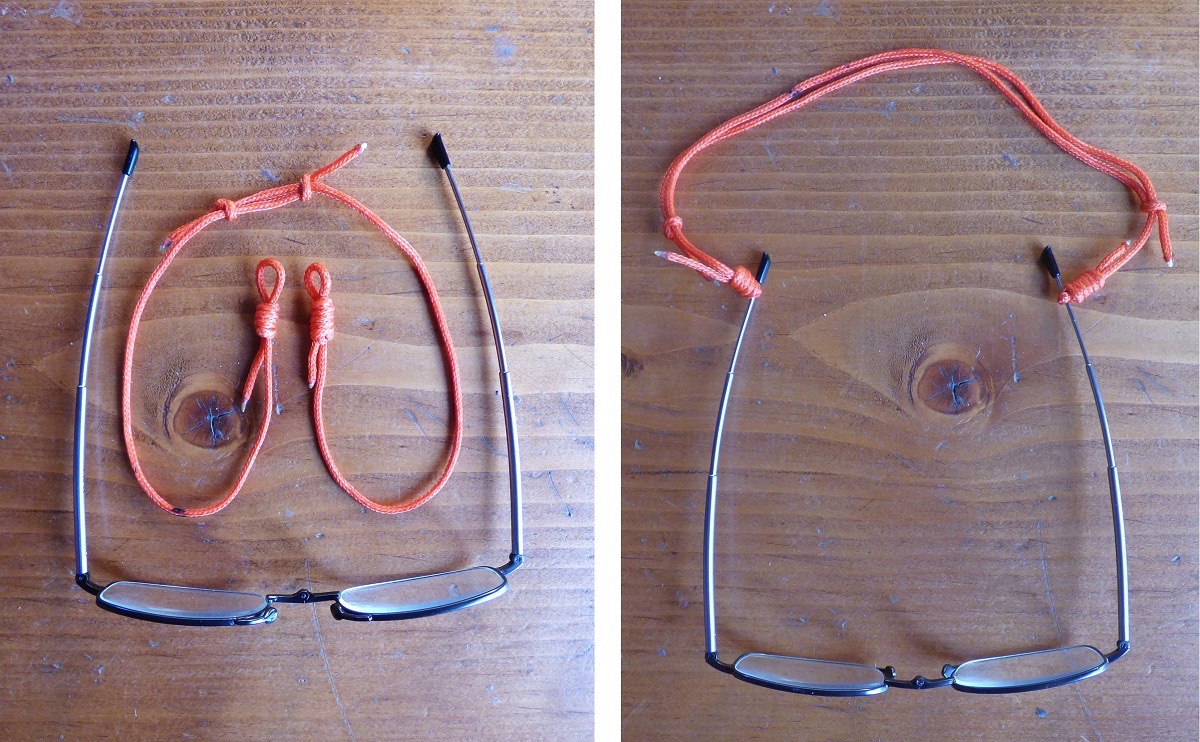
[PHOTO 8 – Fisherman’s Combo]
If you never learned to tie a hangman’s noose when you were a kid playing cowboys, an internet search will give you the details.
(To be continued tomorrow, in Part 2.)