


(Continued from Part 2. This concludes the article.)
The EU database listing for Salix states as a fungicide it is useful against leaf fungus and powdery mildews[EU]. The recipe for making a Salix solution: “30 L of natural or rain water is brought to simmering in a stainless steel tank with cover, at 80°C infuse 200 g of Salix spp cortex for 2 hours. After cooling down, and filtration with a stainless steel sieve, adjust pH to 6.2 and proceed the dilution by 3 with water. Use within 24 hours to avoid bacterial contamination [EU].” Some recipes refer to the “aerial” part of the plant, this recipe to the “cortex”. In practice, one might just get some pencil size or smaller shoots from a willow tree and chop them up to fit inside where you are performing the extraction. However, never having tried this willow concoction before, a reputable recipe is cited. I have heard from a friend who went to school for botany that in the greenhouses on campus they would place cuttings in buckets along with cuttings of willow branches to enhance the rooting of the cuttings, albeit that was second-hand information. If you do make a Salix based fungicide/rooting solution, I would apply it to the girdling and bud incision wounds via soaking a towel in the solution and tying it to the wounded twig for a few hours, and then use the same solution to wet the soil in the air layering packet.
How to air layer: Cover the incision with moist soil and protect from the elements.
This is the fun part of air layering, where you get to use your imagination and materials on hand to keep freshly wounded twig covered in soil and moist. But before we get to the covering, lets discuss the soil. The most common soil used for air layering (and what I use) is peat (i.e., sphagnum) moss. Peat moss is ideal because it is naturally anti-fungal, and if you buy it wrapped in plastic it is going to contain very little fungal spores, once wet it will hold water. It also provides a “light” growing medium for the roots. Whatever soil you choose, you want a soil that will not promote fungal/bacteria growth (so don’t use your compost) and that is “light” (so don’t use soils with a high clay content).
If you have a freshly opened bag of potting mix or peat moss, you should be fine regarding sterility. But for any garden soil or bags of potting mix or peat moss that has been open for weeks, you can heat treat them to sterilize them. Heating up to the boiling temperature of water (212 degree F) will kill basically all organisms and viruses that could negatively affect your air layering. There are numerous methods online describing how to get soil up to this temperature, everything from solar to steam canning equipment. We only need small volumes of soil (like a handful per air layering) so if you have a wood stove and just put some wet soil into a clay pot on top of your wood stove for the day, you are going to be fine. Use wet soil so as it heats up, it will make steam which will permeate through the pot (and make your house smell very earthy).
The moisture level needed for air layering is moist, not wet. For peat moss, I just take a potting jar with holes at the bottom, fill it with peat moss, and water it until water comes out the bottom. You may need to slowly pour the water in until the peat moss becomes hygroscopic and “sucks” the water up. After you pour in the water, the peat moss will be too wet to use. So as you need it, just grab it out of the pot and squeeze it in your palm as hard as you can, driving excess water out.
The volume of soil needed for the air layer should be roughly the amount you can hold in one hand. You just need about 1 inch of soil around the girdle and bud incision. The internet is rife with tutorials claiming you can just take damp peat moss and squeeze it onto a twig and it will stay there while you wrap it… I’ve never had such luck. Since we need to keep the soil moist, but not wet, we need to keep moisture in and also rain out. This is the fun part of air layering: coming up with a protective covering. Professionals wrap their air layerings with polyethylene wraps. So when you read online that air layering was revolutionized by polyethylene… they are basically just saying people wrapped the soil to the tree with common kitchen plastic wrap!
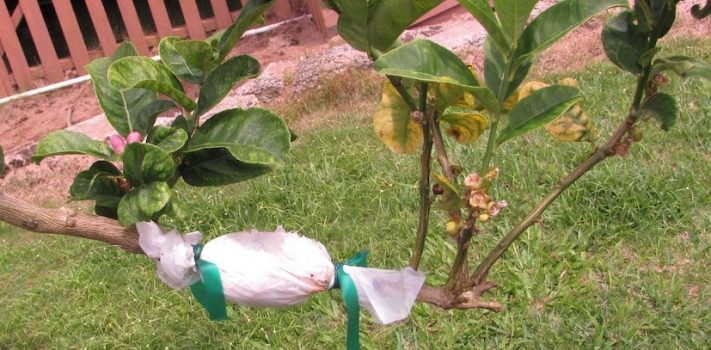
I like to get a piece of kitchen wrap long enough to wrap around my hand three times. I put the wrap over one of my hands, and then place a handful of peat moss onto the wrap. Then I take my hand and press the peat moss and wrap to the wounded twig, forcing the twig into the peat moss. Then I wrap the kitchen wrap around the mass of peat moss roughly three times. The clear plastic kitchen wrap will stick to itself producing a little “cocoon”. You want to make sure to wrap the ends tightly, to keep rain out (you don’t want the air layering soil packet to become waterlogged) and moisture in (the moist peat moss post being “squeezed dry” provides sufficient moisture that you don’t want to lose).
Many people then tie the ends with tape (e.g., electrical tape) or zip ties. I don’t do this. I follow the kitchen wrap with aluminum foil. The aluminum foil protects the soil packet from direct sunlight, which can be harmful to the roots. This is recommended for any air layering done in the sun. Since we are working on trees that grow outside, it is a safe bet all your air layering locations will receive direct sunlight (or else the tree won’t be growing at that location). I find the mechanical strength of three wrappings of aluminum foil good enough to keep the soil packet held together.
I also recommend forcing a small piece of peat moss into the node incision. This clean incision may perfectly heal itself instead of “staying open” which reduces the chances it will be the genesis site for root formation. A small stick (e.g., toothpick) can also be used for this purpose, just be careful not to force the node incision open too far and break the twig.
Imagination comes into play when you consider all the other ways to accomplish: (1) keeping rain and sunlight out and (2) keeping moisture in. For example, I have used disposable plastic water bottles wrapped in aluminum foil instead of plastic wrap. I also use zip lock bags with a small hole in the bottom in place of kitchen wrap. I’ve seen people online make apparatus to actually hold regular clay pots to a tree branch for air layering. Anything should work that will accomplish the goals I’ve discussed. I like the aluminum foil method because I don’t waste tape or zip ties when I want to check on my air layering.
Once you put the air layer soil packet together as described above, you should periodically check on it. This is where the air layering method really shines for a TEOTWAWKI scenario. It doesn’t require constant babysitting like a grafting or cutting greenhouse. You should just check the soil packets every few days to make sure there is moisture but not standing water inside the soil packet. Zip ties or tape are kind of a pain to remove and replace. If you live somewhere that has high levels of wind, it makes sense to secure the soil packets better than I have described using aluminum foil alone. Use your own best judgment and materials on hand.
Removing the air layered plant and next steps
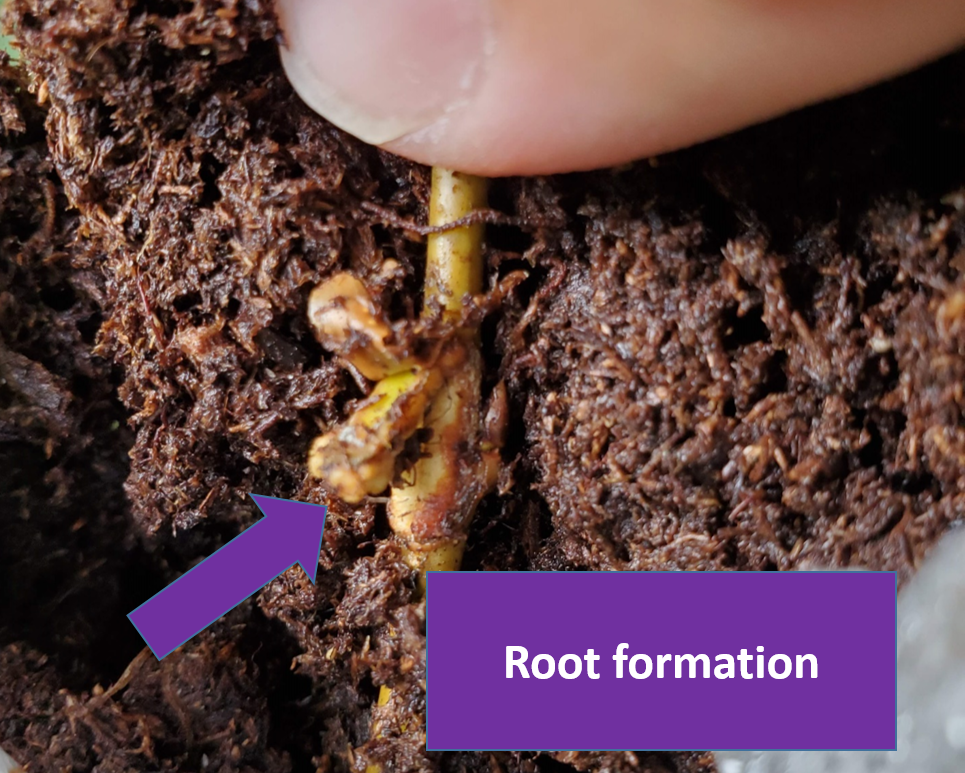
In my experience on Prunus and Malus spp. (cherry and apple varieties), after a week and half I will see root formation coming from the bud incision. At this time, I usually see the roots as small light-colored round “bubble looking” structures coming from the inside of the incision. (See Figure 4). They come from the “flap” of wood we made when cutting into the twig under the bud. After ~4 weeks, or at least when you see the roots on the outside of the soil packet, the air layer is ready to be cut from the parent tree. I would recommend removing the air layer from the tree before the first frost, regardless of the progression of the roots. You should be able to avoid the situation of a late-season frost encounter by starting the air layer by mid-summer in your climate.
When cutting the air layer free from the parent, you want to minimize the lengths of dead wood for the parent and air layered plant. So cut the air layer free from the parent as close as possible to the closest bud (cut on the distal side, or further from the parent so the bud is the last thing on the parent branch). For the air layered plant, cut off any wood on the “root end” that doesn’t have roots formed. Leaving wood above the bud on the parent or below the roots on the air layered plant is a source of decay/infection.
The new air layered plant can be planted in a pot using a potting mix or directly into the ground. Follow guidelines for general tree/shrub planting here for the soil. Don’t use 100% compost for soil, don’t replace 100% of the ground soil with a different soil type if planting directly into the ground, don’t let the roots dry out during the planting process (spray or dump water on them if it is windy/sunny).
Now that the air layered plant is on its own, we have some trimming work. You should remove all but 1/3 of the number of leaves left on the top of the air layered plant (I would leave at least 2 leaves, so keep 1/3 or 2, whichever is higher). This may seem like a devastating amount of foliage to remove, but the roots won’t be ready to support all those leaves with water yet. So leaving too many leaves may cause the new plant to die. If you watch enough youtube videos, you see a lot of people skip this step… I would recommend not to gamble here. You have already spent a lot of time and energy on this little plant, don’t risk losing it because you are greedy for a larger-looking plant.
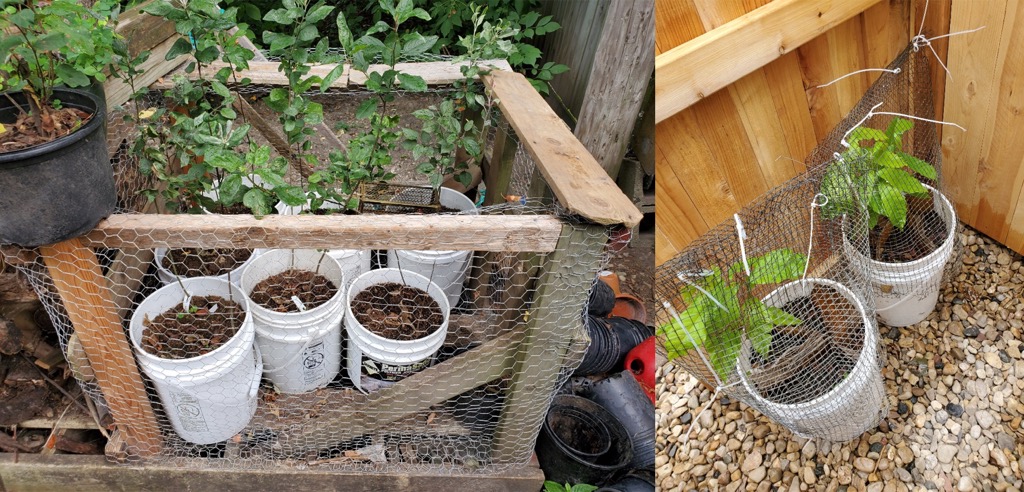
Once planted into a pot or in the ground and trimmed, the main enemy is animal predation. To keep the plants 100% safe from mice, chipmunks, rabbits and squirrels, you will need ¼ inch wire mesh cages. (See Figure 5). You can make these pretty easily with wire cutters and zip ties, I’ll won’t go into details for that here. If you use regular chicken wire, chipmunks and mice will get in (the left side of Figure 5 is chicken wire, and I suffer chipmunk and mice predation in that enclosure). If you use multiple inch wire fences, rabbits and squirrels will get through as well. Rabbits will eat the young tender wood in winter, and the other animals, in my experience, will just chop them off “for fun”.
This is where I will leave you. From here, care of your young trees or shrubs would include watering during the fall and all next spring/summer as needed according to your rainfall (they should get water once a week through fall until freezing weather and starting in spring once the ground unfreezes and before buds start to break). After a year, they should be established and you should water and fertilize as you would other food producing trees/shrubs in your climate.
Good luck!
References
Deniau, M. G., Bonafos, R., Chovelon, M., Parvaud, C. E., Furet, A., Bertrand, C., & Marchand, P. A. (2019).
Willow extract (Salix cortex), a basic substance of agronomical interests. International Journal of Bio-resource and Stress Management, 10(4), 408-418.
EU: Accessed 8/6/2021, search for “salix cortex”