


I often enjoy using my Norwegian “Storm Kitchen” alcohol stove. It is reliable, quiet, compact, clean, and convenient. It has just two weaknesses: it heats slowly, and in a long-term disaster scenario, I might run out of fuel for it. So I started looking into “twig stoves”. These stoves are fueled by sticks, pine cones, and other small, dry bio-mass. They have a reputation for heating quickly, and I have a virtually unlimited supply of fuel around my property.
I looked at quite a number of stoves. There are dozens to choose from. Most of them are made in China. I really wanted to find one that was made in the United States.
The Emberlit-UL Original Titanium Lightweight Backpacking Stove
In the course of my search, I ran across the Emberlit-UL Titanium. I was excited to note that it is made in the United States. I sent an inquiry to Mr. Mikhail Merkurieff, CEO of Merkwares LLC, asking if he could provide me with a unit for testing and evaluation. He was kind enough to agree.
The Generic Twig Stove
 I also ordered a generic “8 Inch Camping Wood Stove” from eBay. The manufacturer was not specified, the country of origin was not specified (but it was presumably manufactured in mainland China), the design looked well-conceived, and the price was excellent ($21.99). Eight days later, the package was delivered from Jurupa Valley, California.
Initial Generic Stove Impressions
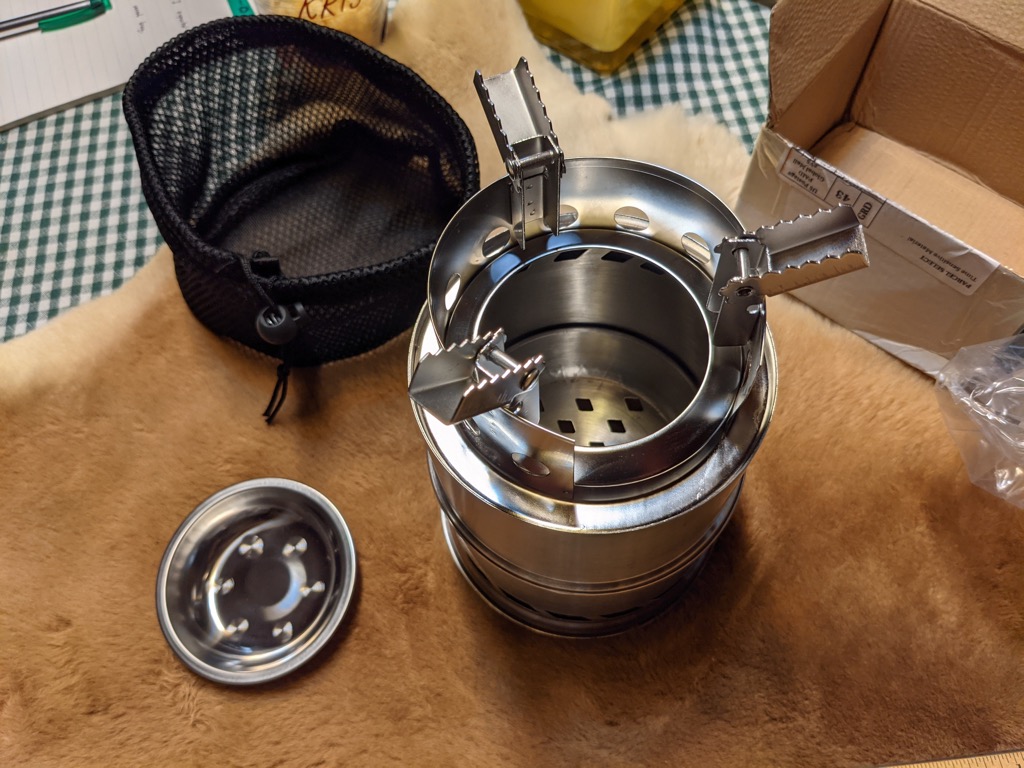
The shipping box was much smaller than I expected, measuring just 5.5″x5.5″x3.13″. The box contained a mesh bag with the stove components and nothing else: No directions, no explanation of how the various components fit together, and no markings regarding manufacturer or country of origin.
Fortunately, the way the components fit together was reasonably intuitive and ingenious. A return visit to the listing on eBay revealed some photos with a rudimentary set of directions regarding how to use the unit.
The stove consists of a base, a tubular stove wall, a firepot, a pan holder, and a plate for holding solid alcohol fuel.
For those seeking a similar stove, it appears identical to the Canway Camping Stove sold on eBay and elsewhere.
The First Test
It was raining steadily outside, so I decided to conduct the initial testing in the garage. I put a broken piece of patio block on my work surface to protect it from any embers that might drop from the fire pan through the open base of the stove.
I then took a foot-long hunk of 2X4, cut some shavings off with the Coast FX350 folding knife that I keep in the garage. Next, I used a baton to drive the knife through the edge of the 2X4 to split off a piece, which I then split several more times into smaller pieces. Finally, I broke these smaller pieces into 4″ lengths.
Next, I removed the fire pot from the stove, fluffed up a cotton ball, added a dab of petroleum jelly, and put the cotton ball in the fire pot. I then ignited the cotton ball with a ferrocerium rod, and dropped the fire pot with the burning cotton ball back into the stove. Then I added the wood shavings, and as they ignited, began adding the 4″ pieces of wood.
The fire caught extremely quickly. I added the pot holder to the top of the stove, put about 16 ounces of water in a coffee can that I had salvaged from the recycling, and set the can on top of the stove. Fifteen minutes later the water was boiling.
Once the stove was burning steadily, it produced no significant smoke. It consumed wood quickly, and needed to be fed regularly. It was easy to control the amount of flame produced by the amount of fuel added. In spite of the relatively smokeless nature of the flame, it left a considerable quantity of soot on the coffee can.
Generic Twig Versus Alcohol
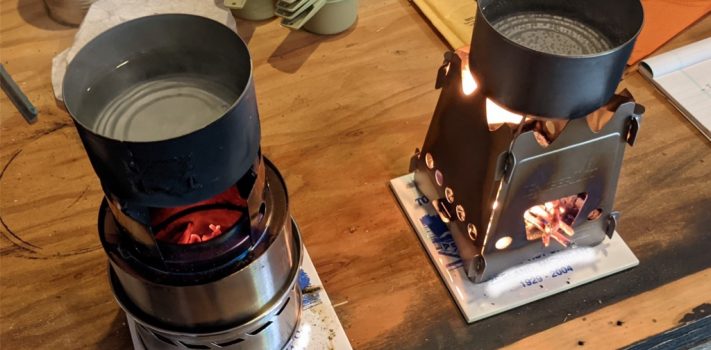
The next test was a head-to-head boiling competition between the twig stove and the alcohol stove.
First I assembled the twig stove on a 12″X12″ slate tile on my work surface. I had gathered quite a number of twigs in a bucket, each twig about four inches long or shorter. I filled the alcohol stove with fuel, took a cotton ball, fluffed it, added a dab of petroleum jelly, and placed it in the fire pan of the twig stove.
Next, I put 16 ounces of water in each of two empty pineapple cans. Then at 7:33 pm I lighted both stoves using a permanent metal match, and put a can of water over the flames of each stove.
By 7:36 pm, both stoves were burning vigorously. The twig stove put out a lot of flame with just a small number of twigs. By 7:40 pm, the water on the twig stove was boiling vigorously. The alcohol stove did not boil until 7:45 pm. So the alcohol stove took almost twice as long to boil as the twig stove.
One thing I noted about the twig stove during this process is that it is hungry. It does not take very much fuel to get it burning vigorously, but it needs more fuel added every minute or two.
Initial Emberlit Impressions
When the Emberlit came in the mail, I was amazed how light and compact it is. The 8-ounce first class parcel rate was sufficient to send the stove and all of its accessories in a padded envelope.
 I slit the padded envelope open with my Leatherman Skeletool, and found the stove in a package approximately 6 inches by 7 5/8 inches, and significantly less than ½ inch thick. The package claims that the stove itself is less than 1/8 inch thick, and that it weighs 5.45 ounces. As I checked up on these claims, my ruler agreed with the package about the thickness of the stove, but my cheap, Goodwill-purchased, spring scale claimed that it actually weighs 6.125 ounces. I don’t know if the unit I received has a slightly thicker than average gauge of titanium, or if the spring on my scale is getting tired. In any case, if I got a little bit more titanium than average, I will not complain.
The package also informed me that the stove has a lifetime warranty, and that it is made in Utah, USA.
In addition to the stove, the package contained directions, and a nylon pouch with a velcro fastener to protect one’s pack from any soot that might remain on the stove after cooling.
 The directions instructed me to “Remove protective plastic film from all parts before assembly or use!” In spite of diligent efforts, I could not find any protective plastic film on any of the parts. After my thumbnail could not find any trace of plastic, and my pocket knife could not find any trace of plastic, I asked my wife to take a look. She could not find any trace of plastic either. I did not detect any signs of melting or burning plastic film during my subsequent use. Following the directions, I assembled the side panels, inserted the base plate, attached the face panel, and inserted the crossbars. The stove was remarkably easy to assemble, and was surprisingly sturdy for such a light object. I took the assembled stove out to the barn, and placed it on a 6”x6” ceramic tile to protect my work surface. I broke a handful of twigs off of a dead branch, and took them into the barn. I lighted a paraffin ball with a permanent metal match, set it on the base plate, and inserted some twigs. Then I put a tin can with about a cup of water over the flame. Four minutes later the water was boiling vigorously.
Twig Versus Twig
Next I attempted a three-way test of the alcohol stove versus the generic twig stove versus the Emberlit twig stove.
I placed each stove on an identical 6″X6″ ceramic tiles on my work surface in the barn. I filled the alcohol stove with fuel. I took a page ripped out of a telephone directory and cut it in half. I folded each half in quarters, and placed one piece in the bottom of each of the twig stoves. I then put a quarter-sized blob of Sterno Green FireStarter on each piece of paper.
Next I took three identical empty canned-chicken cans, and put one cup of water in each. I then lit each of the three stoves with a permanent metal match, put some twigs in each of the twig stoves, and attempted to place a can of water on each stove.
I was able to easily place the cans on the twig stoves, but I discovered that the support arms of the alcohol stove were too widely spaced to allow a canned-chicken can to be placed on that stove. As a result, I aborted the test of the alcohol stove.
I continued to feed equal numbers of twigs into the two wood stoves. The generic stove began to show signs of boiling after only two minutes, and was boiling vigorously after three minutes.
The Emberlit was showing signs of boiling after three minutes. I stopped adding fuel to both stoves when the generic stove began to boil. The remaining fuel in the Emberlit stove was not sufficient to bring the water to a vigorous boil. Eventually, I added more fuel, and then the can on the Emberlit stove quickly came to a vigorous boil.
I was surprised to notice that although the Emberlit stove produced slightly more smoke, the generic stove seemed to leave more soot on the can.
Conclusions
The generic twig stove was able to bring water to a boil more quickly than either the alcohol stove or the Emberlit stove. It was also able to bring water to a vigorous boil using a smaller amount of fuel than the Emberlit stove.
If weight and size are not an issue, then the generic twig stove is the most effective alternative. If you plan to carry the stove in your pack, I highly recommend the Emberlit stove instead. It is much lighter and more compact, and will still bring water to a boil reasonably quickly using a reasonable amount of fuel.
The one advantage of the alcohol stove over the twig stoves is that it does not leave a layer of soot on the cooking pans like the twig stoves do.
Disclaimer
Merkwares LLC was kind enough to provide me with an Emberlit-UL Titanium stove for testing and evaluation. I did not receive any other financial or other inducements to mention any vendor, product, or service in this article.
Editor’s Closing Note: Readers have probably noticed text ads in SurvivalBlog from Siege Stoves. They are also one of the generous prize donors for our nonfiction writing contest. So, in my opinion, they deserve your business.