


(Continued from Part 3. This concludes a four-part series.)
Introductory Disclaimer (Repeated):
Making black powder, while safe in the author’s experimental experience, can be dangerous. The author and SurvivalBlog.com do not endorse making black powder, and you do so at your own risk. Making black powder could also be in violation of the laws in your jurisdiction. You are responsible for compliance with all laws in your area. Neither the author, nor SurvivalBlog.com, are responsible for your use of the information in this article. The processes described herein are therefore for informational purposes only.
Safety Note (Repeated):
Black powder can be dangerous if there is a gap between the powder and the projectile, when the firearm is loaded. When loading a muzzle loading firearm, be sure to seat the projectile firmly, so there is no empty space above the powder. This includes cap-and-ball revolvers, which can have no space between the powder and the ball or bullet, although wads can be used to fill the space when a light powder charge is used. When loading black powder cartridges, there must be no empty space inside the cartridge. You may need to use a wadding or other “filler” over the powder to take up the space inside the case.
—
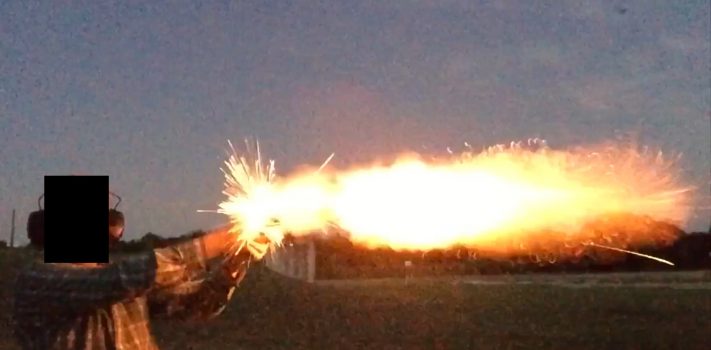
I primarily used a full charge of 35 grains of my home-made black powder for the tests. No commercial powder was used. Black powder is measured by volume, not weight, by the way.
Cap-and-ball revolvers are meant to be used with soft, pure lead balls or bullets. Because of the very hard lead, I could not use the pistol’s rammer without fear of breaking it. To load, I had to remove the cylinder and load it on a wooden range bench. Balls in cap-and-ball revolvers must fit tightly in the chambers. It is normal for a small ring of lead to be cut from the ball as it seats in the front of the chamber.
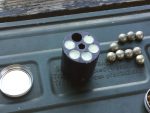 I poured the powder in each chamber and immediately seated a ball. I used a short starter to do the initial seating. A surprising amount of force was needed. I suspect the range lead I melted down included hard-cast commercial lead bullets. Once the widest part of the ball was past the chamber mouth, I pushed the ball in until it was flush, using a short dowel. The balls have to be flush in order to put the cylinder back in the gun. Again, I load only five of the six chambers.
After the cylinder was replaced, I gently seated the balls firmly against the powder with the revolver’s rammer. This was easy, as the balls had been shaved down to the exact width of the chamber mouths. A small amount of homemade lube was then applied to completely seal the front of each chamber. Although it helps prevent chain fires by sealing the chamber mouth, the tight bullet fit also does that. The lube is there mainly to provide bullet lubrication and to keep the powder fouling in the barrel and at the barrel/cylinder gap soft. This helps keep the gun from freezing up and requiring a stop to clean and lube the gun.
The last step before firing was placing caps on the nipples. The nipples were capped only when the gun was assembled. NEVER install a capped cylinder into a black powder revolver. That is extremely dangerous!
Before loading the revolver, I had fired a cap in each chamber to make sure no residual oil was in there to deactivate the black powder. Failing to completely remove oil from the nipples and chambers is a common cause of failures to fire for black powder revolvers.
Because of the risk of chain fire, I loaded and shot my revolver as a single shot when testing the homemade caps. When shooting groups, Remington #10 caps were used.
TEST RESULTS
The initial tests used the first batch of powder, which had been corned while too dry and was not very “granular.” I also used the second batch, which looked like FFFg black powder. Fifty shots were fired in the first test, using both powders, and all shots went off and completely burned. The first batch, however, did not have as much felt recoil as the second.
The first batch of powder was later re-moistened and corned again. Its appearance was changed, and it behaved like the second batch, after that.
The second round of testing was twenty shots, with similar results, except for one chamber that required a second Remington #10 cap to get it to fire at the beginning of the test. Evidently, there was still some oil present when I loaded it.
As noted above, when homemade caps were used, only one chamber was loaded, out of caution to prevent a possible chain fire. Twenty homemade caps were tested. All homemade caps set off the powder charge in the chamber. The roasting pan aluminum was rather thin, and some caps had holes in them after firing, but they still worked!
The homemade lube worked perfectly. It stayed solid in nearly 100 degree weather. It also kept the gun from seizing up due to powder fouling the area around the barrel/cylinder gap. Cleaning the bore afterwards was easy, thanks to the soft fouling.
Although I tried to use only the amount of lube I needed, I saw tiny dots of lube on the target at ranges of less than seven yards! However, the revolver was not overly greasy.
The Uberti Remington replicas have a reputation for accuracy. I believe the revolver is more accurate than I am, as my vision is not what it once was. The revolver has better sights than many of its contemporaries, and it shot to point of aim at seven yards. My best group at that distance measured 1-1/8 inches, center-to-center.
Penetration was tested by setting up a row of gallon milk jugs full of water and shooting to see how many jugs the bullet would penetrate. With 35 grains of FFFg homemade black powder (from the second batch) and a homemade cap, the home-cast 140-grain round ball went completely through five jugs and dented the sixth. That is 30 inches of water! By comparison, a modern .38 Special self-defense load I tested went through only four jugs and lodged in the fifth. I have no doubt that the Uberti Remington, loaded with a round ball over 35 grains of powder, could be effective for self-defense or for dispatching varmints like raccoons or possums.
CLEANING
“…only about 44 percent by weight of a properly burned charge of black powder was converted into propellant gases, the balance being solid residues.” – “The Gunpowder Revolution, C. 1300-1650”
Black powder is messy, but cleanup is not that difficult. First off, the use of good, non-petroleum lubes should help keep the fouling soft and easy to remove. Secondly, one of the best solutions for black powder cleaning is inexpensive and easy to find: Windex!
In his excellent and highly informative book, Shooting Sixguns of the Old West, firearms historian and gun writer Mike Venturino recommends using a bottle of standard formulation Windex (NOT the variety with ammonia). He dumps it into a gallon jug and fills it to the top with water. I filled the Windex spray bottle with the mix. With the Windex cleaning solution, 100% cotton patches (from recycled shirts or from the bargain bin of a fabric store), some Q-tips, and pipe cleaners, cleaning a cap-and-ball revolver isn’t difficult.
The only tools needed for cleaning are a long pistol rod, a nipple wrench, and a few good screwdrivers. One of the great things about the Remington New Model Army design is that it has few parts and is easy to dismantle and reassemble. There are few “nooks and crannies” for black powder fouling to hide in.
For metal protection and lubrication after cleaning, I use non-petroleum Lubriplate FMO-350-AW Oil. It was designed for use in food processing facilities and is non-toxic and has almost no odor. But there are plenty of other good choices available.
CONCLUSION
Black powder firearms would not be my first choice for self-defense, hunting or for long-range and other specialized types of shooting. But I would not feel severely handicapped if I had to switch to loading the .357 Magnum, .45 Colt ,and .45-70 calibers with black powder. In any case, learning about black powder gives us more tools in our tool box. The strong do-it-yourself mindset that seems to be part of black powder shooting is a plus.
Black powder technology is very difficult for tyrannical governments to regulate because so much of the information about it is public, and because the technology is fairly easy for a home hobbyist to replicate. Even if you never need to use black powder, you’re missing out on a lot of fun if you don’t try it!
—
References
Brushhippie on Vimeo – only Part II of his Homemade Black Powder video is online.
“The Gunpowder Revolution, C. 1300-1650”
“Homemade Gunpowder for Long Term Survival”
Posted on October 11, 2013
By Plan B Writer’s Alliance
Percussion Revolvers : A Guide to Their History, Performance, and Use, By Mike Cumpston and Johnny Bates
Shooting Sixguns of the Old West, By Mike Venturino
Sixguns, By Elmer Keith
Resources
Harbor Freight (Rock tumbler, for use as a ball mill)
Ja-Ru Roll Caps (Walmart) – for making percussion caps
Lubri-Kit – Source for food industry, non-toxic oil
Sharp Shooter – source for #11 percussion cap tool.
I have been shooting BP rifles and pistols for years, what a kick . . . I have found from some serious shooters of BP that Windex with Vinegar will clean it the best. I had been cleaning them in soap and water then oiling them down really well. Now I use the vinegar Windex and it will clean them better, IMHO, better than the soap and water ever did. Some of the people shooting Cowboy Action shooting pistols just take the grips off and put the whole pistol in the Windex, and they are “serious” cowboy action shooters too, no problems. I pull the Nipple off my Hawken and spray it down the barrel and into a trash can and the powder residue just flows into the trash can, then oil it down . . .
I clean at the range: a spray bottle of Windex/water, a few tools and cleaning rods and brushes, and some oil and patches. It goes quickly, and I don’t anger SWMBO (She Who Must Be Obeyed!) at home with the BP residue in the utility room sink.
I have tried using powder made from white sugar and saltpeter, as well as charcoal and saltpeter, without the sulfur. Mix the powders wet, and then granulate through a screen part way through the drying process. Dextrin would be a good idea with the charcoal.
As you say, pack all the powder in the case that it can hold. With .357, it should be enough to kill a rabbit.
I made the mistake of loading the first round with about 6 grains of the white powder. After firing, the bullet was protruding from the muzzle of a 3-inch barrel. Subsequent loads were using about 20 grains.
No doubt, using sulfur would improve the performance.
Sugar is definitely less messy to work with than charcoal, but it comes with a load of water on board. So, the finished product is heavier for the amount of actual fuel. However, steam is also
Also, if there is a shortage of saltpeter, iron oxide (red rust) can be used as an oxidizer supplement, according to the manuals.
Thanks for the cleaning tips!
Now, we need some good info on stone-age methods of separating the organic matter from “compost tea,” preparatory to separating the saltpeter from the table salt. The 1862 manual from the Carolinas said to use blood or “glue” (hide glue?) to get this done. Modern manuals say to use alcohol.
You’re too nice: A dropped, loose revolver cylinder, capped and loaded, is more properly classified as a hand grenade.
The main disadvantage, in my opinion, of using cap and ball BP revolvers for defense is the extremely long reload time compared to modern weapons. For those first five shots though…
Granted there are range and ballistics issues, but at standard handgun distances it shouldn’t matter too much.