


Several years ago, I was fortunate to be able to share my experiences and recommendations on being prepared while traveling on SurvivalBlog (Survival To Go Part 1 and Part 2). However, as most of us know, being prepared is never a “one and done” situation. You have to constantly reassess the threats and risks you face. Adjust your preparations, approaches, and skills to stay aligned with your current situation. The goal of this article is to share how my approach to travel preparedness has adapted in the last three years. I based my approach on how my personal situation and travel conditions have changed.
Significant Changes
Let’s start with what significant changes have occurred:
- Travel in general, and air travel in particular, has become much more dangerous. Between airport bombings (Brussels, Paris, Istanbul), airport shootings (Florida, Paris), airport stabbings (Flint), airport facility disasters (Paris, Netherlands, Hong Kong), and too many airplane accidents to list, the chance of being seriously injured while traveling has increased significantly. This doesn’t even take into account terrorist attacks, shootings, accidents, riots, and disasters while you’re at your destination.
- I’m getting older, and my back is having a harder time carrying a 28 pound backpack through the airport.
- I kept accumulating more stuff in my travel backpack. It was getting harder to find something when I needed it, especially in emergencies.
- I did a review of what was in my backpack. I found there were a number of items that I hadn’t used in a long time.
- My company made me replace my personal laptop with a company-issued one. I now have no problem putting it in my checked bag. I also realized that I pretty much never open my laptop on flights anymore anyway. There just isn’t enough leg room.
Updated Goals For A Travel Kit
Like anything in life, being properly prepared starts with defining goals. Based on the changes listed above, here are my updated goals for a travel kit:
- Ability to handle a wider range of traumas and injuries.
- Smaller and lighter that my previous carry-on pack, which was a 35L Red Rock Large Rebel Assault Pack with a bunch of extra Molle pouches attached to the outside. (Note: The RR Rebel Assault pack replaced the 30L Outdoor Products backpack mentioned in my previous article). Since I now put my company laptop in my checked bag, the new bag doesn’t need to hold a laptop.
- Better organization so I can find what I need quickly, without having to dump the entire backpack.
- Flexible expansion options (Molle attachments, side straps, et cetera).
- Contents to handle the most common travel situations.
- Contents to help in an emergency survival situation.
- Modular contents to allow for different laws, regulations, weather, et cetera at different destinations.
The Pack Bag
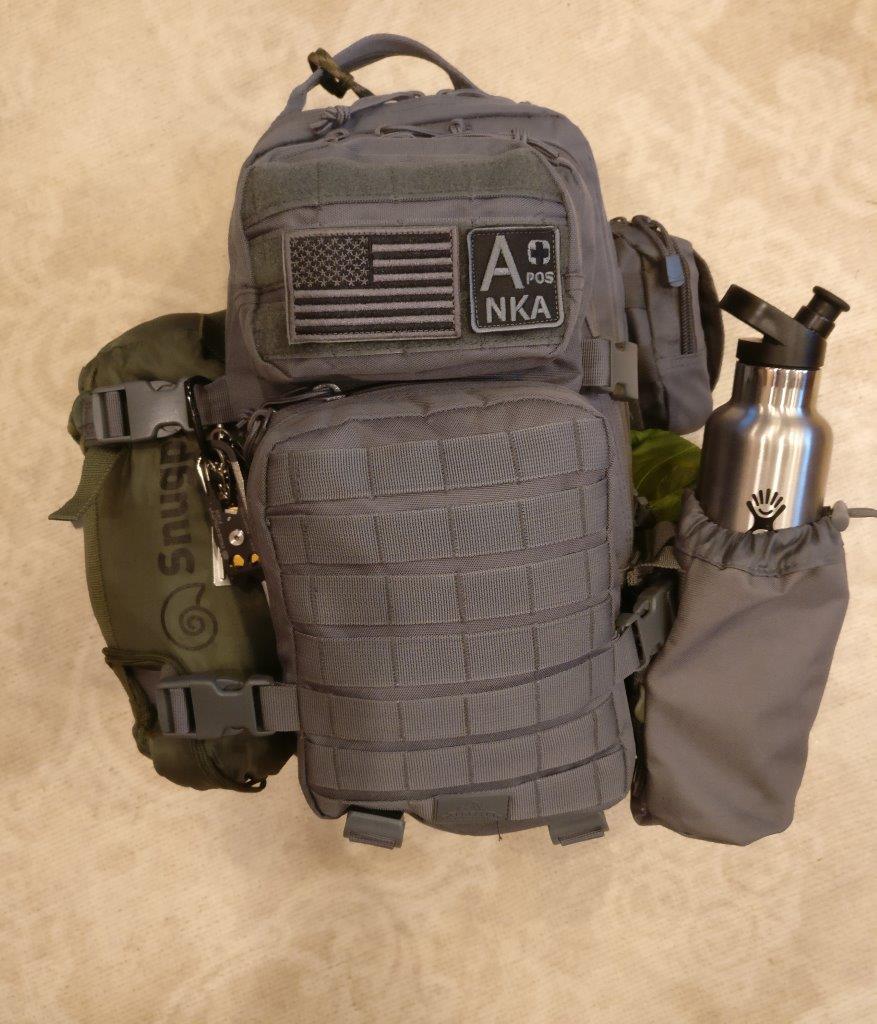
Since my previous Red Rock pack survived several years of heavy travel with no problems, I decided to stick with the brand. The new pack I chose is the Red Rock Outdoor Gear Assault Pack (28L) in gray; I figured that most people associate brown and OD with military, so even with the molle straps it doesn’t really attract any attention. I have one small pouch (NcStar Small Utility Pouch) and a dump pouch Molle’d to the sides. To keep the contents organized, I used a bunch of reinforced plastic zipper bags and small zip lock bags (4 mil). Every bag has a label to identify the contents.
There is an advantage to this approach if I ever have to change packs. I can quickly and easily transfer everything. Fully loaded (without any liquid in the water bottle), the new bag weighs in at around 18 pounds. I find this weight to be much more manageable.
Training To Use Medical Supplies In Emergency
My most important goal was to be able to handle a wider range of injuries and traumas. I didn’t want to have to wait for help to arrive. A situation may exist where seconds could mean the difference between life and death. I knew that just buying a bunch of medical supplies wasn’t going to provide that; I need the skills to use them effectively. Additionally, I have taken a number of medical and first-aid courses over the years. However, I didn’t feel like I was prepared to handle some of the more severe injuries that might occur. Luckily, I found a solution. While we were attending a cookout at a friend’s house, we met a guy that had been combat corpsman for several years over in Iraq and was now an EMT.
We asked him if he’d be willing to help us put together a decent trauma kit and teach us how to use it. We offered to pay him for his time. He jumped at the chance, and when he showed up at our house a few days later, he even brought a bunch of practice supplies and a trauma practice dummy. We spent several hours going through what we needed and what we could carry (given my pack size), and he gave us pretty detailed hands-on training on how to use all of it. He even gave us some copies of the training materials he used when he was getting his EMT license. He also agreed to come back in six months or so to give us a refresher.
I highly recommend making some friends at your local fire department or EMS company and finding an EMT that would be willing to help you out. Note that most of these folks are grossly underpaid for what they do, so be generous when paying for their time. And in response to what some of you are probably thinking, yes, I realize that a couple of hours of training doesn’t make me a fully-qualified EMT; however, I’m a lot more confident that I can handle a wider range of injuries when seconds or minutes can make the difference between life or death for me and mine.
The Kit
Here’s a picture of my new kit, fully assembled:
My Trauma Kit/Large, Front Outer Pocket
Now let’s look at what’s inside. Starting in the large bottom front outer pocket, this area is for my trauma kit, which contains the following:

- Beacon Pocket Non-Vented Chest Seal 6″
- Beacon Pocket Vented Chest Seal 6″
- Celox 8″ x 8″ Multi-Pad
- Water-Jel® Military Burn Dressing 4″ x 16″
- NuMask CPR Mask
- Guedel Disposable Oral Airway – I only carry the size that (luckily) fits both me and my wife. Once you’ve practiced this a few times on a dummy, it’s surprisingly easy to insert, although knowing when to use it is a lot more difficult.
- Nasopharyngeal Airway w/lube – Like the Guedel airway, I carry the size that will work for both me and my wife (28 Fr., 9.3mm).
- Rescue Essentials Concealed Carry Trauma Kit w/Celox– This is a nice sized kit that you can pull out of your travel pack and put in to your jacket pocket or EDC bag when you’re out and about at your destination. I always carry one if I’m carrying a concealed firearm, or in an area where traumatic injury is possible (which is pretty much everywhere these days!). It contains:
- SWAT-T Tourniquet which can also be a pressure bandage
- Celox Hemostatic Gauze
- A pair of Nitrile Gloves
- 4″ First Care WoundStop Israeli Bandage
- SOL survival blanket (patient warmth)
- 2 x 6×9 Combine ABD Pads (trauma pads)
- Pair of nitrile gloves
- NAR Triangular Bandage w/safety pins
- Roll of compressed gauze – More compact than regular roll.
- Elastic wrap (flat folded and compressed) – This stuff is incredibly useful, and the vacuum-packed flat folded format takes up a lot less space than the standard rolls.
- Antiseptic wipes
- Steri-Strip wound closure strips
- Small pair of EMT shears – I’ve gotten these through airport security at a dozen different airports around the world with no problem. (They’re on the front of the pouch, which is why they’re not in the picture. Sorry.)
- Bushnell TRKR Multi-Color Headlamp w/2 Eneloop AAA batteries – Critical for treating someone (including yourself) in low-light conditions, especially when there’s no one else around to hold a flashlight.
This all fits inside an 8” x 6” x 3” tri-fold medical pouch that I had, which in turn slips into the outer pocket of the backpack.For less-serious wounds I have a “Minor Wounds” FAK pouch in my bag, which I’ll discuss later.
See Also:
- 2- Survival To Go, Revisited, by JMD
- 3- Survival To Go, Revisited, by JMD
- 4- Survival To Go, Revisited, by JMD (Active on 08/27/17)
SurvivalBlog Writing Contest
This has been another entry for Round 72 of the SurvivalBlog non-fiction writing contest. The nearly $11,000 worth of prizes for this round include:
First Prize:
- A $3000 gift certificate towards a Sol-Ark Solar Generator from Veteran owned Portable Solar LLC. The only EMP Hardened Solar Generator System available to the public.
- A Gunsite Academy Three Day Course Certificate. This can be used for any one, two, or three day course (a $1,195 value),
- A course certificate from onPoint Tactical for the prize winner’s choice of three-day civilian courses, excluding those restricted for military or government teams. Three day onPoint courses normally cost $795,
- DRD Tactical is providing a 5.56 NATO QD Billet upper. These have hammer forged, chrome-lined barrels and a hard case, to go with your own AR lower. It will allow any standard AR-type rifle to have a quick change barrel. This can be assembled in less than one minute without the use of any tools. It also provides a compact carry capability in a hard case or in 3-day pack (an $1,100 value),
- An infrared sensor/imaging camouflage shelter from Snakebite Tactical in Eureka, Montana (A $350+ value),
- Two cases of Mountain House freeze-dried assorted entrees in #10 cans, courtesy of Ready Made Resources (a $350 value),
- A $250 gift certificate good for any product from Sunflower Ammo,
- Two cases of Meals, Ready to Eat (MREs), courtesy of CampingSurvival.com (a $180 value).
Second Prize:
- A Model 175 Series Solar Generator provided by Quantum Harvest LLC (a $439 value),
- A Glock form factor SIRT laser training pistol and a SIRT AR-15/M4 Laser Training Bolt, courtesy of Next Level Training, which have a combined retail value of $589,
- A gift certificate for any two or three-day class from Max Velocity Tactical (a $600 value),
- A transferable certificate for a two-day Ultimate Bug Out Course from Florida Firearms Training (a $400 value),
- A Trekker IV™ Four-Person Emergency Kit from Emergency Essentials (a $250 value),
- A $200 gift certificate good towards any books published by PrepperPress.com,
- A pre-selected assortment of military surplus gear from CJL Enterprize (a $300 value),
- RepackBox is providing a $300 gift certificate to their site, and
- American Gunsmithing Institute (AGI) is providing a $300 certificate good towards any of their DVD training courses.
Third Prize:
- A Royal Berkey water filter, courtesy of Directive 21 (a $275 value),
- A custom made Sage Grouse model utility/field knife from custom knife-maker Jon Kelly Designs, of Eureka, Montana,
- A large handmade clothes drying rack, a washboard, and a Homesteading for Beginners DVD, all courtesy of The Homestead Store, with a combined value of $206,
- Expanded sets of both washable feminine pads and liners, donated by Naturally Cozy (a $185 retail value),
- Two Super Survival Pack seed collections, a $150 value, courtesy of Seed for Security, LLC,
- Mayflower Trading is donating a $200 gift certificate for homesteading appliances,
- Montie Gear is donating a Y-Shot Slingshot and a $125 Montie gear Gift certificate.,
- Two 1,000-foot spools of full mil-spec U.S.-made 750 paracord (in-stock colors only) from www.TOUGHGRID.com (a $240 value), and
Round 72 ends on September 31st, so get busy writing and e-mail us your entry. Remember that there is a 1,500-word minimum, and that articles on practical “how to” skills for survival have an advantage in the judging.
Great article, my only comment would be to avoid tactical looking bags at all costs. As many articles on SB, have mentioned, in this politically correct world, anything tactical ius going to stand out and drawvcattention. Think gray man here and OPOSEC.
Although i have some good tactical bags, (5.11, Maxpedition, etc) if i fly or even go on a day trip I use a “Swiss” backpack, it lacks molly attachments, but has many compartments,as well as room for laptop and water bladder, and most importantly, looks like a backpack you may see on the street or on college campus.
Just Some thoughts.
While I realize that molle in general is viewed as being military, I’ve found that the gray pack seems to illicit less attention than a brown or OD one does. When I used to carry the larger coyote brown pack I would frequently get asked about my military service or get invited to the USO lounge in the airport – that hasn’t happened once since I switched to gray. Your mileage may vary, of course.
Now that I am getting older and slower and experiencing the return of pain from injuries sustained in my youth, I find that I really want a pack (carry on or otherwise) with a padded hip strap and some form of rigid frame. My neck and shoulders just won’t take the load of a 20 lb pack for more than brief periods without instigating an extended episode of pain and diminished function.
Ergonomically, a hip strap and a frame is much more suitable for human transport than a shoulder bag. The hip strap puts the load down on the pelvis, where our bodies are more suited for it. The frame keeps the load from sagging, thus keeping the weight and stress from transferring back to the shoulders. If you look at the Osprey line of packs, some of them are quite ergonomic without being conspicuous.
Last year I finally gave up my old “go bag” Camelbak Motherlode pack from my time in Baghdad a decade ago. I was endeared to that pack, but it just won’t work for me anymore. It was like pulling out a sore tooth. Now my packs either have wheels, or they have hip straps and frames.
“Travel in general, and air travel in particular, has become much more dangerous.”
You left out the most dangerous threat to air travel, the TSA (apologies for language, I couldn’t link back to the original source):
https://antzinpantz.wordpress.com/2017/08/24/tsa-pervs-announce-new-grab-ass-rules/
This is the gubberment group that gobbles more geld in order to enable their ever more intrusive groping.
It used to be that you had “options”; image screenings, metal detectors, pat-downs. Now apparently it’s just pat downs (HAH! Were the image screens and metal detectors really gotten rid of?)
Ironically, as much as I travel, I have never had any serious problems with the TSA folks. I’m polite, smile and joke with them, and they always seem to reciprocate. I agree that the agency overall has some serious issues, but the individuals working at the security checkpoints tend to be just regular people.
I feel much safer flying than driving, in almost all circumstances I have experienced. I agree, flying is getting more troublesome, but statistically I think flying is still one of the safest modes of transportation. Good ideas, but the general pack configuration still looks pretty military to me; I’m opting for something much less obvious.
A 16 hour “wilderness first aid ” course from SOLO has been of great comfort to my level of comfort.
Yes, the WFA course with SOLO is the way to go. It covers so much information from standpoint of not having EMS to depend on. And that is the situation to plan for, that you’re basically on your own and you are you own support system.
Good article,through I also prefer a more grey man approach to packs. I currently use a camelback Rim Runner 22. They do have a few larger ones if need be.
This is just part 1 – more to follow 😎
Air Travel might be more dangerous, but it started and still is trivial. How many each day use air travel without incident?
Very well thought out list.I carry a small mirror so I can inspect myself, eyes etc, and fine tweezers with with magnifying lens from harbor freight.
There are a number of additional items I carry that will be listed in the next part(s) of this article.
An LED glow stick with replaceable batteries might be a good addition to the medkit. Mine is red and is by NiteIze. It’s light, water-resistant, and it floats. It could be used to mark someone you treated in a mass casualty, while you moved on to someone else. It could also be a self marker. If you treat yourself, you could lose consciousness, and the light raises your chances of being found.
That’s a good idea – thanks!