


(Continued from Part 5.)
A Picture is Worth a Thousand Words
One of the most useful capabilities of mobile devices is their ability to take pictures and videos. If you’re out on a patrol you can photograph people you encounter, potential enemy locations, plants you discover for future foraging, abandoned material for future scrounging, etc. Pretty much every mobile device has a built-in camera, and most have both a front and rear camera. My Armor X5 has a 13 megapixel (MP) camera, which can take high-resolution pictures. I recommend that you always use the highest resolution possible for photographs, since that will allow you to zoom in and make out small details.
Every mobile device that has a camera comes with some kind of built-in camera app, all with varying levels of quality and capability. You shouldn’t be too worried about things like the ability to add funny features or beauty filters to your pictures – focus on something simple that lets you easily control the quality of your photos and allows you to store them on the SD card. I like to use an app called Open Camera, which allows you to do things like add date/time stamps and GPS coordinates to pictures and stitch multiple pictures together for panoramic shots (they also provide a nice online users guide). I set the extra programmable button on my phone to open up the camera app, since you never know when you’ll need to take a picture in a hurry. For videos I recommend recording at a resolution of at least 1080p, as that will provide a good level of detail.
Beyond the built-in camera, having the ability to zoom in to capture details in photos at long distances can be useful in field situations. For example, you may want to set up an observation post (OP) on a hill overlooking a road and get pictures of everyone going by and determine if they’re carrying weapons, or take detailed pictures of a property you need to check out and share them with other team members to plan your approach. You may have seen mobile device clip-on telescopic lenses on places like Amazon, and believe it or not they actually work pretty well.
Alternatively, you could get a universal lens adapter and use your monocular or binocular lens with your camera. I’d also recommend getting one of those hated selfie sticks with a built-in tripod, which can be used to hold your device still while you take pictures. You can use it to take pictures/videos around corners or from behind cover without exposing yourself, and it has other uses which I’ll discuss later.
If you’re interested in ‘upgrading’ your mobile device’s camera to support infrared night vision, there are a number of instructions on the web that show how to take a phone apart and remove the IR filter on the camera – check out here and here. I’ve never done this, doing so will impact the quality of the color quality for regular pictures you take with the camera, so do it at your own risk. There’s also a great video on how to combine a mobile device, cheap VR goggles and a USB web camera to make a set of wearable night vision goggles.
One point that last video illustrates is that you can easily use USB cameras on Android devices that support OTG. This provides a number of additional options for working with pictures and videos in the field:
- You can use a standard USB web camera and extend it around obstacles to view live video on your mobile device without exposing yourself. You can use the selfie stick I mentioned earlier to extend your reach. There are also higher-end cameras available that connect to a USB port.
- You can remove the IR cut filter on a USB camera as described in the video and use the camera as an IR night vision device without having to hack your actual device.
- You can get a USB digital telescope camera and use that for long-range observation.
- You can connect a USB camera with the IR filter removed to your rifle scope to give you night vision on your firearm.
Be aware that standard Android doesn’t have support for USB cameras built-in – you have to install a USB camera app in order to use them. The one I use is called ‘USB Camera Connect’.
A unique case of a USB camera is the Seek Thermal XR – it’s a camera that plugs into your mobile device and provides live thermal image video you can view on your screen. If you want to use it at night (remember, thermal also works fine during the day) you should consider getting an extension cable – that way you can use it to look around obstacles without exposing your face being lit up by the screen.
Another type of USB camera is called an endoscope, borescope or inspection camera. These are small cameras on the end of long flexible cables that are designed to see into small spaces and inside things like car cylinders. While your first inclination might be that these would be good for peeking under doors prior to entry or looking through small holes in walls, most of these cameras have a lens with a fixed focal distance of a couple of inches – anything further away than that will just be a bunch of blurry blobs. You might be able to change the lens on a cheap endoscope with one from an old cell phone, but I’ve never tried that so you’re on your own.
One issue with all USB-connected cameras is that you’re limited in how far away you place them by the length of the cable. Say for example you’re going to get off of a trail a couple of hundred feet through some dense brush for a meal break, but you want to be able to see if anyone is coming up the trail behind you. The good news is that there are a lot of battery-powered wireless cameras that you can use with your Android device. Many of the devices that are billed as ‘action cameras’ such as the GoPro Hero series, Dragon Touch and the Akaso series include WiFi, which allows you to stream video to your mobile device.
You can stick one of these on a tree branch or under a bush facing down the trail and keep watch while you’re eating your meal. There are also less expensive options available like the generic SQ23 camera. The SQ23’s internal battery (200mAh) is good for about an hour when streaming via WiFi, so I plug in one of those credit card-sized USB batteries I mentioned earlier if I need to extend its operating time. Keep in mind that the SQ23 creates its own WiFi hotspot that you need to connect directly to it in order to stream video, so you’ll only be able to view a single camera at a time. It also has one significant limitation – the IR night-vision can only be turned on when it’s recording to a microSD card, not when it’s streaming via WiFi, so you can only use it for realtime monitoring when it’s light out.
If you want to be able to set up and monitor multiple cameras at once you’ll need to create a field WiFi network like the one I mentioned earlier and connect multiple cameras such as the VStarcam C90S to the network. The Eye4 app that VStarcam provides supports viewing multiple cameras. In addition to being a WiFi camera, the C90S can also be switched to ‘DV’ mode, where it just records video to the local microSD card based on motion detection (basically a game camera).
It’s small enough that you could stick it in a room in an abandoned house or other location you suspect is being used for nefarious purposes to record video and audio of what’s happening, and come back later to view what was recorded using a microSD adapter for your mobile device. Note that the internal battery on the C90S is only good for about 4-5 hours, so you’d probably want to plug in a small external USB battery.
A third option is the S81 camera – it has the longest battery life of the three, up to 7 hours, and has IR-cut, so it’ll automatically switch to night vision mode when the light level goes down. Out of the box it runs in WiFi access point mode so you can connect directly to it from your mobile device, or you can configure it to connect to a local WiFi network so you can monitor several of them.
Most of these battery-operated cameras that generate their own WiFi network tend to be limited to a range of 30’ or so for wireless transmission, but you can use the Xaomi WiFi Range Extender I mentioned earlier to significantly extend the range if the camera uses a password. If I position the range extender near the SQ23 camera I can usually connect to it from around 50’-60’ feet away in a heavily forested area, and if I position the range extender part way in line between me and the camera I can usually extend that to well over 75’. As with USB cameras, you can stick a wireless cameras on the aforementioned selfie stick to see over or around obstacles.
There are other types of cameras that may provide useful functionality in field situations. Standard game cameras that record to a microSD card can be set up along commonly used trails, and you can check the recordings they’ve made onsite by plugging the microSD card into a reader on your mobile device. Body cameras are similar to game cameras, but they’re usually designed to continuously record once they’re turned on versus being triggered by motion. Some body cameras support WiFi, which may allow you to use them as a remote camera (if they support streaming) or download recorded videos remotely. Body cameras are also useful for recording interactions with people you meet while you’re out and about, or helping you recall details of your more ‘energetic’ interactions.
Another possible use for either a USB or wireless camera would be to allow you to accurately fire your rifle from behind cover without exposing yourself. You could mount the camera on a quick-release picatinny mount that aligns it with your scope or red-dot sight, then hold the rifle around a corner or over top of your cover and view the image on your mobile device to line up your dot. This is where having your mobile MICCS device mounted on your forearm or chest would come in really handy, since you could start up the app then aim your rifle without having to hold the device for viewing.
Most of the cameras I discussed definitely aren’t designed to handle the shocks from multiple recoils and would probably eventually fail, but most of them should be able to handle an occasional peek-n-shoot. What would make this option even cooler would be the ability to see the display in a heads-up fashion so you wouldn’t have to look at your mobile device, kind of like what Google started doing a few years ago with their Google Glass. Unfortunately, that technology is still pretty immature, and the decent options from companies like Vuzix are expensive and not very good.
Up, Up and Away!
One limitation of USB and wireless cameras is that you need to physically place the camera in the location where you want to be able to see from. While this may be appropriate for observation from cover where the target is exposed or for recording in a fixed location when you’re not present, there may be situations where you need to be able to see around or over obstacles at a distance to make sure you’re following the right path or not walking into a potentially dangerous situation. That’s where Remotely Piloted Vehicles (RPVs) can come into play, or as most people refer to them, drones. Drones can take many shapes and sizes, but the most common ones are aerial quadcopter drones, which is what I’ll focus on first.
The first thing to understand is that because some people that aren’t smart enough to realize that flying drones near active airports is a bad idea, their use has become pretty tightly regulated in most countries (OK, so the government’s desire to regulate everything might have had something to do with it). In the United States drones are regulated by the Federal Aviation Administration (FAA), which requires that any aerial drone that weighs more than 250g (.55 lb) has to be registered and display a registration number, and defines a whole boatload of designated no-fly zones which includes not just airports and military bases, but parks, wildlife areas, rivers, etc.
Note that these regulations are in force as long as the FAA is an ongoing concern, and some drone manufacturers strictly enforce no-fly zones in their control software – e.g. it won’t let you fly your drone in any FAA-designated restricted areas. Unfortunately, these manufacturers (and the Internet) probably won’t be around after a major worldwide meltdown, but the software will continue to enforce those restrictions even if they don’t make any sense in a post-SHTF world.
That being said, there are a number of decent smaller foldable drones available that could be used for tactical observation. Note that with drones, size matters – heavier drones allow longer flight time (bigger battery) and better resistance to buffeting by wind, and larger drones tend to have better antennas and stronger transmitters, increasing their useful range. The downside of bigger drones is that they’re bulky and heavy to carry. Drone manufacturers also tend to try to add as many bells and whistles to their products as possible – follow-me tracking, acrobatics, beauty filters on cameras, gesture control, etc., most of which will not be very useful in tactical scenarios (although acrobatics might make it harder to shoot down).
One of the best-known drone manufacturers is DJI, and their Mavic Mini isn’t a bad choice for tactical use. It weighs 249g (1 gram under the FAA limit – imagine that!), has around a 30 minute flight time, an operating range of well over a mile, a great 12MP camera, and it’s around 5.5” x 3.2” x 2.3” when folded. However, it’ll cost you around $400-$500, depending on which package you buy, and there have been issues using the drone when you aren’t connected to the Internet. Also, the DJI control software will strictly enforce the no-fly zones mentioned earlier.
Another potentially nice high-end drone for tactical use is the Zero Zero Robotics Hover 2 ($600 for just the drone). It has a built-in protective cage that folds up for storage, so you’re a lot less likely to break the blades by running into something, and it has great range and run time. I don’t have any direct experience with this one, but it’s got some great reviews. Moving down the price range slightly are offerings like the Holy Stone HS720, which sells for around $300, but has similar range and endurance specs as the Mavic and Hover 2.
While all of these are great drones, they tend to be overkill for most tactical situations, as well as being large, heavy and expensive. Keep in mind that the goal is to allow you to quickly check out things like potential ambush sites, possible alternative paths to take, unsafe buildings, etc., so you should only need a range of a couple of hundred feet and a flight time of 15-20 minutes. You’ll also want something that’s small, lightweight and inexpensive, so you can stock up on a couple of them.
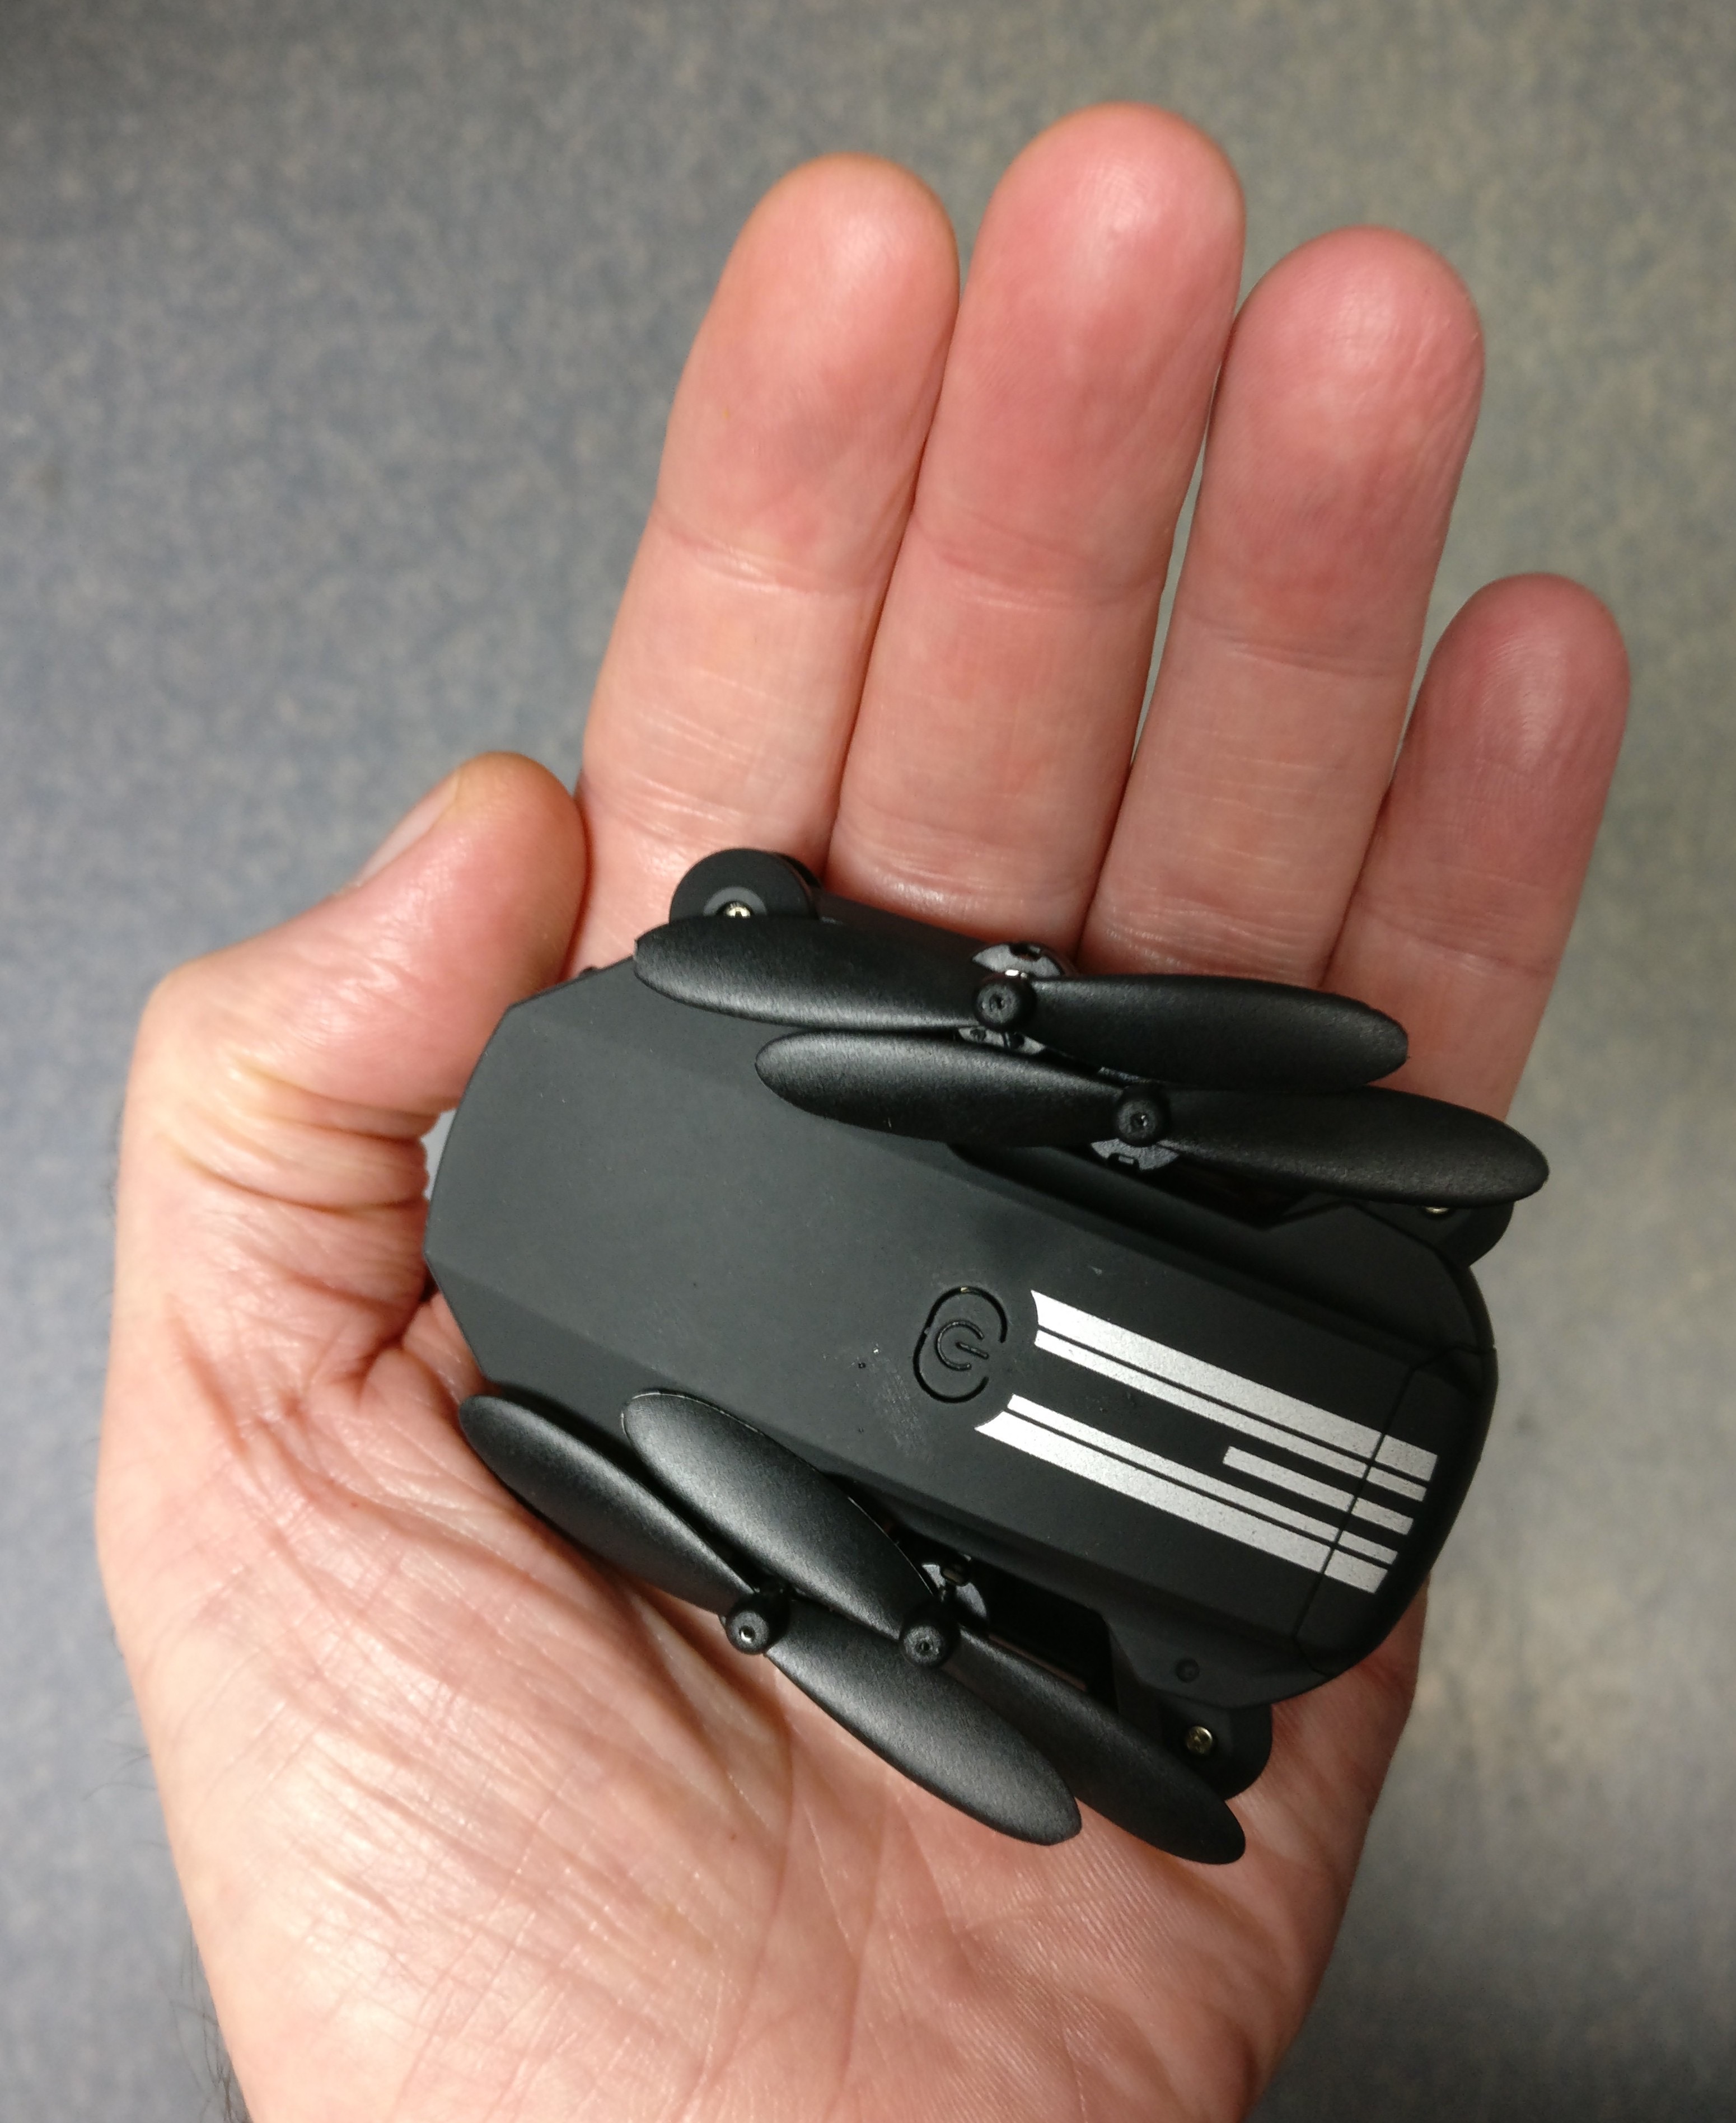 One that I like is called the ‘LS-Min’ with the 1080p camera option, but it’s also available with 480p and 4K cameras; I recommend sticking with the 1080p, which is a nice balance between resolution and bandwidth (480p tends to be too blurry and 4K tends to be choppy due to the volume of data). I’ve seen it under different names on different web sites, with prices ranging from $25 on sale up to $50, so shop around. It’s incredibly small. You can easily fit the folded drone and a spare battery into a small Sistema snack container for protected transport. The downside of its size is that the range (with streaming video) is limited to around 125’-150’, and endurance is only around 12-13 minutes. That should be enough for most scenarios, like a quick check of what’s around the next corner or an aerial view of an active engagement zone.
Note that the camera on the front of the drone is fixed at a slightly downward angle, so you’ll have to move the drone to change your view. Given how compact it is there aren’t really many hacks you can do to improve range or endurance, although you could probably replace the small wire antenna on the side with something longer to increase its range. You can find extra batteries by searching eBay or one of the Chinese direct sites for ‘ls-min battery’.
A decent step up is the LS11 drone, which sells for anywhere from $40-$60. It’s roughly twice the size of the LS-Min, but the bigger battery (1800mAh vs. 650mAh) gives you over 20 minutes of flying time and the range is around to 300’. It does offer really nice feature for scouting – in addition to the 1080p/4K forward-facing camera there’s a second downward-facing camera, and you can switch between them in the viewing app on your mobile device.
If money is no object and you want an advanced quadcopter with thermal vision capability, check out the Parrot Anafi 4K Thermal Drone. It has two cameras – one thermal (-14°F to 752°f) and one 4K visible light with 180° tilt and 3x zoom, reduced acoustic signature (it’s quiet), 30 minutes of flight time, over 2 miles of range, can handle 31mph winds and folds down to 8.5” x 3” x 2.5”. It costs $1900, so I have one of these on my ‘when I win the lottery’ list.
Be aware that many quadcopters offer two methods of control – either a separate physical controller or from the app interface on your mobile device. The separate controller tends to be easier to learn and use and generally has more range than using the device app, but it requires you to carry another piece of hardware, along with the batteries to run it. One advantage to using a separate controller is that you can see the full video on your mobile device’s screen, instead of having screen real estate being taken up by virtual controls. Try out both methods to see which one you’re most comfortable with.
Another important point is that unless you’re a 13-year old kid, learning to fly quadcopter drones can be tricky. Just like firearms, you need to learn how to use it effectively and practice a lot to become proficient in their use. This is especially critical if you plan on using aerial drones in areas with lots of obstacles like forests or urban environments.
Your options for recon with RPVs go well beyond just quadcopters – many different types of remote-controlled vehicles come with a camera, or you can attach a lightweight WiFi drone camera like a RunCam to pretty much anything that moves. Horizon Hobby has one of the widest selections of remote-controlled vehicles around, with everything from gliders to DIY tanks. If you operate on or near water a remote-controlled boat with a RunCam on top might be a good option for you, and it wouldn’t have to be super expensive – even something like a kid’s RC amphibious car can provide enough range and endurance to be a viable option (although you may want to paint it a different color).
One useful RPV that I’ve used several times in heavily wooded areas is the Parrot MiniDrone Jumping Race Drone, which can scoot around through the woods with no problem, jump over larger obstacles, and comes with a built-in camera. Parrot stopped making these so they may be hard to find, but you can search the web for ‘Jumping Car with WIFI Camera’ to locate a generic alternative.
Regardless of what type of RPV you choose, there are a few common aspects of their operation you need to think about:
- Most RPVs are noisy – if you’ve ever been around someone operating a quadcopter drone you probably heard their mosquito-like whine well before you saw it. The noises are a combination of the motors, airflow over propellers, etc., and there’s not a lot you can do to reduce it. Smaller drones are generally less noisy than larger ones, but you shouldn’t plan on using them for close-in work or to sneak up on someone. The good news is that tripping an ambush early by having someone fire at your drone still tells you there are bad guys ahead, and they can do a lot of useful jobs that don’t require stealth.
- You can use an RPV to place a camera and increase the endurance of your device. For example, you can fly your quadcopter up and land on a roof or hunting platform with the camera facing the direction you want to watch, then shut the motors down to extend battery life. Just make sure you save enough battery power to get it back down!
- Consider how you may want or need to deploy your RPV. If you only plan on using it for casual observation or scouting, keeping it inside your backpack would probably be OK. On the other hand, if you want to be able to quickly deploy it from behind cover to find the location of someone that’s shooting at you you’ll probably want it closer at hand. I have one of the LS-Min drones and a spare charged battery in one of the Sistema waterproof boxes I mentioned earlier, stored inside a hand grenade pouch on my molle gear. I can deploy it in a couple of seconds using my mobile device mounted on my forearm as the controller.
(To be concluded tomorrow, in Part 6.)
The clip on camera lenses do work very well. I bought my daughter some for her birthday last year.
When possible I use photographs to compliment or even substitute range cards. It allows for quicker mental processing under stress for those without backgrounds.
What happened to part 4…..did i miss somethin?
It was posted yesterday – here’s the link: https://survivalblog.com/tactical-technology-teotwawki-part-4-j-m/
Thank you.
I thought i was losing my mind….KEK
Hey JM, good article to print. It’ll be even better when I can get some of these electronics, especially in the home security/surveillance area.
Two questions. First, what is the law about shooting down a drone over your house (assuming you live in the boonies with 40 acres) if it’s one of the under 250 grams unregistered ones?
Second, I’m not having much luck googling but I need an inexpensive remote control car like the RC amphibious car that you linked, but I need one with a camera so I can look under the house to see if the termites are building ladders yet and wondering if the raccoons have made a home in that cinder block section under the bathroom. Any links you can provide?
Also from Part 1, I’m interested in building some of the alternate energy chargers you mentioned, jury rigging my own versions of course. Until you mentioned cell phone plug-in chargers for cars, I hadn’t realized they had a transformer built in. (Note to self: don’t assume too much.) I always thought they were charged using 12 volts. Your article made me think…wait, that can’t be possible.
The biggest thing your Part 1 did for me was to remind me I really need to get on the ball when it comes to rechargeable batteries.
Thanks for the article, looking forward to Part 6.
I have to admit I don’t know what the law says about shooting a drone over your property but I suspect that if you do it that you will go to jail or at least face some kind of punishment. You don’t just shoot at things you don’t like and destroying private property is asking for trouble.
St. Funogas – If you search for ‘rc car camera’ or ‘remote control car with camera’ there are a bunch that show up. Amazon has a couple for around $50-$75, and places like AliExpress has dozens. It all depends on how much you want to spend and how long you’re wiling to wait to get it. One of my favorites for crawling around outside is the old Brookstone Rover tank, but the only place you can get those these days is used on eBay, and the app for it only supports Android OS versions prior to 9.0. You can find something similar on AliExpress.
The SCOTUS has determined that you own the airspace over your property to 83 feet should you chose to defend it. Do your own DD here but it was decided involving a farmer and his chickens that stopped laying, some dying in their futile attempt to flee, planes that dropped to 83 feet over his property in their landing approach. US vs
Causby 1946 https://supreme.justia.com/cases/federal/us/328/256/
Drones in particular make this all more complicated as discussed in the link below. The 83-500 feet range is FAA regulated for drones even though below the 500ft navigable airspace limit for regular flights. There are attempts to get drones over private property (deliveries, etc) below 83 feet but those should be contestable at least for now. Of course you need to do your own DD and see what state and local regs there may be as well.
https://www.criminaldefenselawyer.com/resources/when-a-drone-flies-over-my-house-is-it-trespassing.html
Please remember that shooting into the air is a very likely violation of Rule 4–if you mise, that round could come down anywhere.