
Hugh,
I would encourage B.M. to sue the contractor even if the contractor has nothing to his name right now. There is a statute of limitations and after the specified time elapses without filing a suit, B.M. is guaranteed to never collect a dime. Sue and get a judgment and then covertly monitor the guy every year or two for indications that he might have improved financially. Very few peoples’ financial situations remain the same forever and most improve to one degree or another. You never know what could happen. State laws vary widely so it is impossible for me to know what types of seizures or collection activity is permitted in B.M.’s state. In my state, if I had a judgment against a contractor and I knew he was working on a big job, I could swoop in at the last minute and force his customer to pay ME instead of him. This is one of many, many ways to collect on a judgment but again, it depends on state law. One thing is certain: If B.M. lets the deadline pass without filing suit then the contractor could win a million bucks in the lottery and there would be literally nothing B.M. could do to get his money back. – M.R.
- Ad Trekker Water Station 1Gal Per MinuteCall us if you have Questions 800-627-3809
- Ad Click Here --> Civil Defense ManualNOW BACK IN STOCK How to protect, you, your family, friends and neighborhood in coming times of civil unrest… and much more!
Economics and Investing:
PRECIOUS METALS INVESTORS: Are You Prepared For The Great Financial Enema?
o o o
Gold Prices: Correction Or Crash?
o o o
Fed Pays Banks $12 Billion on “Excess Reserves,” Taken from Taxpayer Pockets – H.L.
o o o
Christmas Fizzles: Retail Sales Except Autos, Gas, Fall Flat
o o o
SurvivalBlog and its editors are not paid investment counselors or advisers. Please see our Provisos page for details.
- Ad USA Berkey Water Filters - Start Drinking Purified Water Today!#1 Trusted Gravity Water Purification System! Start Drinking Purified Water now with a Berkey water filtration system. Find systems, replacement filters, parts and more here.
- Ad Survival RealtyFind your secure and sustainable home. The leading marketplace for rural, remote, and off-grid properties worldwide. Affordable ads. No commissions are charged!
Odds ‘n Sods:
You must delete your personal information from this scary site now! – DSV
HJL notes: it was fairly easy to remove my own information, but Mrs. Latimer took considerably longer. There were only two variations of my name and she had nearly 14 variations listed.
o o o
H7N2 news: City quarantines hundreds of cats amid bird flu outbreak – W.C.
o o o
America’s Least Populated Counties Listed by Population Density
o o o
Welcome To The Smallest Town in America… Population: 1 (YouTube video.)
o o o
Finding Fearless – Women Self Defense Training Series
- Ad California Legal Rifles & Pistols!WBT makes all popular rifles compliant for your restrictive state. Choose from a wide range of top brands made compliant for your state.
- Ad Civil Defense ManualClick Here --> The Civil Defense Manual... The A to Z of survival. Looks what's in it... https://civildefensemanual.com/whats-in-the-civil-defense-manual/
Hugh’s Quote of the Day:
“And the time drew nigh that Israel must die: and he called his son Joseph, and said unto him, If now I have found grace in thy sight, put, I pray thee, thy hand under my thigh, and deal kindly and truly with me; bury me not, I pray thee, in Egypt: but I will lie with my fathers, and thou shalt carry me out of Egypt, and bury me in their burying place. And he said, I will do as thou hast said. And he said, Swear unto me. And he sware unto him. And Israel bowed himself upon the bed’s head.” – Genesis 47:29-31 (KJV)
- Ad LifeSaver 20K JerryCan Water PurifierThe best water jerrycan you can buy on the market! Mention Survivalblog for a Free Filter ($130 Value)
- Ad Ready Made Resources, Trijicon Hunter Mk2$2000 off MSRP, Brand New in the case
Notes for Friday – January 13, 2017
This is the birthday of actor and shooter Robert Stack (1919 -2003.)
o o o
Today, we present another entry for Round 68 of the SurvivalBlog non-fiction writing contest. The nearly $15,000 worth of prizes for this round include:
First Prize:
- A $3000 gift certificate towards a Sol-Ark Solar Generator from Veteran owned Portable Solar LLC. The only EMP Hardened Solar Generator System available to the public.
- A Gunsite Academy Three Day Course Certificate that is good for any one, two, or three day course (a $1,195 value),
- A course certificate from onPoint Tactical for the prize winner’s choice of three-day civilian courses, excluding those restricted for military or government teams. Three day onPoint courses normally cost $795,
- DRD Tactical is providing a 5.56 NATO QD Billet upper with a hammer forged, chrome-lined barrel and a hard case to go with your own AR lower. It will allow any standard AR-type rifle to have a quick change barrel, which can be assembled in less than one minute without the use of any tools and a compact carry capability in a hard case or 3-day pack (an $1,100 value),
- Gun Mag Warehouse is providing 20 Magpul PMAG 30-rd Magazines (a value of $300) and a Gun Mag Warehouse T-Shirt; (an equivalent prize will be awarded for residents in states with magazine restrictions),
- Two cases of Mountain House freeze-dried assorted entrees in #10 cans, courtesy of Ready Made Resources (a $350 value),
- The Ark Institute is donating a non-GMO, non-hybrid vegetable seed package (enough for two families of four) plus seed storage materials, a CD-ROM of Geri Guidetti’s book “Build Your Ark! How to Prepare for Self Reliance in Uncertain Times”, and two bottles of Potassium Iodate (a $325 retail value),
- A $250 gift certificate good for any product from Sunflower Ammo,
- Two cases of Meals, Ready to Eat (MREs), courtesy of CampingSurvival.com (a $180 value).
Second Prize:
- A Tactical Self-Contained 2-Series Solar Power Generator system from Always Empowered. This compact starter power system is packaged in a wheeled O.D. green EMP-shielded Pelican hard case (a $2,400 value),
- A Glock form factor SIRT laser training pistol and a SIRT AR-15/M4 Laser Training Bolt, courtesy of Next Level Training, which have a combined retail value of $589,
- A gift certificate for any two or three-day class from Max Velocity Tactical (a $600 value),
- A transferable certificate for a two-day Ultimate Bug Out Course from Florida Firearms Training (a $400 value),
- A Trekker IV™ Four-Person Emergency Kit from Emergency Essentials (a $250 value),
- A $200 gift certificate good towards any books published by PrepperPress.com,
- A pre-selected assortment of military surplus gear from CJL Enterprize (a $300 value),
- An infrared sensor/imaging camouflage shelter from Snakebite Tactical in Eureka, Montana (A $350+ value),
- RepackBox is providing a $300 gift certificate to their site, and
- American Gunsmithing Institute (AGI) is providing a $300 certificate good towards any of their DVD training courses.
Third Prize:
- A Model 175 Series Solar Generator provided by Quantum Harvest LLC (a $439 value),
- A Royal Berkey water filter, courtesy of Directive 21 (a $275 value),
- A custom made Sage Grouse model utility/field knife from custom knife-maker Jon Kelly Designs, of Eureka, Montana,
- A large handmade clothes drying rack, a washboard, and a Homesteading for Beginners DVD, all courtesy of The Homestead Store, with a combined value of $206,
- Expanded sets of both washable feminine pads and liners, donated by Naturally Cozy (a $185 retail value),
- Two Super Survival Pack seed collections, a $150 value, courtesy of Seed for Security, LLC,
- Mayflower Trading is donating a $200 gift certificate for homesteading appliances,
- Montie Gear is donating a Y-Shot Slingshot and a $125 Montie gear Gift certificate.,
- Two 1,000-foot spools of full mil-spec U.S.-made 750 paracord (in-stock colors only) from www.TOUGHGRID.com (a $240 value), and
- Fifteen LifeStraws from SafeCastle (a $300 value).
- A $250 gift certificate to Tober’s Traditions, makers of all natural (organic if possible) personal care products, such as soap, tooth powder, deodorant, sunscreen, lotion, and more.
Round 68 ends on January 31st, so get busy writing and e-mail us your entry. Remember that there is a 1,500-word minimum, and that articles on practical “how to” skills for survival have an advantage in the judging.
- Ad Don't wait - get the ultimate US-made ultra-high performance US-made SIEGE Stoves and stunning hand-crafted SIEGE belts for Christmas. For stocking-stuffers see our amazing fire-starters. Gifts that can save lives. Big Sale!Every bespoke SIEGE buckle goes through an hours-long artisanal process resulting in a belt unlike anything else, with blazing fast performance and looks and comfort to match.
- Ad USA Berkey Water Filters - Start Drinking Purified Water Today!#1 Trusted Gravity Water Purification System! Start Drinking Purified Water now with a Berkey water filtration system. Find systems, replacement filters, parts and more here.
Propane as an Energy Source- Part 1, by JB
Propane, or liquefied petroleum gas (LPG), is an excellent energy source for several reasons. It stores easily and has a great shelf life. It’s portable and can be adapted for use in internal combustion engines. It can also be used as a refrigerant, and in some situations a viable weapon. Long after the grid goes kaput and gasoline has turned to varnish, propane will still be usable.
Basics of Propane
There are hundreds of thousands, if not millions, of full grill bottles stacked in exchange racks throughout the country. In addition, there’s a multitude of medium and high volume tanks scattered about where one can find propane. Super large tanks are used at industrial sites to supply large volumes of gas for manufacturing. Some municipalities use blended propane-air for large-scale distribution systems, which supply entire cities, and therefore require massive amounts of propane storage. With the right tools and the right knowledge, tapping into these resources in a TEOTWAWKI situation can be very advantageous.
To understand the true benefits of using propane, we must know a few basic fundamentals about it. As with any flammable, explosive gas, it is very dangerous and will kill you if you don’t treat it correctly and safely. It is equally or more dangerous than gasoline, and only those with knowledge and experience should handle any propane equipment.
Propane is an odorless, non-poisonous, asphyxiant gas and can contain some butane, propylene, and other compounds. In order to recognize this dangerous gas, ethyl mercaptan is added, giving it the pungent rotten egg smell. In a gaseous form, it has a specific gravity (density) of 1.52, which makes it heavier than air and creates a hazard. Any leaking or expelled propane gas will sink and accumulate on the ground and in low areas and poses a risk of fire or explosion. For this reason, never store propane indoors or in an enclosed space.
A gallon of liquid propane weighs approximately 4.2 pounds, which makes it lighter than water. Each gallon contains around 91,500 BTUs and will produce 36 cubic feet of gas, with each cubic foot of gas containing 2,516 BTUs. Liquid propane boils at -44 degrees Fahrenheit; therefore, it is classified as highly volatile, and liquid propane against the skin will freeze tissue immediately.
As propane boils into vapor, it will refrigerate as it absorbs latent heat from the container. You can see this effect on a grill bottle where frost or condensation has accumulated below the liquid line during use. This property also makes propane an effective refrigerant.
Propane has a higher BTU content per cubic foot than natural gas at 2516 compared to 1030. What this shows is that propane has twice the energy capacity per cubic foot than natural gas. This is also why there is a difference between natural gas and propane appliances. Neither gas will work with the other without some intervention. We’ll talk more about this later.
Storage Tanks and Transfer of Propane
Typical LP tank pressure can dwell anywhere between 100-200psi, depending on ambient temperature. The colder it gets, the lower the pressure. Straight tank pressure should never be used to operate anything unless you want to die in a huge, deadly fireball while incinerating everything around you. Typical home supply LP tanks use a regulator at the tank to reduce the pressure to 1 psi or lower to the home. Home LP appliances (and most grills) operate with pressures around 10 to 11 inches of water column or (WC). 1”WC= ~.036psi and is achieved by a secondary regulator on the appliance. Grill regulators reduce gas from tank pressure to burner pressure in one step. Very little pressure is needed for normal appliance combustion.
Liquid propane is stored in pressurized tanks, such as the small one-pound Coleman stove bottles*, 20-lb to 100-lb portable bottles, 500 gallon home tanks, or a 60,000 gallon industrial tank. For the most part, the 40- to 100-lb cylinders all use the same type of valve, but newer ones seem to be equipped with the OPD valve. Due to lack of proper training and people overfilling 20-lb grill bottles, a new OPD (overfill protection device) valve was mandated on all grill bottles. It closes the inlet via an internal float when the liquid level reaches its limit. They can be identified by “OPD” stamped into the valve knob. Older tanks will have the old valves with a bleeder port on the side of the valve head and do not have the external acme threads. These valves will not accept the newer grill regulators, as they require the external threads exclusively. All valve types are equipped with the standard left hand internal threads.
Generally home supply tanks range from 250 to 1500 gallons. They don’t have any means to refill portable tanks, and getting any liquid out requires special equipment. As with all LP tanks vapor head space is necessary, so they are only filled to a maximum of 80-85% liquid capacity. Home supply tanks can be either under or above ground.
The larger, industrial-sized tanks are typically used to supply delivery trucks, refill bottles, and/or supply an industrial plant requiring large amounts of fuel for furnaces or refining. They’re typically mounted above ground on concrete piers so that the bottom of the tank can be piped for liquid transfer with a common manifold.
Industrial systems are equipped with a bottle fill/transfer station where forklift or portable bottles can be refilled and this provides a means to fill the larger tanks via rail car or tanker truck. The fill station is similar to what you see near the tank at the local hardware store that refills your grill bottles. The fill station uses an electric pump to pump liquid from the bottom of the supply tank into the bottle. Industrial stations will have another pump to feed tanker liquid into the storage tanks.
I have a quick word on forklift tanks: They are 33-lb tanks specifically designed to supply liquid propane and must be properly mounted on the equipment to operate correctly. They do not have the same fittings seen on portable tanks and are not compatible with any LP home appliance, as they do not supply vapor. In addition, most vehicle applications use liquid propane exclusively.
The standard components of a tank fill station begin with a pump manifold assembly. It is typically connected to a valve on the bottom of the main tank(s) for liquid transfer. The manifold includes a liquid bypass line for when the fill line valve is closed, preventing the pump from dead-heading. Connected to the pump outlet is a wye-strainer then a hose assembly consisting of a ball valve, liquid unloading valve, quick connection adapter for Acme threads (forklift), and a tank fill adapter (fits the LH internal threads on the cylinder valve).
There are generally two methods to filling a non-OPD portable bottle– either by weight or volume. Since a 20-lb tank should only be filled to 85% max, you would stop at 4.2 gallons if metered and 17.8lbs if using a scale. (This weight does not include the tank weight.) A 40-lb cylinder will hold 34lbs of propane or 8.1 gallons and so on. Weight is the better method in that it accounts for any remaining liquid still in the tank once tank weight is taken into account.
If neither a scale or a meter is available, there is another method used to ensure you don’t overfill the tank. The same old way before OPD came along, and to me it’s more reliable than either of the above. On the side of the valve head, there is a small bleeder port requiring a flat head screwdriver or a small crescent wrench. The bleeder port is cracked open just enough to allow gas to vent out during filling. There is a small tube from the port extending down into the tank that ends at the proper liquid level. Liquid will begin to spew from the port once the proper level is reached, indicating the tank is full.
Please note, an overfilled tank is dangerous to use. It will expel liquid instead of gas and cause a fire hazard you want to avoid.
The process for filling a portable bottle begins with connecting the fill hose and adapter to the tank valve. This connection is a left-handed thread. Once secured, the bottle valve is fully opened and then the fill hose ball valve is opened. At this point, you will hear the flow of liquid entering the bottle. The fill station liquid pump is turned on to speed up the process, and the bleeder port is cracked opened if used. Note: The bottle will eventually fill without the assistance of the pump but will take much longer.
If it is an OPD valve tank, the flow into the tank will shut off and you’ll hear the pump strain a little as it starts bypassing. If you are filling a bleeder type valve, liquid will begin to discharge from the bleeder port forming large frosty accumulations. Both of these conditions indicate the tank is full.
- Ad STRATEGIC RELOCATION REALTYFOR SALE: Self-sustaining Rural Property situated meticulously in serene locales distant from densely populated sanctuary cities. Remember…HISTORY Favors the PREPARED!
- Add Your Link Here
Letter Re: Major Mistakes with a Building Contractor
Hugh,
Regarding the Major Mistake, B.M. needs to track that guy down and serve him a subpoena. Take him to court. People have tried to rip me off several times for tons less than that. I told them all if they don’t finish the job, pay their bill, or do it correctly, I will take them to court. Each time I wasn’t being overly picky or unreasonable. In each instance, the other party knew I was right. I was patient with all of them. I am sure those people have ripped other people off successfully before. I even emailed / called the customer service and manager several times in one case. Anyway, they all called my bluff. They all got sued. I won each time. I am not a lawyer. I am a retired LEO. Being an LEO has nothing to do with it. Don’t take this laying down. Post this! Tell the dude to get mad. Go to the court house in the venue where this occurred. Fill out a few forms, after asking for some assistance in where to start. Don’t hire an attorney; you already have enough money problems. Get this documented and on paper. If the contractor has no money, let him prove it. If the contractor has no money, that’s his problem; he can still work, right? Is he working and making money elsewhere? After finding him, go check out if he has a new 4×4 in the driveway and other high dollar assets. This is just to get a snap shot of the contractors’ reality. Put a lien on his assets via the same court system. Nobody is going to fix this except you.
Taking the next step. Many states have funds for homeowners where contractors have ripped people off. The contractor either didn’t do something by code, took the money and ran, or other. Often times the state will do their investigation and help you out financially. You can survive this and come out looking pretty good if you try. Don’t go straight to the state for a hand out. I suggest doing both at the same time. Find this contractor. Identify if he has changed his business name say four or five times after claiming bankruptcy only to rip the next guy off and change his business name yet again. His business name is most likely in a county or city database. His real name is in there somewhere. Find out how many business names he’s operated under for say the last ten years. Most of this that I’m suggesting can be done in one day. After doing the above, you will have more information to work with. I would then find the local law enforcement authority in the area. Go to see a detective face to face. Tell him your situation. He’ll ask you what you want from him. Ask him if there is anything LE can advise that might help you out. Like what? Were there any LE contacts with this guy say in the last 24 months? Anything the detective can share that would be helpful will be appreciated. Follow your gut and get busy. If you had the backbone to buy a property in a rural area and take on the challenge of being “more” off grid, you have what it takes to see this through and come out pretty good considering. Good luck. – Pete
Economics and Investing:
Investors Bolt Mexico as Peso Enters Free Fall – G.P.
o o o
The Fed Needs Competition, Not Rules
o o o
Gold Holding $1,200 As Weekly Jobless Claims Rise By 10K
o o o
o o o
SurvivalBlog and its editors are not paid investment counselors or advisers. Please see our Provisos page for details.
Odds ‘n Sods:
Japan researchers warn of fingerprint theft from ‘peace’ sign – DSV
o o o
These Are The Top Global Risks For 2017 According To The World Economic Forum – H.L.
o o o
Police Support Gun Rights over Gun Control by 3 to 1 Margin – D.B.
o o o
Verizon threatens to cut off your service if you don’t change your plan – DSV
Hugh’s Quote of the Day:
“Where is it written in the Constitution, in what section or clause is it contained, that you may take children from their parents and parents from their children, and compel them to fight the battle in any war in which the folly or the wickedness of government may engage it?” – Daniel Webster
Notes for Thursday – January 12, 2017
On January 12, 1888, the “Schoolchildren’s Blizzard” killed 235 people, many of whom were children on their way home from school across the Northwest Plains region of the United States. The storm came with no warning, and some accounts say that the temperature fell nearly 100 degrees in just 24 hours. There were many instances of teachers keeping or rescuing children who would have been caught in the storm while walking home.
o o o
Today, we present another entry for Round 68 of the SurvivalBlog non-fiction writing contest. The nearly $15,000 worth of prizes for this round include:
First Prize:
- A $3000 gift certificate towards a Sol-Ark Solar Generator from Veteran owned Portable Solar LLC. The only EMP Hardened Solar Generator System available to the public.
- A Gunsite Academy Three Day Course Certificate that is good for any one, two, or three day course (a $1,195 value),
- A course certificate from onPoint Tactical for the prize winner’s choice of three-day civilian courses, excluding those restricted for military or government teams. Three day onPoint courses normally cost $795,
- DRD Tactical is providing a 5.56 NATO QD Billet upper with a hammer forged, chrome-lined barrel and a hard case to go with your own AR lower. It will allow any standard AR-type rifle to have a quick change barrel, which can be assembled in less than one minute without the use of any tools and a compact carry capability in a hard case or 3-day pack (an $1,100 value),
- Gun Mag Warehouse is providing 20 Magpul PMAG 30-rd Magazines (a value of $300) and a Gun Mag Warehouse T-Shirt; (an equivalent prize will be awarded for residents in states with magazine restrictions),
- Two cases of Mountain House freeze-dried assorted entrees in #10 cans, courtesy of Ready Made Resources (a $350 value),
- The Ark Institute is donating a non-GMO, non-hybrid vegetable seed package (enough for two families of four) plus seed storage materials, a CD-ROM of Geri Guidetti’s book “Build Your Ark! How to Prepare for Self Reliance in Uncertain Times”, and two bottles of Potassium Iodate (a $325 retail value),
- A $250 gift certificate good for any product from Sunflower Ammo,
- Two cases of Meals, Ready to Eat (MREs), courtesy of CampingSurvival.com (a $180 value).
Second Prize:
- A Tactical Self-Contained 2-Series Solar Power Generator system from Always Empowered. This compact starter power system is packaged in a wheeled O.D. green EMP-shielded Pelican hard case (a $2,400 value),
- A Glock form factor SIRT laser training pistol and a SIRT AR-15/M4 Laser Training Bolt, courtesy of Next Level Training, which have a combined retail value of $589,
- A gift certificate for any two or three-day class from Max Velocity Tactical (a $600 value),
- A transferable certificate for a two-day Ultimate Bug Out Course from Florida Firearms Training (a $400 value),
- A Trekker IV™ Four-Person Emergency Kit from Emergency Essentials (a $250 value),
- A $200 gift certificate good towards any books published by PrepperPress.com,
- A pre-selected assortment of military surplus gear from CJL Enterprize (a $300 value),
- An infrared sensor/imaging camouflage shelter from Snakebite Tactical in Eureka, Montana (A $350+ value),
- RepackBox is providing a $300 gift certificate to their site, and
- American Gunsmithing Institute (AGI) is providing a $300 certificate good towards any of their DVD training courses.
Third Prize:
- A Model 175 Series Solar Generator provided by Quantum Harvest LLC (a $439 value),
- A Royal Berkey water filter, courtesy of Directive 21 (a $275 value),
- A custom made Sage Grouse model utility/field knife from custom knife-maker Jon Kelly Designs, of Eureka, Montana,
- A large handmade clothes drying rack, a washboard, and a Homesteading for Beginners DVD, all courtesy of The Homestead Store, with a combined value of $206,
- Expanded sets of both washable feminine pads and liners, donated by Naturally Cozy (a $185 retail value),
- Two Super Survival Pack seed collections, a $150 value, courtesy of Seed for Security, LLC,
- Mayflower Trading is donating a $200 gift certificate for homesteading appliances,
- Montie Gear is donating a Y-Shot Slingshot and a $125 Montie gear Gift certificate.,
- Two 1,000-foot spools of full mil-spec U.S.-made 750 paracord (in-stock colors only) from www.TOUGHGRID.com (a $240 value), and
- Fifteen LifeStraws from SafeCastle (a $300 value).
- A $250 gift certificate to Tober’s Traditions, makers of all natural (organic if possible) personal care products, such as soap, tooth powder, deodorant, sunscreen, lotion, and more.
Round 68 ends on January 31st, so get busy writing and e-mail us your entry. Remember that there is a 1,500-word minimum, and that articles on practical “how to” skills for survival have an advantage in the judging.
Leatherworking for the Beginner, by R.S.
Leather has been used for millennia as a durable resource for clothing, shelter, armor, and more. If you pay attention, there is an abundance of leather all around you. It’s on furniture and baseball fields, in cars, and on garment racks. If you found yourself in a post-collapse situation, leather is a readily available scavenge resource. If you know how to work with it and have a few simple tools and supplies, you have the solution to countless problems. Later I’ll explain some basics. My journey with leather began a few years ago.
I was attending a homeschool conference and saw a beautiful leather backpack. It was extremely durable, functional, and handsome to look at. It had been constructed to minimize points of failure and last a lifetime. Zippers, for example, were eschewed in favor of buckles, as zippers are typically the first thing to fail on a bag or garment.
I immediately began my online search for this glorious bag only to find that it retailed for $695. Knowing my wife would have an aneurysm if I paid that much for a bag, my dream of carrying this pack died a little that day. A few weeks passed, but I couldn’t shake the thought of the bag. I began to wonder if I could possibly make a backpack. Never mind that my leather-working had been confined to Boy Scout camp 30 years earlier and a failed attempt to make a pair of sandals, I knew I had to try.
Several months earlier I had bought a shoulder of vegetable tanned leather in at attempt at making a pair of sandals. While that effort ended in failure, I was undeterred at a much more difficult undertaking in this backpack project. I began in the same way all beginners since the beginning of time have begun, on Youtube. Several hours later, I was ready to head to my local leather supply store– Tandy Leather.
If you’ve ever taken up a hobbyist endeavor, you likely had the same experience I did as I walked into Tandy that first time. I asked very dumb questions, and they treated me like the idiot I was. But I got my supplies and headed home to begin the first of many leather projects.
I started with the smallest project I could think of, card wallets. These simple creations are literally one piece of leather folded in half and stitched on each side. Simple as it may seem, my first attempts were in hindsight Frankenstein-like. I had yet to realize the importance of patterns, stitch techniques, and overall finishing details. Nevertheless, I was proud of those first pieces. I had created something!
By trade, I’m a sales person. I sit at a desk, write emails, and talk on the phone all day. I don’t work with my hands, and there’s no lasting evidence of my trade. So it was monumentally satisfying to create something functional and lasting.
I started creating larger pieces, like notebook covers and Field Notes holders. Then I made my first shoulder bag. I’ll admit that it was a thrill when people noticed it. Looking back, however, I’m amazed that anyone even mentioned it. My skills were so limited that it was still very amateurish looking. It was those comments though that led me to a revelation, the vast majority of people are overwhelmed at the prospect of learning a trade like leather working. And yet, with less than one week’s worth of self-led training, I was able to make basic goods.
At this point, I decided I was ready to tackle the bag. I’d spent hours researching construction and planning the design. I read online forums and watched more videos and went back to Tandy to buy the hide I would use. I asked them more questions, and they still looked at me like I was an idiot. Undeterred, I began.
I spent every free minute for weeks working on my bag. I worked slowly (mainly because I was slow) to minimize error. I lined it with pigskin and melted down when I made a mistake. After nearly 40 working hours, I completed my bag. It was an amazing feeling. Everywhere I went people commented on it and asked where I bought it. Even now, I carry that bag every day to work. The bag I didn’t want to spend $695 on probably ended up costing me about four times that to make myself when considering time and materials, but I’d learned a trade.
Now I run my own small leather-working business selling duffle bags, tote bags, wallets, belts, and other assorted custom leather goods. It will likely always be a side project for me, which is fine. I don’t do it for the money. Now I know that if I need to make something, I have the basic skills necessary to do so by hand without electricity. Here’s the best part– so can you!
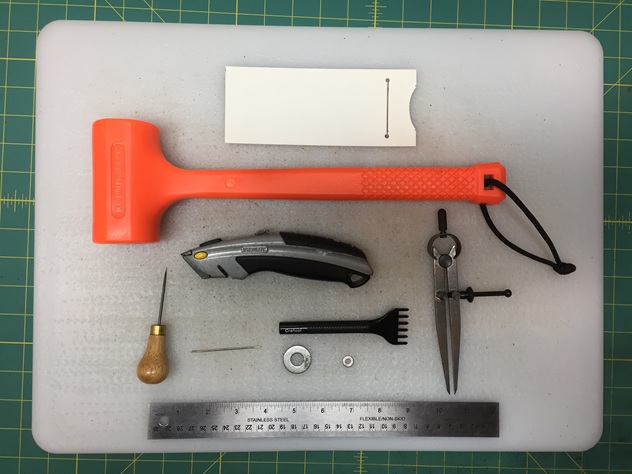
There are really only a few basic tools that are needed for simple leather projects. Several of these are likely already lying around any modestly appointed garage.
First, the tools you likely have:
- Rubber mallet or dead blow hammer (do not use a standard hammer, as it will damage your punches)
- Utility knife
- Lighter – for melting the ends of your stitch
- A few small-to-mid-sized washers – handy for cutting rounded corners
- Awl – used for marking your cutting lines and punching through a hole that’s too small
- Plastic kitchen cutting board – when you punch through the leather it’ll save your tools to punch into this board
- Ruler – preferably flat, metal
Leather-working-specific tools you’ll need to buy:
- Diamond punches
- Needles
- Cutting mat – These can be bought at a sewing shop or Wal-Mart. While not required, it’ll save your table top and extend the life of your cutting blades, not to mention prove a handy measuring tool.
- Wing Divider
Materials:
- Waxed poly cord – I use the waxed cord from Maine Thread Company. It is made in the U.S.A and great quality. I prefer a .030” diameter cord.
- Leather hides – I could write a series of articles on this topic alone. Let’s assume that you won’t be dyeing your leather at this point. Considering we’re talking about a survival situation, you’d be re-purposing whatever you can find. My advice is to make life easy on yourself and find a hide that’s already tanned at the thickness for your desired project. Get creative as your skillset grows.
- Poster board – Buy good, thick stock for making your patterns. Leather moves when you work with it, so you’ll definitely want to make patterns of the pieces you’ll be cutting out.
Depending on your project, there could be a much longer tool and material lists. Things like rivets, buckles, snaps, and d-rings could be on this list. Let’s start small, shall we?
The Project
Now that you have your materials, you are ready to begin. For the purposes of this article, we will begin where I began– with a card wallet.
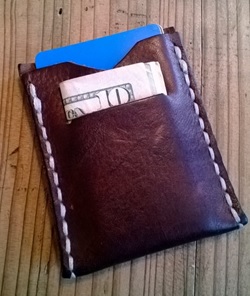
This is one of the first card wallets that I made. As you can see, it’s a very simple straight-forward design.
- Make your pattern
Measure out and mark the following dimensions on your poster board: 2 3/4” x 6 3/4”. The slit should be 2 1/8” wide.
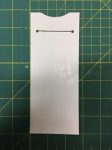
Use your utility knife and the edge of your metal ruler to cut out the pattern. Be as exact as possible. This will help immensely later in the process. Cut the slit open at this point as well.
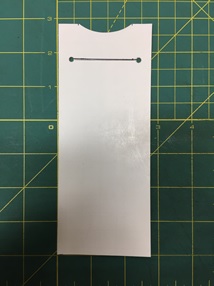
- Mark your pattern on the hide
Lay your pattern on the finished side of the hide. I like to use a paperweight to hold the pattern in place so it doesn’t slip while tracing it. Use the awl to trace the outside of the pattern and the slit.
- Cutting the leather
Using your metal ruler as a guide, cut along the lines you marked on the finished side of the hide, being careful to keep your knife upright and the ruler still throughout the process.
This is a stressful part of the process when you’re just beginning. You’ve probably paid a decent amount for your hide and don’t want to mess up. Have no fear; we’re starting with a small project and you can’t mess it up that badly.
Now take one of your small washers and align it flush to the edges of the top right corner. Use your utility knife to trim off the edge using the washer as a guide. This should result in a nice, rounded corner. Repeat for each of the four corners.
- Marking your stitch lines
Set your Divider Wing to a width of 1/8”. You’ll notice that one of the tines on the tool is slightly longer than the other. Place the shorter tine on the leather and use the longer tine as a guide along the outside edge of the length of the hide. This allows you to mark a straight line a consistent width from the side of the piece. Do this on Side A and Side B.
- Punch stitching holes
Using your diamond punch, align the first tine of the punch just off the top of side A. The first tine won’t actually punch through the leather, if you do it correctly. This simply allows you to get a consistent alignment of the holes on each side. Line the remaining tines up along the line you just marked in step 4.
Use your mallet to hammer the punch through the leather into the cutting board. (Pro-tip: Do not do this into a table top or your cutting mat. It’ll ruin the table and is very hard on your punches over time.)
After punching through the leather, place your finger lengthwise along the face of the punch and hold the leather down while you extract the punch with your other hand. This will help keep the leather from stretching out as you remove the punch.
Now put the first tine of the punch in the last hole on the piece and hammer the next set of holes. Do this until you have a row of holes along the length of side A. Once that’s complete, do the same on side B.
- Fold and stitch
Now, fold your piece in half so the holes are aligned. To measure the amount of thread you’ll need, pull off a piece that is roughly 4” longer than the length of the folded piece and then double that length. You can cut two pieces to that length, as you’ll need the second piece for side B.
Thread your waxed cord through your stitching needle. We’ll be using what is called a saddle stitch. A saddle stitch is essentially a running stitch that is stitched in each direction. It’s especially durable, as you’re basically stitching the piece twice. This ensures that if one stitch breaks, the other will still be intact.
Start at the bottom where the piece is folded and push your needle and waxed cord through (yes, it may be difficult; yes, your hand will hurt if you stitch long enough!). Leave about two inches out of the end of the initial hole. Now, with your needle, go up to the next hole and back through. Weave your way to the top of the piece and then back down to where you started. Your stitch should look like the picture of the card wallet shown above.
Now you should have one end of the waxed cord point one way out of the initial hole and the other end with the needle pointing the other way. Take the needle and stitch back up one hole so your threads are both pointing the same direction, one hole above the other. Take your needle and thread it under the stitching to the immediate north (up) from where it is. Push the needle all the way through, which should create a small loop. Put the needle back through the loop and pull it tight. This will knot the thread.
Remove the needle and re-thread the other end of the waxed cord and knot that one in the same manner.
Now trim the loose ends to about 1/8”, and use the lighter to singe them down to nothing.
Voila, you have a card wallet!
With these simple skills and tools, you have the foundation you need to start creating (or surviving) using leather craft.
Letter: Major Mistakes with a Building Contractor
Hi,
I purchased 150 acres in my chosen location and intended to have a cabin built on it with a well and septic system. I found a contractor who said he would complete a well, septic, and “dried in cabin” for me. He was making good progress and completed about 60% of the work and then just stopped working on it. He has been at it for over four years, and the wood framing is getting very old. Anyway, this was the first time I’ve ever hired a contractor to build something for me, and like a moron I gave him the final payment (over $110,000 in total) about two years ago. I now have four walls, 1/4 roof with tar paper, and a septic tank.
I am told suing him wouldn’t get me anything, since he is completely broke. I dumped much of my retirement into this and am slowly saving up again. Do you have any advise for me? I feel like such an idiot. – B.M.
HJL’s Comment: Sadly, you have now learned a lesson from the school of hard knocks that countless others have learned. It’s not necessarily that your contractor set out to defraud you either (though the industry is rife with charlatans). Many simply underbid the project, can’t pay the necessary bills, and start the dangerous practice of using your money to pay for another project’s bills. Like any “borrowing from Peter to pay Paul” situation, it usually catches up to them and they can’t continue, leaving the last few customers holding the bag. I’m skeptical of your contractor’s skills and knowledge, because two years is a very long time for a build. Six to nine months is more typical, and a well prepared contractor can move the project along in as little as four months.
In the future, here are a couple of things you can do:
- Make sure your contractor is licensed and bonded. While I dislike the idea of the government telling me what I can and can’t build or who I can hire, those are two things that go a long ways towards alleviating the issue. Many laborers believe that since they have the skill and knowledge to build a house that they can be a contractor, but running a business is something at a whole other level. All the building skill in the world won’t teach you good business practices. Those who make the effort to be licensed and bonded are at least trying.
- YouTube is your friend. There are videos on every aspect of building a home. When your contractor tells you he is doing something or describes a process to you, look it up on YouTube and see if it is standard practice.
- Always pay your contractor in segments and never release a payment until the agreed upon work for that particular segment is complete. The final payment should be up to 1/3 of the price of the project and should never be released until the project has your final inspection and approval. You will probably hear all manner of sad stories about why you should release a payment early, but if you do, you lose your leverage, especially that final payment.
- Do your due diligence on the contractor before signing a contract with him. Ask for references and projects that you can view in person. Simple background checks for criminal history are easy and inexpensive. In retrospect, the cost is well worth it when you consider how much you’ve lost. Depending on your location, you may be able to ask the county/city/state inspector for an opinion.
- As much as it pains me to say it, be careful about friends, family, and even fellow church members when it comes to building contracts. I’ve seen many relationships destroyed over the parties inability to separate business from personal. It would seem that those who are closest to you just expect you to release them from any responsibility when the going gets tough. I’m not suggesting that you avoid those contacts, but make sure the other person understands that it is a business contract. You should understand that saying “no” to making an early payment for these people is extra difficult and most will expect you to bend.
Economics and Investing:
Three former London-based traders face US charges over currency rigging – G.G.
o o o
Lincoln Cent Roll Searching: What I Found in a $25 Box of Pennies – DSV
o o o
The “Curse” of Labor-Saving Machinery Is Nothing New
o o o
o o o
SurvivalBlog and its editors are not paid investment counselors or advisers. Please see our Provisos page for details.
Odds ‘n Sods:
Land of the Free: Michigan man issued parking ticket in his own driveway
o o o
Airport Shooter Converted to Islam, Identified as Aashiq Hammad Years Before Joining Army – W.C.
o o o
US-Funded White Helmets Exposed in Al-Qaeda Plot that Poisoned Water of 5 Million Syrians. It is bad enough they contaminated the water supply, but they control the area so no one can go there and fix it. Same with electricity. Civilization is easy to destroy and easy to keep from being rebuilt if you are dependent on it. – T.Z.
o o o
Finally! The US Air Force has embraced reality — the A-10 is here to stay ‘indefinitely’ – T.P.
o o o
And we wonder what is wrong with our churches today? Koran Verse Denying Jesus Was Son Of God Sung in Scottish Cathedral – D.S.