
We are debuting a new weekly column today. “Security for Survival” will profile some modern technology for your bug-in/bug-out location to help with the strain of retreat security. Video surveillance, perimeter security, and communications will be the main focus, with reviews of newer products and a DIY approach. Let us know what you think.
- Ad USA Berkey Water Filters - Start Drinking Purified Water Today!#1 Trusted Gravity Water Purification System! Start Drinking Purified Water now with a Berkey water filtration system. Find systems, replacement filters, parts and more here.
- Ad Civil Defense ManualClick Here --> The Civil Defense Manual... The A to Z of survival. Looks what's in it... https://civildefensemanual.com/whats-in-the-civil-defense-manual/
Security for Survival
Shielded Ethernet Connectors
When connecting devices to your security system, there are two basic methods used: wired and wireless. In a later article, I will cover the advantages and disadvantages of both systems and when they are appropriate to use. However, the idea for this first installment was created as I had to repair some Ethernet cabling at a customer’s residence. The customer was familiar with Ethernet connectors and had cobbled together a connector when he moved his computer system to another area of the residence. He had lost a wifi radio to a lightning storm when he shouldn’t have, and we discovered the root of the problem was the connector he installed on the cabling.
EMP is a huge concern anytime you are dealing with electronic hardware, and there are some steps that you can take to minimize the risk of your equipment. Everyone knows about installing a quality surge protector for equipment that must be live, storing unused equipment in a Faraday cage, and implementing other such preps, but few seem to realize that the data cable connecting their computer or security system is just as critical. Long wires attached to your computer represent the greatest danger, as they act as antennae to pick up the magnetic energy from an EMP pulse, whether generated by a nuclear, solar, or lightning event, and they turn it into electrical pulses that damage sensitive electronics.
One of the easiest and best methods of protection is to simply provide a better, alternative path to ground for the electrical impulse. Shielded cabling and grounded connectors achieve just such a result. There are many types of shielded Ethernet cabling; the two that we currently use– Ubiquity’s Tough Cable Pro and Tough Cable Carrier– are among the best. We also use Ubiquity’s Tough Cable RJ45 connectors, though you can use any grounded RJ-45 connector. The tools required for these connectors are simple but specialized. Figure 1 
Both cables that we use are rated “5e”, but the carrier cable is much tougher. 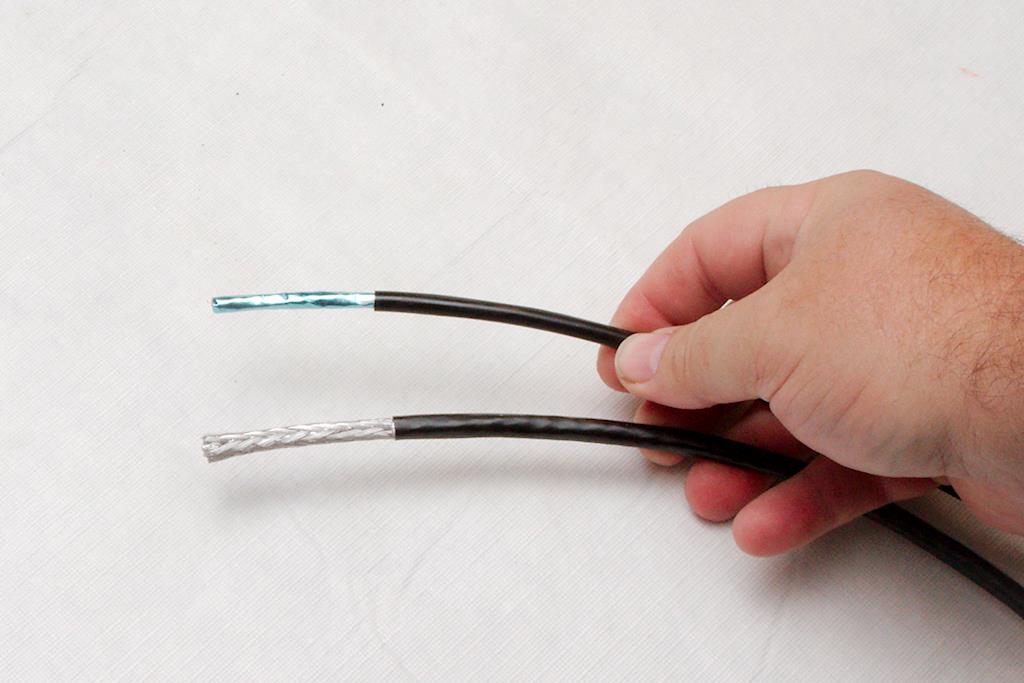
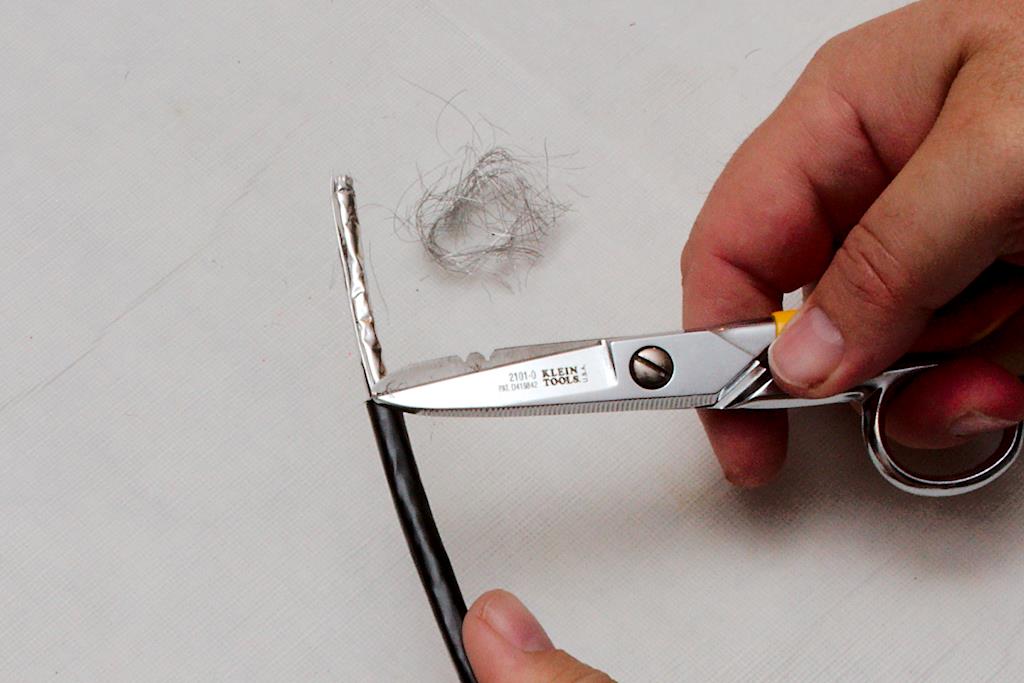
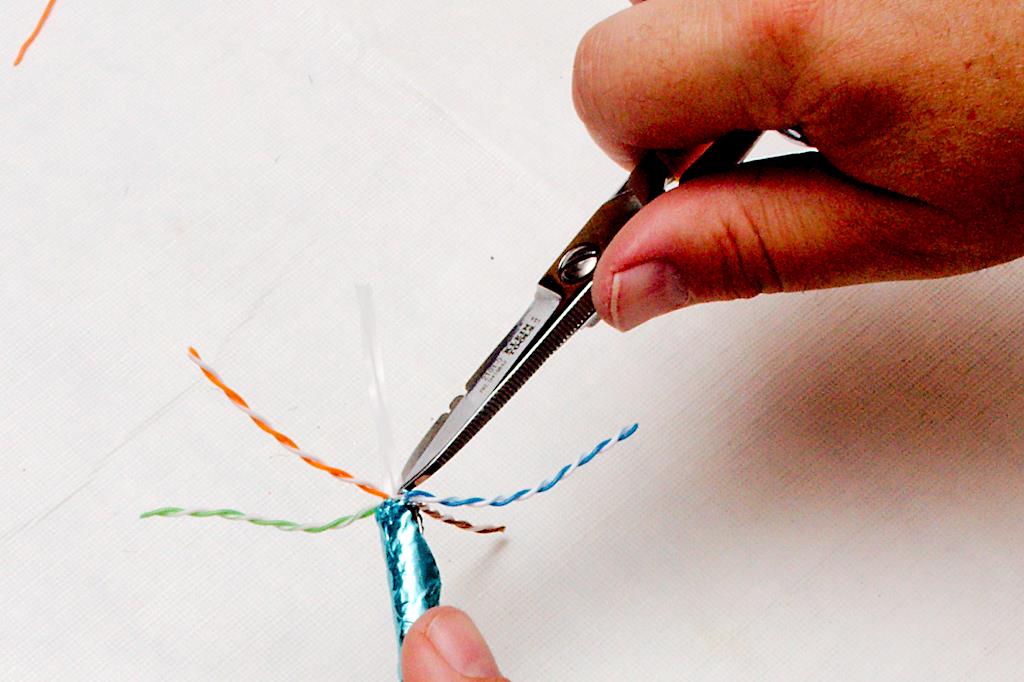
To start, you have to strip the jacket off of the cable. The amount that you strip will be based on your comfort level. 

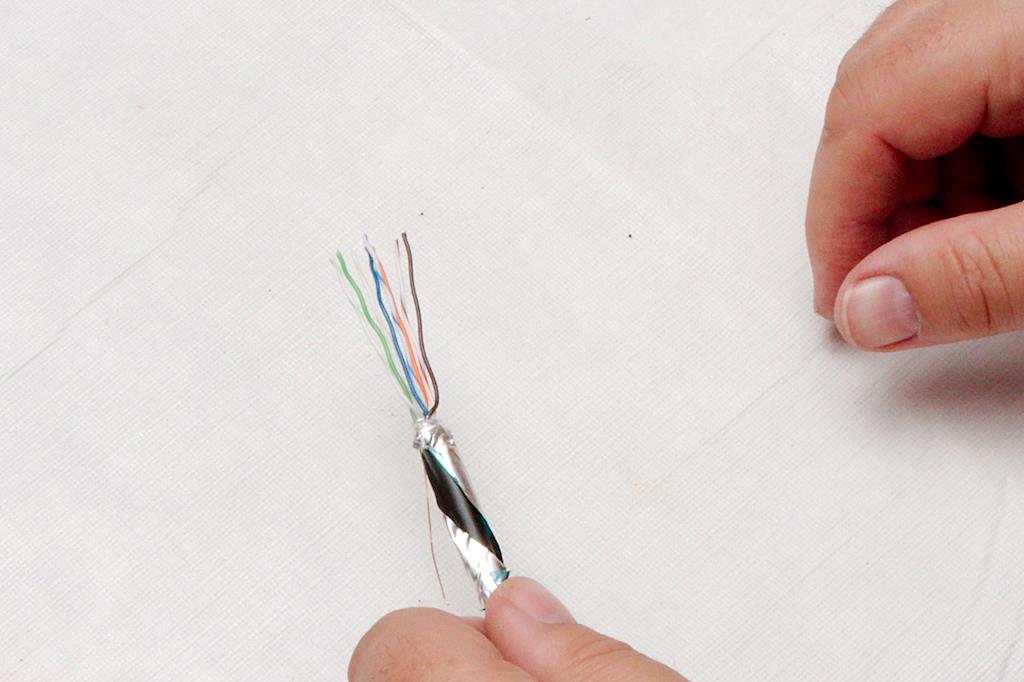
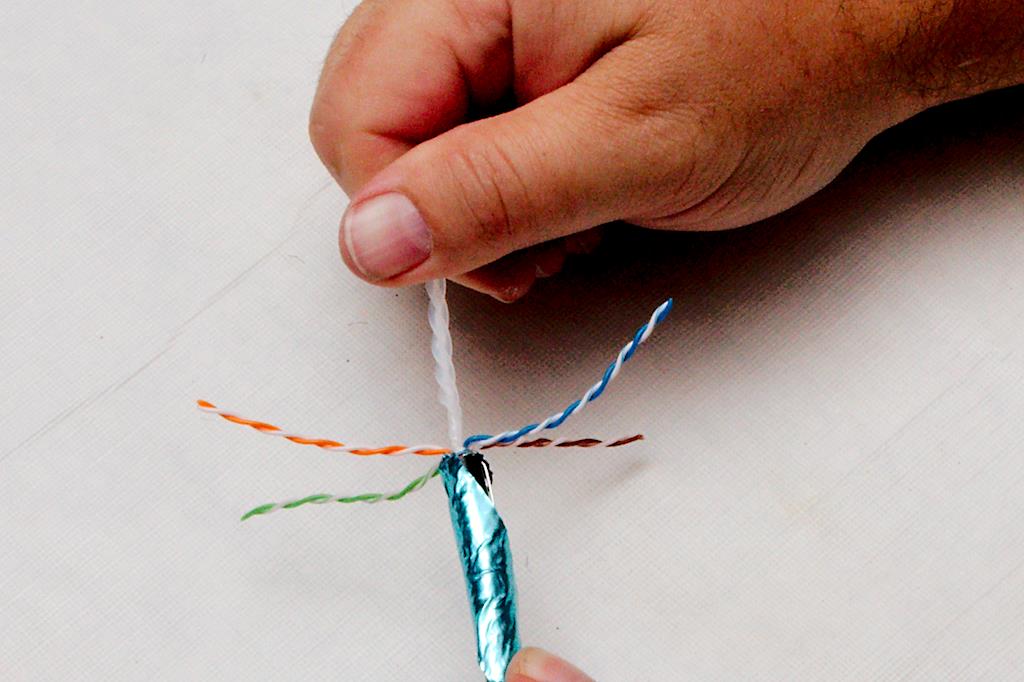
If using the “Pro” cable, you must carefully unwrap the foil ground. This foil is wrapped in a spiral around the cable, and one side will be easy to unwrap, but the other will not be easy, as the foil is tucked under itself. 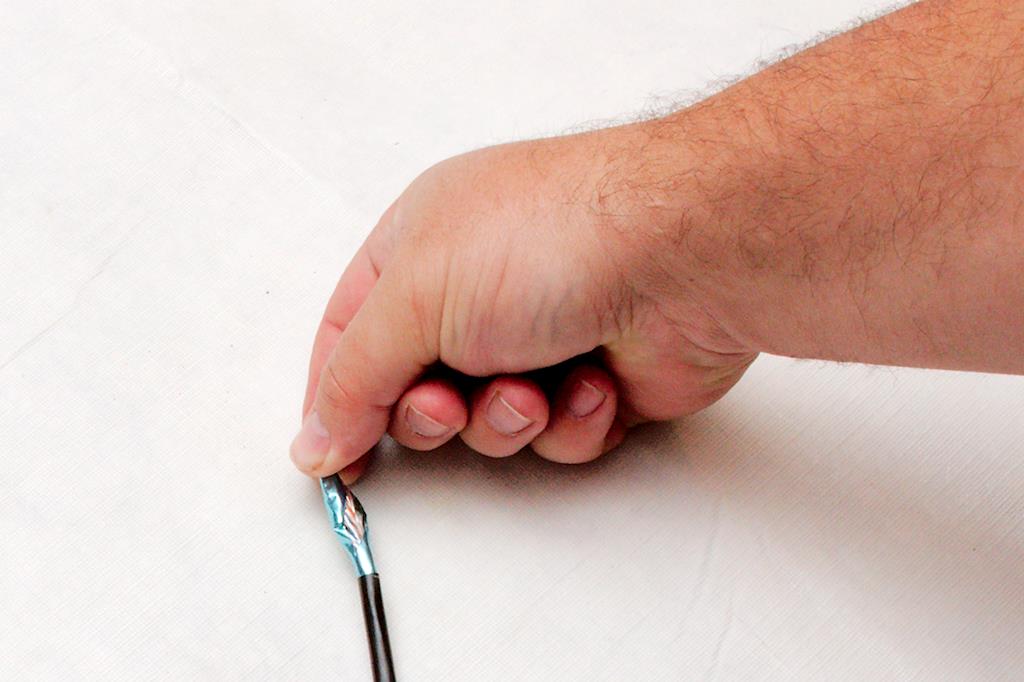


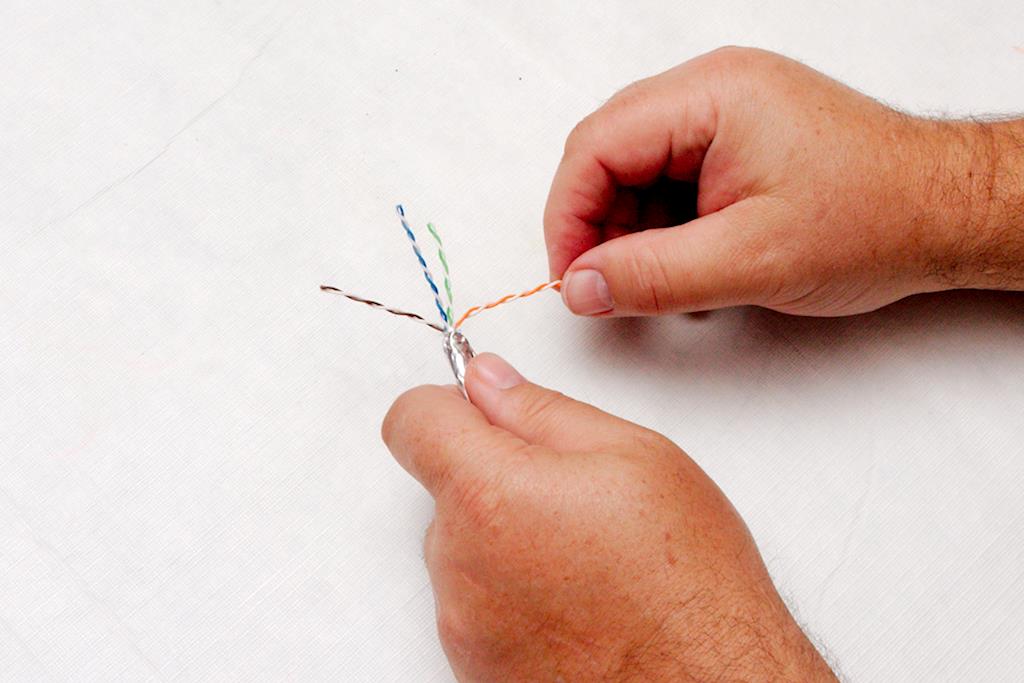
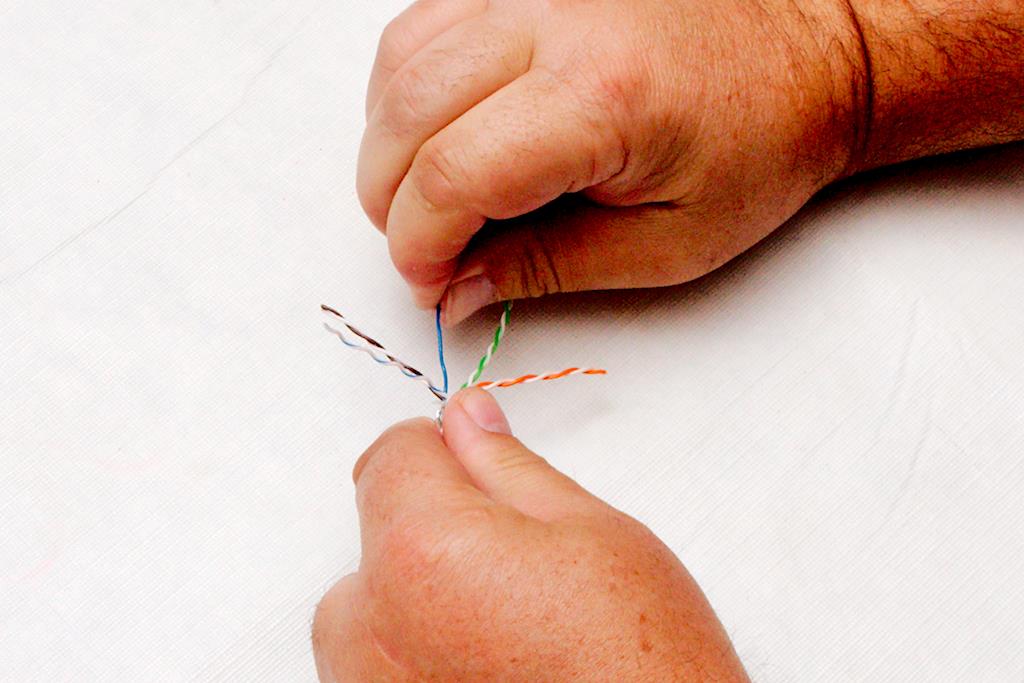
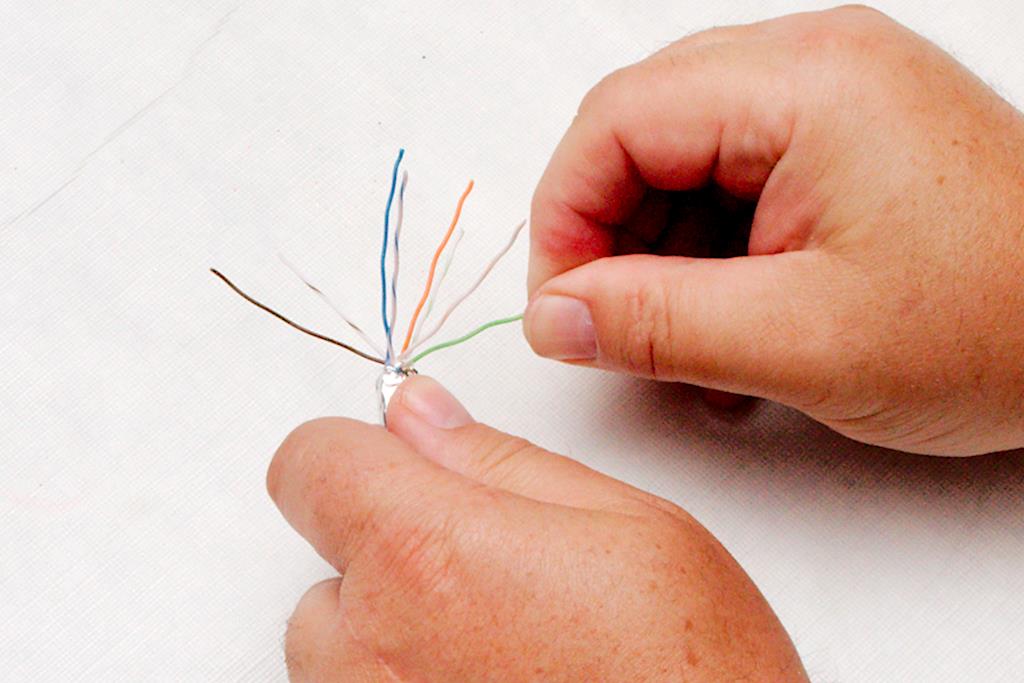
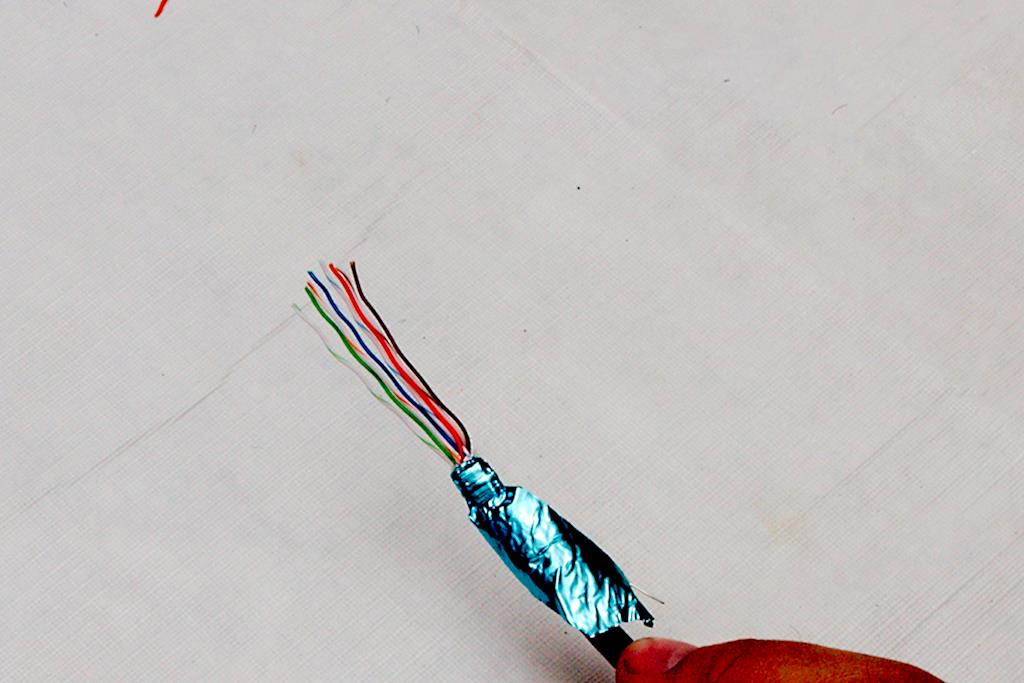
Now, while pinching the wires (at the point where the wires exit the jacket) between the forefinger and thumb of your left hand (for us “righties”), begin to line the colors up. 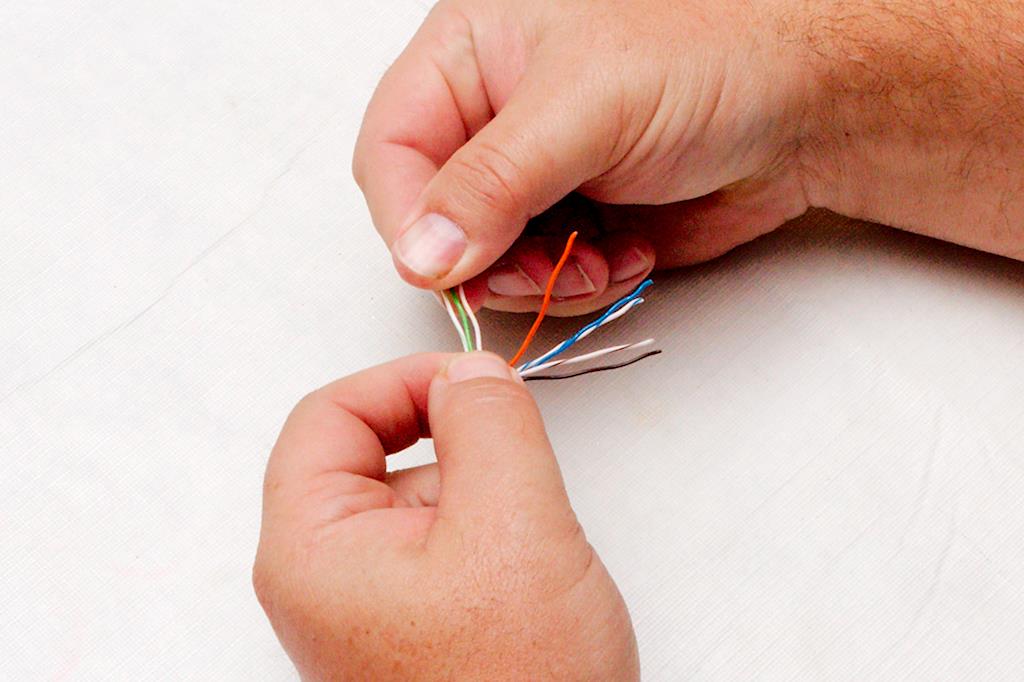

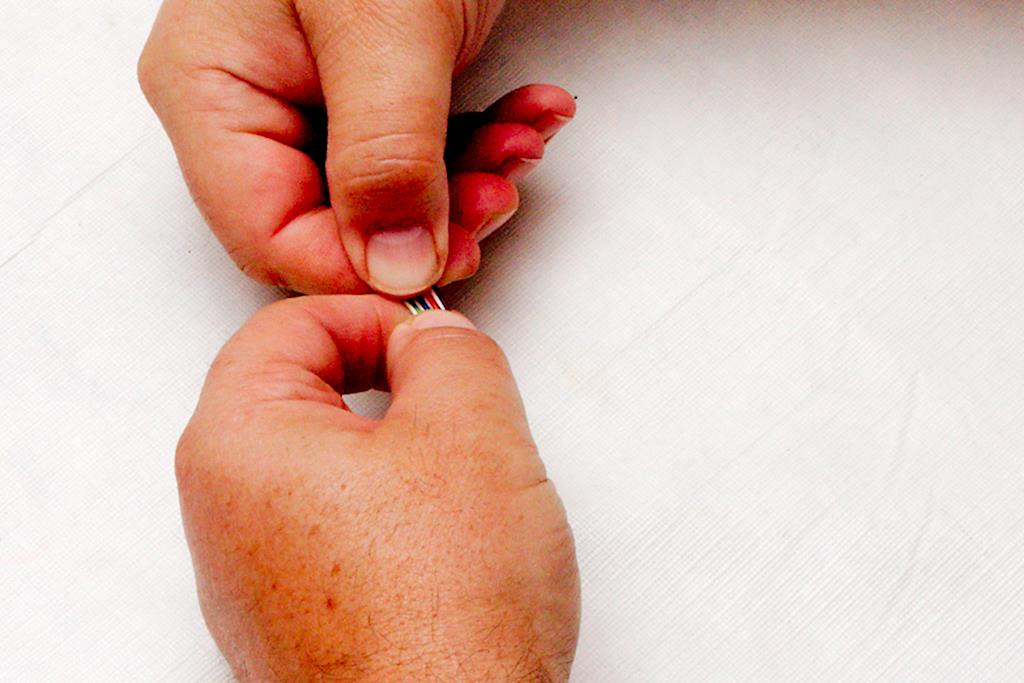

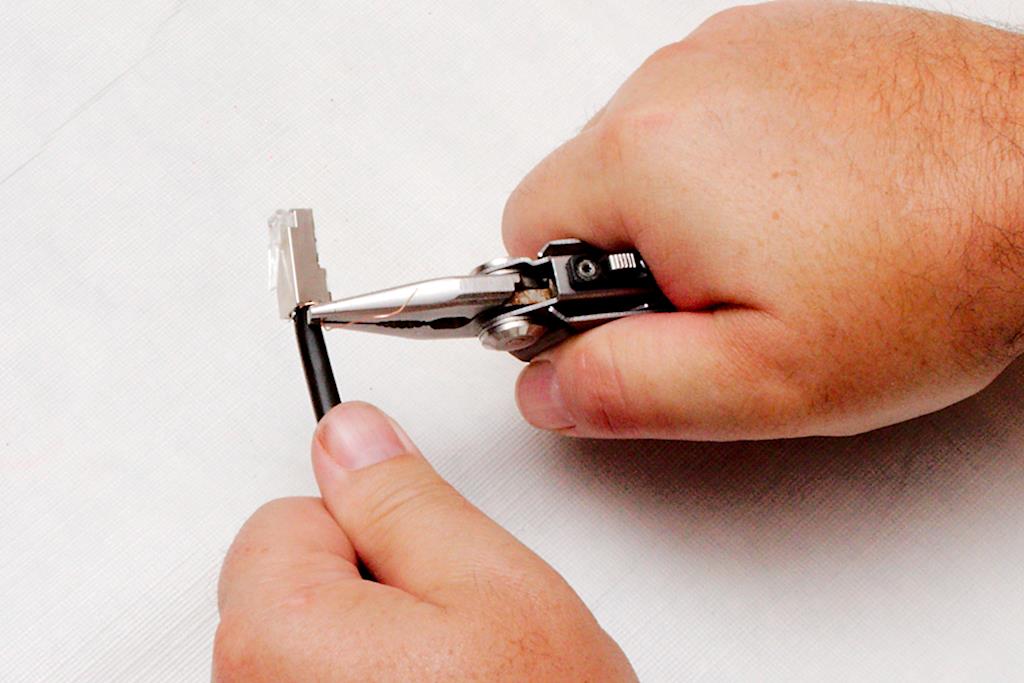
Finally, use the cutting edge of the crimpers to cut the wires to the correct length 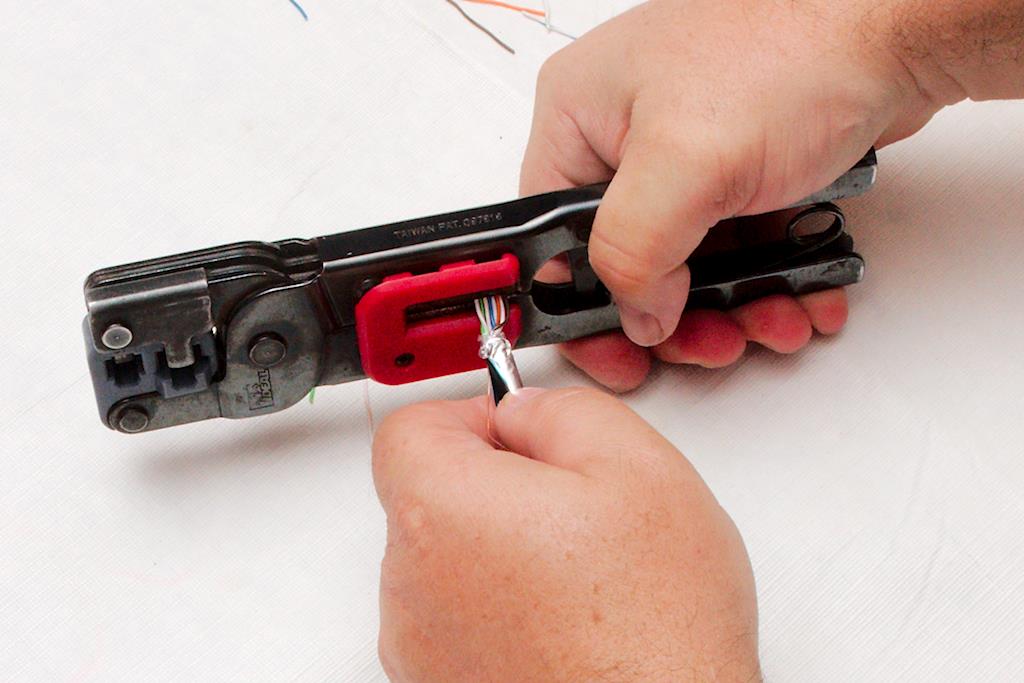
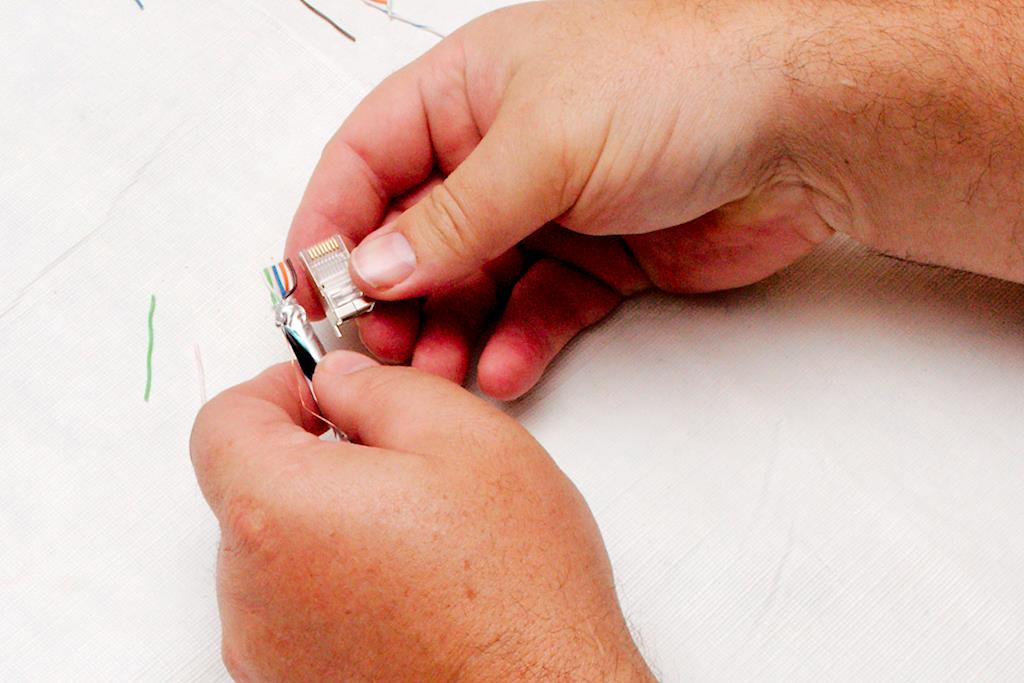


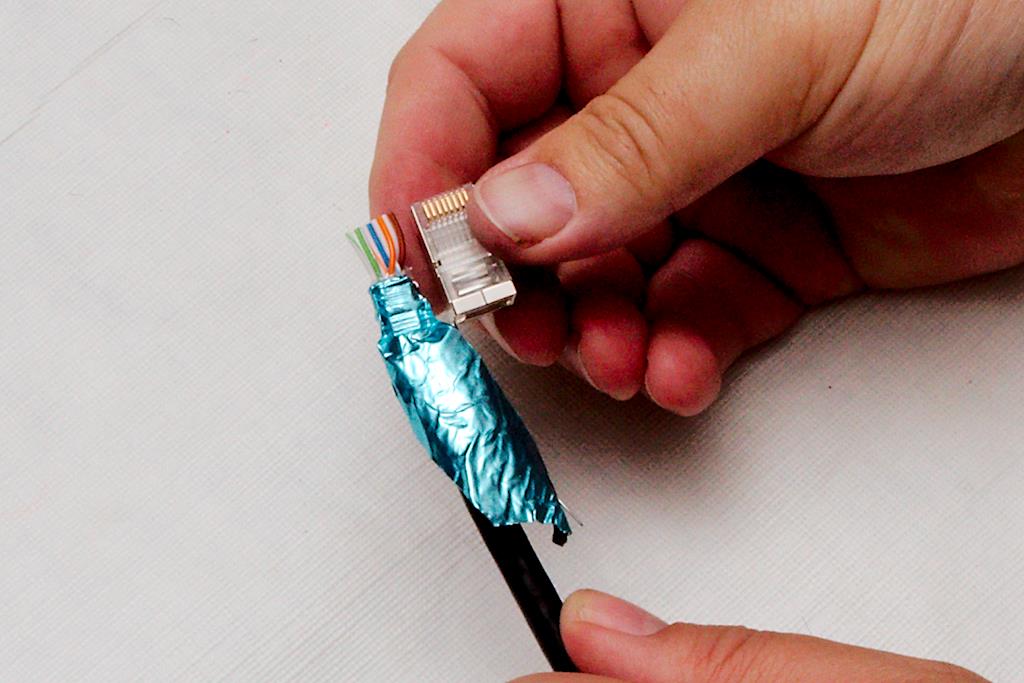
Before you crimp, take another look at the wires in the connector; use a magnifier if you need one. Make sure each wire is positioned in the proper channel. Finally, insert the connector into the crimper, and crimp it all the way down while making sure your wires don’t pull out in the process. 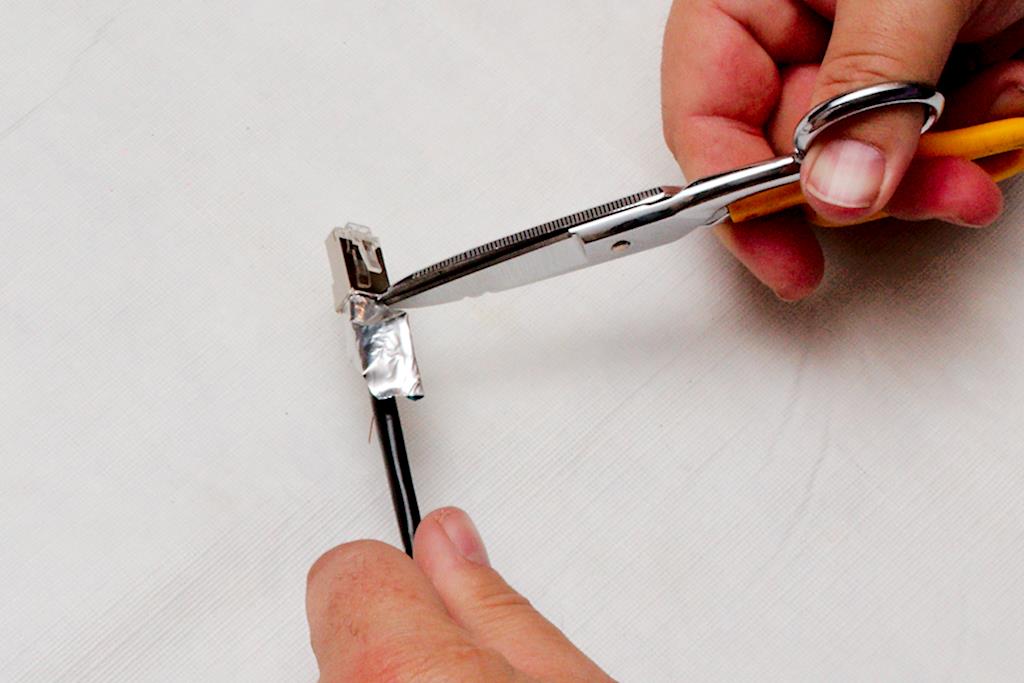
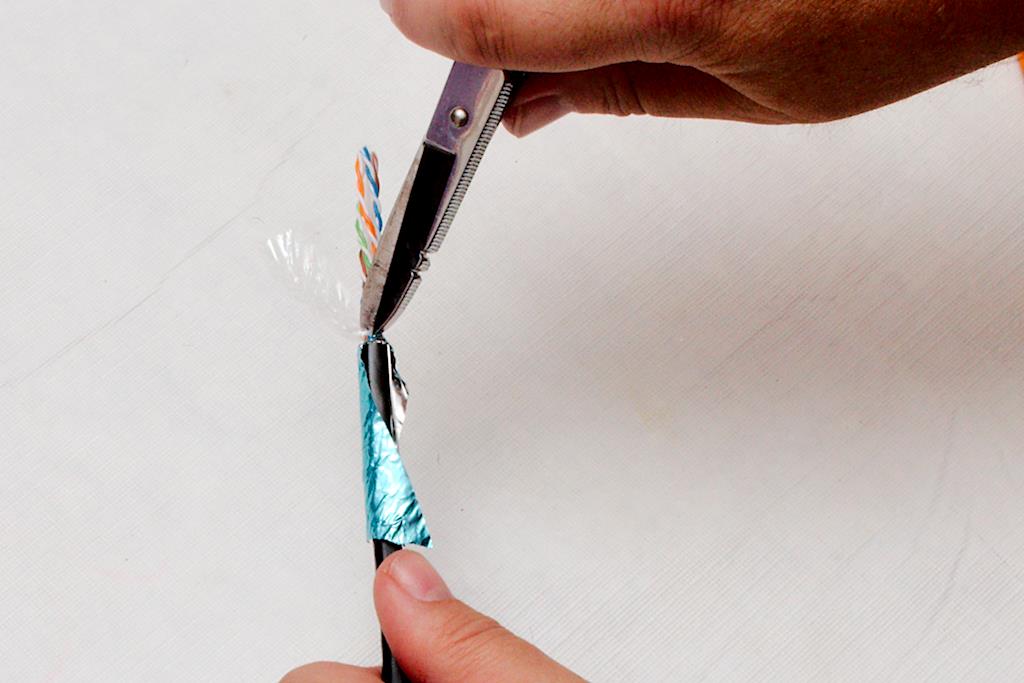
Next, use your snips to nick the foil right up against the connector 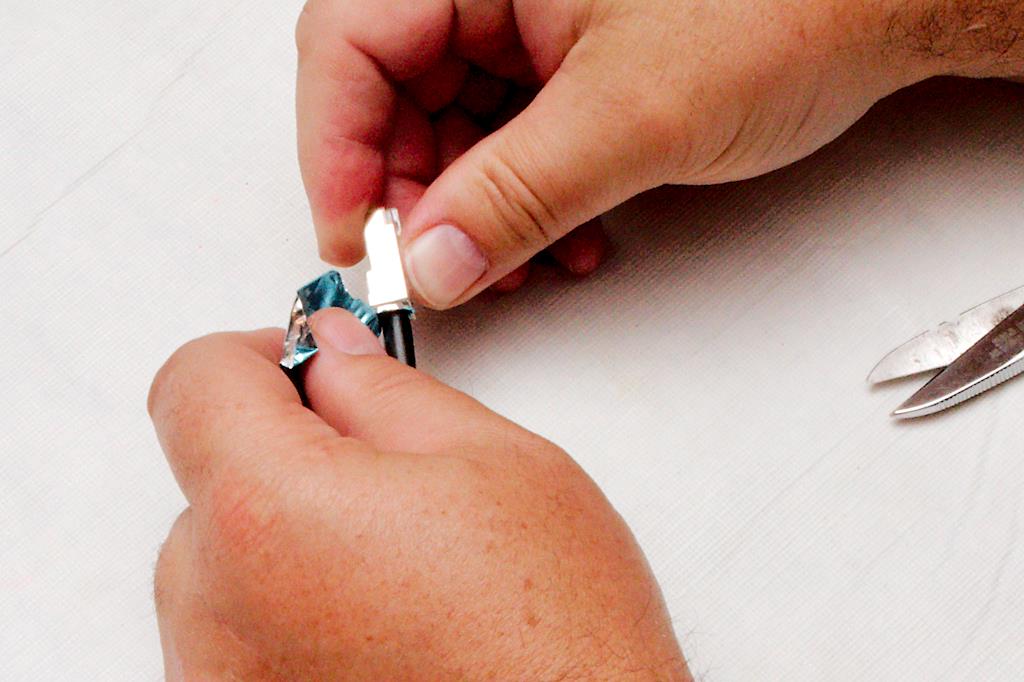


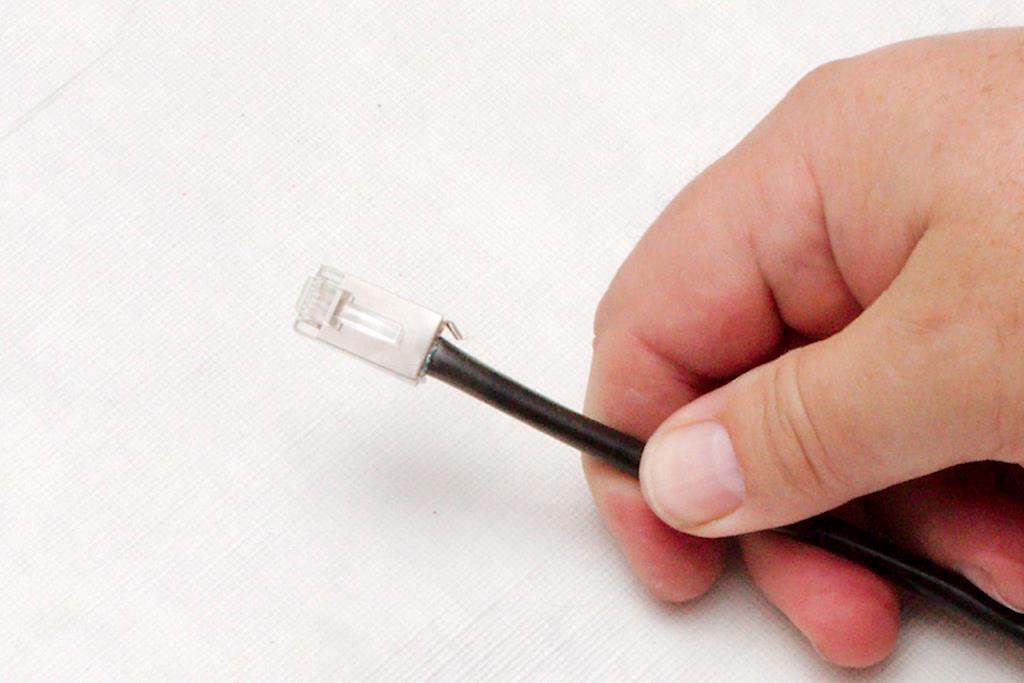
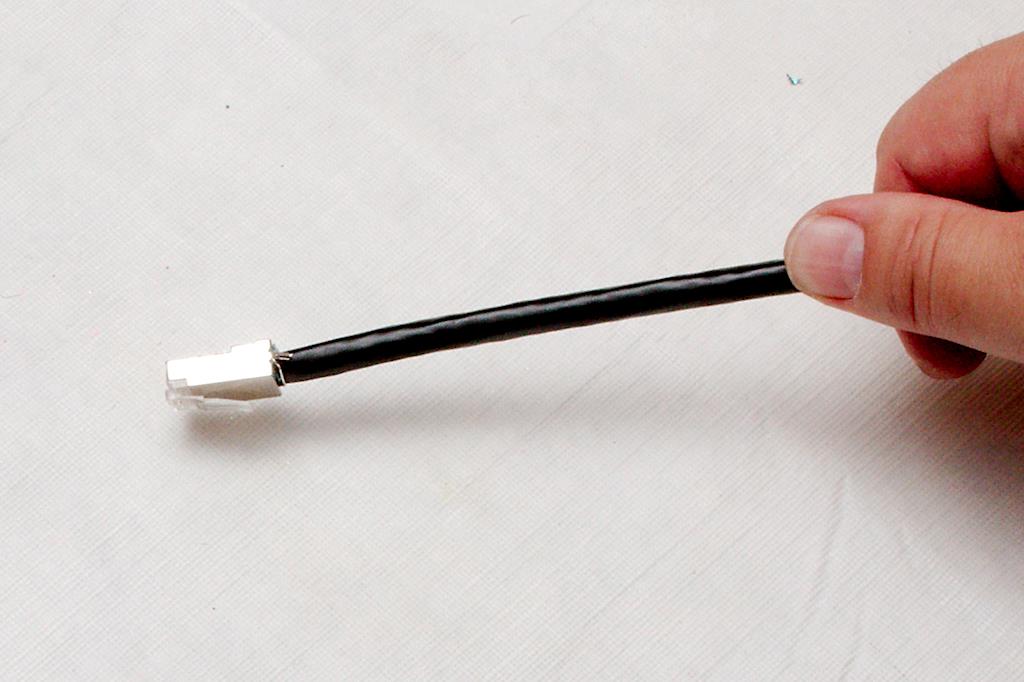
When done, inspect the connector. 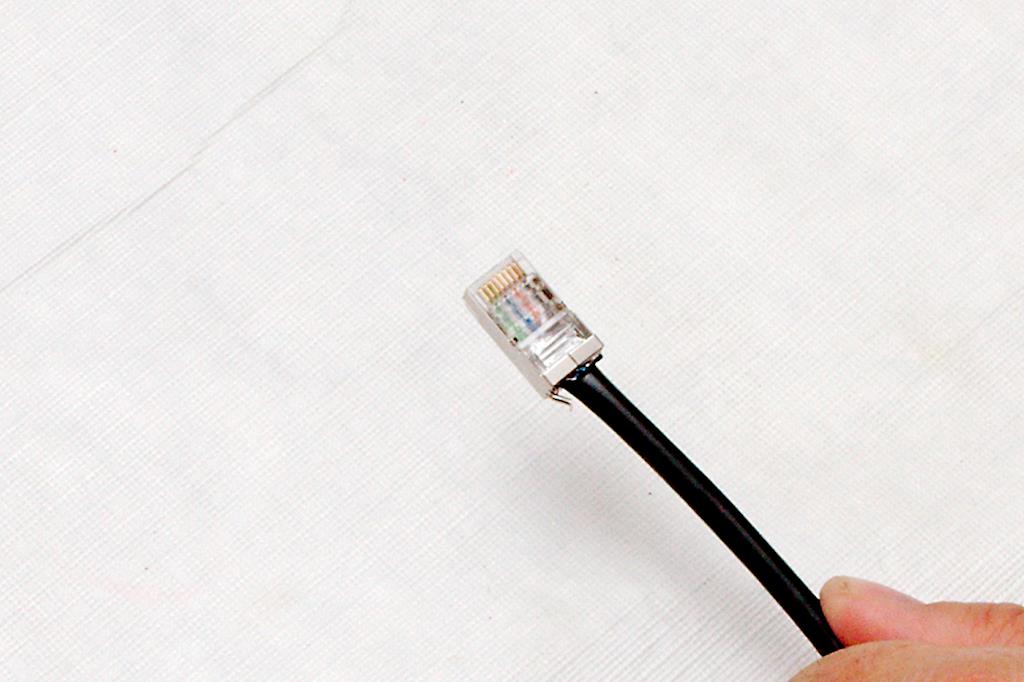
Working with the carrier cable is very similar but a bit more difficult. First of all, you have to deal with the protective braid shown in figure 28.
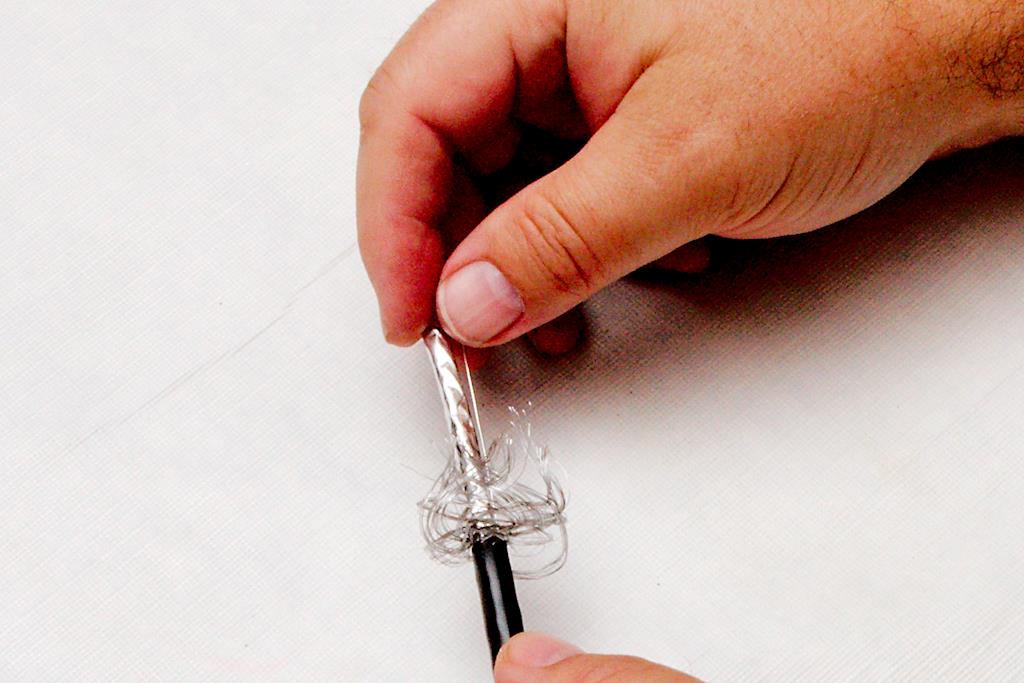
You will notice that the ground wire is now located outside of the foil rather than inside of it. make sure you do not cut this drain wire when cutting the braid off, as it is integral to the grounding operation of the connector. 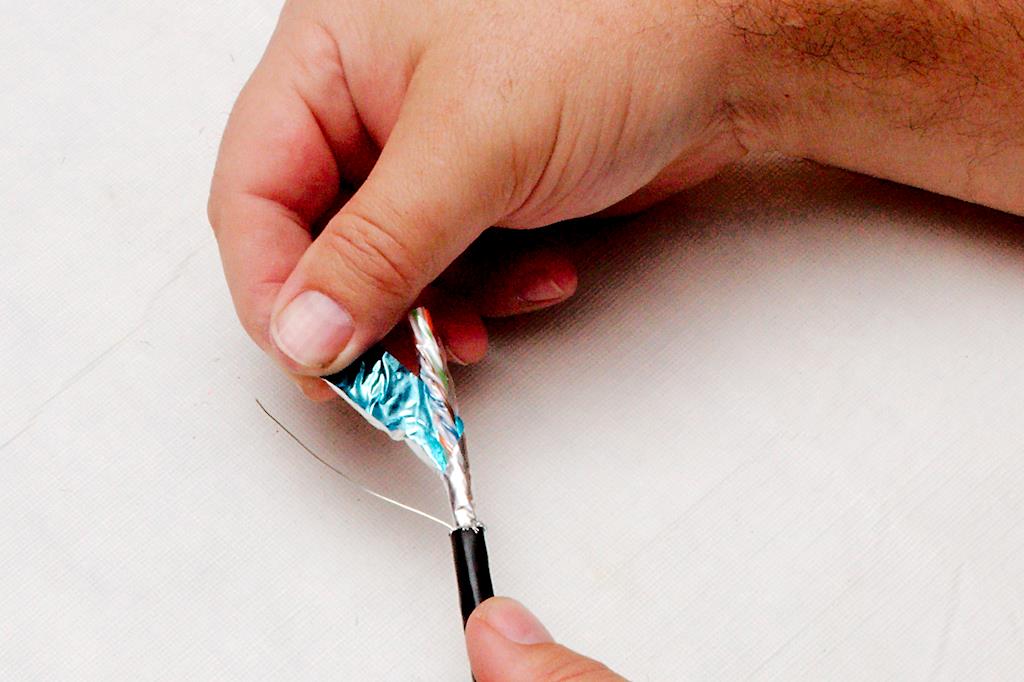
When you are bending the signal pairs back, you will notice an anti-crossover device in the center of the wire 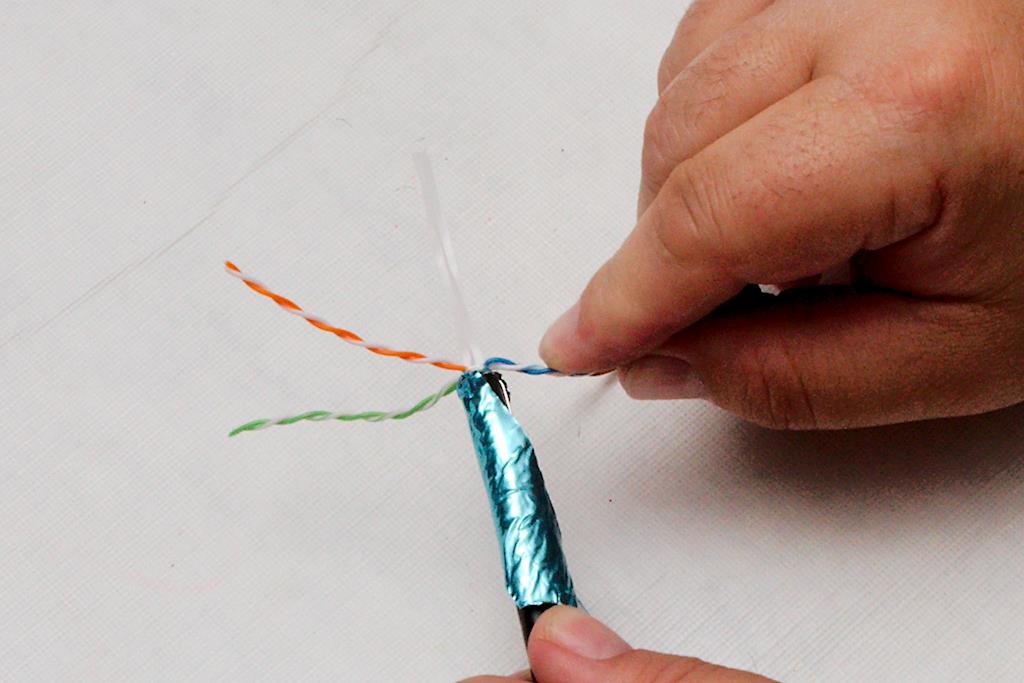
Now go through and separate the wires, and then line the colors up as you did before. Here is where you will run into trouble and where our method differs from the manufacturer’s instructions. A significant part of the structural integrity of the connector/cable interface is having the cable jacket crimped inside of the body of the connector. However, this cable is a much larger diameter than regular Ethernet, nearly approaching the size of RG-58 coax. It’s like putting the proverbial round peg into the square hole. The manufacutre will simply have you put the crimp in off the jacket, but if you do that, you will notice that it creates a weak point. If any bending tension is on the cable when you insert the connector into the socket, the bend will turn to a kink right at the back of the connector. it also puts the strain of the connection directly on the grounding foil. To over come this weakness, we used to use a pair of pliers and form the round end of the cable into a rectangle that would fit into the connector. Then one day, I happend to notice that the yellow compression crimps were just the right size. After you line the wires up, insert the cable into the crimpers as in figure 36 

Once the cable is inserted into the connector properly, crimp it as before and tear the foil off.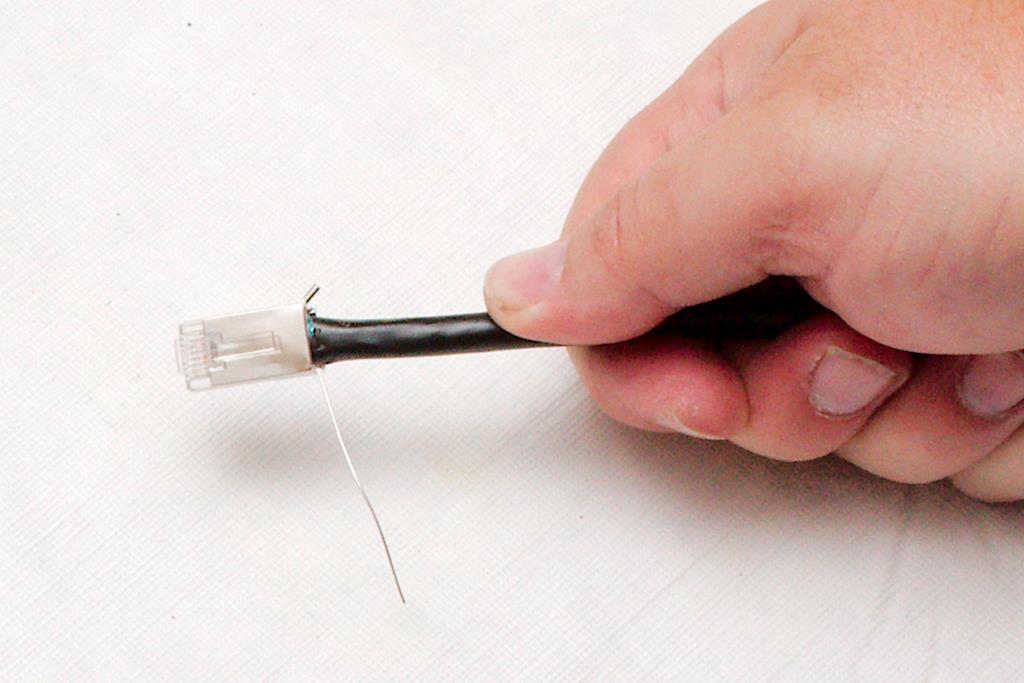
One last note. 
Now, go and soak those hands in warm water. If your fingers are not aching after about the third or fourth connector, you are superhuman.
~ Hugh James Latimer
- Ad Trekker Water Station 1Gal Per MinuteCall us if you have Questions 800-627-3809
- Ad USA Berkey Water Filters - Start Drinking Purified Water Today!#1 Trusted Gravity Water Purification System! Start Drinking Purified Water now with a Berkey water filtration system. Find systems, replacement filters, parts and more here.
Letter Re: Water Issues
HJL,
Another option the author might consider is a well bucket. I bought mine from Lehman’s as a short-term solution to possible electrical power failure until I have my PV system fully up-to-speed. I think it was around $70, plus shipping, and it provides me an affordable alternative water source. -BPF
HJL responds: This is a viable alternative as long as you realize that your submersible pump will have to be pulled in order to effectively use this setup. For those who are uncomfortable with working on your own well, beware that this option may not work for you.
o o o
Hugh,
PLEASE, PLEASE do a write up on the bison pump that you have on today’s post; the guy has it set up near his sink and plumbed into his well. This is really a good idea. – B.L.
HJL responds: I spoke with the author today, and I believe he is planning to do just that. There was enough responses to his pictures that he is interested.
- Ad Ready Made Resources, Trijicon Hunter Mk2$2000 off MSRP, Brand New in the case
- Ad California Legal Rifles & Pistols!WBT makes all popular rifles compliant for your restrictive state. Choose from a wide range of top brands made compliant for your state.
Economics and Investing:
California gets $1bn emergency relief to stave off severe water shortage. – H.L.
o o o
This week’s Zerohedge reporting shows the rapid DEATH of the US dollar
o o o
Sears suppliers said to grow uneasy
o o o
Items from Mr. Econocobas:
The Latest Flashing Red Light: Global Earnings Plunge Most Since Lehman
- Ad Don't wait - get the ultimate US-made ultra-high performance US-made SIEGE Stoves and stunning hand-crafted SIEGE belts for Christmas. For stocking-stuffers see our amazing fire-starters. Gifts that can save lives. Big Sale!Every bespoke SIEGE buckle goes through an hours-long artisanal process resulting in a belt unlike anything else, with blazing fast performance and looks and comfort to match.
- Ad LifeSaver 20K JerryCan Water PurifierThe best water jerrycan you can buy on the market! Mention Survivalblog for a Free Filter ($130 Value)
Odds ‘n Sods:
Is NYC’s new gunshot detection system recording private conversations?. – B.B.
o o o
What’s next in police state America? Why wearable alcohol biosensors of course!. – H.L.
o o o
Milita good for defending your country, not so good for projecting arbitrary force around the globe…. – D.E.
o o o
Today, “60 minutes” Lara Logan reports on the plight of Christians forced to flee ancestral homes in Iraq. This might be a good program to watch, if you can.
o o o
This Old Pill Bottle May Look Like Trash, But It Could Save Your Life.. – D.S.
HJL adds: We used to build these back in Boy Scouts. I’m not sure anyone’s life was ever saved from such a sparse kit, but it was fun and good practice.
- Ad STRATEGIC RELOCATION REALTYFOR SALE: Self-sustaining Rural Property situated meticulously in serene locales distant from densely populated sanctuary cities. Remember…HISTORY Favors the PREPARED!
- Ad Click Here --> Civil Defense ManualNOW BACK IN STOCK How to protect, you, your family, friends and neighborhood in coming times of civil unrest… and much more!
Hugh’s Quote of the Day:
“He answered and said unto them, Well hath Esaias prophesied of you hypocrites, as it is written, This people honoureth me with their lips, but their heart is far from me. Howbeit in vain do they worship me, teaching for doctrines the commandments of men. For laying aside the commandment of God, ye hold the tradition of men, as the washing of pots and cups: and many other such like things ye do.” Mark 7: 6-8 (KJV)
- Ad Survival RealtyFind your secure and sustainable home. The leading marketplace for rural, remote, and off-grid properties worldwide. Affordable ads. No commissions are charged!
- Add Your Link Here
Notes for Saturday – March 21, 2015
Today, we present another entry for Round 57 of the SurvivalBlog non-fiction writing contest. The $12,000+ worth of prizes for this round include:
First Prize:
- A Gunsite Academy Three Day Course Certificate, good for any one, two, or three course (a $1,195 value),
- A course certificate from onPoint Tactical. This certificate will be for the prize winner’s choice of three-day civilian courses. (Excluding those restricted for military or government teams.) Three day onPoint courses normally cost $795,
- DRD Tactical is providing a 5.56 NATO QD Billet upper with a hammer forged, chromlined barrel and a hard case to go with your own AR lower. It will allow any standard AR type rifle to have quick change barrel, which can be assembled in less then one minute without the use of any tools, and a compact carry capability in a hard case or 3-day pack (an $1,100 value),
- Gun Mag Warehouse is providing 30 DPMS AR-15 .223/5.56 30 Round Gray Mil Spec w/ Magpul Follower Magazines (a value of $448) and a Gun Mag Warehouse T-Shirt. (An equivalent prize will be awarded for residents in states with magazine restrictions.),
- Two cases of Mountain House freeze dried assorted entrees in #10 cans, courtesy of Ready Made Resources (a $350 value),
- A pre-selected assortment of military surplus gear from CJL Enterprize (a $300 value),
- A Model 120 Series Solar Generator provided by Quantum Harvest LLC (a $340 value),
- A $300 gift certificate from Freeze Dry Guy,
- A $250 gift certificate from Sunflower Ammo,
- KellyKettleUSA.com is donating both an AquaBrick water filtration kit and a Stainless Medium Scout Kelly Kettle Complete Kit with a combined retail value of $304,
- TexasgiBrass.com is providing a $300 gift certificate, and
- Two cases of meals, Ready to Eat (MREs), courtesy of CampingSurvival.com (a $180 value).
Second Prize:
- A Glock form factor SIRT laser training pistol and a SIRT AR-15/M4 Laser Training Bolt, courtesy of Next Level Training, which have a combined retail value of $589,
- A FloJak EarthStraw “Code Red” 100-foot well pump system (a $500 value), courtesy of FloJak.com,
- Acorn Supplies is donating a Deluxe Food Storage Survival Kit with a retail value of $350,
- The Ark Institute is donating a non-GMO, non-hybrid vegetable seed package–enough for two families of four, seed storage materials, a CD-ROM of Geri Guidetti’s book “Build Your Ark! How to Prepare for Self Reliance in Uncertain Times”, and two bottles of Potassium Iodate– a $325 retail value,
- A $250 gift card from Emergency Essentials,
- Twenty Five books, of the winners choice, of any books published by PrepperPress.com (a $270 value),
- TexasgiBrass.com is providing a $150 gift certificate, and
- RepackBox is providing a $300 gift certificate to their site.
Third Prize:
- A Royal Berkey water filter, courtesy of Directive 21 (a $275 value),
- A large handmade clothes drying rack, a washboard, and a Homesteading for Beginners DVD, all courtesy of The Homestead Store, with a combined value of $206,
- *Expanded sets of both washable feminine pads and liners, donated by Naturally Cozy (a $185 retail value),
- Two Super Survival Pack seed collections, a $150 value, courtesy of Seed for Security,
- Mayflower Trading is donating a $200 gift certificate for homesteading appliances,
- APEX Gun Parts is donating a $250 purchase credit,
- Montie Gear is donating a Y-Shot Slingshot and a Locking Rifle Rack (a $379 value), and
- Two 1,000-foot spools of full mil-spec U.S.-made 750 paracord (in-stock colors only) from www.TOUGHGRID.com (a $240 value).
Round 57 ends on March 31st, so get busy writing and e-mail us your entry. Remember that there is a 1,500-word minimum, and that articles on practical “how to” skills for survival have an advantage in the judging.
PVC Survival Gear: How to Make It – Part 5, by J.H.
PROJECT 5: PVC Survival Staff (Walking Staff, Blow Gun, Frog Gig, Fish Spear, Survival Kit)- continued
Today, we’re continuing to work through the steps of how to make a survival staff, walking staff, blow gun, frog gig, fish spear, and survival kit. It is versatile and can be whatever you choose to make it and used however you need it. We’ve completed the MAIN section and are currently working on the section containing the frog gig tines. So let’s continue with the process.
STEPS:
- We now want to take this frog gig tines section and connect it to the MAIN section of your staff. But before we do, let’s add the cork. Where the 3” section of 3/4” diameter pipe is attached, there should be a 1” section of free 3/4” diameter pipe at the end. Heat this 1” section fully and insert the cork. Use the cool, damp rag to quickly cool the PVC around the cork. Did you say, “The cork is too big.”? That’s okay; just use a mallet or other hammering tool (don’t overdo it!) to gently tap the cork into the heated PVC pipe. Did you say, “The cork is too small.”? That’s okay also; just squeeze the heated pipe around the cork evenly, until it cools.
Now, the open end of your “gig” section of pipe will be slid onto the MAIN section of your staff. To do this, you simply have to heat the 3/4” diameter (the 3” of “free” pipe at the end of the section (NOT the end with the cork), and drive it onto the exposed 1/2” diameter section of the MAIN staff. Let me be explicitly clear; this is NOT the end of the MAIN staff that we added the 1/2” section of pipe to in step 3. The 1/2” diameter pipe that IS already part of the MAIN staff. Drive the piece on until it stops and then cool with a rag.
- We are getting down to the nitty gritty. For that added top portion of 1/2” diameter pipe we included (in step 3), there are a few ways you could “top it off”. One simple way would be to get a 1/2” PVC pipe cap (glue on) and simply fasten it. Another way would be to use a small cut-off of 3/4” diameter pipe and make a cap by heating and squeezing together one end. Or you could fill the top open end of the pipe with a bit of hot glue, which will serve as a waterproof seal instead of putting on a cap. Generally, I like to have the 1/2” end exposed and not capped, in case I decide I want to attach another piece– a “shepherd’s hook attachment, which comes in handy very often out in the wilds. (I made the shepherd’s hook attachment myself and carry it in my pack.) This section of 1/2” diameter pipe we added in step 3 makes a great area to store survival items or fishing items. It is also completely removable. It may seem difficult at first to take off or put on the removable survival storage section or the “gig” section but after a few times, it will get easier.
*Note- Using ***AMAZON.amazon.com/Vaseline-100%25-Petroleum-Jelly-Ounce/dp/B007E62538/ref=sr_1_1?ie=UTF8&qid=1426767686&sr=8-1&keywords=petroleum+jelly***petroleum jelly or “drawer slide wax” will make the removable pieces slide on and off more readily without compromising the integrity of the overall piece.
- Drill three small holes in the cork in a triangle shape, so that the holes are not too close to the outer edge of the cork and not too close to each other. You want them as evenly spaced as possible while keeping in mind that these are for a frog gig, so if you make the holes at too much of an angle or too far apart, it will be ineffective as a usable tool. After the holes are made, safely drive the dull ends of the gig tines into the holes. Work each one around a bit in its respective hole so the cork will accept them easily. While you don’t want to make the holes too large, it’s okay to widen each to some degree as the cork will expand with time. Also, dipping the cork in water can help “heal” the holes slightly. Once you are satisfied with the gig setup, you can remove the tines and store them in the “gig” section of the pipe. You may want to use rubber bands around them to keep them together and cut down on any rattle. Also, tying a string to them and letting it run out the end of the pipe helps to ensure easy retrieval of the tines. You likely will have additional space in the “gig” pipe section. Go ahead and fill the excess with cotton balls or whatever you’d like. Just don’t overpack it.
- When you remove the 1/2” diameter section from the top of the staff and set it aside, what you have left– the open part of the MAIN staff– is the mouthpiece for your blowgun. To use the blow gun, simply remove the “gig” pipe and the survival storage pipe and use the MAIN section as a 3 1/2′ blow gun. The darts can be stored inside the MAIN staff pipe. With the MAIN section clear, just pop in a dart, aim, and blow. If you don’t already know how to use a blowgun safely and properly, I suggest you watch a tutorial or have someone show you. This may seem silly if you think it should be common sense on how to use it, but I have watched people have blowgun accidents because they didn’t have the correct knowledge of proper use.
As far as darts go, you can buy them. (Make sure to get the right size.) ***AMAZONamazon.com/Bore-Blowguns-625-Mini-Broad/dp/B002LEZFQW/ref=sr_1_2?ie=UTF8&qid=1426766546&sr=8-2&keywords=cold+steel+blowgun+darts***Cold Steel sells darts that are very close in size and are compatible with this staff with minor modification, or you can make your own. It is quite simple to make very efficient homemade blow darts, and there are tutorials online of how to do it with nails or other materials.
- (OPTIONAL)- Sand, Paint, and Paracord Wrap. Use the paracord to do a single spiral wrap on the MAIN section of the staff up to the point where it is comfortable to you, near the mouthpiece. Make a lanyard loop at the end for your wrist.
Now you’re ready! Go for a hike. Well, why not just go for an adventure and enjoy your light-weight, versatile survival staff. Have fun!!
P. S. You will notice you have extra PVC pipe left over. I didn’t do that accidentally. Use these pieces to come up with attachment sections that you will find useful. Play around with it. Have fun.
So, after looking at and maybe even doing one or more of these projects, do you think PVC gear has a future? I’ll start of by saying this: I can make a 35-pound draw re-curve bow for less then $10. I can make a real, usable and durable take-down survival bow for about $15. The ability to grow your survival tools and gear, while adding knowledge and also saving money is real. What do you think? Add to this the ability to make a multitude of gear, just the way you want that can really suit your own style and needs and you should be able to see the value of this material.
There are several other projects worth looking up and probably several more I don’t even know about. To give you an idea of other applications for the use of PVC, you may want to look into: DIY Water Filter, Sling Shot, A Top Shelf Versatile Back Pack Frame, Portable Greenhouse Structure, Snow Shoes, Truck Tent, and PVC Air Rifle, just to name a few. These can all be designed with this amazing material. There are videos with well-known survival instructors, like Dave Canterbury for example, that have PVC gear instruction. Many videos are available for free on youtube with these tutorials. There are also a number of books and blogs on PVC builds. I believe the trend of making PVC gear will grow into a well recognized survival skill.
Another thing I’d like to point out is that in a WROL situation, that includes abandoned houses and buildings, you will have a fairly high chance of finding PVC pipe. That makes this material quite abundant in those circumstances. That means that you have a valuable accessible asset, if you know what to do with it. As weapons, caches, barter, what you make has so many options. Not only do I believe that PVC gear has a viable future, but it may turn out that it is a futuristic survival source, and through this skill of producing items from PVC, you have learned one of the main and very necessary basic survival skills– adaptability.
In conclusion, I would like to thank you, dear prepper friends and readers, for taking the time to entertain what may seem like a strange notion. I hope this article has been useful and enjoyable to all of you. I wish you all the best of luck on your journey. Keep on keepin’ on. Don’t just survive; live and thrive. God Bless.
Letter Re: Water Issues
M,
Consider connecting your hand pump to the well pipes where they enter your basement or house.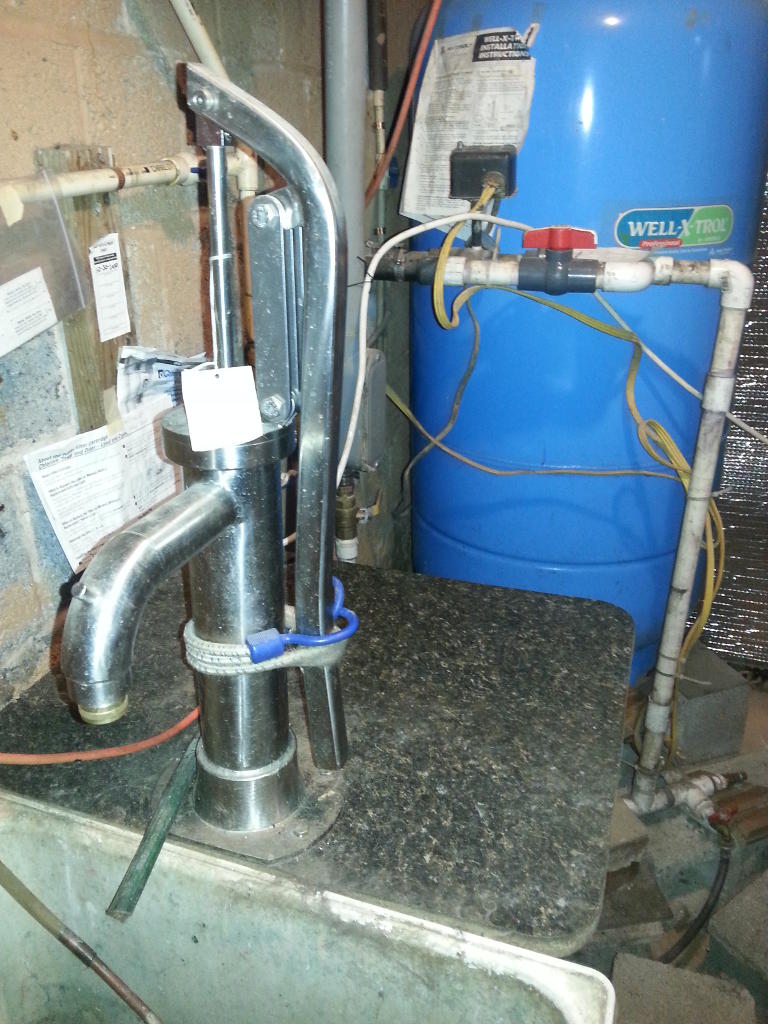 I did this with my Bison pump. Having the pump indoors offers obvious advantages for issues such as weather, security, and using during night hours. Mine sits on a countertop over a tub adjacent to my pressure tank.
 I get the extra benefit of being able to generate enough psi so that the water supply flows in my barn 100 yards away. To engage, all I have to do is flip three valves. Good luck. – Pete
Economics and Investing:
Irish Finance Minister Dumps Stocks to Buy Gold
o o o
The Latest Flashing Red Light: Global Earnings Plunge Most Since Lehman
o o o
Items from Mr. Econocobas:
Brace for Recession Next Year – I’d be bracing for a bit more than that, but that recession is starting to come up in the mainstream is what’s pertinent here.
The Fed Keeps Getting More and More Pessimistic
Odds ‘n Sods:
Mike Williamson, SurvivalBlog’s Editor at Large, forwarded this interesting thread on Reddit.com that amounts to confessions from a former gang member. It’s a long thread, and it does contain some offensive language, but it has some very applicable information about what works as a deterrent and how clean buyers for guns are maintained. There is much useful information buried in the dross here.
o o o
o o o
Gordon Blaine has a new book out on finding the perfect homestead, and it’s available for free (pdf): Survival Homestead. – P.S.
o o o
Feds to Weigh Children in Daycare. – D.S.
o o o
Hugh’s Quote of the Day:
“And the Lord spake unto Moses, saying, Speak unto the children of Israel, saying, If a soul shall sin through ignorance against any of the commandments of the Lord concerning things which ought not to be done, and shall do against any of them: if the priest that is anointed do sin according to the sin of the people; then let him bring for his sin, which he hath sinned, a young bullock without blemish unto the Lord for a sin offering.” Leviticus 4:1-3 (KJV)
Notes for Friday – March 20, 2015
March 20th is the birthday of Mel Tappan. (Born 1933, died 1980.) His perennially popular survivalist books Survival Guns and Tappan on Survival have a well-deserved following.
o o o
Today, we present another entry for Round 57 of the SurvivalBlog non-fiction writing contest. The $12,000+ worth of prizes for this round include:
First Prize:
- A Gunsite Academy Three Day Course Certificate, good for any one, two, or three course (a $1,195 value),
- A course certificate from onPoint Tactical. This certificate will be for the prize winner’s choice of three-day civilian courses. (Excluding those restricted for military or government teams.) Three day onPoint courses normally cost $795,
- DRD Tactical is providing a 5.56 NATO QD Billet upper with a hammer forged, chromlined barrel and a hard case to go with your own AR lower. It will allow any standard AR type rifle to have quick change barrel, which can be assembled in less then one minute without the use of any tools, and a compact carry capability in a hard case or 3-day pack (an $1,100 value),
- Gun Mag Warehouse is providing 30 DPMS AR-15 .223/5.56 30 Round Gray Mil Spec w/ Magpul Follower Magazines (a value of $448) and a Gun Mag Warehouse T-Shirt. (An equivalent prize will be awarded for residents in states with magazine restrictions.),
- Two cases of Mountain House freeze dried assorted entrees in #10 cans, courtesy of Ready Made Resources (a $350 value),
- A pre-selected assortment of military surplus gear from CJL Enterprize (a $300 value),
- A Model 120 Series Solar Generator provided by Quantum Harvest LLC (a $340 value),
- A $300 gift certificate from Freeze Dry Guy,
- A $250 gift certificate from Sunflower Ammo,
- KellyKettleUSA.com is donating both an AquaBrick water filtration kit and a Stainless Medium Scout Kelly Kettle Complete Kit with a combined retail value of $304,
- TexasgiBrass.com is providing a $300 gift certificate, and
- Two cases of meals, Ready to Eat (MREs), courtesy of CampingSurvival.com (a $180 value).
Second Prize:
- A Glock form factor SIRT laser training pistol and a SIRT AR-15/M4 Laser Training Bolt, courtesy of Next Level Training, which have a combined retail value of $589,
- A FloJak EarthStraw “Code Red” 100-foot well pump system (a $500 value), courtesy of FloJak.com,
- Acorn Supplies is donating a Deluxe Food Storage Survival Kit with a retail value of $350,
- The Ark Institute is donating a non-GMO, non-hybrid vegetable seed package–enough for two families of four, seed storage materials, a CD-ROM of Geri Guidetti’s book “Build Your Ark! How to Prepare for Self Reliance in Uncertain Times”, and two bottles of Potassium Iodate– a $325 retail value,
- A $250 gift card from Emergency Essentials,
- Twenty Five books, of the winners choice, of any books published by PrepperPress.com (a $270 value),
- TexasgiBrass.com is providing a $150 gift certificate, and
- RepackBox is providing a $300 gift certificate to their site.
Third Prize:
- A Royal Berkey water filter, courtesy of Directive 21 (a $275 value),
- A large handmade clothes drying rack, a washboard, and a Homesteading for Beginners DVD, all courtesy of The Homestead Store, with a combined value of $206,
- *Expanded sets of both washable feminine pads and liners, donated by Naturally Cozy (a $185 retail value),
- Two Super Survival Pack seed collections, a $150 value, courtesy of Seed for Security,
- Mayflower Trading is donating a $200 gift certificate for homesteading appliances,
- APEX Gun Parts is donating a $250 purchase credit,
- Montie Gear is donating a Y-Shot Slingshot and a Locking Rifle Rack (a $379 value), and
- Two 1,000-foot spools of full mil-spec U.S.-made 750 paracord (in-stock colors only) from www.TOUGHGRID.com (a $240 value).
Round 57 ends on March 31st, so get busy writing and e-mail us your entry. Remember that there is a 1,500-word minimum, and that articles on practical “how to” skills for survival have an advantage in the judging.
PVC Survival Gear: How to Make It – Part 4, by J.H.
PROJECT 5: PVC Survival Staff (Walking Staff, Blow Gun, Frog Gig, Fish Spear, Survival Kit)
This is one of my favorite PVC build projects! It’s fun to make and can be made with “attachment” pieces for a multitude of different options. The design example I will be using for this article is more basic than some of my very intricate designs. However, I feel this is the most “user friendly” PVC staff build I can explain. There are more “parts” to this piece of survival equipment than the previous projects. If this seems to be too much and you want a simpler design, you may choose to eliminate some of the components. The “base” of the staff will remain the same.
There is some question of the validity of having a blow gun as a piece of gear in your survival selection. Okay, it’s fair to assume you aren’t a ninja who will be poison darting anybody any time soon. However, there is plenty of information as well as photos and films available referring to the blowgun as a viable survival tool. There are tribes spread across the world who have relied on this weapon for collecting a portion of their food source. Also, truthfully, it’s fun to use. On the other hand, if you really don’t find it useful, that’s okay. Instead, substitute a small survival kit, fishing kit, extra paracord, or whatever you’d like in the empty space. The adage, “I’d rather have it and not need it, than need it and not have it.”, comes to mind. That is true of the most important “redundancy items” for survival. Also note that I make a variance of this staff called the Tracker Survival Staff, which includes an inlaid metal ruler and some other cool tidbits that are extremely useful to those who embark on tracking adventures.
MATERIALS AND TOOLS:
- 1/2” Diameter Schedule 40 PVC pipe, 5 foot length
- 3/4” Diameter Schedule 40 PVC pipe, 5 foot length
- 1 cork (1/2” diameter), wine bottle type
- Drill and bit (1/16”)
- Heat source
- Pot holder or hand towel
- Frog gig tines(You need three individual tines. If you cannot find them separately, you can cut them off of a frog gig, which can be found for as low as 3-4 dollars.)
- Marker
- Measuring tape
- Paracord (approximately 50 feet)
- A rag
- Cold water
STEPS:
- Take the five-foot long 1/2“ diameter pipe and measure 3’3” from the end of it, and mark it. Do the same on the 3/4” diameter pipe. Cut each pipe on the mark you made, and set the smaller cut off pieces to the side. (You will need them later, so don’t lose track of these small pieces.) At this point, you should have two pieces of pipe, each 3’3” long.
- Measure 3” from one end of the 1/2” pipe and mark. This mark is a stopping point as you slip the 3/4” pipe over the 1/2” pipe. Now, mark 3” from one end of the 3/4” pipe. This mark will serve as a stop point when you are heating this pipe. Next, holding the 3” section of the 3/4” pipe in your hand; thoroughly heat (but do not burn) the longer section of the 3/4” pipe. In other words, heat the pipe from the 3” mark all the way down to the farther end of the pipe (3′ in length) and around the entire diameter the whole way. You want the pipe to be nice and soft and flexible, but do not burn it. Once the 3/4” piece is fully heated, you want to slip it over the 1/2” diameter piece and slide it all the way down to the 3” mark on the 1/2” pipe. (The mark should be closer to the floor if you are standing the 1/2” pipe upright, which I suggest for this as it makes it easier to drive the 3/4” pipe over the 1/2” pipe.) Use a cool, wet rag or towel to cool the pipe faster so there is little chance of it warping or changing the overall shape of the pipes. When you are done with this step, you should have a single length of the two pieces combined that equals 3’6” overall with a 3” piece of pipe extending at each end. (One end will have the 1/2” pipe protruding; the other end will have the 3/4” pipe extending.) The purpose of this doubling up of pipe is for reinforcement and durability while walking or otherwise using the piece in a somewhat aggressive fashion. This first finished piece we will call the MAIN section of your staff.
*QUICK TIP: You may find it helpful to round over the edge of the 1/2” pipe with a file as well as bevel the inside edge of the 3/4” pipe so that the sliding of one over the other becomes easier. It is not necessary, however, it does help.
- Now, it’s time to get to those cut-off pieces, but first I suggest that you round over and bevel the 3/4” end of your MAIN section. By preparing the pipe in this way, it will look nicer in the end and it makes it easier than trying to file the pieces after they are all connected. Any of the rounding or beveling is optional, but it does make for a nicer finished product; the joints will also look smoother and more natural. Take the cut-off section of 1/2” pipe and mark 5” from one end. Cut the 5” section off and set the rest aside. Round over one end of the 5” piece. Next, heat the 3” of 3/4” pipe that extends at the end of your MAIN section. ONLY HEAT UP THE 3/4” PIPE!! (You do NOT want to heat the 1/2” pipe inside of the 3/4” piece.) It is better to not heat all 3” than it is to heat too far down and risk misshaping the pipe. When the 3” section is properly heated (the full diameter), drive the 5” length of 1/2” diameter pipe as far into the 3/4” pipe as you can. Take your time, do it smoothly, and keep it as straight as you can. You can always reheat it if it didn’t work out the exact way you want. Pushing too fast may result in tears in the PVC, if you have overheated it. Use a cool, wet rag to cool the piece you just finished.
*QUICK TIP: Using petroleum jelly on a piece of pipe that you are inserting in another pipe will make it work much easier. It also makes it easier to pull the piece back out.
- Take the cut-off portion of 3/4” pipe and mark 6” from one end. Cut off the 6” section and set aside the rest. Round and bevel both ends of the 6” length. Next, grab that cut-off 1/2” diameter piece that’s left, and mark 9” from one end. Cut on the mark, keeping the 9” section and setting aside the excess. Round and bevel both ends of this 9” piece as well. Now, what you want to do is similar to what you did with the MAIN section. On the 6” length of 3/4” pipe, measure and mark 3” from one end. This should be as close to exactly middle as you can get it. After that, on the 9” section of 1/2” diameter pipe, mark 3” from one end. This mark will serve as your stop point for combining the 9” length and 6” length sections. Heat the 3/4” diameter piece you marked from the end to the 3” mark, around the full diameter of the pipe. Heat until soft and flexible. Once it is ready, insert the 6” length of 1/2” diameter pipe into it. Stop when you get to the 3” mark. (Let me be clear; only 3” of the 1/2” pipe should be driven into the 3/4” pipe.) Use a cool, damp rag to cool the pipe(s). If you have done this correctly, you will have a section with a combined overall length of 12” with one end having a 3/4” diameter section extending at one end and a 1/2” diameter section protruding at the other.
- Using the cut-off piece of 3/4” diameter that you set aside. Mark 3” from one end and cut on the mark. Keep the 3” section and set aside what’s left. On the 1/2” diameter portion of the combined piece we made in the previous step, mark 2” from the end. This will be the stop mark for the 3” length of 3/4” diameter we will be putting on. Next, heat about 2” of the 3” length of 3/4” pipe. Once properly heated, drive this section onto the 1/2” protruding pipe, up to the 2” stop mark. Use a cool damp rag to cool the pipe. Now, you should have a piece that is a combined overall length of 13” with each end having a section of 3/4” diameter pipe. This section will contain your frog gig tines and the cork to hold them.
(Instructions for this project will be continued in tomorrow’s SurvivalBlog post.)
Letter Re: Water issues
Hello,
We have a submersible in a four-inch casing/well. Our well is 125 feet deep. I don’t know what the static level is right now. The well casing sticks up out of ground about 18 inches and has the cap on it, where the electrical goes up into the cap next to the casing. There is a pitless adapter. With the four-inch casing and because of the pitless adapter I don’t think there’s room in the pipe for a manual pump. Is there any other way that we could make a hand pump in our existing well? If not, do you have other suggestions beside a sandpoint? – M.
HJL responds: You have several options in dealing with your existing well. You need to find out how much room there is from your pitless adapter to the opposite side of the well casing. If you have at least 2”, there are several hand pumps that you can place in the well parallel to your submersible line, as long as you have the headroom available above the submersible pump. If the water level inside the well is within 20 feet, you can use an inexpensive pitcher style pump and the maximum diameter of the drop pipe will simply be your pipe connectors. A 1 inch drop pipe will usually have connectors of less than 1.5” in diameter. If your water level is deeper, you will need to use a pump type where the actual pump is at the bottom of the drop pipe and this pump mechanism becomes the limiting factor. In my well, I used a “Simple Pump” and the pump section was 1 3/4” which will fit in a 4” casing with a narrow pitless adapter with some care. In my case, I wanted to be able to service the pump with ease, so I had the original 4” PVC casing cut off about 5′ below the surface with a 6” steel casing (10 ft long) pounded down over the top of the original casing. This allowed the pitless adapter to be mounted on the steel casing (giving a much stronger mounting point for the submersible pump) and much more room in the 4” well casing. You will have to change the well seal, but a good hand pump will come with a well seal. You will just need to specify your casing diameter when you purchase it.