


(Continued from Part 1. This concludes the article.)
The Black Swan Has Landed
Following the arrival of guests, we found ourselves using more water than we should have. When one is dependent on rainwater, one simply cannot afford luxuries like taking a bath every single day – that is the simple reality. And the young children, they certainly did need their baths at the end of each day.
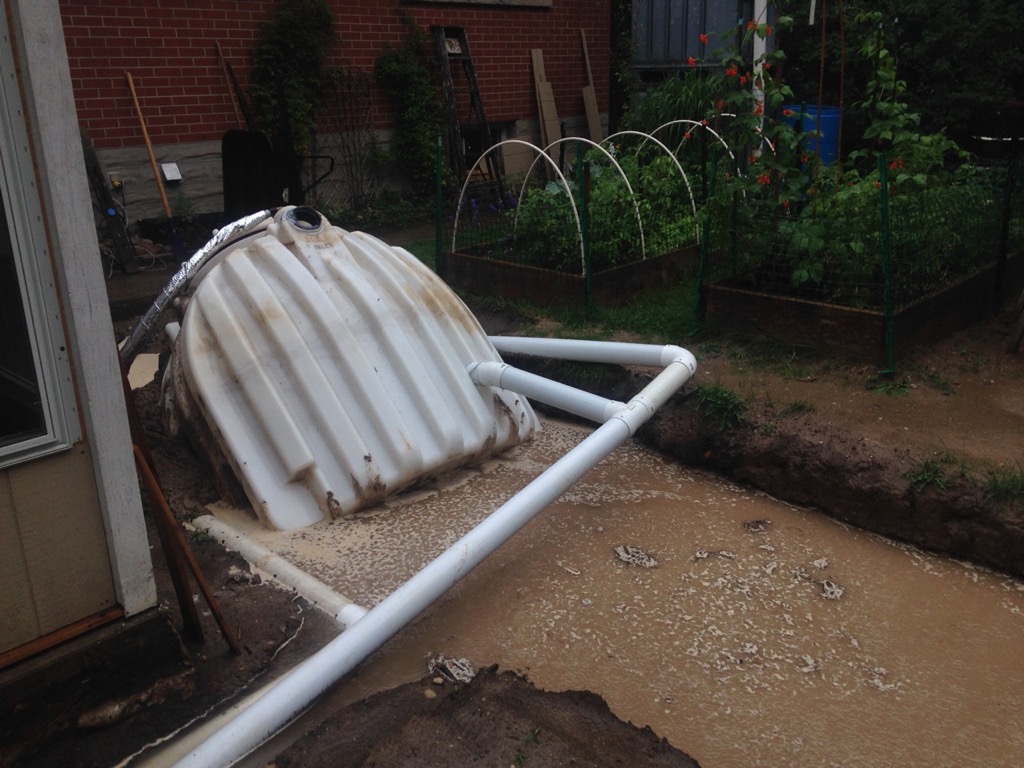 One morning, 10 days later – we had our Black Swan event – two inches of rainfall in less than one hour! Our 250 gallon water collection tote overflowed in short order. Torrents of water moved across the landscape, pooling in every dip, eventually making its way to the mostly backfilled cistern cavity – soon the whole neighbourhood was flooded. There was a huge pond where we had buried the cistern. And then suddenly, the tank became buoyant and the one end floated up so that it was now on a 45 degree angle. (See photo.)
Yes, a tank partially filled with air is rather buoyant. And when the only thing holding it down is loose soil, it will act very much like a boat.
As I then shared this experience with a few others, one fellow mentioned that he had witnessed the same behavior with a concrete cistern, also which had been recently buried and partially full.
I e-mailed photos to my supplier hoping to get some advice.
I had followed the manufacturer’s instructions to a detail. However, in hindsight, I really should have anticipated metaphorical Murphy would raise his head.
We quickly switched back to our RV pumps and rainwater storage totes in the garage, which at least now were about to get good and full.
Scaffold and Rigging
After the storm I made a journey to the family farm where I had stockpiled plenty of lumber recently salvaged from a construction site. I piled high the pickup truck and trailer with long pieces: 2x4s, 2x6s, 2x8s, 2x10s, 2x12s. I would need these to build a strong scaffold to rig.
Rather than try to lift a half full cistern tank out of the muck so I could re-excavate, I needed first to pump out the remaining water. For this, I used a Red Lion submersible pump which I was able to lower into the deepest recesses of the tilted cistern tank.
I initially set up the rigging using the ‘fence puller’ to lift the tank. This worked adequately for lifting the tank, but how was I going to later lower it?
The overhead beam was comprised of three 2×12’s nailed together at interval with a logging chain placed over the middle as my rigging point. The 2×12 beam was strained – it bowed sideways by an estimated 16 inches when fully stressed by the still stuck-in-the-muck tank.
Eventually, I got the tank level with the ground and turned it sideways to straddle the hole with long lumber supporting it on the sides of the excavation.
Partway through the process I abandoned the fence puller and replaced it with a two-ton chain hoist with 10-foot chainfall. Although this tool was not cheap, it was worth every penny in terms of improved productivity.
Digging Deeper, Adding Concrete
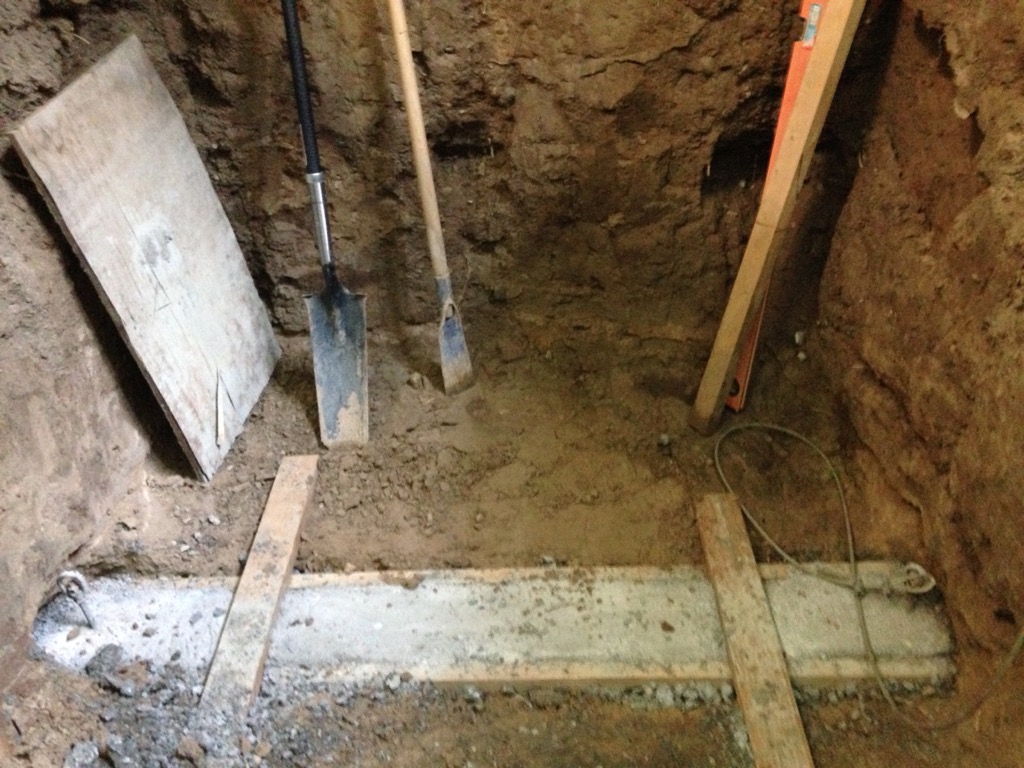
Next came the incredibly tedious weeks of hand digging to re-excavate this muddy mess. This time I would deepen the hole to 7 feet.
Once I had the hole back to spec, I started looking for a cement mixer. I lucked upon a hardware store a half hour away selling their last new mixer of the season for less than what most of classified ads were asking for a used unit.
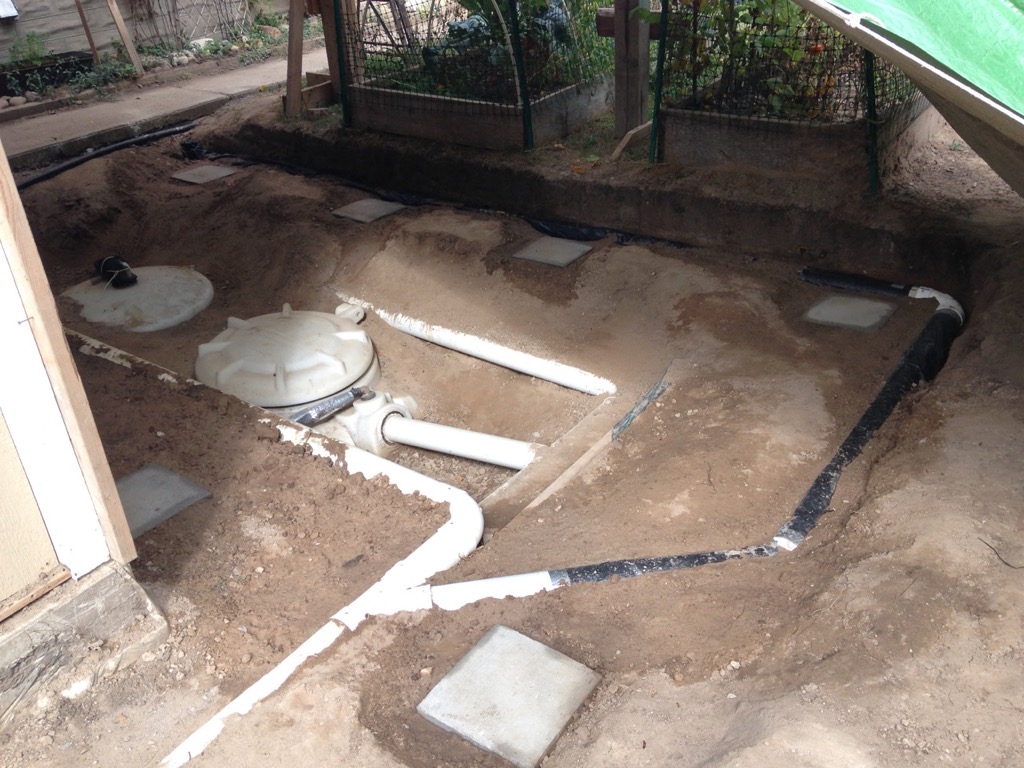
The new plan was to pour a concrete base and anchor some 1/4-inch wire ropes as a retainer to hold the tank down in case of possible repeat event.
I had a local building supplier deliver a skid of premixed bags of concrete: that is Portland cement, sand and gravel mixed dry, bagged in correct proportions.
I then constructed a chute using scrap lumber. I needed to mix the concrete up top at ground level and then send it down the chute to the location it would be required at the bottom of the hole. I would climb out, mix the concrete, and then my wife would send it down the chute while I received it down below with garden hoe and trowel at the forms I had created.
 I had carved out slight cavities in both of the sidewalls of the excavation at approximately 1/3 distance in from each of the ends. Connecting the cavities was a form, for an 8” x 8” beam that I was about to pour. In the end of the beam, near the hollows of these cavities I placed some giant eye-bolts, that is 1/2” galvanized threaded rod, with a steel plate and double nutted bottom end and loops at the top. These were embedded near the ends of the beam as I poured the concrete. It was slow tedious work that I didn’t want to mess up. I poured a beam each on separate days, ensuring that these were level side to side and end to end.
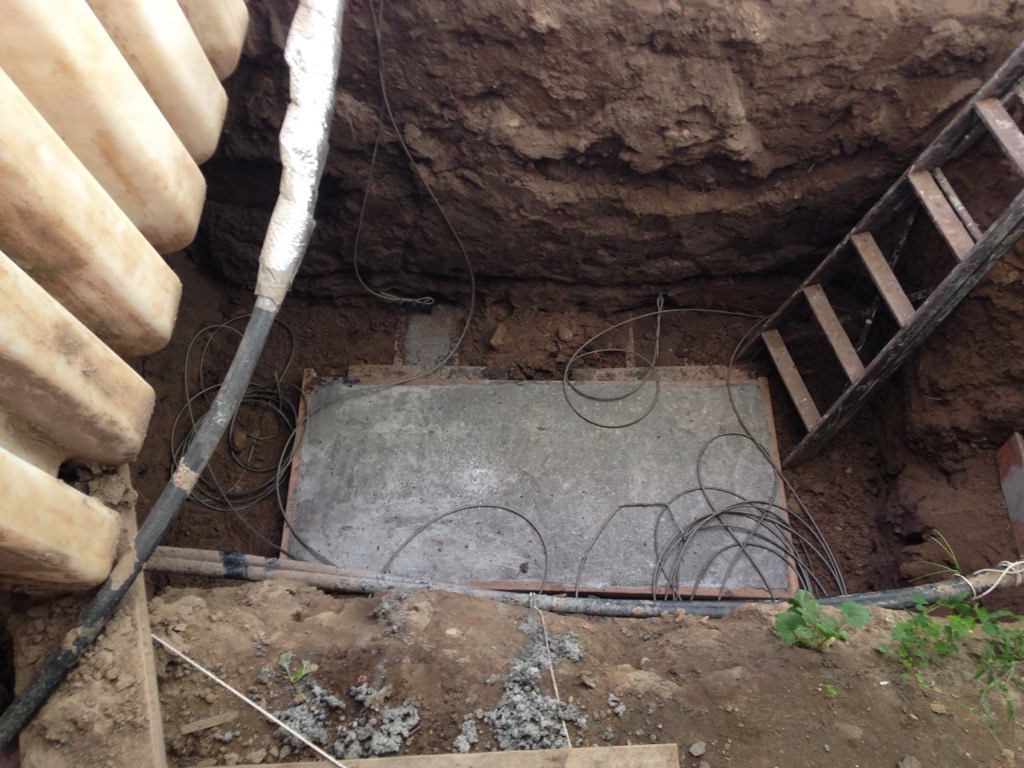 Once the beams had cured for a week, I formed a slab base upon which the tank would be set. The slab extended over top of the beams to approximately the size of the tank bottom. I then poured it so it was minimum of four inches thick. Once the concrete was hard, I backfilled sufficiently to level the entire bottom of the excavation to be even with the top of the slab.
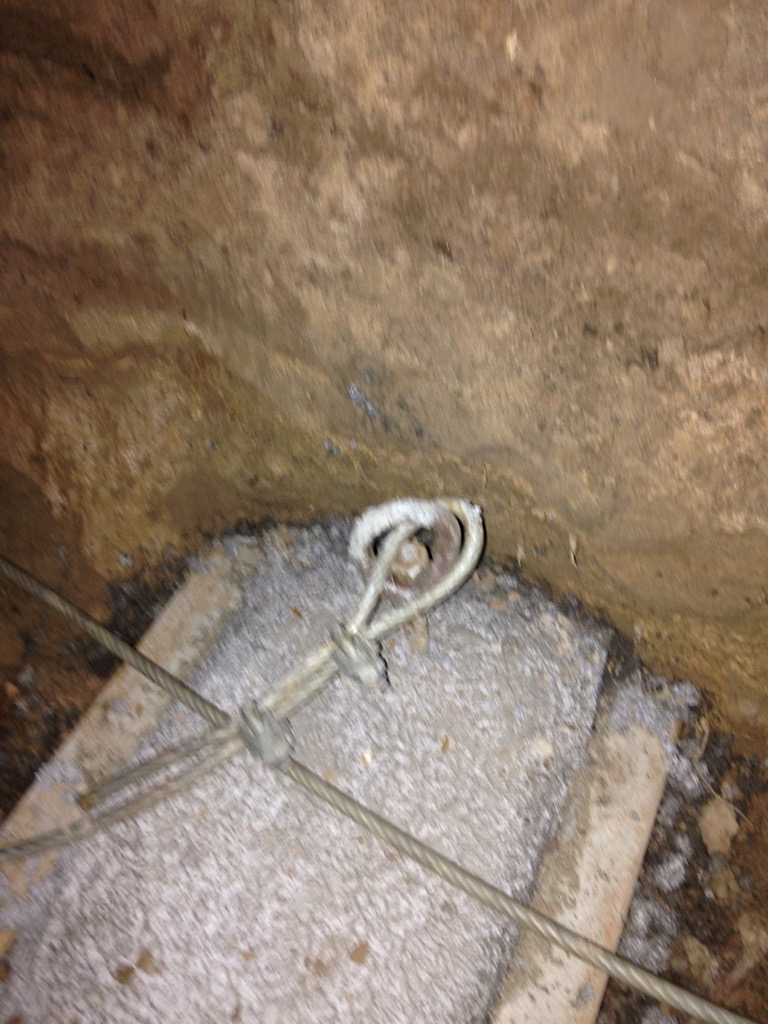
After allowing another week for the slab to cure, I made sure the four 1/4” wire ropes were securely attached – one to each embedded threaded rod. The wire ropes were secured using pairs of Crosby clips. Crosby clips are always installed with the u-bolt over the dead end of the rope. A millwright once described it to me as: “never saddle a dead horse”. The “saddle” is the other part of the Crosby clip. Once you have the u-bolt over the dead end, the saddle is attached over the live end of the rope using hex nuts threaded onto the u-bolt threads.
The top ends of the wire ropes were temporarily secured at ground level, because once the tank was back in the excavation it would not be possible to retrieve any loose ends that might have fallen down in the process.
I was ready to lower the cistern onto the concrete pad. Using the chainfall this was quick, precise, and easy. Once it was situated, I once again double checked the level of the tank before removing the rigging.
Now, for the backfill part of the operation. It was time for another call to the water service as winter was rapidly approaching.
 With the tank full of water, I then tied it up like a bow tie – that is, joined the wire ropes across the top of the tank using additional Crosby clips. I did this for each end of the tank. This way, if it ever again gains buoyancy, the wire ropes will hold each end down to the anchors in the 8”x8” concrete beams which extended into the side walls of the excavation – into very old compacted stony, sandy, silty till. Altogether, I calculated the total concrete ballast to be in excess of one ton.
Backfilling
 The backfill was started the very next day – again, a few inches at a time. However this time I would use an amount of precious water to wet down the fill around the tank each day. Eventually, the fill was complete and I was able to redo the plumbing. The four inch PVC pipe which leads from my water capture system to the cistern needed to be completely replaced. I also ended up routing underground drainage tile through a separate four-inch PVC pipe so that there would be minimal chance for it leave its excess water in the cistern excavation area. I also made modifications to the water collection tote, so that if it overflows it would direct the overflow into the opposite direction – away from the cistern area.
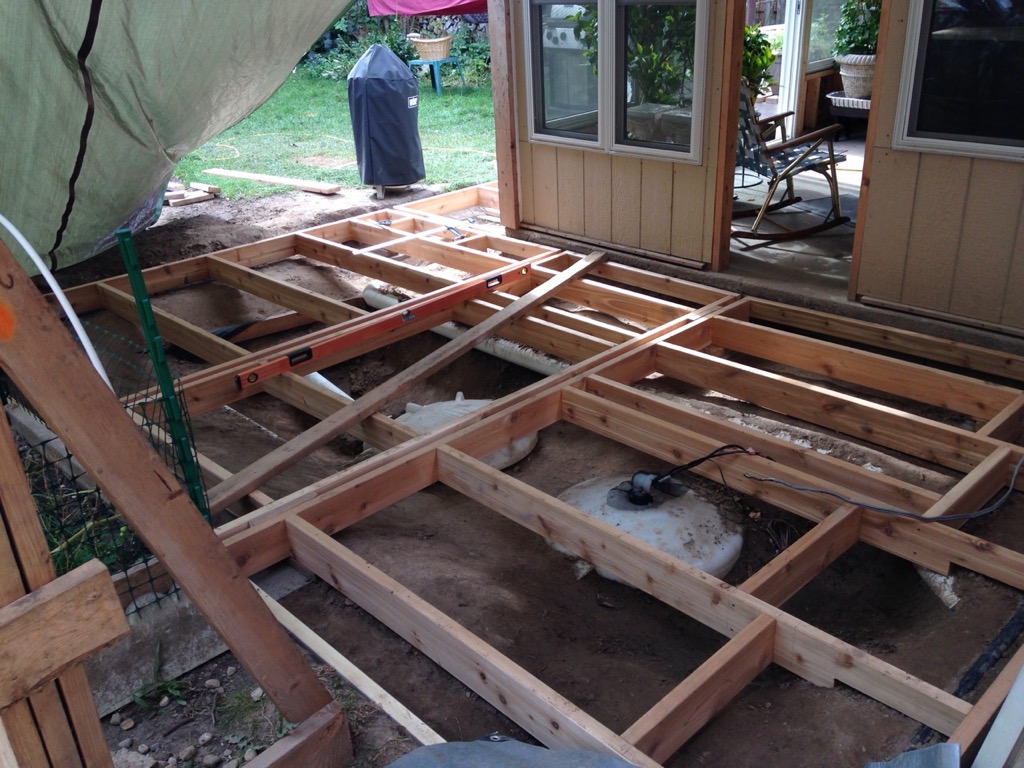
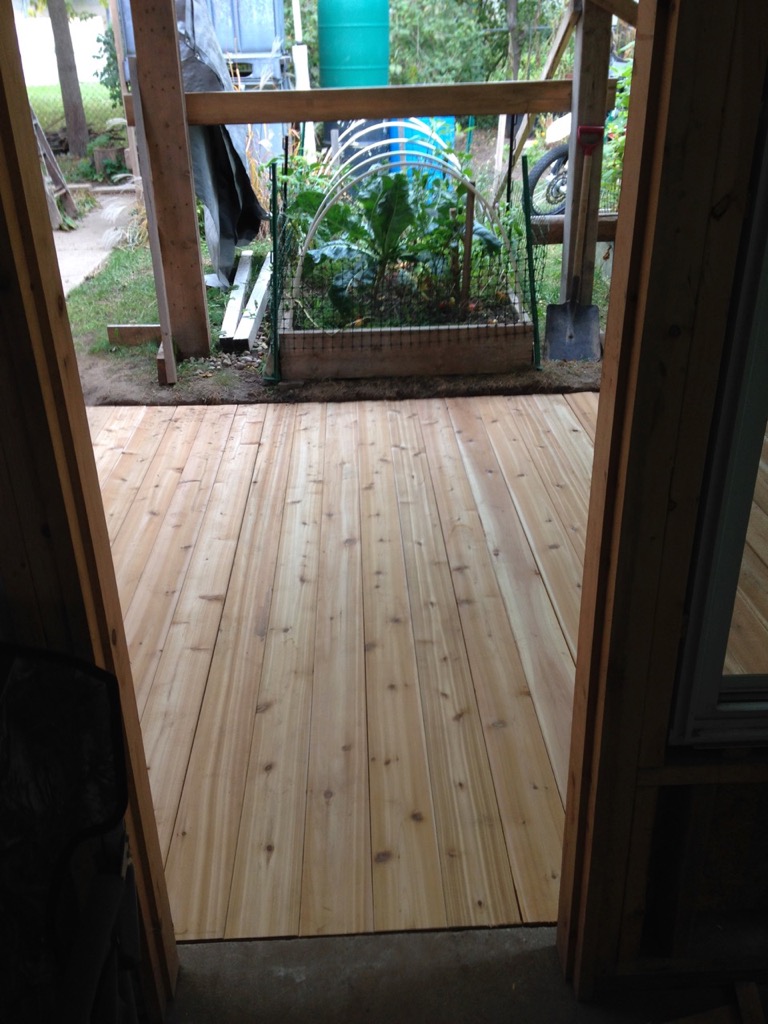 Once I had completed the plumbing, I built a cedar deck over the cistern. The deck structure was anchored to the concrete pads shown in the photo. The concrete pads themselves extend down into undisturbed soil about three feet so they would be minimally impacted by frost heave. It was early December when I put the final screws into the deck as it was snowing heavily. This time I was able to leave the water sitting in the cistern tank for five months before using it. We had a very dry fall and winter, so by February we were thankful that we had the cistern storage.
The Pump
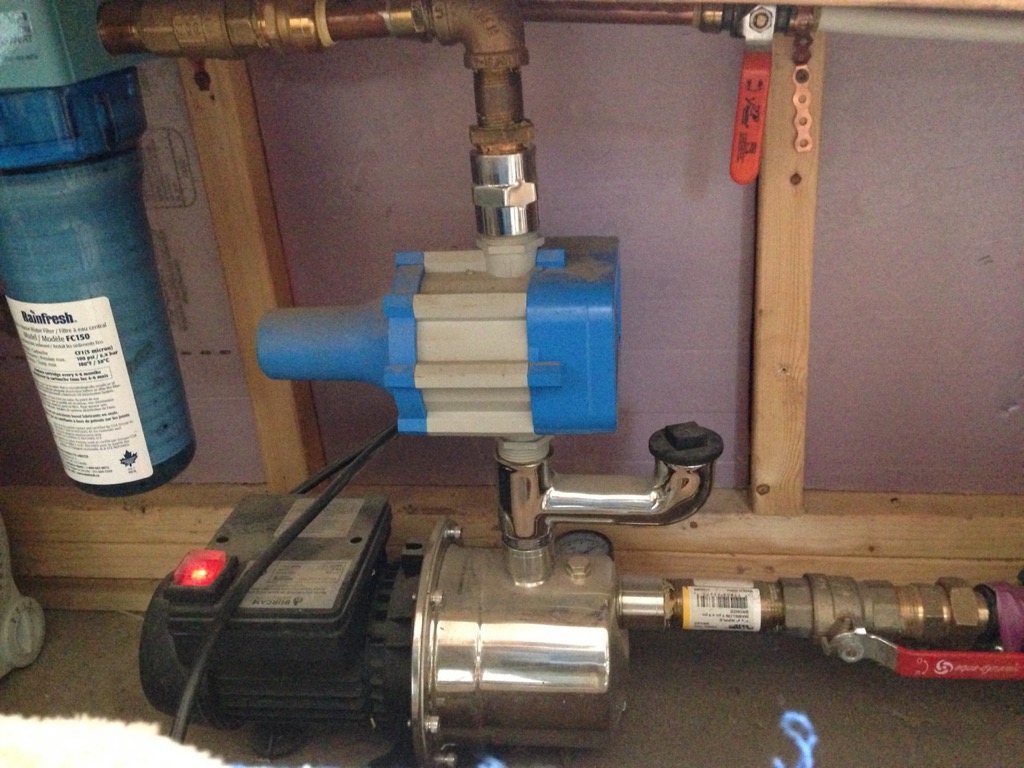 The jet pump pictured is Burcam Model 506532SS version W, which runs on standard North American household power, 120 Volts, AC. The pump is unique in that it incorporates a sophisticated pressure sensor so that it does not require a pressure tank. In this way it resembles an upscaled version of the RV pumps I had been using. This pump is rated at 7.5 amps @ 120 vac, roughly calculated, about 10 times the strength of the RV pump described in my previous article.
Since our fallback power is from the solar inverter 12 feet away from the pump, the pump is also powered in off-grid manner. When grid power is available, it uses grid power. When there is a power outage, the inverter automatically fails over to battery power. The batteries themselves are automatically charged using the solar panels.
Optimization
The jet pump worked admirably well and it pressurized at a higher pressure than the RV pumps did. My only complaint was that it tends to be noisier than the RV pumps. To reduce the frequency of it running, I subsequently introduced an optional six gallon pressure tank onto the cold water line. This was made simple once I had the correct threaded fittings, some Teflon tape for the seal, and some pressfit (i.e. “Sharkbite”) fittings to attach the 1” plastic to the existing 1/2” copper pipe in the house.
The pressure tank has a valve stem on the one end which resembles an automotive tire. The tank came pre-pressurized but can be adjusted to suit by reducing or increasing the air pressure slightly. The pressure tank is Burcam Model 600524B.
Initially, I used 1” PVC threaded fittings on the tank, pictured. The result was water tight for less than a week. On the following Sunday morning, when I did not really want any such surprises, I came downstairs to a puddle of water on the floor. The PVC elbow fitting on the tank had begun to split and a tiny stream of water was slowly soaking everything that should really have been kept dry.
The local plumbing supply store, with a reputation for carrying everything you need, did not have a replacement part in their inventory. How things have changed for small businesses since 2020! The nearest farm store did carry all the parts I needed, either in PVC, or in somewhat expensive, yet more durable, bronze.
The general rule of thumb for torquing threaded plumbing fittings is – hand tight, plus a quarter turn with leverage, i.e. with a pipe wrench. As I learned with PVC threaded fittings, hand tight for a big strong guy can easily result in over-torquing the fitting. How do we get a seal when the fittings tend to be so fragile?
Instead of teflon tape, some plumbers recommend a silicone based sealant when threading PVC. I normally use plumbers putty, although the packaging contains the instruction not to use it on threaded plastics. It did not explain why.
I chose a bronze replacement.
Initially, threaded fittings are prone to drip slightly when first assembled. If you used the proper sealant, the drip can take a day or two to resolve on its own.
Risk
Life is fraught with risk and life without water is fatal.
Some folks have expressed concerns with using plastics to store human consumable water. The questions raised seem to involve the potential for plastic containers to leech endocrine-disrupting chemicals into the contents.
To that, I also add the following observations:
- Plastics are widely used in ALL new building construction. All of the plumbing, piping, fittings and many fixtures are made of plastic.
- The water mains delivering municipal potable water are now nearly all plastic.
- The metal cans in which commercially canned food is packaged, are lined with plastic.
- The IBC totes I am using are made of polyethylene plastic. These totes, purchased as surplus, had been used for bulk transportation of food ingredients before I acquired them.
- The membranes that I might have used with a concrete cistern tank might have been plastic.
Is there anything that is not being made of plastic these days? - Hard plastics leeching estrogen-mimicking chemicals have empirically been identified as a concern with certain polycarbonates. Some jurisdictions have placed restrictions on such polycarbonates prone to leeching bisphenol in the context of food storage. Although I did not receive a materials manifest, the cistern tank does not appear to be of polycarbonate plastic.
- Politics can be downright nuts. Just because a government agency okays something as ‘safe’ or ‘dangerous’ does not mean that it is. Big government is filled with conflicts of interest and has proven itself to be a major purveyor of lies and deceit. Independent research is warranted.
- Do pay attention to the fact that some locales have statutes regarding the collection of precipitation.
- Check your local codes and choose your battles carefully if you live in such a jurisdiction. Above all, be discrete. Opsec, in the current vernacular, is essential.
Conclusion
It has been entirely possible to live well in this climate without an artesian well, spring, or water main connection. By God’s grace, he brings us rain and he accomplishes his purposes.
Whenever she comes for a visit, our youngest daughter rarely fails to mention that she likes the taste of our drinking water. Filtered rainwater does seem to taste better than other types of filtered water.
Rainwater also does seem to have many other advantages too: it is naturally soft, leaves no mineral residue on plumbing fixtures, reduces the amount of laundry soap required, and it constitutes a perfectly renewable and sustainable resource. And, because filtered rainwater is untreated it does not contain many of the contaminants that will ruin our home brewing and wine-making endeavours.
At this juncture, political risk remains unacceptably high and rather than abating, this perceived risk continues to rise. It is entirely appropriate to take measures now to develop lifestyle resiliency and independence while the cost of correcting mistakes is still fairly low. The capabilities to store water in sufficient quality and quantity in a manner that remains cool in summer and is resilient to freezing in the winter, should not be overlooked.
A shallow buried cistern requires a much less powerful pump than does a deep well. As such, it can easily be powered by alternative means such as a modest solar array. Also, it would be simple to add a hand pump, if required.
Our choice of tank proved to be economical, practical, and was installed by one person mostly working alone.
The manufacturer’s cistern burial instructions were, however, insufficient. Experience would recommend a procedure which involves anchoring the tank using concrete ballast, as described above.
The discrete underground cistern tank does have a few disadvantages, as well. Algae, for example, can be difficult to control in summer even if you keep rainwater stored filtered, cool, and dark. Underground, you also have the disadvantage of not knowing exactly how much water is in storage at any given time. How I eventually solved this so that I am not left guessing, will likely be a future documented project.
Final Thoughts
As Samuel Clemens once said, “It’s not what you don’t know that kills you; it’s what you know for sure that isn’t so.” As always, take the opportunity to test what you think you know while the opportunity to make inexpensive corrections exists.
And, as we continue to anticipate technocrats pushing the NWO Agenda, we take perspective from scripture:
“But as for you, ye thought evil against me; but God meant it unto good, to bring to pass, as it is this day, to save much people alive.” – Genesis 50:20