For starters I should let you know that I was school trained as a farrier at the Oklahoma Horse Shoeing School in Purcell, Oklahoma. I went there right after two tours in the U.S. Army. I worked full time as a shoer for about 10 years, then part time for another 10 years, and now I just shoe my own horses. In short, I have about 30 years and thousands of horses under my belt. I suspect the readers of this blog have already read JWR’s Patriots, which was the inspiration for this article.
The purpose of this article is to give you a usable reference to help you maintain the health of your horse’s feet, should you find yourself in a TEOTWAWKI situation where transportation via horseback is essential. I should also point out that all the information relative to shoeing, choosing sound horses for purchase, correcting traveling problems, forging corrective shoes, and identifying and treating ailments would take an entire book, which is likely a little too lengthy for this format. The aim of this article is to familiarize you with trimming horses feet and hopefully start you on a path of confidence and skill so that you can not only maintain your own stock but use this information as a barter skill to add to your TEOTWAWKI preparation toolbox.
Preparations
First, I think it’s best to give you a quick outline from start to finish of a basic trim. Later, we will go into detail on all the anatomy, tools, and procedures. (You can print, laminate, and keep this with your emergency horse trimming tool kit.)
Outline
Trimming horses feet:
- Starting with the front left foot, lift the foot and grasp securely and comfortably.
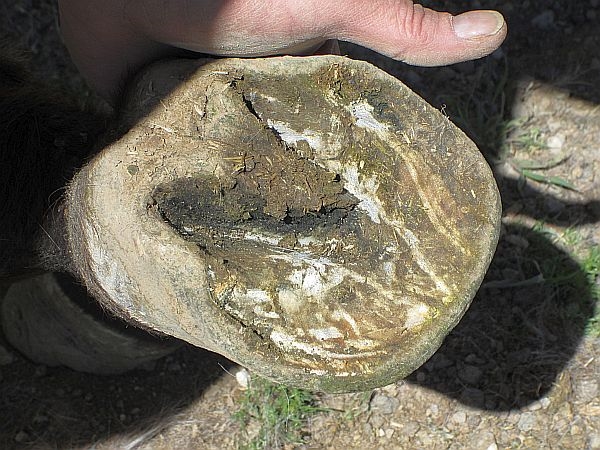
- Clean debris with dull side of knife.
- Check the foot for any sign of disease or injury.
- Use hoof knife to find the white line at the toe of the sole.
- Use hoof knife to concave the sole to the commisures, leaving enough dead sole to protect the foot.
- Use the hoof knife to trim the bars and frog.
- Use the nippers at the toe of the hoof wall to start a straight and level cut.
- Continue trimming the hoof wall along the left and right sides level with the initial cut.
- Check the alignment of the heels, using imaginary T line.
- Use the coarse side of the rasp to smooth and level the hoof wall from the heels to the toe.
- Check the alignment of the heels again, using imaginary T line and rasp to level.
- Use the coarse side of the rasp to cut a 45 degree angle across the front half of the hoof wall.
- Use the fine side of the rasp to “round” the 45 degree cut angle.
- Check again for any sign of disease of injuries and treat accordingly.
- Continue this process around the back feet and back to the opposite front foot.
Sounds simple enough, right?
Anatomy
It is important that you familiarize yourself with the anatomy of a horse’s foot. 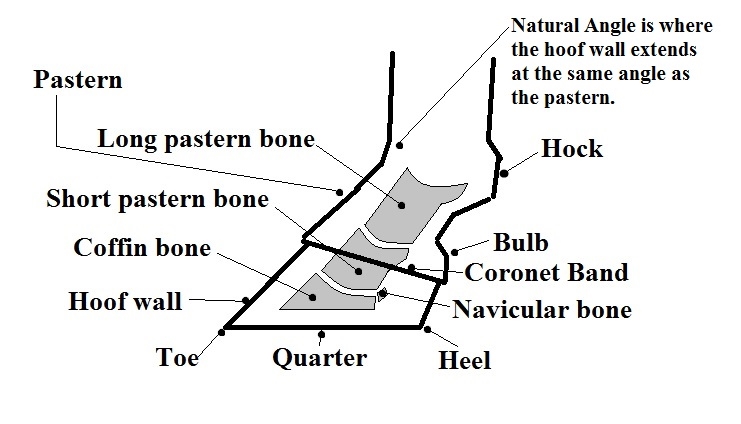 The outside shell that you see when the horse is standing is called the hoof wall. The hoof wall is named for the toe at the front, the sides are called the quarters, and the farthest back points are called the heels. Between and above the heels is a fleshy area, called the bulbs. At the top of the hoof wall, at the hair line, is an area called the coronet band. Inside the hoof the bone in the bottom of the foot is called the coffin bone. Just above that is the short pastern bone, with the long pastern bone above that and the navicular bone to the rear of the short pastern and coffin bone joint. If you lift up the foot and look at the bottom, just inside the hoof wall is a thin line called the white line.
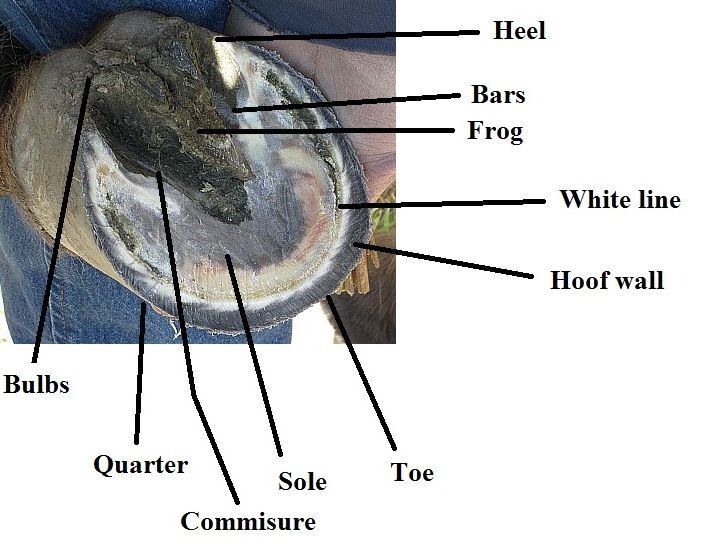 The white line is the laminae that adheres the hoof wall to the sole. After the white line is the sole. The sole comprises most of the area under the foot. The large leathery triangular pad at the rear of the foot is called the frog. On each side of the frog, there is a trough called a commisure, and just outside that, running from the heel to the front of the frog, is a line of wall tissue called the bars.
Tools
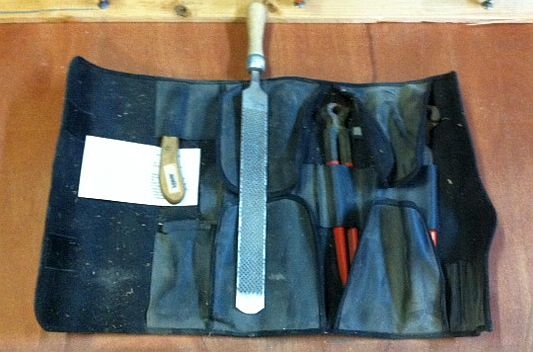
The next bit of necessary background reference is the tools. As a bare minimum to trim a foot, you will need a hoof knife, nippers, and a rasp. 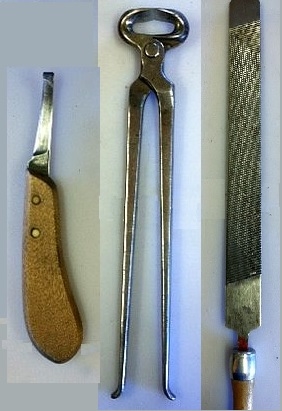 Hoof knives are hand specific; so, if you are right handed, you will need a right hand knife. I am right handed, but I also keep a left hand knife because it is much easier to trim the left side of the frog with a left-handed knife for a right-handed person. They also make a double-bladed hoof knife so you can have both knives in one tool. The knife should be kept sharp including the hook end, which is used to clean out hard to get to areas, like the commisure. Your nippers are for cutting the hoof wall. I recommend buying the best pair of nippers you can find. I went through three pairs of Diamond brand nippers before I finally broke down and purchased a pair of 15” GE nippers. The diamond nippers are fine for general purpose, but I have busted two pair on really hard mustang feet. The next tool on the list is a hoof rasp and rasp handle. Rasps are very sharp but also very brittle. When used for the intended purpose, they are like a hot knife through butter. However, if you accidentally drop or step on a rasp, they can snap like peanut brittle. So, for TEOTWAWKI, I recommend having at least one spare. The rasp has four cutting surfaces. The rough side is used for the bottom of the foot. The smooth side is used for the outside of the foot, and the edges are only used when shoeing. The last critical piece of equipment is an apron. I use custom-made chinks with a pocket and a magnet sewn onto the right outside of the knee.
 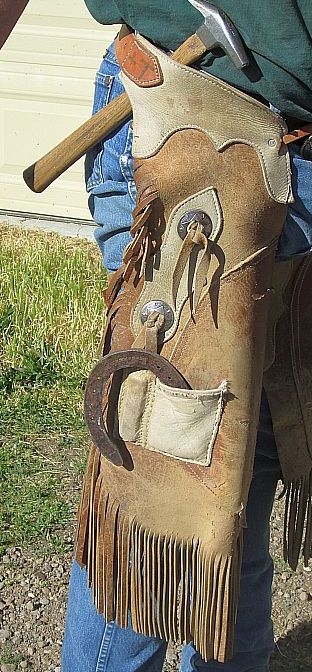 The apron will protect your legs from sharp edges of the hoof wall and provide a place to hold your tools, so you can use both hands to lift and position the horse’s feet.
The Details and Explanation
Now, let’s get to the detail and explanation that I promised you earlier. I like to start with the front left foot, because the left side of the horse is the most used and, hence, most familiar to the horse. It is important to keep the horse comfortable and relaxed as much as possible, as it makes your job a lot easier if the horse is not moving around trying to get comfortable. The whole job is about the horse, so keep that in mind; be considerate of the horse, and the whole job will be much faster. Pat Parrelli once said, “A horse doesn’t care how much you know, until he knows how much you care.”
Lifting a Horse’s Front Foot
Always start with your hand on the horse’s body just above the leg and run your other hand down the leg to the foot so the horse can follow what you are doing. When you get to the foot, if the horse is already broke to shoeing, it is likely he will just lift the foot for you. If he does not, you just grab hold of the hair at the back of the hock and give it a tug upward. If that doesn’t work, you can slide your hand above the hock and feel for a soft spot between the bone and the tendon. If you give that area a little squeeze, most horses will automatically give to this pressure and lift the foot. However you get them to give the foot to you, be prepared to take a good hold on the foot just above the hoof wall until you can get it high enough to grab it by the toe. When you have the foot raised, make a mental note of where the foot is. On a horse with straight legs, the foot will rise straight up and should be directly behind his elbow. The less you move the foot from that position the easier the job will be. If you try to pull the foot out toward you, it will be uncomfortable for the horse and he will likely be moving around trying to get comfortable while you are trying to work. So keep him comfortable and make your job easier. I keep my body as close to the horse as possible, raise the foot with my hand closest to the horse, then slide the foot between my knees, and switch to my outside hand in front of my knees to position the foot and get a good comfortable stance for both me and the horse. On the front feet, this position is very much more uncomfortable for you, but that bit of discomfort will pay off in the end with a happier more tolerant horse.
Cleaning the Foot
Once positioned, I start the trim by using the dull side of my hoof knife to clean out the foot. 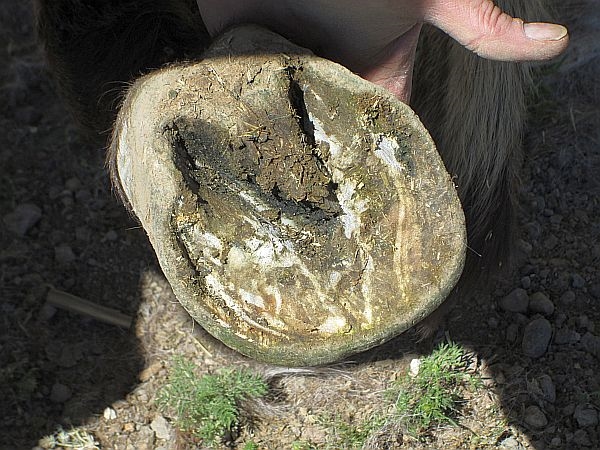 Keeping your knife sharp is critical for efficient trimming, and using the dull side of the knife means you don’t have to carry an extra tool to clean the foot. Plus, it protects the sharp side of your knife from rocks and gravel packed in the dirty foot.