


One of the challenges of keeping domestic animals is providing them with forage during the winter months, or year-round if you live on a small lot. We started keeping sheep in a cold climate on a small lot as a way to feed our family when we were paying off student loans and a mortgage at a high interest rate. Haying by hand was a way to make use of previously unproductive spots on our land (and other people’s land), because a person with a scythe can work in places that would be lethal by tractor.
Believe it or not, hand mowing is sometimes a competitive sport! The Addison County Fair in Vermont had a hand mowing contest for many years, and it was still going in 2021. There’s nothing like competition to motivate improvement, and it was a great way to connect with more experienced hand mowers to learn from them.
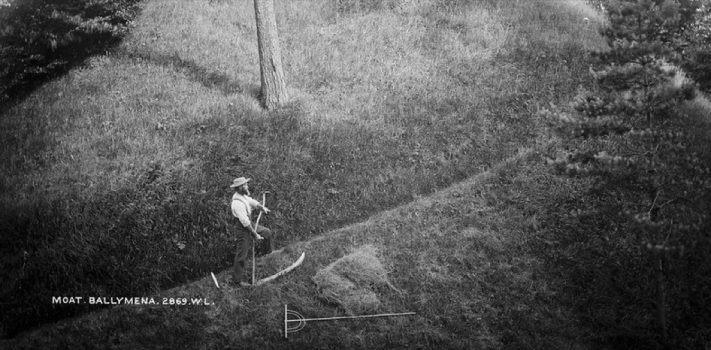
If you want to start hand mowing, learn about the equipment first. There’s a lot more to it than just “a scythe”.
The Snath
Every scythe consists of a handle, called a snath, and a blade. Let’s start with the snath.
European snaths are straight. They are much lighter than American snaths. They are meant for cutting grass, so they aren’t as versatile as an American snath. But for cutting grass hay, you can go much faster with a light snath than with a heavy snath. New European snaths are available that can be custom fit to your size.
An American snath is curved, and it has two handles, called nibs, that stick out at a right angle from the snath. Usually, the placement of the nibs is somewhat adjustable, so that different-sized people can use a single snath at different times. (Some old ones were made when people were smaller-statured, so very tall people might not want to use a beautiful antique American snath.) American snaths are usually made of wood, and are mostly available in used condition. The thickness of snaths can vary a lot, depending on what it is being cut. Cutting grass hay doesn’t require as heavy a snath as brush or tangled vetch.
Choose your snath based on what you want to cut, and how much you want to cut. If you have a field that’s been hayed for years and is a mostly weed-free field, then a European snath is the better choice. If you are just getting started haying a field, or if you’re taking advantage of otherwise unusable places that are nowhere near level, an American snath is likely to be a better choice. (In our case, we didn’t so much choose a snath as inherit one, but luckily for us, Great-Grandpa knew what he was doing when he got that snath.)
To position the handles, bend your elbows to a right angle in front of you, keeping your wrists straight. The handles should be placed where your hands are. With time and experience, you can move the handles a little farther apart.
Blades
Now let’s look at blades. Brush blades have little curvature, and typically, they are no more than 20” long. They are usually a fairly broad blade. Grass blades are longer, lighter and more curved. For cutting mixed grasses and alfalfa, a long blade works, but it should be broader. Long blades are less forgiving of errors in technique but cut more grass faster. The blade should be set with an angle such that when standing straight with the end of the snath on the ground, you can reach the tip of the blade with your toe. If the angle of blade is wrong, it is harder to use.
Maintenance
Blade maintenance is crucial to success in hand mowing. Maintenance is not a once-a-year, once-a-month, or once-a-week thing; it’s ongoing and constant. A hand mower carries a stone or a slick in a pocket or in a belt pouch, and uses it frequently. If your blade isn’t sharp, you end up working a lot harder, and you don’t so much cut the grass as beat some of it into submission. One hand mower whom we know has made a small portable anvil, and keeps it handy along with a peening hammer.
A hammer and anvil is used to maintain European blades’ shape and edge. For some American blades, the hammer and anvil can be used to maintain correct shape, but not edge. American blades, which are thicker and, in the case of older blades, made of harder steel than European blades, must be ground to shape without overheating them. Maintaining blade shape is important because when the blade strikes a rock, a fencepost, or anything harder than what it’s intended to cut, it gets deformed to some degree. (This is not an if, it’s a when. Resign yourself to it!) Any deformity of the blade is bad, and a gross deformity may mean that it’s time to retire that blade. Take the time to learn how to shape your blade properly. It is best learned by watching someone else do it correctly, and asking lots of questions.
The sharpening stone or slick is used to maintain a sharp edge. (A slick is a piece of leather, treated with resins and abrasives, that is fastened to a piece of wood.) Like sharpening a knife, opinions vary on the best tool and the best technique. The technique that we use is to draw the stone or slick in one direction along the edge of the blade, with one stroke for the full length. The stone or slick should be at a very low angle, which makes a lot of sense when you see it. (Think about it: The higher the angle, the more you’re mashing the edge of the blade over on itself.) Give the blade about a half dozen strokes, then flip it over and do the other side. When competing, I would use fewer strokes and flip the blade several times. A stone takes small amounts of material off the blade and will ultimately wear it out. A slick doesn’t do that as much, but usually a slick is bigger and harder to carry.
A scythe blade should never be put away wet or dirty. Carefully wipe it dry with a rag, and give it a light coating of oil. Treat the edge with respect because it is a slicing tool.
A wooden snath should be oiled periodically, like any wooden-handled tool. Frequency will depend on how wet or dry your climate is. Metal snaths may need occasional oiling to prevent rusting (unless they are aluminum). All snaths should be wiped off and put away clean and dry.
Mowing Technique
Now let’s look at mowing technique. The usual beginner’s error is to swing the snath so that the blade makes an arc that starts high above the ground, goes low, and ends high above the ground. If you do this, you will generate a stubble path that is high on both sides and low in the middle. You want your stubble to be uniform height, less than an inch. To achieve that, position the blade so that it’s parallel to the ground, keeping the heel of the blade closest to the snath at the ground level as you swing the blade, pivoting at your waist, starting with the snath at about 80 degrees off to one side (about the 2:30 position if you use an imaginary clock face) and moving to a point directly in front of you.
If you’re right-handed, swing from right to left. Aim to keep the tip cutting just a few inches into the grass in each swing, slicing the grass, not hacking. You should normally avoid pulling the blade toward you. Be careful to avoid snagging the tip because any large force on the tip will break the snath. When learning, start slowly and gently, because if your blade is properly sharpened, you need little force or speed to cut the grass. (I know, it’s counterintuitive.) When you get to the point where your stubble is nice, short, and even, then you can speed it up.
There is a rhythm to hand mowing: Draw, step, swing, draw, step, swing. If you step before you draw, your blade is in front of you, underneath a pile if freshly cut grass (which can be heavy). So, once you’ve swung that blade across in front of you, draw it back out, without lifting, back to the 2:30 position. Then take a step, and swing the blade across in front of you again.
Very little brute force is required (although there is an exception which I will mention later). If you find yourself using a lot of effort, you will tire quickly, and you won’t be able to cover as much area. Let the edge of the blade do the work for you. When you find that you are using more force to cut the grass, that’s a sign that you need to stop and sharpen that blade. You’ll know that you have the technique down correctly when your stubble is short and even, and the blades of grass that you’ve cut are sliced neatly.
Once you have the basic technique down, you’re ready to attack a nice flat field. Start with a rectangular field if you can, and start at a corner. Focus on an object (like a fencepost or a tree) to define a straight line, and start cutting toward it. (Humans don’t naturally walk in straight lines.) Focus mainly on your stubble, but give your object a periodic glimpse to keep your line straight. Once the first line is laid down straight, you will just follow it with succeeding lines. If that first line isn’t straight, you’ll repeat any deviation again and again and again, through the whole field.
Watch your stubble. Any problems with either your blade or your technique will show up first in your stubble. Ragged stubble or shredded grass means a dull blade, and varying height may mean that you’re starting to unconsciously favor a muscle. If you see varying height stubble that is cleanly sliced, slow down for a few strokes and analyze what you’re feeling. It’s easier to prevent an injury than to fix it.
While you can work a field back and forth, I prefer to only work a field in one direction (meaning that if my first line is west to east, all succeeding lines will be west to east). By only working a field in one direction, all the downed grass is oriented the same way, and that makes life easier when you’re raking your hay. Especially if you’re using a rake that’s drawn by a horse or tractor, cutting in one direction with constant swath width is a good idea. If nothing else, it gives your arms, shoulders, and back a brief break at regular intervals. I take the time as I walk back to my starting side to look for hazards.
Always watch for hazards. Know and avoid toxic or noxious weeds, especially near field edges or ditches. Poison hemlock kills anything. Jimson weed, poison ivy, or deadly nightshade are not things you want to store. Wilted cherry leaves contain cyanide, and it only takes three or four wilted leaves to kill a horse. Fresh or really old ones may be tolerable. Be alert for old fence wire and other obstacles.
Early in the season, be alert for fawns, especially newborns. Often, they won’t move, even when you’re right on them. If you aren’t watching, you can kill a fawn and destroy your snath in one stroke.
Once you get straight lines and flat terrain down, you’re ready to tackle slopes, gullies, ditches, and all the complicated stuff that mechanized haying can’t touch.
While I’ve mostly talked about grass hay, monocultures are abhorred by nature, so you are likely to be dealing either with a mix of grass species, or a mix of grass, legumes, and weeds. Many weeds are not noxious or hazardous; they are a weed because we didn’t plant them, or they are a weed because they’re growing in a place where we don’t want them to grow. Dandelions in hay are beneficial because the greens are nutritious, but they’re still considered a weed. Vetch, a legume and also considered a weed, is very nutritious, but wow, is it nasty to cut! Cutting vetch is where a certain amount of brute force is helpful, because it tangles itself on the blade. The more varied the vegetation that you are cutting, the stronger the case for a wider blade.
Hand mowing is vigorous exercise, and you rip through both water and electrolytes. It is vital to replace both. Do not ignore the signs of dehydration (headache, dry mouth, difficulty focusing, slow capillary refill on a skin pinch) or heat exhaustion (profuse sweating, nausea, altered level of consciousness), because these conditions are easier to prevent than cure. Any heat injury leaves you more susceptible to a subsequent heat injury. Before there was Gatorade to replace electrolytes, there was a beverage called switchell. Here is the recipe:
Switchell Mix Recipe:
- 1 gallon boiled water
- 2 cups honey
- 2 cups cider vinegar (or 1 cup vinegar and 1 cup lemon juice)
- 1 tablespoon salt
- 1 teaspoon ginger (optional)
Weather
Watch the forecast before you cut. Useable hay must dry quickly. If your hay is rained on while it’s drying, it loses nutritive value. Any hay that has been rained on should be tedded (lifted and turned) and allowed to dry thoroughly before storage. Freshly cut hay is about 90% water; dry hay is under 20%, so cut grass will be heavier if you feed it immediately.
How long you leave your hay down to dry depends on your climate. I’ve lived in places where we had to leave it down for as much as a week, and had to ted it. I’ve also lived in places where it dries in a day or two, and no tedding is necessary. Ideally, your hay should be dry enough that it doesn’t start fermenting or molding after it’s stacked or baled (which can lead to spontaneous combustion). But you also don’t want it so dry that it crumbles to powder in your hand, or is completely blanched.
Hay Storage
A leaf rake will not work for raking hay. A hand hay rake is over two feet wide. It has a light handle and has tines four to six inches long. The tines are wood dowels parallel to each other, and separated by at least two inches. You can replace the dowels when you break them, which is easier than replacing the handle or back of the rake. If you can’t get or make a hay rake, a pitchfork is a better choice than a leaf rake.
Should you stack your hay loose, or bale it? If you can bale it, then do it. Baled hay is easier to move, keeps longer, and it maintains its nutritional value longer. Especially if you are feeding animals that you’re milking (cows, goats, or sheep) and have a lot of acreage, look into getting use of a baler. In the very old days, a hay press was used to form bales. Stacking loose hay is an art on its own.
Whether you’re trying to maintain a few animals on small acreage to weather hard economic times or you’re trying to prepare for civilizational collapse, haying by hand is a skill that can help you. It doesn’t require a large investment for the basics. As long as you’re willing to learn, you can make it work.