


In The Wizard of Oz, Dorothy’s mantra is “There’s no place like home, there’s no place like home”, and the entire movie is pretty much about her following a yellow brick road to get there. Many of us spend a good chunk of our lives away from home, whether it’s at work, on vacation, visiting family or friends, or just going on a camping, hunting or fishing trip. If you spend any amount of time more than a few miles (or kilometers) away from your home or bug-out location (BOL), there’s a chance that an emergency or disaster might strike while you’re away, requiring you to travel your own personal yellow brick road to get back. While there have been a number of articles by myself and others in SurvivalBlog.com about kitting out a Get Home Bag (GHB), less attention has been paid to planning how you would get back to your home or BOL. The purpose of this article is to provide some tips and guidance to help you plan your journey home from wherever you may be when disaster strikes.
Documentation
Unless you’re blessed with an eidetic memory or you only ever travel to one of two nearby locations, you’re going to need some method of creating, storing, organizing, and updating get-home route plans. I highly recommend Joplin, which is a free open-source note-taking tool that supports formatted text, embedded images, attached files, and many other features, and is available for Windows, macOS, Linux, Android and iOS. It also supports synchronization of all notes (and hence your route plans) between multiple devices using a wide range of cloud services. This allows me to create and manage my get-home route plans on my desktop computer and easily access them on my mobile device when I’m on the road.
Note that once you’ve created a route plan you’ll need to run Joplin on your mobile device to synchronize a local copy, which you’ll want to do before you start traveling, since Internet access will probably be one of the first things to go in many disasters. I have a Nextcloud personal cloud service running on a Raspberry Pi on my home network for synchronizing Joplin (among other things), so I don’t have to worry about anyone else reading my notes, and Joplin also supports strong end-to-end encryption to protect my data in transit. I’ve created a Joplin template that I use every time I create a new route plan; it has predefined sections for everything I want to cover.
The other nice thing about Joplin is that it has a great print feature, so you can print off a hardcopy of your get home route plan to take with you in case we’re hit with an EMP and all of the electronics are down. I usually print hardcopies of any routes that I may need on a regular basis, and coat them with AquaSeal map sealer or use a DIY method to protect them. Alternatively, you can print them off and store them in a waterproof map pouch or large ziplock baggie to protect them until you need them. In order to reduce weight and bulk I print my route plans double-sided in color on 8.5” x 11” (A4) paper using a quality printer and fresh ink cartridges.
Route Planning Software
The first thing I do is plan my initial route – this is my proposed route without any potential hazards, obstacles, weather, etc. taken into account. My tool of preference is the Open Route Service (ORS), which is an online open-source route planning tool. I changed the map source to OpenStreetMaps (OSM) and the units to miles – click the right arrow on the left side of the screen, click on the gear icon, expand ‘Map view and extra information’, then select ‘OpenStreetMap’ as the tile provider and ‘Miles’ as the units, but you can set it up any way you want. You could also use commercial offering like Google Maps or Bing Maps, but they lack one feature that we’ll use later on – the ability to export a GPX track file, which is a list of lat/long coordinates that define the route and that can be imported into mapping software on your mobile device. Most commercial online mapping tools also collect a lot of information about you and your activities, so I try to limit that as much as possible.
Like most map routing services, ORS has the ability to choose between driving, walking, biking and public transportation for your route, and provides some additional options for each. For example, there’s regular walking and hiking, on-road biking vs. mountain biking, etc. – you can choose the one that works best for you, or just leave the defaults.
I tend to do all of my route plans as both walking/hiking and biking, on the assumption I may be able to acquire a bicycle immediately after a potentially critical situation arises that requires me to get home ASAP (I carry a bunch of emergency cash, and include the addresses of local bike shops in my planning). If you’re going to be a long distance from home you may want to consider acquiring a bike with a small trailer before starting out, as this would allow you to easily carry more gear. You can also plan on having a motor vehicle to drive home, but I believe there are too many scenarios where that would be difficult if not impossible and I want to be prepared for a worst case.
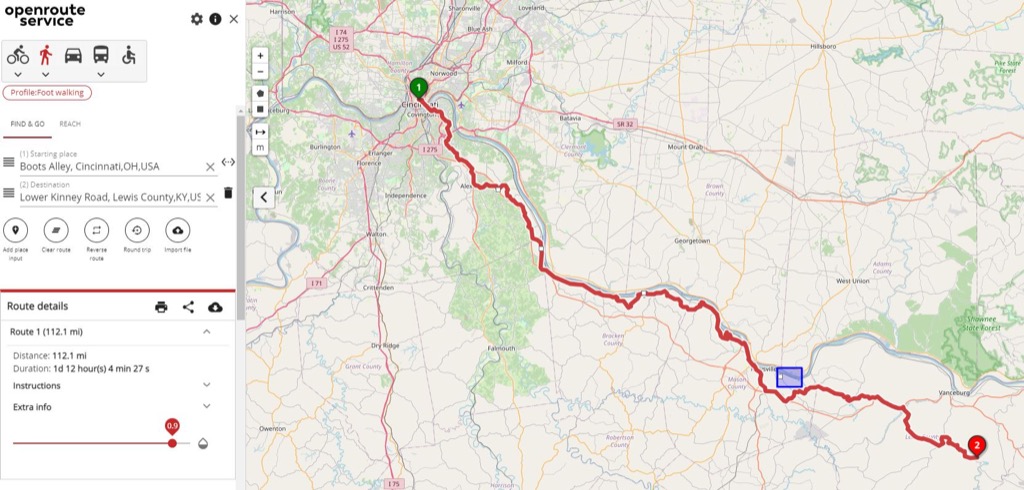
ORS provides a couple of features that are very useful for get-home route planning – the ability to manually change the route, and the ability to exclude areas from route planning. To manually change the route you just move your mouse over the route and drag the white box that shows up to the point you want to include on your route. ORS will re-calculate the route to take you through the point you dragged it to. Exclusion zones give you the ability to define an area you want to avoid; there are two methods for doing this – a rectangle or a polygon. The two tools on the maps are circled in the following picture:
 The top one is the polygon tool – click on the tool, then click on a series of points to enclose the area you want to avoid; when you’re done, click back on the first point and ORS will draw a blue polygon and change your route to avoid that area. The rectangle tool is similar, but you click on it, then click and hold on one corner of the zone and drag the pointer to the opposite corner. When you release the mouse button it will fill in a blue rectangle and route you around it. You can delete any exclusion zone by clicking directly inside it and clicking on the trash can that pops up. Here’s a picture of a sample for a walking route from downtown Cincinnati, Ohio to Camp Dix, Kentucky, with a small rectangular exclusion zone near Marysville, Kentucky that simulates a location where hazardous chemicals might be stored:
Note that ORS limits the size of exclusion zones, so for a larger area like city you want to avoid you may need to create multiple smaller zones, or drag the route around the areas you don’t want to go.
ORS also provides different map ‘layers’ that show different types of maps – I tend to use the default OpenStreetMaps, but there are satellite imagery, topographic maps, etc. The icon in the upper right-hand corner that looks like three sheets stacked on top of each other allow you to switch between the different layers. Satellite imagery is useful for identifying wilderness areas you can use for taking breaks or sleeping.
Another point to keep in mind with any of the route planning web sites and applications is that when you select walking for your transport mode, they won’t route you anywhere you’re not allowed to walk under normal conditions. I’ve done walking plans where ORS routes me miles out of the way to avoid walking a couple of hundred feet on a highway, so you’ll need to keep in mind there may be alternatives available, depending on the scenario. After a major disaster a lot of existing safety regulations will probably become less critical, and you most likely won’t get in trouble for hiking along the side of a highway if there are no cars running.
Alternate Route Options
While most route-planning applications (including ORS) assume you’re perfectly happy walking along sidewalks and other public pathways, there may be scenarios where you prefer to avoid obvious paths like roads as much as possible while you’re making your way home. There are a couple of options for more discreet travel pathways that you may want to consider, like hiking trails, railroad tracks, and power line right-of-ways.
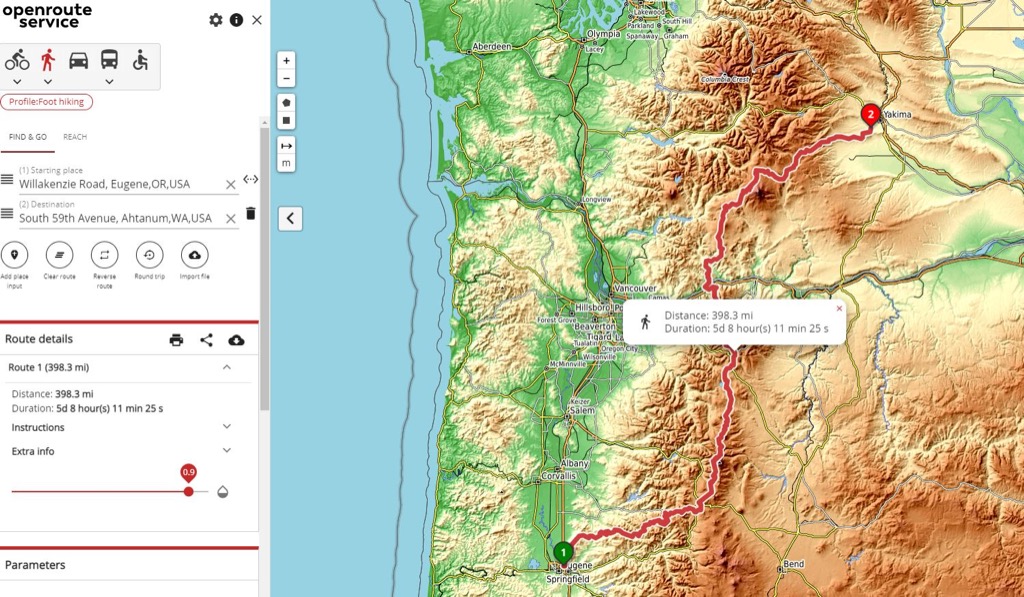
Hiking trails offer one good alternative to public roads and ways. There typically won’t be a lot of folks hiking after a major disaster, and a lot of the trails are well-documented and marked. The good news is that when you select ‘Foot Hiking’ as the mode of transportation in ORS, it will automatically route you via hiking trails if they’re available. Note that this may not always be the fastest route – here’s an example:
Say you live in Yakima, Washington and you’re visiting Eugene, Oregon when disaster hits and you realize you need to walk home. Here’s the route ORS calculates if your mode is set to ‘Foot Hiking’:
And here’s the same route plan except for the mode being set to ‘Foot Walking’:
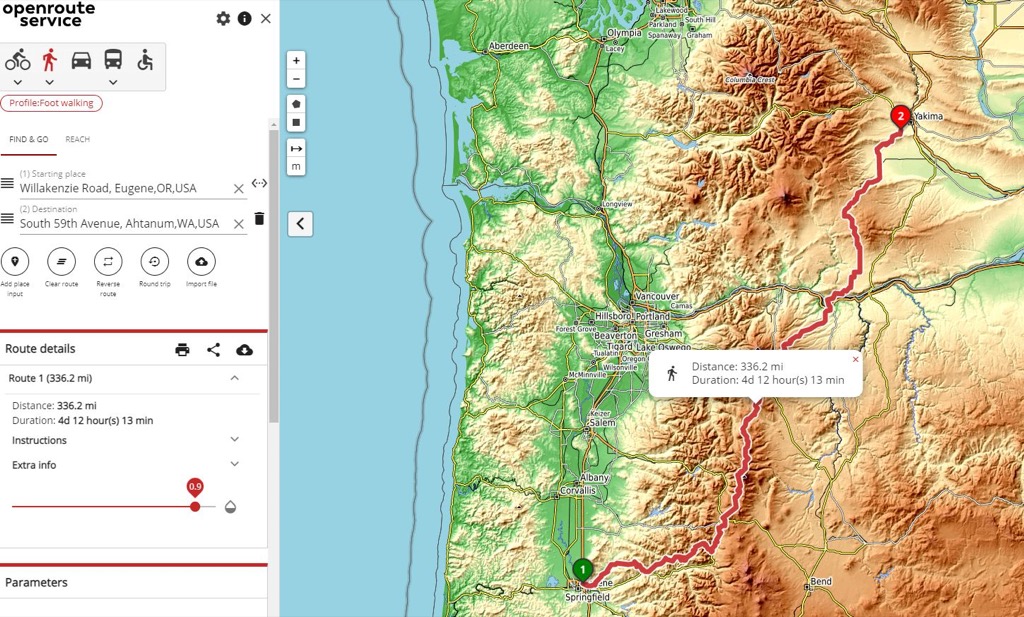
The Hiking route has you following the Pacific Crest Trail for most of the trip, but it’s around 60 miles (97 km) longer. You’ll need to balance your perceived need to maintain a low profile with potential time and distance tradeoffs. If you do choose to incorporate hiking trails you can easily identify them as dotted lines on ORS, and there are a lot of websites that can provide you with additional details on things like shelters, campgrounds, water sources, etc. that you can find along the trail. Here are a few:
- AllTrails
- Appalachian Trail
- Pacific Crest Trail
- Continental Divide Trail
- The Great American Rail Trail
- Others
Many states and countries provide detailed online maps of their hiking trails and campsites, and in the US, REI stores typically have a great selection of paper maps for many local and national hiking trails.
(To be continued tomorrow, in Part 2.)