


(Continued from Part 1.)
Hidden Rooms and Secret Passages
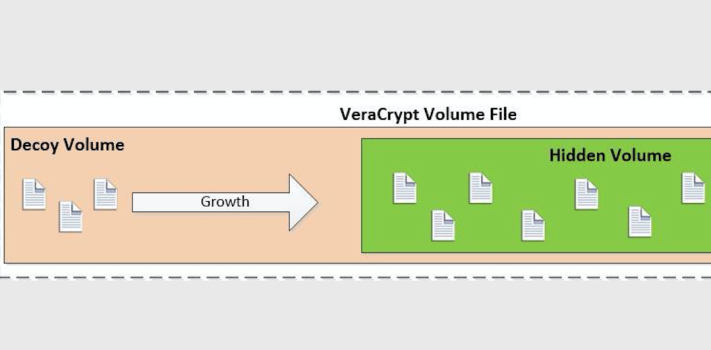
VeraCrypt has an extremely useful feature called a ‘hidden volume’, which is what we’ll be using to hide and protect sensitive files. As I mentioned earlier, a volume is basically a chunk of storage (file) that Windows mounts and assigns a drive letter to. What VeraCrypt does is allows you to create a big encrypted file and mount that as a virtual storage volume – ‘virtual’ in this case just means that the volume doesn’t correspond to a unique physical storage device, since the file can be moved anywhere and still mounted and accessed. However, VeraCrypt goes one step further and allows you to create a second hidden encrypted volume inside the first volume – which volume is mounted depends on which password you type in when you tell VeraCrypt to mount the file that contains the volumes.
In order to keep the storage space separate for the two volumes inside the file, VeraCrypt stores files in the outer decoy volume starting at the beginning and moving towards the end. The inner hidden volume is created from the end of the file and is filled in towards the front. This creates a situation that you need to understand – if you have the outer decoy volume mounted and add a lot of files after you’ve created a hidden inner volume in the same file, you could potentially overwrite the beginning of the hidden volume, which will mess up the hidden volume and prevent you from ever mounting it again. Conversely, once you’ve created the volume file and a hidden volume inside of it, you can’t expand the size of either without messing things up.
![]()
Unlike a lot of other encryption solutions, VeraCrypt doesn’t store any kind of header or metadata in the volume file itself – if someone were to dump the contents of the file all they would see is a file full of what looks like random numbers.
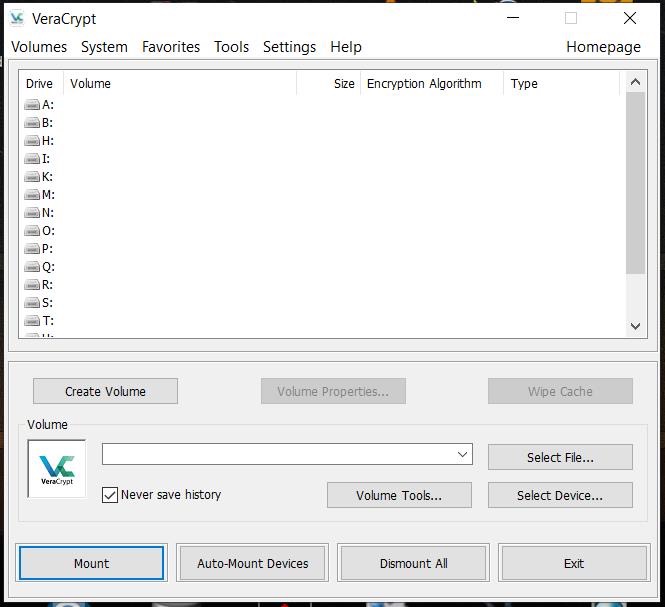
To get started, double-click on VeraCrypt.exe to run VeraCrypt from the removable storage device (‘F:\VeraCrypt\VeraCrypt.exe’ on my system):
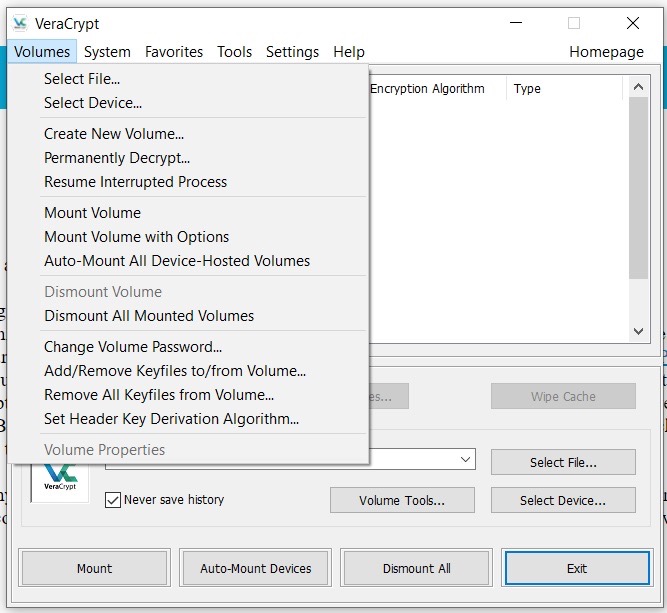
Select ‘Volumes/Create New Volume…’
The VeraCrypt Volume Creation Wizard will pop up:
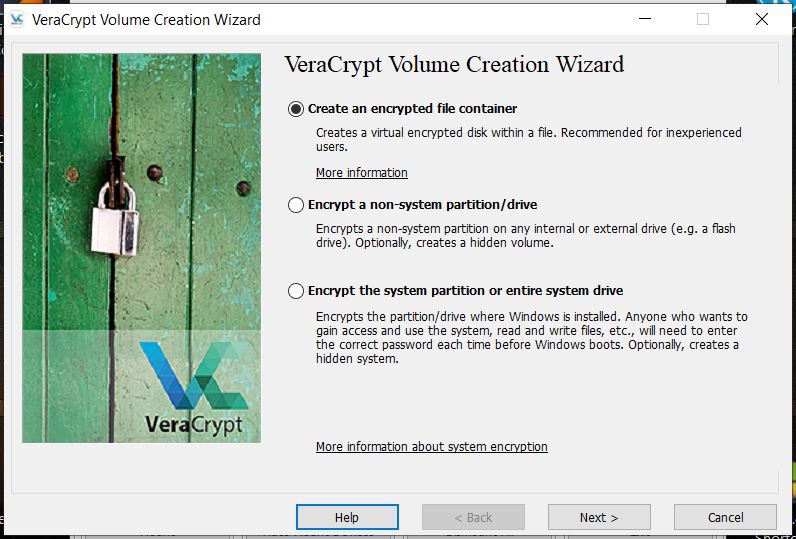
Select ‘Create an encrypted file container’ and click ‘Next >’
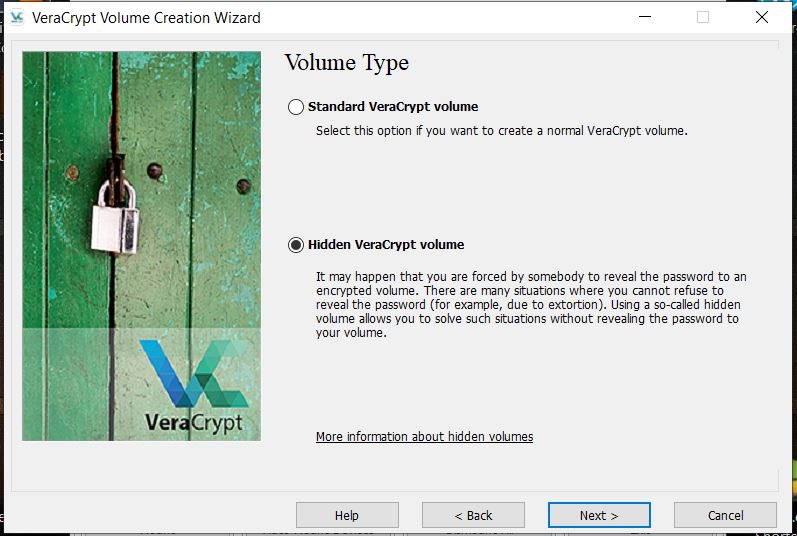
Select ‘Hidden VeraCrypt volume’ and click ‘Next>’
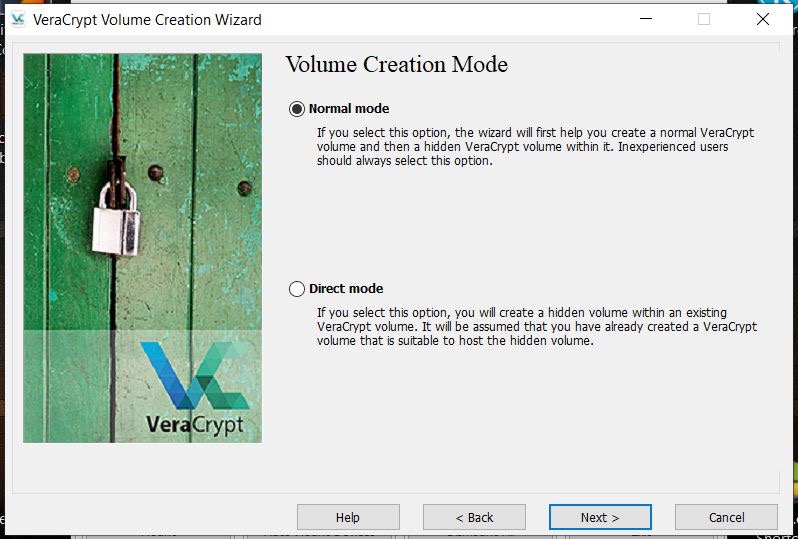
Select ‘Normal Mode’ and click ‘Next>’
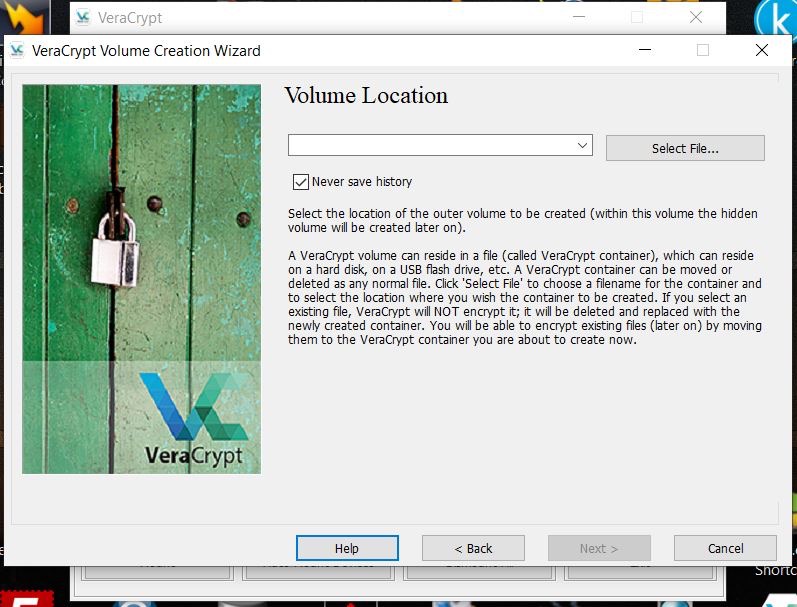
The Volume Location windows will be displayed – Click ‘Select File…’ to get a ‘Specify path and file name’ window:
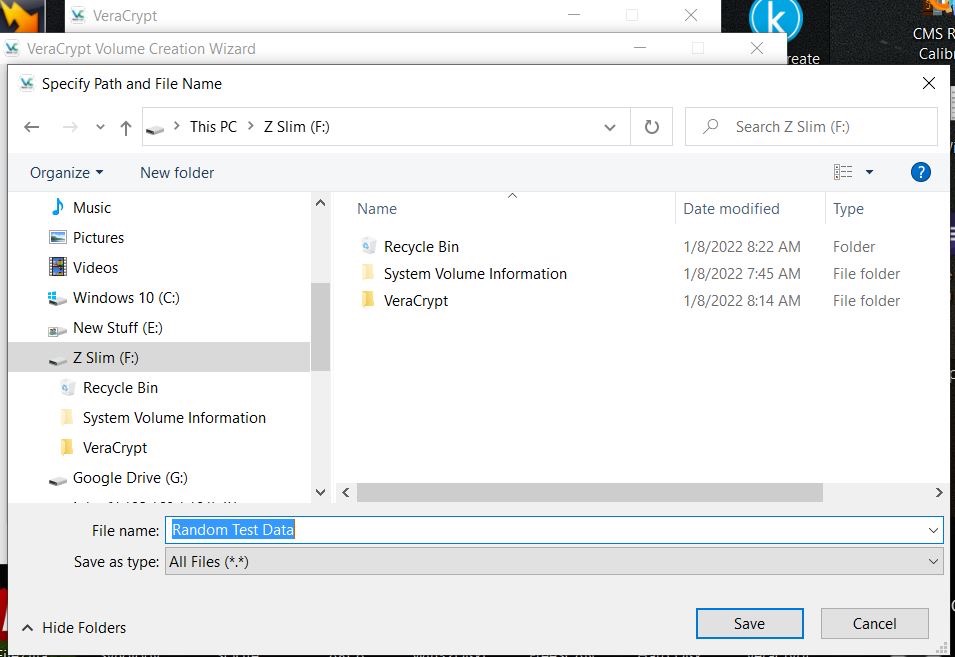
Navigate to the root folder of your external storage device (F:\ for me) and enter a file name. I named mine ‘Random Test Data’. Note that the file name doesn’t have to have any extension (like a .doc or .txt), but it can if you want to use one. This is the file that will contain your encrypted outer (decoy) and hidden volumes. Try to avoid obvious and easily searchable file names like ‘My Secret Data’ or ‘World Domination Plans’. Click ‘Save’ to get back to the previous window, make sure that ‘Never Save History’ is checked and click ‘Next…’. A screen providing a notice that you’ll be first creating the outer volume will pop-up – just click ‘Next…’.

The next selection window allows you to choose how the outer decoy volume is encrypted. Encryption algorithms are an extremely complex topic which is way beyond the scope of this article, so I’m just going to recommend you leave the defaults that VeraCrypt provides (‘AES’ and ‘SHA-512’). If you’re curious how well each of the different algorithms will run on your system you can click on ‘Benchmark’ and VeraCrypt will run a quick test and show you the results. Once you’re done here, click ‘Next >’:

Now you can set the size of the outer decoy volume. Remember that your hidden inner volume will be stored inside the outer one, so the decoy volume will need to be big enough to hold the decoy files as well as the files you really want to protect. I recommend that you use as much of the space on your storage device as possible, but at least 32GB. I used 210GB out of the 232.82GB free, which left me some extra unencrypted space on the F: drive in case I wanted to use it to store some noncritical files later on. Set the size (don’t forget to select ‘GB’ for Gigabytes) and click ‘Next>’.
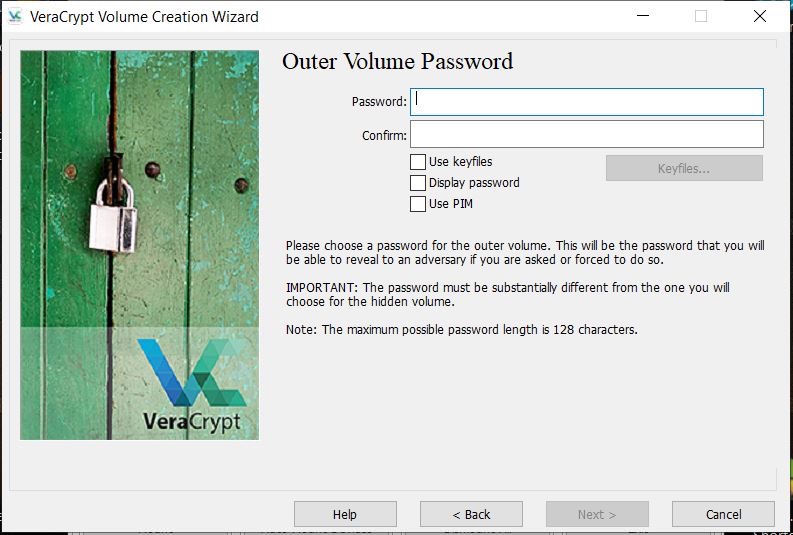
Next, set the password for the outer decoy volume – this is the decoy password that you’ll provide if you’re ever coerced into giving someone access. This should be a moderately complex password like you’d use for an online service. Leave all of the options unchecked and click ‘Next>’. Note that if you use a weak password you’ll get a warning pop-up – it’s up to you if you want to ignore it. This password isn’t stored or remembered anywhere, so don’t lose it! If you want to check on the strength of your password, here’s a decent and secure online tester – https://www.uic.edu/apps/strong-password/.
Next you’ll get a question about storing large files – unless you’re planning to store huge video files or databases larger than 4GB as part of your decoy file collection I recommend just leaving ‘No’ checked, but for the outer volume it shouldn’t really matter. Click ‘Next>’.
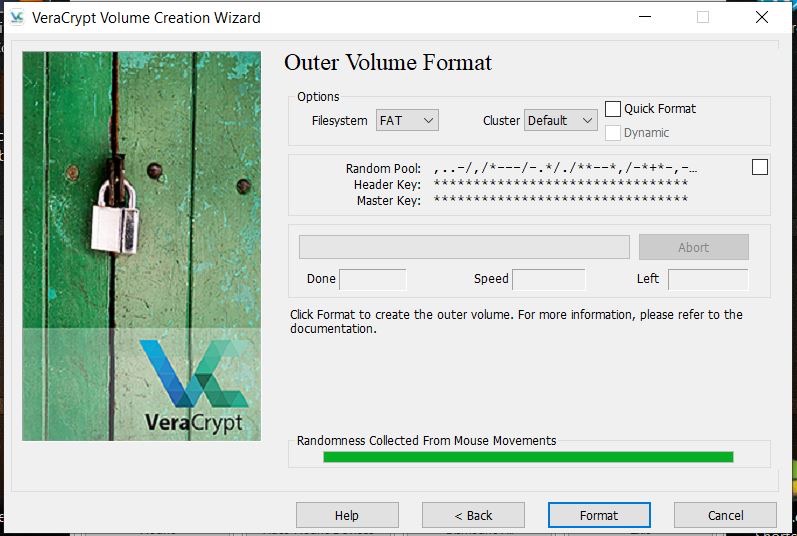
The ‘Outer Volume Format’ window generates the random encryption key based on your password and mouse movements. Just keep moving your cursor randomly around inside the window until the progress bar at the bottom gets to the end, then click ‘Format’. The more and faster you move your mouse, the greater the randomness of the encryption key. You should also select ‘Quick Format’ before clicking ‘Format’ if you’re the impatient kind – otherwise it’ll take anywhere from 5 minutes to several hours to format the outer volume, depending on how large you made it and how fast your system is. Once it’s done you’ll see the following window:
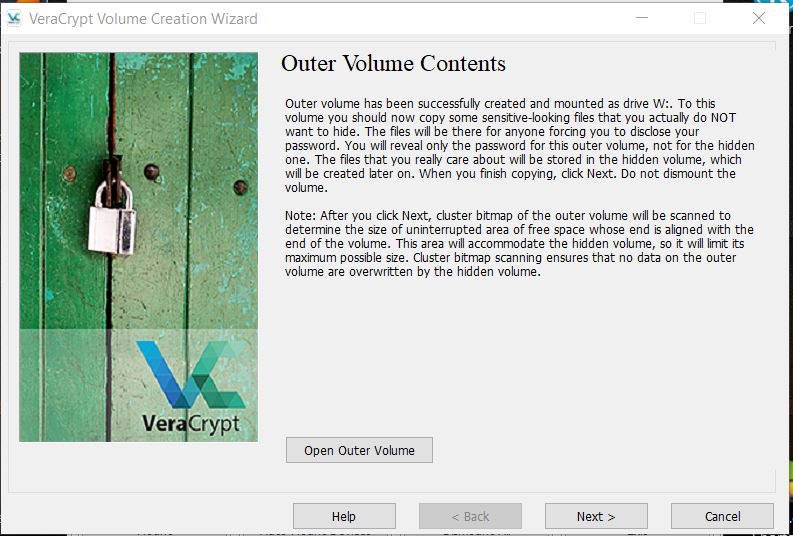
Click on ‘Open Outer Volume’ and a File Explorer window will pop up for the mounted outer volume, which will only contain a single ‘System Volume Information’ file (leave that file alone). On my system it was mounted as ‘W:’, but it might be different on yours. Now you need to copy those semi-sensitive decoy files you identified earlier onto the outer volume. I created a couple of folders and copied about 1GB of various files onto the mounted W: decoy volume.
Keep in mind that any space you use for decoy files won’t be available for the hidden volume, so don’t go overboard. You’ll also need some space for a little extra misdirection later on, so make sure you leave at least 100MB or so extra free space in addition to the space you want for your hidden volume. Don’t forget that the hidden volume will be created using the empty space in the outer volume starting at the end and moving towards the beginning, whereas the decoy volume starts at the beginning and moves towards the end, and you could wipe out the hidden volume if you overwrite the space it’s using with more files.
Once you’ve finished copying the decoy files, come back to the ‘Outer Volume Contents’ VeraCrypt window and click ‘Next>’. It’ll close the File Explorer window that it opened and take you to the beginning of the process for creating the inner hidden volume. Click ‘Next>’ on the ‘Hidden Volume’ intro window, and the same ‘Volume Encryption Options’ window you saw earlier will be displayed. As I said earlier I don’t want to get into the gory details of encryption algorithms, but my recommendation is to select the same options as you did for the outer volume (AES & SHA-512) and click ‘Next>’.
Next, you’ll see the same ‘Volume Size’ window you saw earlier, but it’ll show the maximum possible size as the size of your outer decoy volume minus the total size of all of the decoy files you copied into it earlier. With my initial starting size of 210GB for the outer volume minus the 1GB or so of decoy files I copied over, plus the 100MB of extra space, I was left with around 209GB. Since I don’t plan on copying too many more files into the decoy volume in the future and I wanted as much space as possible for my real secret stuff I selected 205GB for my hidden volume. Once you’ve entered the size for your hidden volume and checked ‘GB’, click ‘Next>’.
Now you’ll see the same ‘Volume Password’ window that you used for entering a password for the outer decoy volume, but now you need to enter a password for the hidden volume. This password is super critical and should be as complex as you can make it. I recommend using a passphrase instead of a password – part of your favorite Bible quote, a line from a song or a movie, a favorite saying, etc., with numbers and punctuation marks added in. You get bonus password strength if you use a foreign language instead of your native language for your passphrase. Since you’ll be using a complex passphrase I recommend enabling the ‘Display Password’ option to reduce the frustration of mis-types. Once you’ve entered your password click ‘Next>’. Again, this password isn’t stored anywhere, so if you forget it you won’t be able to recover the files you store in the hidden volume. If you’re worried about forgetting it, one option to consider is to write it down on the back of a copy of some critical documents, seal it in an envelope and ask a friend or family member who lives somewhere else to hold onto it for you.
Once again you’ll see the question about large files, and for the hidden volume I recommend selecting ‘Yes’, since there are some things we’ll be doing in a future article that will require large files. Click ‘Next>’ and you’ll get the ‘Format Volume’ window – as before, move your mouse around randomly and quickly within the window until the progress bar gets to the end, then click ‘Format’. When that’s done you should get a ‘Hidden Volume Created’ window – just click ‘Next>’ to get back to the original Volume Creation Wizard window, and click ‘Cancel’ to get out of that, which will bring you back to the main VeraCrypt window.
Now you should test things out – first select an unused drive letter from the list. I usually go with ‘S:’ for secret, but you can select any free drive letter. Then click on ‘Select File’ near the bottom and navigate to the volume container file you created earlier – on my system it’s ‘F:\Random Test Data’ – and select that file and click ‘Open’, which will bring you back to the main VeraCrypt window.
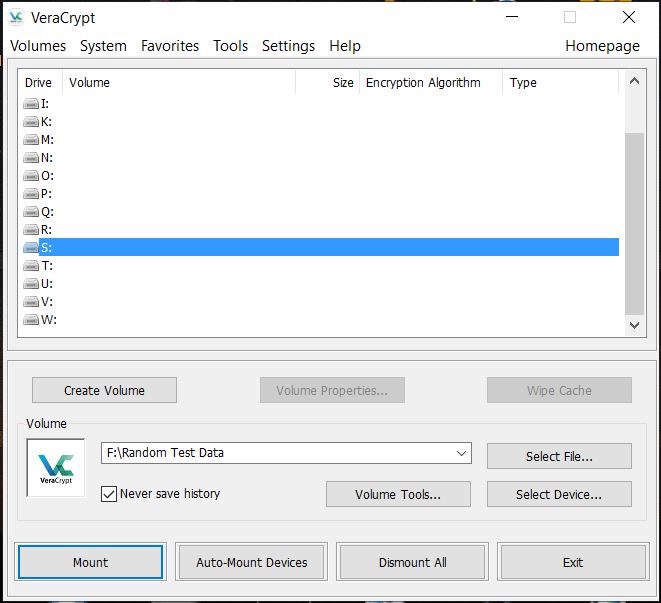
With the drive letter and Volume file selected, click on ‘Mount’ at the bottom and you’ll get prompted to enter the password for the volume:

Under Duress?
This is the critical point – if you’re being tortured by the Spanish Inquisition into giving up your password, you can give them the password for the decoy volume and that’ll be mounted on your system as the drive letter you selected. If you bring up a File Explorer window you’ll see that there’s now an S: drive mounted (or whatever drive letter you chose) that contains the decoy files you copied over earlier. However, if you enter the passphrase for your hidden volume at the password prompt, that volume will now be mounted on the selected drive letter on your system. Assuming it’s safe to do so you can now use the mounted hidden volume to store sensitive information.
Once you’re done working with whichever VeraCrypt volume you mounted, go back to the main VeraCrypt window, make sure the mounted drive letter is highlighted and click ‘Dismount’ at the bottom. That allows you to eject the external storage device and store it somewhere safe. Note: just like dismounting a removable USB drive, you need to make sure there are no files open on the mounted VeraCrypt volume before you dismount it.
Keep in mind that since you’re running VeraCrypt off of the SSD directly, you should be able to plug it into any Windows system you have an administrator account for, run VeraCrypt and have access to your sensitive files.
(To be concluded tomorrow, in Part 3.)