


To be prepared for a crisis, every Prepper must establish goals and make long-term and short-term plans. Steadily, we work on meeting our prepping goals. In this column, the SurvivalBlog editors review their week’s prep activities. They also often share their planned prep activities for the coming week. These range from healthcare and gear purchases to gardening, property improvements, and food storage. This is something akin to our Retreat Owner Profiles, but written incrementally and in detail, throughout the year. We always welcome you to share your own successes and wisdom in the Comments. Let’s keep busy and be ready!
JWR
Dear SurvivalBlog Readers,
Whew! It’s been a very busy week getting ready for the first snow of the year. It arrived on Wednesday afternoon. According to the forecast, with this snowstorm by midnight Saturday the possible amount of snow that we could receive could be nearly 2 feet (54 cm). The minimum amount could be about 12 inches (30cm). We’ll just have to wait and see what God gives us.
We’ve mostly have been ready for it. But we did a “final” walk-through of the ranch, on Monday. We found several last-minute projects to do. For instance there were still a few extra hoses out around the stock tanks. The wheelbarrows needed to be put in the barn. (We seasonally exchange them for our work sleds.) We pulled the snow shovels out of storage and made them readily accessible. We found a few unused pet dishes, buckets ,and salt block trays that needed to be consolidated into one place in the barn. All the four-wheelers, trailers, the weedwhacker, and rototiller had long since been brought in under cover.
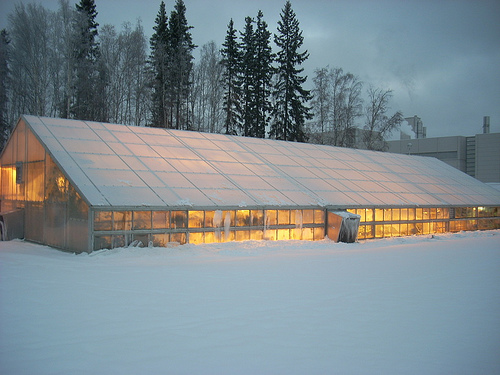
Lily chopped some more wood for kindling. (It’s usually Jim’s job but, she enjoys doing that chore once in a while). We cleared an open porch of all objects to make shoveling snow easier. I cleaned up manure around the the ranch from free ranging beasties. Jim drained and rolled up the hose from the greenhouse and the one still in the garden and stowed those in the greenhouse.
Winter Preps
As usual for each November, Jim rigged heavy gauge extension cords and stock tank heaters for our stock tanks. These will keep the stock water from freezing this winter. Together, we mounted the snow plow onto our pickup truck. (We had the snow tires put on our vehicles a couple of weeks ago). Jim also placed markers around the property for protection from the plow such as a concrete pad, an RV septic dump station, and the locations where the meadow irrigating hoses and lumber piles are stored for the winter. Those markers prevent damage to them from plowing the snow. We also discussed snow pile placement for this year to maximize accessibility to things, come spring. Last year we had so much snow and such large snow piles blocking the garden and barn that we couldn’t bring out some equipment and go into the garden as soon as I would have liked. Therefore, this year we hope to mitigate that problem. We already have by planning ahead and preparing everything and placing it where we want it ahead of time.
Lily cleaned the chicken coop and hauled that manure and straw down the the orchard garden which will be our second large garden starting next summer. Jim went hunting a couple of times. No luck, yet.
On Wednesday, Lily took out the last of the dead tomato vines from the greenhouse. And with Jim’s help, she hauled in more soil and manure compost to prepare that section of the bed for a winter garden or for next year. Jim said that he “hauled soil as an obedient husband for his wife’s projects in the greenhouse.” (These are his words, not mine!! 😉).
Also on Wednesday, Lily hauled six more wheelbarrow loads of soil and compost into the greenhouse for spring planting of seedlings. The soil and composted manure were put into a large group of deep dish bussing trays, plastic dish pans and some very large planter pots. Come March, I’ll just take the soil mixture out of a large pot and put it into the seedling trays and plant my seeds, and there we go.
Earlier in the week Lily sorted through five hundred pounds of potatoes, saving the really nice ones for seed potatoes, throwing out the few rotten ones, separating very small potatoes from larger ones and bagging them in burlap bags and put them into our “cold cellar” for winter storage. She then went through some recent food purchases, and did some “bucketing” into six gallon HDPE super pails with Gamma Seal (spinner) lids. This included flour, pasta, and nuts. She found cupboard space for cases of peanut butter, tuna, pasta, extra canning jars, and other things in that room. Then that room was further organized, vacuumed, dusted. She also washed and scrubbed the windows and floors. The laundry baskets and plastic totes that had temporarily held the potatoes were also scrubbed and put away into storage.
Lily also saved more seeds from the light green striped Zuchinnis, red and orange Cherry Tomatoes, and Butternut squash. She also dehydrated, by the wood stove, about two cups worth of oregano that was brought in from the greenhouse.
Winter Gardening Experiment in the Greenhouse
On Sunday, Lily finished manuring the last section of the last raised bed inside the greenhouse. Then she pounded 20-inch lengths of half-inch diameter rebar into the beds and slipped 12 foot, 3/4-inch PVC pipes over those stakes to make hoops. The completed hoops are about 45 inches wide and about 2.5 feet high. Then she cut 2 mil clear visqueen plastic, doubled it and draped it over the hoops. Next she planted in very tight rows about 2 to three inches apart: A winter spinach, Red and White Russian kale, Red leaf lettuce, Winter Density lettuce, Rainbow Swiss chard, Mizuna Asian Greens, and Crisp Mint Lettuce. Then she watered them and covered the hooped beds with the plastic. Now we’ll wait to see if they’ll germinate and grow. The seeds were packaged in 2014 (three years old), so I planted extras just in case some have lost their viability.
On Wednesday, after the tomatoes were pulled, she fired up the wood stove. There is rotting manure under the beds–hopefully generating heat– and the doubled visqueen hoops over the beds to retain heat. We also have the woodstove burning in there nearly 16 hours a day. Hopefully, we’ll see the greens germinate and grow. When we get enough snow, We plan to gently bank it close to the walls of the greenhouse to add even more insulation the greenhouse.
As a side note; We also do have 18 plastic 55 gallon barrels of water lined up inside the north wall of the greenhouse, as heat sinks. But I don’t notice that much of a heat retention with them. Once the seeds germinate, I’m hoping that the beds will be warm enough on their own, so we don’t have to continually feed the wood stove. We will surely lose track of feeding it with all of our other indoor projects happening. But in the next few days we’ll do our best, especially on very cold nights. We’ll keep you updated on it’s progress.
The tomato plant from the greenhouse which was potted and accidently left out in the sun for a few hours, which consequently wilted and appeared to have died last week, was still brought into the house to see what it would do. I trimmed off all of the clearly dead leaves. It then looked like a tomato stick with a few naked branches with only three leaves alive on it. I watered it well several times. Tuesday, I looked at it and noticed a whole lot of buds at branch junctures. On Wednesday it had put out a large number of baby leaves and branches. I’m so amazed and excited, that it is bouncing back so well. Of course, it does help that our Great Room’s temperature is around 78 degrees 24/7, from the wood stove.
Time to Relax? Hardly
Well, now that the snow is arriving and most of the main outdoor work is wrapped up for the year, I am very much looking forward to curling up near the wood stove with the children and concentrating on homeschooling. No more projects ’till spring! Right??? Riiiight!!! We will still have to clean the poultry coop and cattle stalls and shovel and plow snow periodically and… and… and… What a wonderful way to live. God is so good to us! When I’ve felt a bit tired this week, I just thanked and praised the Lord for giving me the strength and energy that I have and the ability to do this work and for the blessings of being married to Jim. He is a wonderful, loving, kind man.
We love living in this beautiful area of the American Redoubt and being able to do exactly what I’ve always wanted to do: living in the wilderness, gardening, having a greenhouse, raising our own animals for milk and meat, and homeschooling. And having the freedom when all the work is done to study the things that interest us the most, et cetera. We’re so blessed!
I’m looking forward to reading comments from readers about your preps for winter. In most years we can’t depend on snow before mid-December.
May you all have a blessed week, – Avalanche Lily Rawles
HJL
As mentioned last week, the Latimer Homestead has been tending to their chickens in addition to other activities. However, the home-based chicken hospital work has been much more effort than expected. It seems that during our leave, some of our chickens developed (or had much worsened) cases of scaly leg mites and bumblefoot (ulcerative pododermatitis). The one that we first noticed shortly after our return from a month-long trip was the worst, with a large, infected nodule on the side of her foot and then one on the bottom of both feet. After inspection, we have found more than a dozen of our chickens with various stages of infection in their feet.
We have performed surgery on the first hen to remove the three infected spots, and after four days she is doing very well. This was our first surgical experience, and we were glad it was not on a family member! We’ve cleaned and prepared several other hens with ointment and bandages to soften the spot but have not yet performed the surgery on them. For those who are in early stages of infection, we have purchased a salve to try using to extract the infection. We hope this will work, since we have so many hens with issues, and surgery is tedious and time-consuming, and we’ll not likely be able to get to all of the chickens soon. Needless to say, we are getting quite adept at bandaging chicken feet!
For the scaly leg mite issue, we’ve soaked their feet in water with thieves soap, brushed the dry skin with a toothbrush, and coated their legs and feet with neem oil and a jelly paste containing sulfur. Oh, how the hens seem to love this treatment! Their eyes almost roll back into their heads as we give them their pedicure foot massages. It’s pretty funny how they relax with this treatment, though they get quite fidgety as soon as we get near the bottom of the foot where the bumblefoot infection usually is located. It’s our understanding that these mites can cause anemia, so we’ve been giving them extra treats of spinach. The run has been covered with diatomaceous earth, and the hen house crevices have been sprayed with pyrethrin and the walls, perches, and laying boxes were washed with vinegar.
With all of the flocks we have had, we’ve never had these issues before. It’s been daunting this week, and it looks like we’ll be quite busy with surgeries and bandage changing through the next few weeks also, as we get rid of their infections and keep their bandages changed while they finish healing as well as keeping their legs and feet coated to suffocate the mites. We are sure hoping that our new, young flock has not been infected. We’ve seen one who may have the very early signs of bumblefoot so far. We’ll keep a close eye out and inspect thoroughly once we’ve removed all of the infections from the older, laying hens. For now, we’re keeping them in their run to protect them from further foot injuries and exposure in the wild while out free ranging.
o o o
As always, please share your own successes and wisdom in the Comments.
For drawing infection you may want to try triple antibiotic (Neosporin) ointment and Epsom salt. Grind the salt very fine in a mortar and add it to the ointment, and mix well. I use a 1 to 1 mixture. This has worked extremely well for drawing infection from critters as well as humans, including a couple of fairly impressive cases of blood poisoning (septicemia)
Bandage it well, and leave it alone for at least 12 hours. Re-dress as needed, though I have found it does the job so well I’ve rarely had to re-treat, except in a couple of cases.
This works well for drawing abcess from horse hooves too, and for that you don’t need to grind the salt.
Why is “cold cellar” in quotes, is it a simulated cellar? Our basement is to war, the barn too cold; if there was a shortcut I’m all ears.
Wow! I’m so totally impressed with everything yawl have done, I’m speechless. God bless you!
I’m trying to understand what caused the infection. Is it staying shut up? That was my first thought. My chickens do better in chicken tractors for many reasons. Some of the reasons may not apply to your area, since you probably live where it gets cold and the ground freezes. I have moved most of my chickens to the chicken tractors because our ground stays wet and winter it usually gets very wet and nasty. The chicken tractors enable the mess to be in the pasture and fertilize it, which is good, instead of harboring bacteria in a stationary pen. Of course, we don’t have to deal with frozen water dishes in the winter either, and it is warm enough that a wire cage is sufficient.
How high are your roosts? Bumble foot is caused by bruising which is caused by landing hard on the ground off of a high roost. I have had a few cases of this and left alone it has always healed it’s self. I use WD40 as a cure for scale mites. usually 2 to 3 applications 1 week or so apart does it.
Been helping my neighbor bring in his corn, endless trips with the tractor and wagon from the field two miles to the bin and back again. Mind numbing….
Shoulder is nearly healed, next week is the last of physical therapy. Finally back in the shop making a living again now that I have two useful arms.
55 gallon barrels of water as heat sinks…what color are the barrels…..black would absorb more heat
We finished getting our winter garden planted this AM. Carrots, spinach, Turnips and Willet English garden peas. Next big project; build a small green house to get the spring and summer crops started early and then be able to transplant as soon as the ground heats up to 65 degrees in the spring. The Compost pile is doing well and should be ready by the middle of Feb. 2018. Talked to a older local farmer yesterday about my less than 2 year old laying hens slow down in egg production. He ? me about what I was feeding them and then recommended a change in my feed mixture. Said that would fix the problem. The wife and I were blessed with such a high producing garden this past summer that we were able to give to friends and family 50% of what came from the garden. Also spent the time to teach other family members how to garden and what to plant in their garden areas. By also showing them how to can their own garden bounty they will be more prepared in our next emergency. My sneaky way of turning them into preppers without them realizing it….. Have a blessed and safe winter.
Depending on the breed, egg production can drop quite a bit after the first year and steadily drop every year there after. For egg layers I general will keep hens 3 years at the most. I have had several breeds that won’t lay eggs at all during the winter no matter how old they are.
They may also be molting, and will start back later or in the spring.
I dried my cows up this week, and I am working to get prepared to do cheese. Doing some experimenting. Anyone made a cheese cave? I have an old fridge, and am thinking of using incubator parts to make it into a cheese cave.
Rose, that would be an interesting article if you convert your frig into a cheese cave!!
Sorry you have had to do so much work to heal your chickens. Thank God for neem oil (it works for so many things). We can relate, these types of disturbances in any animal flock can consume a great deal of time and effort. Your detailed response shows an obvious concern and compassionate care for your animals.
I will keep everyone updated, especially if it works. I found articles on it online, so we are thinking through it. Keeping it cold in the summertime will be the real challenge for us, since we live in the south.
I’m having the same issues with my hens, most of which are less than two years old. I have a mix of Rhode Island Reds, Orpingtons, and White Leghorns; twelve in all, not counting a very gentlemanly… and huge… Orpington rooster. The ‘Reds and Orps always shut down during the summer (I live in a “low desert” area). The weather’s cooled of though, and they still aren’t laying. The leghorns laid right through the hottest days of summer (I’m talking 110*+ heat!), but stopped in mid-August. The only eggs I’m getting right now are from my two oldest birds, which are three years old. I’ve tried worming them, laying down DE, spraying for mites, and changing the feed. Nothing’s working. Any ideas out there?
I got out the old, cantankerous, Troy-Bilt Horse and tilled up the winter garden plot. The crops will go in this weekend.
I also did some work on the ham radio gear, hoping to avoid having to service that stuff during the rainy season.
God’s blessings to all!
Except when our chickens are molting they lay all year up here in NW Montana.We just make sure they have at least 12 hours of light each day. We use led lights which don’t use much electricity as we are off grid at times. They do have an enclosed shelter which we shut down a night to help keep the warmth in.