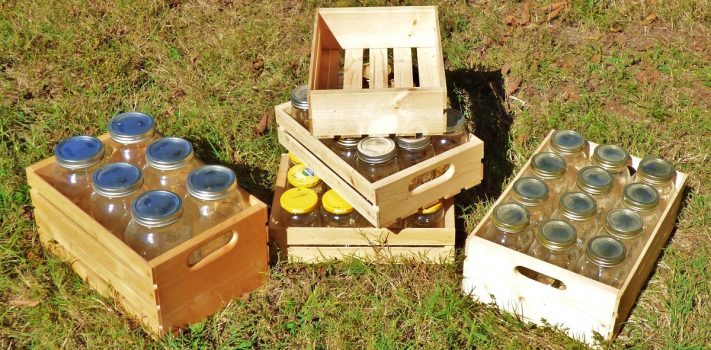
If you’re an average prepper, you no doubt have enough mason jars to sink a small yacht if they were all filled with pickles and tomato sauce and snuck aboard. And if you’ve done a lot of canning, you’ve probably thought there has to be a better way to manage all the jars than those cardboard boxes they come in. I’ve found that homemade wooden crates work great for me and may work for you as well.
What I really like about these crates is that you can store empties in them as well as full jars, then stack the crates so you can use valuable shelf space for other things.
The Basics
If you don’t have a woodshop or a table saw, fear not, you can probably find someone who will cut these pieces out for you for a small fee, then you can nail them together at home. While these are easy to make with my Grizzly cabinetmaker’s table saw and a drill press, they can also be made with a hand drill and the $95 reconditioned portable table saw I bought at Home Depot a few years back.
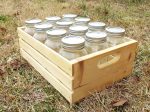
I make four kinds of crates: half-pint, pint, quart, and half-gallon (the moonshine crate). For this tutorial, I’ll walk you through the process of making a crate for a dozen quart-sized jars. At the end of the article, the dimensions will be listed so you can construct all 6 types and sizes of crates. I’ll show you how to make handles in the ends for easy carrying, but if you lack the tools, or have to hire someone to cut these out for you, and/or you’re trying to keep this on the tightest budget possible, you can get by without handles. (See the top center crate in the lede photo.)
Equipment & Material Needs
The tools you’ll need are a table saw, drill press (or hand drill), and a hammer. If you want the optional handles in the ends, you’ll also need a hole saw (or spade-bit), jig saw, and a router (preferably table mounted) or coarse sandpaper.
For materials, you’ll need 4d (“four penny”) nails, wood glue, and lumber. Each crate consists of two components: slats, which are cut from 2 x 6 boards, and ends, which are made from either 1 x 4’s (pints), 1 x 6’s (quarts), or 1 x 10’s (half-gallons). I use 2 x 6 x 8’s for the slats because they’ve worked out to be the cheapest per slat and easiest to work with, but any kind of “2 by” will work.
Ball/Kerr Jars vs Generics
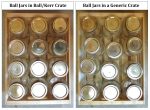
If you have both Ball/Kerr/Anchor Hocking jars (B/K) as well as generics then you’ll need to make a decision on crate size before you begin. Most generics are slightly larger than B/K jars so you’ll need a larger crate. In their proper crates, both B/K and generics have just the slightest amount of wiggle room, about ¼” at the edges of the crate. That leaves just enough room to slip strips of corrugated cardboard between the jars to provide a tight, rattle-free crate for your home-canned products in earthquake country. If you own both generic jars and B/K, you can either build both kinds of crates or use a one-size-fits-all approach. The downside to the one-size-fits-all is when the crate is filled entirely with B/K jars instead of generics, is that you’ll have more slop room as shown in Photo 2, a big disadvantage when the ground starts shaking.
Building a Crate
To make a Ball/Kerr quart-jar crate, you’ll need 16⅝” long slats so begin by cutting pieces of 2 x 6 “slab” to that length. Each quart crate uses 12 slats, and you’ll average 12 slats per 2 x 6 slab, so plan on one slab per crate plus one or two extras for fudge factors. Some slats are unusable due to knots, etc.
Next, cut two pieces of 1 x 6 into 11¼” lengths. Once you’ve cut the 2 x 6’s and 1 x 6’s to length, you’ll want to make some jigs to produce the crate slats and handles.
Making Jigs
Since you’ll be making a bunch of crates, start by making a couple of jigs. Jigs are devices that greatly speed up repetitive work and in some cases, provide greater safety by keeping your hands away from the saw blade. The three jigs needed are: a slat-making jig, a hole-drilling jig, and a handle-marking jig.
Building and Using the Slat-making Jig
The first jig will be used to slice the 2 x 6 slabs into ¼” thick slats. The table saw fence will be set at ¼” from the blade and since it would be tedious and dangerous pushing all the slats through with a thin push stick, this jig is essential for speed and safety.

The jig will look something like the one in Photo 3 and the exact dimensions are not important. This one was made from scraps of 1 x 4. Occasionally you might forget to have the saw blade set at the correct height and will ruin the jig so while making this jig, make a few extras for backups. If you attach the handle with screws instead of glue, you can at least reuse the handle.
The hole in the jig handle is optional. The handle (A) sticks up so you have something to push down and forward on. A heel (B) is glued to the base of the jig and hooks the 2 x 6 to push it into the blade of the table saw. The back (C, and Photo 4) is a replaceable pair of plates whose function is to hold the slat after it separates from the 2 x 6 slab and push it through the last few inches until it clears the blade. The backplates are made of scrap ¼” plywood, doubled up and attached with small 3d brads.
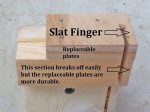
Photo 4 shows the jig after it has cut the first slat, forming a shallow groove along the length of the jig and forming the finger which pushes the slats past the saw blade. The slats will be ¼” thick so adjust the fence of the table saw as shown in Photo 5.
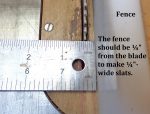
While adjusting the saw blade height, it’s important to have a 2 x 6 slab next to the blade as shown in Photo 6. The height of the blade should just barely clear the top of 2 x 6 by ⅛”. The very first time you use the slat-making jig, the blade will cut into the jig ⅛” deep. That won’t be a problem since the jig base is ¾” thick. It’s also going to cut a slit in the back plate leaving a delicate finger hanging down. There will be very little supporting that finger so double up on the back plates and be careful how you lay it down when not in use.

The next three photos show the jig in position for cutting slats (Photo 7), what it looks like as a slat is being sliced off (Photo 8), and finally, the slat, slab, and jig after a slat has been cut off (Photo 9).
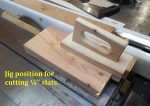
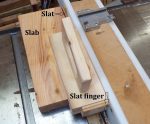

After your jig is constructed, the fence is ¼” away from the blade, and the blade is set to ⅛” above the height of the slab, fire up the table saw and begin slicing slats off your 2 x 6 x 16⅝” slab. Stop at 14 or 15 slat pieces, just to have enough and a few extras for the first crate.
(To be concluded tomorrow, in Part 2.)



This is a great article. Thanks for taking the time to write it. This can also be a profitsble side gig for someone. I’d like to explore the option of making the side walls and corner pieces a little higher so these can be stacked without adding weight to the sealed tops on the jars. Again, great stuff!
Good thought provoking article.
I too make my own wooden boxes for jars, but I use recycled Oak Pallets and many other things would work as well. I disassemble the pallets which isn’t easy with the spiral nails used, but worthwhile at only a cost of time. I plane the slats down to 3/8″ and glue and nail them to 3/4″ end boards of sufficient height that any crate stacked sits on the end boards and not the jars. There are only two sizes of wood needed, the slats for the bottom/sides and those for the ends. I set up the table saw and mass produce the wood pieces. Dimensions are taken by setting a dozen jars as they would sit in the box and measuring plus a tad for slight variance in the jars.
Hey Red Rover, pallets are definitely a great way to save money. For those of us with a lot more time than money, why not take advantage of a free resource that only requires some time to prepare it for use?
Have you ever gotten the 48″ 2 x 4’s that lumber is stacked on so the forklift can get underneath? I get those free from my local lumber yard in both treated and untreated. I use the treated ones to make beehive stands and outdoor projects, and the untreated ones for everything else. That’s another good resource for making mason jar crates and don’t require any nail removal or planing to make slats. Lumber yards/hardware stores usually have a pile of them somewhere and will probably give some to you free for the asking just like they do with pallets. They’ll also give you the tarps the lumber comes wrapped in.
Hey Chris, thanks for the comments.
I have a few crates with higher sides so they stack wood on wood instead of wood on jars, but in order to keep these as inexpensive as possible, I went with the shorter versions. They also stack better in the shelves I have in my garden shed, a stack of two fitting nicely between the shelves. This year I’ve stacked four crates high of honey, which is half again as heavy as water, and haven’t had any problems with lids or damage of any kind.
This can definitely be a good side gig for anyone. Once you get the whole idea of ¾” thick end boards + slats, the options of what you can do with that is only limited by your imagination. I make about 20 different items using the method, mostly my own ideas as certain needs have arisen on my homestead, others just from sitting in my recliner with coffee and cinnamon rolls conjuring up ideas. Once I create something and then start googling the idea, it’s true that “there is no new thing under the sun” and others have thought up the same or similar kinds of ideas. But, in my humble opinion, the things I make look much better and are just as strong or stronger than anything similar I see on the internet that is trying to fill the same need. IMO the slat thickness is perfect for the ¾” end boards so they have a nice look to them, compared to the very clunky-looking things I’ve seen with very wide and unnecessarily thick slats.
My favorite item I make is a jar carrier for two half-gallon jars. It has two end boards, and a third ¾” thick board in the middle which separates the two jars. The center board is about three inches taller than the jars and has a handle in it similar to the mason jar crates. So it’s a carrying “crate” for two half-gallon jars with a handle in the center. I’ve made some for people with milk goats and have also bartered them for goat’s milk soap. I’m a huge fan of barter.
I also like the look of 4d nails as compared to staples. For someone not caring about aesthetics and just needing some functional crates, staples of course would be much quicker and less tedious. The look “cheap” however on other items like baskets and countertop items.
Things like mason jar crates are bulky and non-nestable so they are too expensive to ship. But I think if I (or anyone else) offered them as kits, I could ship all the pieces to customers and they could glue and nail them together, something I don’t have the patience or manual dexterity for. I shipped the pieces for 10 crates to one of my daughters in a box slightly larger than a single crate takes up.
As you said, this could be a good side gig for lots of people and I hope people take advantage of the idea for their own personal use as well as for barter or making a few extra bucks.
These are beautiful! I’ve been looking for wood boxes and have not been able to find any so your article is very timely. I think this is going to be a future project. The pictures are very helpful to me and make the instructions more clear.
Hey Animal House, I’m glad you found the article useful and timely. Good luck on this as a future project. 🙂
Correction: under Equipment and Materials where it says “or 1 x 10’s (half-gallons)” it should read 1 x 8’s.
2xwhatever or one by which is 3/4″?
Hey Norman, not quite sure of your question. The slats can be cut from any width of 2 x, the end boards are all 1 x, which are only ¾” wide as you mentioned. I prefer 2 x 6 for the slats because you end up with fewer pieces from the last edge that are too thin to use compared to a 2 x 4. It also worked out to be the most economical on a cost-per-slat basis based on my local lumber prices from a few years ago.
I was confused as well about the sizes. The picture looks like the slats are cut from 1x’s and the ends are from 2x’s rather than the other way around
Your pint size boxes reminds me of the old orange and apple boxes that they used to get from the grocey store and that is one of many uses that my folks had for them. My son recently made something similar to what you have. thank you for bringing back a few memories ( I’m in my mid 70’s)
I see many wintertime hours working in the wood shop this season. Between this (new) project, on top of the dozen others I have plus reloading, I might as well black out my entire calendar until March or June, whichever comes first… Thanks for adding to the load. (tongue in cheek)
“Thanks for adding to the load. ”
Hey Rob, I have that same problem with all the great books Once a Marine recommends. My life is the happiest when I have a long list of projects to do and books to read, and the biggest decision of the day is which one to work on next.
Very nice
I have thought about investing in some of these, JarBox Protector for Canning Jars:
https://www.simplycanning.com/canning-jar-storage-box-jarbox.html
https://www.amazon.com/JarBox-Canning-Storage-Container-Quart/dp/B007K8GC52
https://www.amazon.com/JarBox-Protector-Canning-Semi-Clear-12-Pint/dp/B00ONZSQC2/
But, they are very expensive and hard to find these days.
These wooden boxes are more economical.
Thanks for sending…
Given that the price of canning jars have doubled and tripled on Amazon, making these crates simply to store the now expensive empty jars is good idea. And a better idea when full. Advertised on Amazon are the highest prices I’ve seen. A case of wide mouth 1 quart Ball jar with lids and seals are advertised at $49.88! Good thang I got my pile.
These are very nice crates. I get wood for building stuff at a friends wood mill, and get lots of custom dimensional boards for free. I will now start making a pile of suitable wood for my poor man’s version of these fine crates.
BTW, a good alternative email service that encrypts your mail, and provides a limited service without charge, can be had at protonmail.com
Why not make them a bit taller to allow stacking without pressure on the lid/seals after usage.
Hey Anonymous, those would definitely be nice to have. They’d do a better job of keeping dust off the jars but I’ve always wondered what kind of plastic they are made of and how durable it is. What scared me away from the most was the price but they’d probably be a good option for folks with more money than my Scotch ancestry will let me part with. The only ones I can see these days are $59.95, but that’s no doubt price gouging like everything else to do with canning nowadays. The mason jar crates I make cost less than a dollar for lumber based on last year’s prices.
Hi Jeri, that’s also an option. I have some which are that way but go with the shorter ones mostly for financial reasons. The taller ones also have the benefit of keeping more dust out of the crates and off the jars.
Here is another viable alternative. I like the cardboard dividers… especially for earthquake regions.
https://www.uline.com/Product/AdvSearchResult?KeywordTyped=canning%20jar&keywords=Canning%20Jar%20Boxes
Hey Newell, wow those are very reasonably priced. Thanks for posting the link.