


(Continued from Part 1.)
Tools for Cutting Wood at Home
Wheelbarrow or manure cart- I use these to haul wood and cutting equipment. Occasionally, someone will offer me free firewood they cut some time previously. Sometimes, if it is seasoned and not split, the wood can be heavy. In these circumstances, I will use a furniture dolly, but I try to never cut and/or haul anything that large/heavy.
Hunting/Boy’s Axe – I prefer using a two-pound “boy’s axe” because it is extremely light, and easily maneuverable. This is strictly used for delimbing.
Splitting maul – I use these not only for splitting wood, but also for driving wedges. An eight, or ten-pound splitting maul seems to work best for me and the wood I split. The weight of your splitting maul is strictly personal preference.
Gas-powered wood splitter – These are a time saver and are very helpful in processing a lot of wood quickly. Ensure all your limbs and appendages are clear of the blade, rams, and wedges. Until last year, I split most firewood by hand. I love a beefy eight-pound maul with a synthetic handle. I prefer wooden handles, but I have had far too many of them break after very little use. The synthetic handled mauls can withstand far more abuse and for a much longer time. Eventually, they all break, but it takes a lot longer with a synthetic handle. In early 2024, I finally broke down and bought a log splitter. I love it. Under the right conditions, I can split a cord of wood in about an hour.
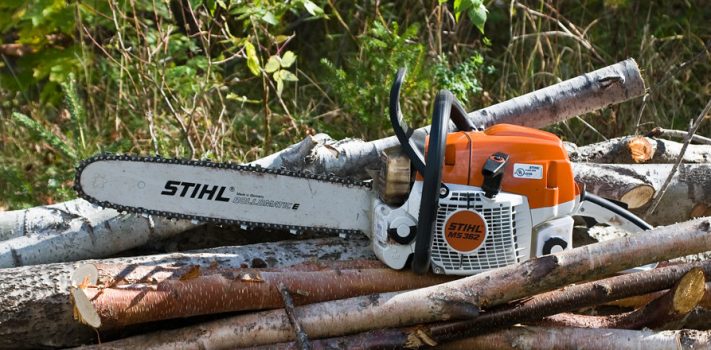
Chainsaw and associated tools/fluids – I currently use a Stihl 271 Farm Boss. It’s a great chainsaw and has never failed me. When this one needs to be replaced, I may look at other brands.
Sledgehammer – Either handheld or full-size. On too many occasions, I have had a stubborn piece of firewood get stuck on the wood splitter wedge. A few hits from a sledgehammer usually take care of the stuck piece quickly. Be careful though. I swung and hit a stuck piece of wood once, when the wooden handle broke, launching the hammerhead and a sharp piece of handle flying into my friend’s chest. Fortunately, he wasn’t hurt too badly.
I also use full-sized sledgehammers for driving steel wedges into hard, stringy or stubborn wood. Sometimes, a splitting maul just won’t do the trick, or isn’t balanced enough to turn around and use the flat, hammer side. Again, the weight and size are a matter of personal preference.
Tools for Cutting Wood in the Field
With the exception of the chainsaw, all these tools stay in the trailer toolbox until the end of woodcutting season (basically when hunting season starts for me). I have owned too many truck toolboxes that leaked during the rainy season, or going through an automatic carwash. I do not trust truck toolboxes to be watertight, so the truck box is emptied of most things when the wet season comes.
Trailer – You may have read the article, Building a Utility Trailer that I wrote about building a trailer from an eight-foot truck bed. One of the reasons I built the trailer was to be able to take everything I need when harvesting firewood. This trailer allows me to cut six, sixteen-inch (eight foot) sections in the field and/or to cut ninety-six inch sections and bring them home to cut up later. With the eight-foot bed, I can camp, cook, store and haul everything I need to successfully bring home about a cord of wood per trip.
Chainsaw – See above.
Chainsaw Parts – Spare air filter, spark plug, appropriate nut driver, flathead screwdriver, plenty of chains, etc. Figure out what you may need and carry a spare.
Chain sharpener – manual file and/or electric-I always take at least one spare chain with me during a woodcutting outing. Once both chains have been used, I will typically use a manual, hand file to sharpen the chains. Stihl makes an amazing sharpener that not only sharpens the cutting teeth, but also levels the rakers and top plates so your cuts remain straight.
Fluids – Gas can, 2-cycle fuel mixing oil, and bar oil
McCleod/Shovel – Sparks happen when cutting wood. There can be nails, bullets, fencing wire or rocks under the bark of a tree. I keep a McCleod or a shovel in the trailer while I am cutting wood just in case a fire starts.
Fire Extinguisher – I keep a fire extinguisher in the toolbox for the same reason as above.
Wedges-Wedges in the field can be extremely useful for many reasons. While cutting a tree, or large limb, your chainsaw may become pinched/stuck. Using wedges in the correct areas will help you free the chainsaw. Steel wedges have a lot of uses.
Rope/Chain/Come Along/Ratchet Straps – These are used to not only assist in felling a tree in a certain direction, but also to move the downed tree and to also secure the load prior to traveling.
Chaps – I have only worn chainsaw chaps during a chainsaw training with the volunteer fire department. I find them to be a little cumbersome, but know a lot of people who use them regularly. To each their own. [JWR’s Adds: Kevlar chainsaw safety chaps are strongly recommended. One of the stock phrases at SurvivalBlog is: “All The Gear, All The Time” (ATGATT). I consider safety gear a must.]
Hardhat – Self-explanatory.
Hunting Axe/Pulaski/Hatchet – See above.
Headphones/Ear Protection – For too many years, I never wore ear protection when working with power tools, shooting firearms, or using chainsaws. As I have gotten wiser, and older, I consistently don some sort of ear protection. An old friend and mentor of mine told me when he saw I wasn’t wearing ear protection, that he never wore hearing protection in his entire life, and the thing he missed the most was listening to the wind in the treetops. I took his hint to heart and I pray that I didn’t do too much damage to my ears in my youth.
Safety Glasses – These go hand in hand with hearing protection. I never leave home without some sort of eye protection. On time I was wearing one of the full face masks while cutting wood. Somehow, a small piece of sawdust made its way through the tiny mesh and went right into my eye. Things can happen, even with the proper gear.
Cant Hook – I don’t use these often, but they do have a place, especially when working with dense and/or wet wood.
Fishing Pole – I tend to cut firewood near creeks or rivers. I enjoy taking a break once in a while to try a few casts.
Wood Storage
Brand new tarps do not always keep water/moisture out. I lost several cords of perfectly dried and seasoned firewood to new tarps failing. After I deployed them, the fall winds arrived which caused friction and rubbed/wore thin holes over the tarps, allowing water in which soaked ALL my dry wood. These were not the cheap tarps either, and they were strapped down tight. For a short time, I was able to find a dry piece here and there, but that did not last long. Fortunately, my father-in-law stays well prepared and allowed me to take wood from his piles as I needed it. His kindness allowed me to keep my family warm during the dead cold of winter and kept our energy and propane bill down. I still use tarps, but I do not rely or count on them.
A couple of years ago, my father-in-law built a beautiful woodshed, and at the time it cost him about $4,500. He used two by six, and four by six pressure treated lumber for the framing and translucent corrugated panels for the sides and roof. To build that now would cost me double what he paid. After a lot of thinking, debating and shopping, I chose to go with cargo shipping container. For roughly the same price as what I would spend on a stick framed structure, I could put in a raised dirt and gravel pad and install a forty foot shipping container. The shipping container we went with has five cargo doors. Four of the doors are on the side and one end has a cargo door, like a normal shipping container. I chose this option for many reasons beyond the cost. If desired, I can move the container in the future, unlike a wooden structure. The foundation can easily be removed or added to in the future. The shipping container is relatively impenetrable. If a branch falls on it, it is not likely to puncture the steel. The shipping container, when closed, is not only watertight, but animal-proof. I will cover animals later in the article.
For a while, I was going to install attic fans and louvered vents to help with air circulation. I was warned that the shipping containers can also have a lot of condensation build up in the winter because of the temperature fluctuations throughout the day. Before I started cutting and welding the new shipping container, I decided to give it a year of use to see if I needed to put the time and effort into adding vents. To date, I’ve had no issues with ventilation during the summer heat and have had zero issues so far with condensation build-up; knock on wood. (Pun intended.)
(To be continued tomorrow, in Part 3.)