


The pandemic has interrupted supply chains worldwide. Combine this with rising fuel costs, government crackdowns on fertilizer use, and suspiciously frequent fires at food processing plants, and people start talking about reductions in our society’s ability to produce enough food. While it is helpful to be able to store food, real food security comes from being able to grow enough food on your own indefinitely– in all situations.
In this climate, and with inflation heating up, my wife and I felt that the best tangible investment we could make was to increase our ability to grow food. We already have a 128-square-foot greenhouse where we grow tomatoes and cucumbers during the summer, and we have 24 raised beds where we use composted cow manure to grow carrots, peas, potatoes, spinach, lettuce, chard, beets, berries, and leeks. But we live in a zone 3 section of the Inland Northwest, and we can only grow these things during the summer. Even though we store a significant portion of our produce to use during the winter, leafy greens are much better when they are fresh; and there are some crops we avoid simply because our season is so short. So we began looking for ways to build a greenhouse that could produce food more months of the year, perhaps even during our cold, dark winters.
Our search led us to Growing Spaces in Colorado, whose motto is, “Gardens that Thrive 365.” They produce Grow Dome kits with components that help these geodesic greenhouses remain cool in the summer and warmer in the winter. This essay summarizes how the Growing Spaces Grow Dome helps to extend our growing season (in the hopes of giving readers ideas about how they can increase the length of their growing season using their own existing or self-designed growing spaces) and catalogs our experience in purchasing, constructing, and planting our Grow Dome.
Ways to Extend the Growing Season
We are all familiar with the way a normal greenhouse allows one to grow food that couldn’t otherwise thrive in a given location. For example, our 8′ x 16′ greenhouse allows us to grow tomatoes (mostly varieties from northern Europe or Russia). Our yield is good, and the sauce we enjoy throughout the year would never be available to us if we didn’t have the protection of the greenhouse to allow those tomatoes to grow. However, once the tomato season is over, those plants are done. Fall comes, and there is no way that greenhouse could provide the thermal control needed to plant other crops in it.
The Grow Dome is unique because it employs a combination of features that enable it to retain heat, thereby allowing certain veggies to grow inside when it gets colder outside. The following are the major ways that these greenhouses are able to have longer seasons that other greenhouse.
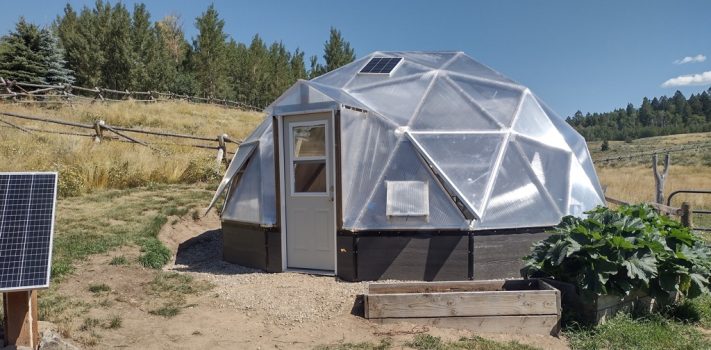
1. Shape. The spherical shape of a geodesic dome minimizes the amount of area exposed to the outside, while maximizing the amount of interior space inside that can be used for growing or retaining heat energy.
2. Polycarbonate thickness. My traditional greenhouse walls are two-walled, 8 mm thick polycarbonate with a single dead-air space. The Grow Dome walls are triple-walled, 16 mm thick polycarbonate with a two dead-air spaces.
3. Solar-powered fans and automatic vents. To keep the Grow Dome cool in the warmest part of the year, there are two automatic vents that open automatically when the interior temperature gets warm enough. There is also a solar-powered fan that turns on when the sun hits the solar panel. These are instrumental in keeping good air-flow in the warmer months, but do not operate during the colder months.
4. 1000-gallon pond. Water holds about four times the amount of heat energy as does gravel or cement for every degree of temperature. This is why cities near the water are more temperate than inland cities. Having 1000 gallons of water available to absorb heat energy from the sun on a winter day, then re-radiate that energy during the colder night plays a huge role in moderating the temperature inside the dome. Additionally, I introduce more heat energy into the water with a solar-powered tank heater (designed to use with RV tanks during the winter). This heater adds a bit more heat to the water when the sun is out to better carry it through the cold night.
5. Reflective insulating material. A reflective material coats the northern wall behind the pond, further focusing the low-angled winter sun toward the water in the pond, increasing the amount of heat that the water absorbs–even on an overcast day.
6. Underground geothermal heating/cooling system. This is a truly wonderful element that can be applied to any greenhouse or home, anywhere. A solar-powered 12-volt fan, normally used to ventilate bilge areas in boats pushes air through a 100′ length of 4″ corrugated drain tubing that runs underneath two feet of soil in the growing beds. This air circulation causes heat to either move into the soil and cools the air (in the summer), or move out of the soil and warms the air (in the winter). This system works so well, we’re planning on doing something similar for our home. There are a number of examples available online of this principle being applied; just search for “climate batteries” for several examples.
Any single one of these techniques, all of which are non-proprietary and proven in other places, would not be enough to keep a greenhouse warm during the winter. However, when all of them are employed together, it seems to have enough of an effect to keep the Grow Dome warm enough to sustain the crops we have planted. Again, any of these techniques–alone or combined–can be useful in whatever applications that you may have for any of your buildings.
Purchasing
To establish a delivery date for a Grow Dome kit, Growing Spaces requires 50% down, with the remaining 50% due before the kit is actually shipped. Their web site contains all the prices and options, so I would refer people there rather than repeat that kind of information here.
There were some hiccups in the purchasing process with Growing Spaces that made the procurement of the Dome frustrating.
 First, at the initial phase of ordering the dome, I was shunted around to four different people within ten days. With each person, it seemed as though they were to be my contact as I went through the purchasing process. But then something would happen and I would be transferred over to another person. There seemed to be little communication between each of those folks, so I had to repeat all my information and characteristics I hoped to see in the project each time I was transferred to a new person. This was needlessly exhausting, and I might have given up had I not done a lot of research about the product itself, and Growing Spaces’ dominance in this market. I know this type of thing can occur in a large corporation (ever tried purchasing health insurance lately?), but this is a folksy, privately owned company. I was surprised.
 Second, the first person with whom I spoke was insistent that I submit a questionnaire–filled out by our county planning department–before getting a bid. So I (mistakenly) assumed that the bid that resulted from this process took into account the information that they had asked for from the County. Silly me. The “bid” they provided was simply a repeat of the price quoted on the web site and did not take into account the increased snow load, wind load, and local seismic requirements reported to them by the County. Providing a product that met the county specifications cost additional fees for engineering and increased shop and production fees. Therefore, the “bid” is meaningless (even though it took them several days to return the “bid” to me); the prices are all listed on their web site. Any further fees are added only after you have committed to signing a purchase agreement, which commits you to go through with the purchase and cover any fees they tack on later. Didn’t seem like a nice way to do business; but heck, I don’t have to keep living with these guys years later when I’m enjoying my greenhouse.
In spite of these speed bumps, they and we persevered and the kit was delivered without further brain damage. I wouldn’t say that the clumsy customer service of Growing Spaces should keep people from purchasing a Grow Dome. The product is definitely worth it; just keep your eyes open as you work through the initial communications with Growing Spaces if you do something like this.
Construction
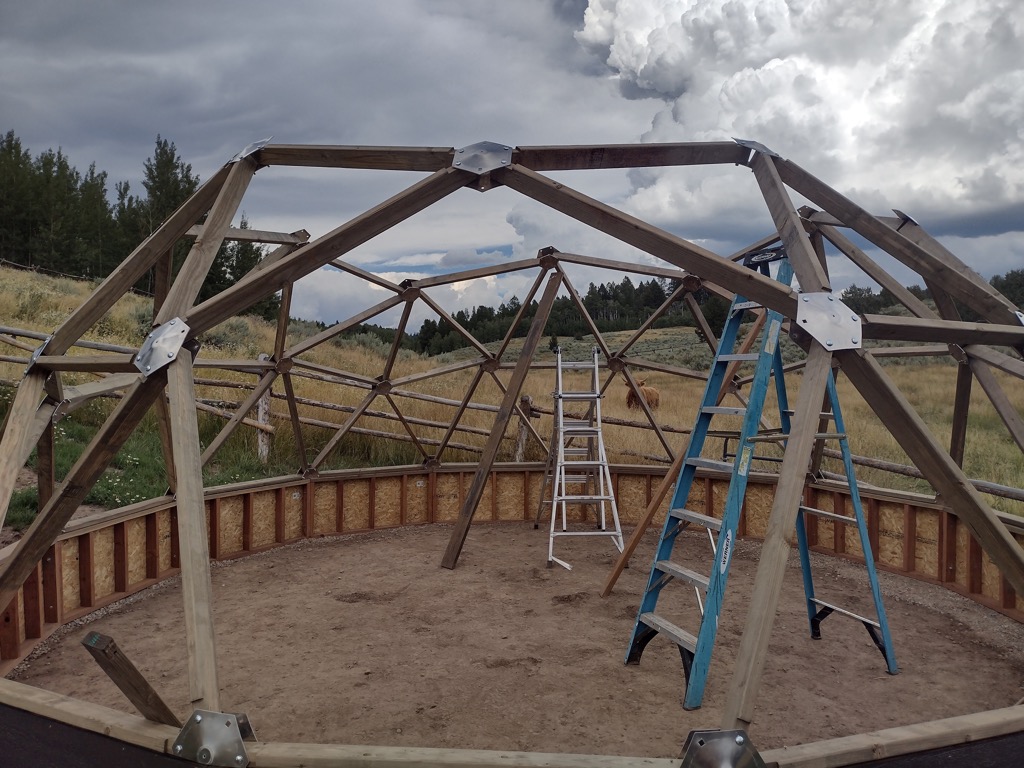
Most of our prepping improvements are self-designed and built, so we are disinclined to purchase a kit where everything is pre-cut/drilled and labeled. But in this case, I am incredibly glad that we did. Even though there are online tools to help people design geodesic domes, I would not have been able to calculate the angles and fashion the hardware to make this a project that would be finished within my lifetime.
 There were unexpected benefit and happy surprises. You haven’t lived until you’ve experienced the luxury of driving a nail in a pre-drilled hole, or have all the hardware for a sub-project to be counted, pre-sorted, and packaged so that you have the right thing available when you do that particular project. But these little conveniences were very minor compared to having the hubs and struts that actually create the geodesic shape all designed according to a plan that really works. It’s actually much more complicated than I anticipated. I would never have been able to get the geometry correct, or fashion the supporting hardware and wood struts so that they fit together effectively to make this design actually accomplish what I wanted to accomplish.
 There was no guess-work because of the abundance of directions and guidance provided. I was given a password that allowed me to access written instructions, diagrams, and videos of each of the construction steps. Each of these short videos was especially useful (but for one exception I will mention later.) The marvelous directions, the effective design, pre-planning of the thermodynamics of how to keep the dome interior temperate, and–most particularly–the pre-engineered hubs and struts made it well worth the extra cost of purchasing a kit, as opposed to figuring it out on my own and purchasing each component separately.
 A few privately produced construction videos were also very helpful. Most notable were two videos produced by Shawn James on his My Self Reliance video blog. One video summarized the overall construction, and one video covered the construction of the pond. Although Sean’s Grow Dome was purchased by Growing Spaces Canadian affiliate, it was virtually the same product as the one I purchased; and he demonstrated several techniques I found useful. A time-lapse overview of someone’s construction of such a Grow Dome can be found here.
Construction of the dome was roughly broken down into the following sub-projects:
1. Leveling and preparing the ground.
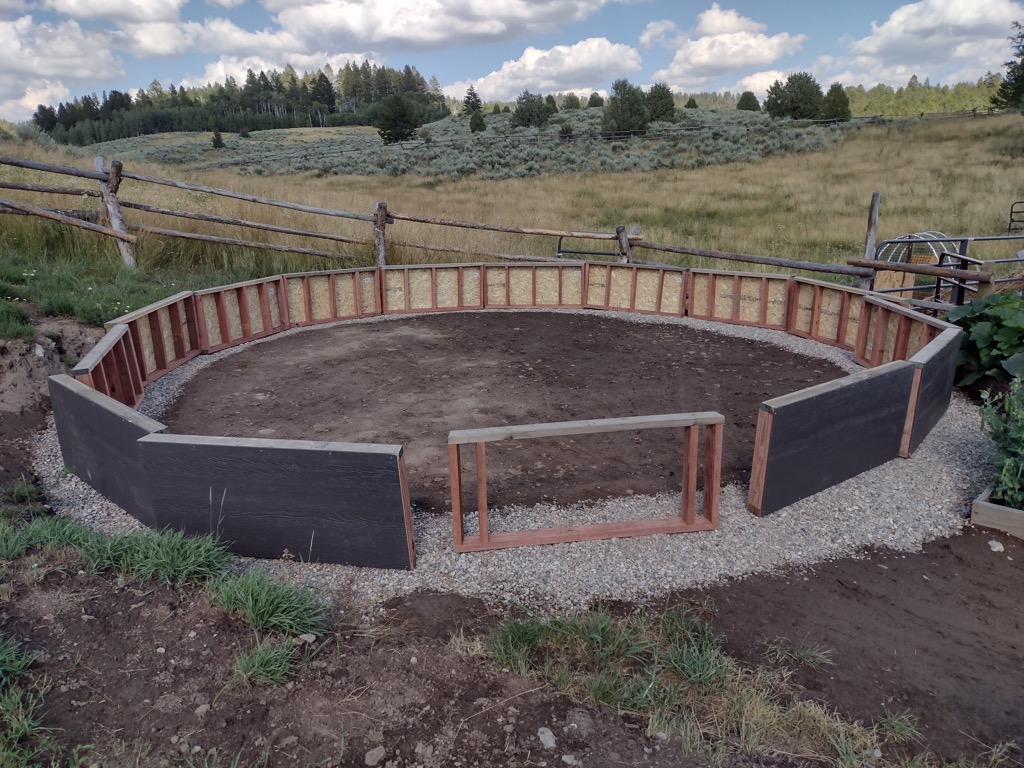
2. Constructing the gravel ring upon which the dome would rest. This was a 8″ deep, 12″ wide ring of gravel that was about 22 feet in diameter.
3. Constructing the framed wall that formed the base of the geodesic dome.
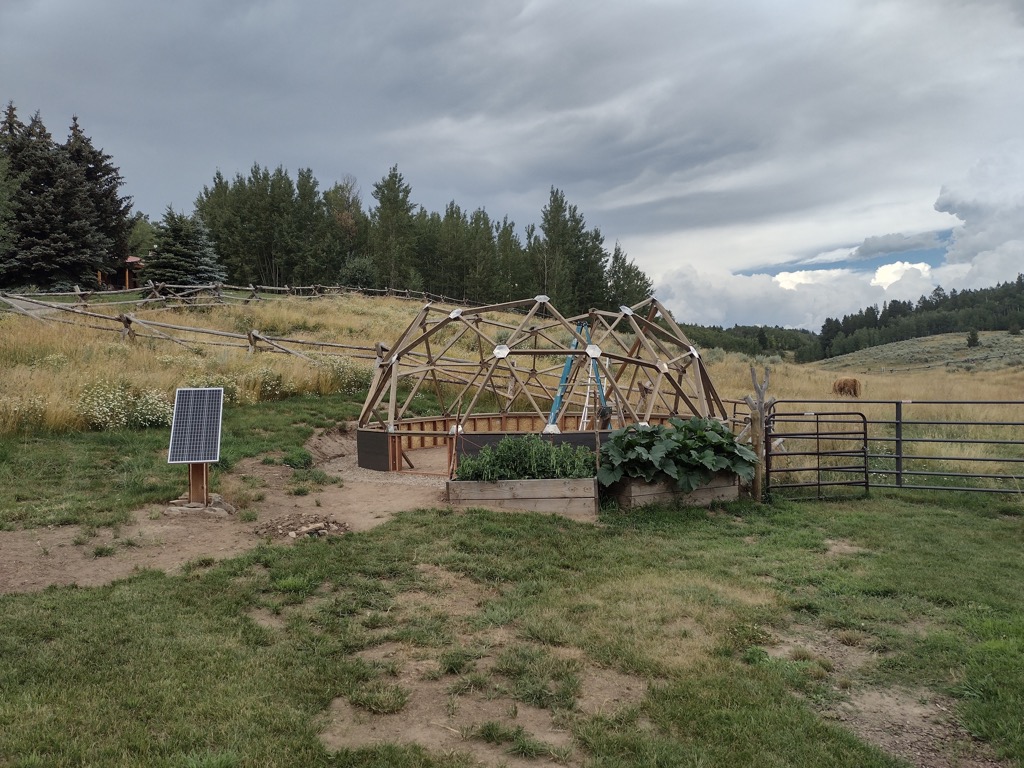
4. Assembling the wooden struts, each connected on both ends to aluminum hubs, that forms the geodesic dome.
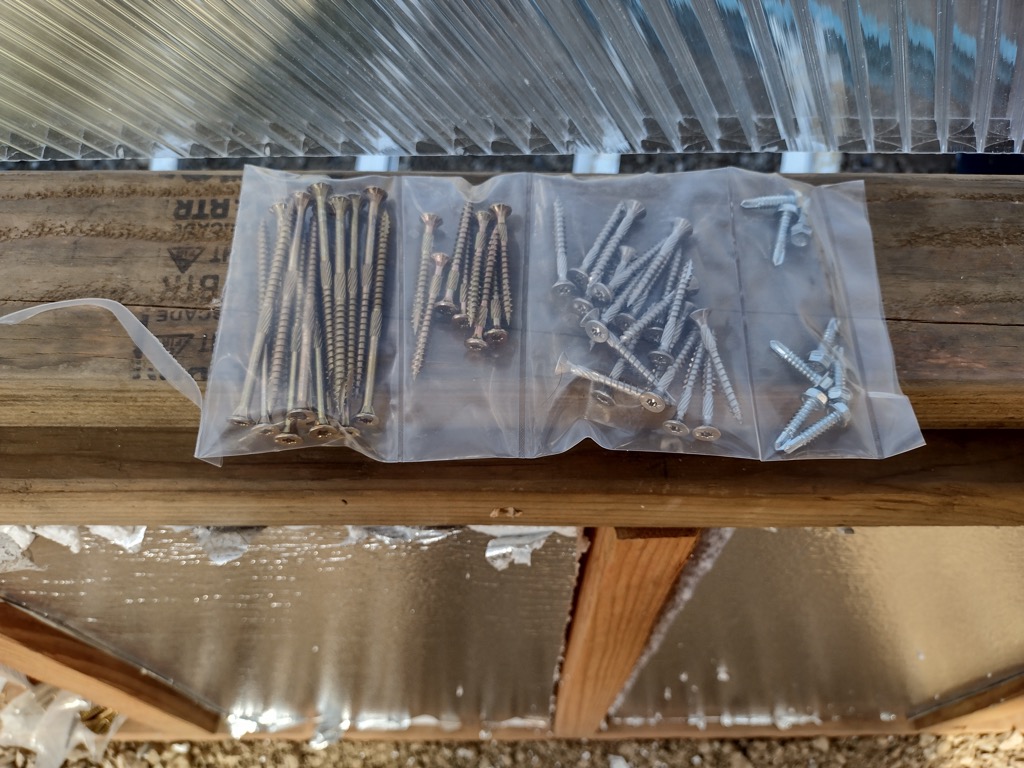
5. Attaching the polycarbonate to the wood struts.
6. Enclosing the dome by adding the door vents, and sealing the spaces between the polycarbonate panels.
7. Assembling the pond, along with the solar-powered water treatment pump.
8. Assembling the initial planting beds, along with filling them with compost for soil.
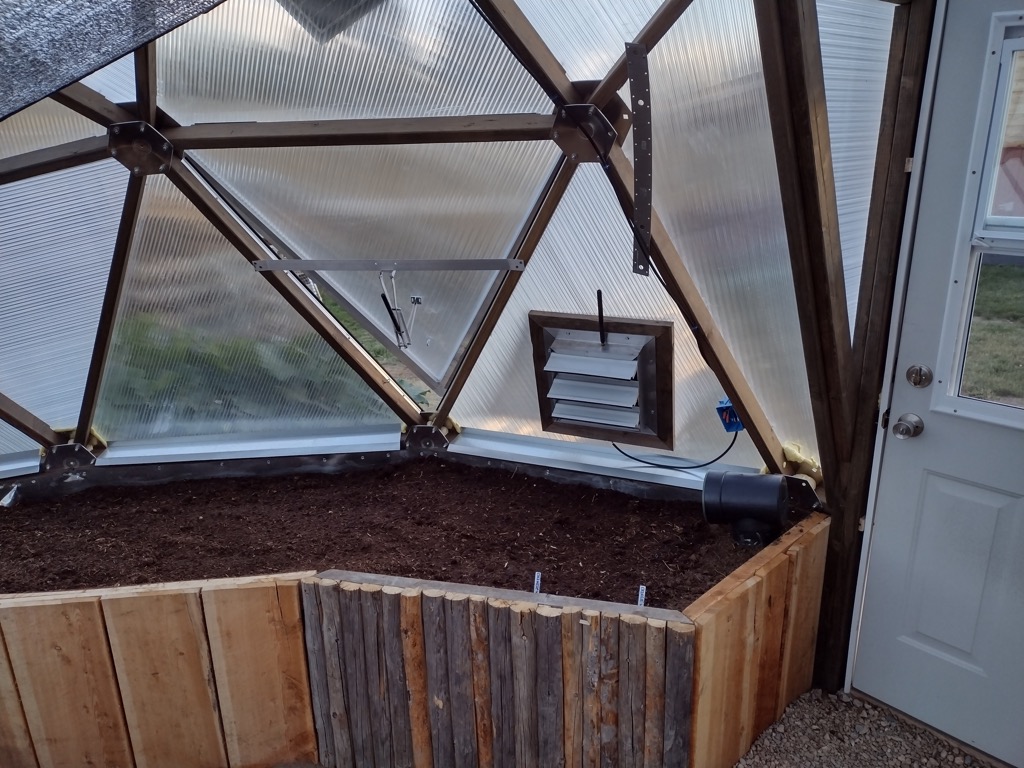
9. Setting up the geothermal heating and cooling system that runs through the planting beds.
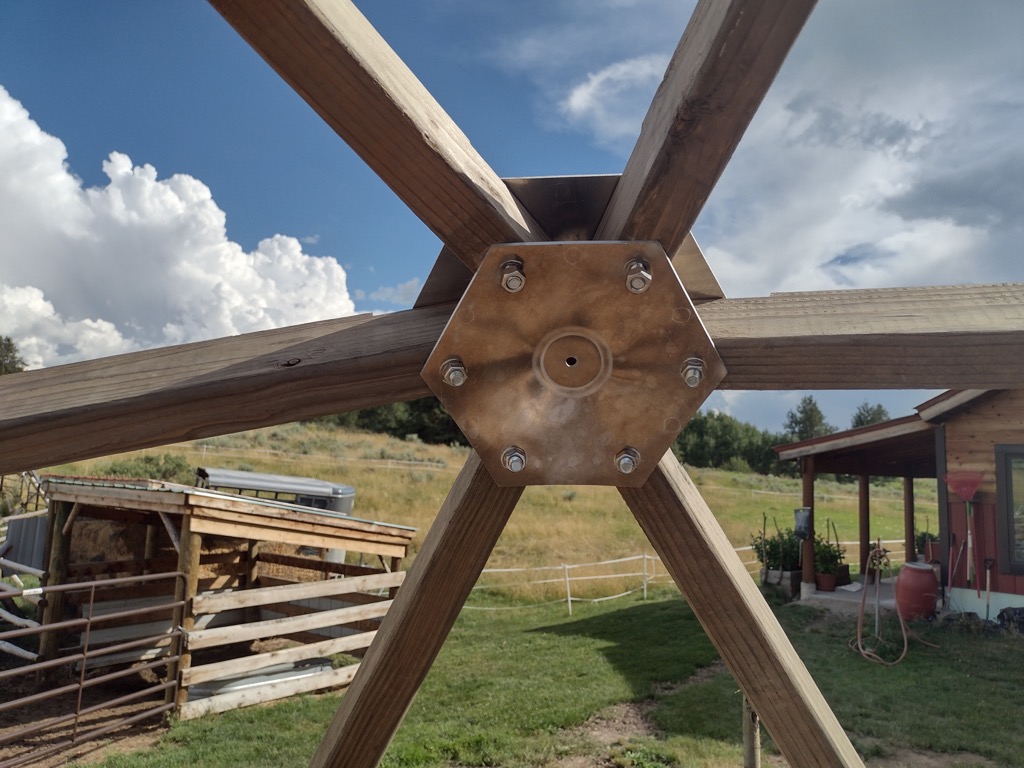 There was one situation that was not covered by the otherwise useful videos which proved very difficult. Our county required a higher snow load than that called for by the standard Grow Dome plans. Growing spaces met this demand through several alterations in the design (at a significant increase in cost). One of these alterations involved doubling up the aluminum hubs at the intersection of the struts. No mention was made to me about how to install these double “hubs” (each strut ends with an aluminum hub on the inside, and one on the outside.
Like the hubs are the bread and the strut in the cheese in a cheese sandwich. Normally, there is a single hub on the inside at the end of each strut.) I wrestled for two days on trying to connect the struts between the hubs. At the end of the second day, I was exhausted and dispirited. I was depressed, thinking I just wasted a lot of money on something I couldn’t even put together.
Upon bringing this to the attention of my Growing Spaces sales representative, he basically replied, “Oh yes. We only have a couple other folks who attempted to construct the 22′ diameter dome with double hubs.” Only then did he offer another video–not otherwise available to me with my password–that described how to get everything to fit together with the double hubs. He also gave me the name of a former employee who had ideas about getting double hub construction to fit on a smaller dome. Both the video and the consultation were helpful, and I soon finished the hub/strut portion of the construction. I would have appreciated having those resources and knowing that my construction was somewhat unprecedented before I wasted two days. That said, the double-hub construction appears to be much stronger, and has boosted my confidence that the dome will withstand the snow we get here. If I were to build another one, I would use double-hub construction.
Overall, aside from the double-hub challenge, construction of the Grow Dome was a joy; something I looked forward to when I woke up in the morning. I enjoyed seeing the geodesic dome come together, and I enjoyed attaching each of the temperature-moderating sub-projects. I’m really glad to have taken on this project.
Planting
We constructed 30″ wide, 2′ high raised beds around the perimeter of the inside of the dome. (See Picture) Then we filled these beds with 1-to-2 year old composted cow manure, sawdust, and some soil from our other beds. (Those of you who have created raised beds know how much it takes to fill a bed!) Then my wife started planting with vigor. She planted lettuce, chard, kale, spinach, carrots, Chinese winter cabbage, radishes, cilantro, parsley, leeks, and peas. There are several examples online to help people know what to plant inside a Grow Dome in their area.
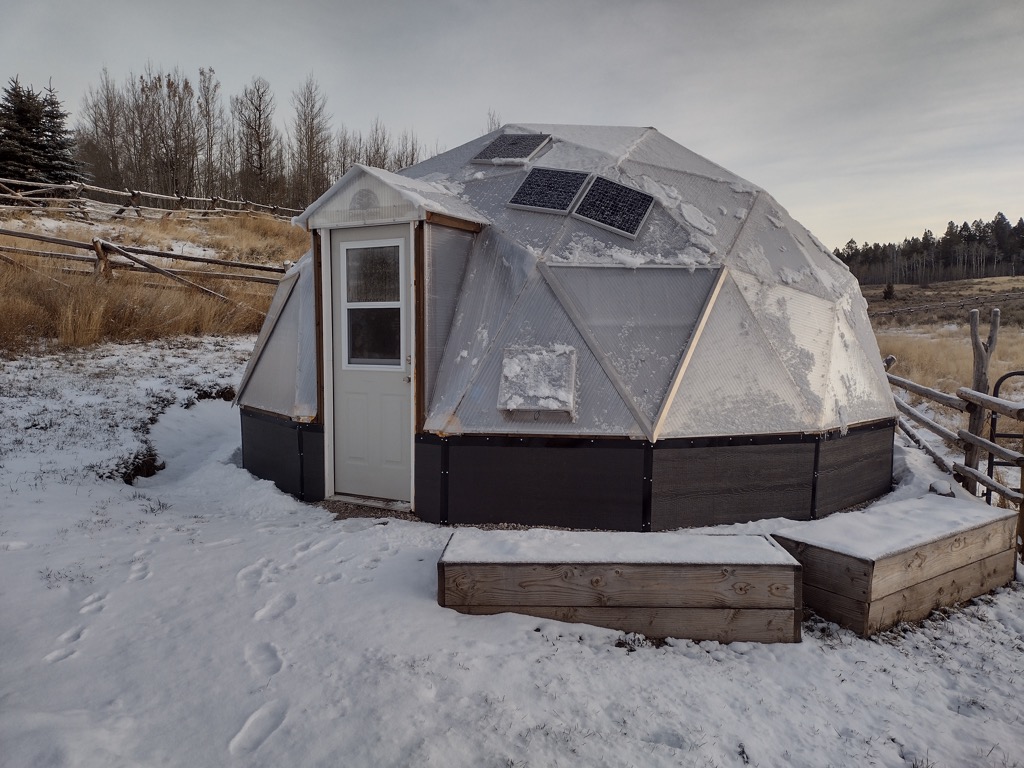
One thing we’ve learned already: even with the many features to enable crops to grow in the cooler months, the Grow Dome does not have limitless ability to do so. Last night’s low was in the high single digits, and it was about 30 degrees when we went in. The plants didn’t look so good. But as the sun rose and the inside temperature increased, they revived. We noticed that Shawn James put a small camp stove in his Grow Dome when it was -6 outside, and he is in Canada. Also, the Ontario Homestead site describes how they’ve used a wood stove in a greenhouse. We will probably do something like that to add more heat going into a colder night. I’ll let you know how this works.
 This first winter is an experiment, but so far, everything is coming up. We can already see that there are tricks to be learned in using a Grow Dome. For example, during the winter, the area close to the pond is the warmer spot; but during the summer, the area next to the pond is the cooler spot. This is just one example of the type of details we hope to learn this year, and then make adjustments for next year. On any given day, we walk out of the dome with a handful of salad and four eggs from the chickens we moved into the center of the dome, and a delight in our heart that we are seeing crops coming up that we would never see in November.
Conclusion
Normally, our summer garden is done and gone by mid-September. By that time, we have canned the tomatoes and carrots as sauce; frozen peas, greens, and soup; and baked about 40 loaves of carrot bread to be frozen. But here it is early November with snow on the ground, and our Dome is providing greens on nearly a daily basis. Additionally, we moved our small chicken coop/run into the center of the dome, and their summer laying levels have continued unabated.
Plus, we are enjoying a new type of fun in growing food during more months of the year. I’m enjoying getting new food produced in the winter. When I look at other investment options out there, I couldn’t have made a better choice in a climate of food scarcity, inflation, supply chain interruptions, and recession.
Next June, I plan to write a follow-up to this article to let you know how our situation fared during the winter, and how we use the dome to get things started earlier in the spring. But so far, it appears the Grow Dome’s combination of temperature moderating systems is accomplishing what we’d hoped: greater food security by being able to grow fresh produce more months of the year.