(Continued from Part 1. This concludes the article.)
Second Jig – Drill-Press Jig
If you have a pneumatic stapler, which greatly speeds up many nailing tasks, you can skip this section. Once you have the first slats cut, you’ll need to drill guide holes for the 4d nails using a 3/16” drill bit. If you try to nail without a pilot hole, not only will many of the slats split, but it’ll slow down your nailing time considerably. This is where jig number two comes in.
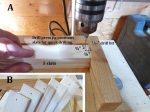
As seen in Photos 10A and 10B (inset), this jig positions stacks of five slats so you can quickly drill the nail hole in each end without having to mark the spot first. It attaches to the deck of any drill press and the wooden “L” holds the stack in just the right position while you drill five holes at once. You then spin the stack around and drill holes in the opposite end.
The simplest way to make and use this jig is to cut out the base, attach the right-angle “L” made from 2 x 4 scraps, and then use clamps to fasten the jig to the drill press in the precise spot. Using a slat pre-marked with the hole position will help you line up the drill bit with the jig before clamping everything down tight. In addition to my regular drill press, I have a small $59 drill press dedicated to this task alone, so I have the jig permanently attached to the drill press plate with bolts.
After you drill the first slat, test out one of the 4d nails to be sure the fit is correct. Once your slats are cut and the nail holes drilled, you are now ready to cut the end boards for the crate.
Preparing the End Boards
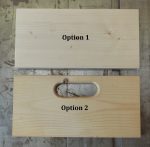
Each end board is cut from 1 x 6 lumber to a length of 11¼”. If you have a drill press, hole saw, jig saw, and router, the handles are quite easy to construct once you get the rhythm of it. If you lack the tools and you have more time than money, you can also use a hand drill, spade bit, coping saw, and sandpaper. But again, the handles are not necessary and a solid end board will work just fine. Both options are shown in Photo 11.
[JWR Adds: If someone wants to make and sell jar crates for profit, then the handle slots will give them much more eye-appeal, and probbaly generate many nore sales.]
End Board Jigs
You’ll want a jig (actually a template) for marking the lines and pilot holes which you’ll use to cut out the handles. You can make a simple one out of paper or cardboard, or use ¼” plywood for durability.
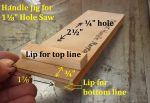
The purpose of this template is twofold: to draw lines for the jigsaw to follow and to mark two dots as guides for drilling holes with the hole saw or spade bit. My template (Photo 12) hooks over the top of the end board to automatically align itself. Then I eyeball it so it’s more or less centered on the board horizontally before marking the holes and lines with a pencil. I make six different crates with this single template so I use the eyeball method instead of making six separate templates. Since these are just Mason jar crates and not fins on a nuclear missile, we can probably get away with it.
Photo 13 shows how to use the template to mark the hole-saw guides and the jigsaw lines.
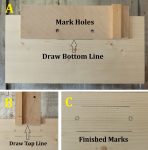
Once the pilot holes and lines are marked, use a drill press with a 1⅛” (+/-) hole saw to drill two holes in the end board (Photo 14.)

Drill only three quarters of the way through the board so you don’t get splintering on the other side, then flip the board over to finish each hole. Going three quarters on the first side leaves most of the wood sticking out of the hole saw when the hole is complete, giving you something to grab onto in order to clear the hole saw for the next cut. (Photo 15.)
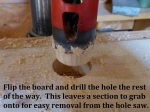
Now with a jigsaw, follow the lines to enlarge the hole (Photos 16a & b), then use a router or coarse sand paper to smooth the edges of the handle as seen in Photos 16 c & d.

Lastly, line up all the end boards side by side, bottoms up, and draw a line across the ¾” width in the center of each board. This will be a guide for lining up the slats on each crate for before nailing.
Final Assembly
With all the pieces cut, it’s time for the final assembly. You’ll need some wood glue or even just plain old Elmer’s. I suggest wood glue such as Titebond II since sometimes the crate will be heavy with full jars. You cannot put these crates together without glue or they will quickly loosen and fall apart at the worst possible time, like when you’re carrying 12 quarts of freshly-canned pasta sauce to the pantry. Wood glue is cheap compared to losing 12 quarts of pasta sauce and having your Italian mother-in-law cut you out of her will.
To begin, make sure you have 4d finish nails. These aren’t the good old days and sizes are no longer standard and consistent, even within the same box of nails, so don’t worry if some of them are looser in the pilot holes than others. Remember to test one of your 4d nails after drilling the first slat holes to be sure the fit is good and doesn’t slip clear through the hole. The nail isn’t going to hold the slat for long, it’s just going to act as a clamp for 24 hours until the dried glue takes over, so don’t spend all the extra money on small nails with bigger heads. Locally, those only come in small expensive packages whereas 4d finish nails come in large economy-size 1- and 5-lb. tubs.
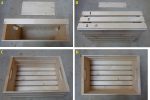
Begin by putting the two end boards bottoms up, handles down, on your work surface (Photo 17a). Take the six bottom slats side by side and line up all the holes, then run a single line of glue down each row of nail holes (Photo 17b).

Attach the two outside bottom slats first to ensure that all the center ones line up properly. Now take two more slats (glue side up) and using the ¾” wide pencil line you drew in the bottom center of each end board as a guide, place the two slats to get a rough idea on the spacing of the four middle slats as shown in Photo 18a. Once you know the spacing (~⁷̸₁₆”), then attach the third slat as shown in Photo 18b, followed by the fourth, fifth, and sixth slats as seen in Photo 18c. If they’re not perfectly spaced it won’t make any difference unless you’re entering these in the county fair woodworking category.

Once you have the six bottom slats in place, tip the crate up on one side and apply glue to the set of six side slats. Nail the topmost slat first, then the bottom, followed by the middle as seen in Photo 19. Flip it over and do the same on the second side.
That’s it, you’ve just finished your first crate! Let it sit for 24 hours so the glue can dry. If everything went hunky-dory with no tweaking required, you can now go into mass-production mode.
Mass-Production Mode
This is where you have done your calculations for the 10 quart-size crates you want to make so you know how many of each component you need. The secret of mass production is to set the table saw up for the first cut and then make all the cuts needed with that setting before moving on to the next setting. Once you start using each jig, you’ll get into a rhythm which will also speed up the work. By setting the table saw up once for each cut and getting into the rhythm of the jigs, you’ll also get a more consistent finished product.
So, to make those ten crates, first, cut out twenty 1 x 4 x 11¼” ends. Second, cut all 10 (+ a few extras) of the 2 x 6 x 16⅝” slabs at the same time. Third, cut all 120+ of the slats using about a 5% overage to account for any unusable slats. Fourth, drill all the nail holes in the ends of the slats and finally, prepare the 20 handles in the end boards. Once you have all the pieces cut out and handles made, get the glue out, put on your most lively bluegrass CD, and start nailing. And nailing, and nailing…
Good luck on this project — and have fun!
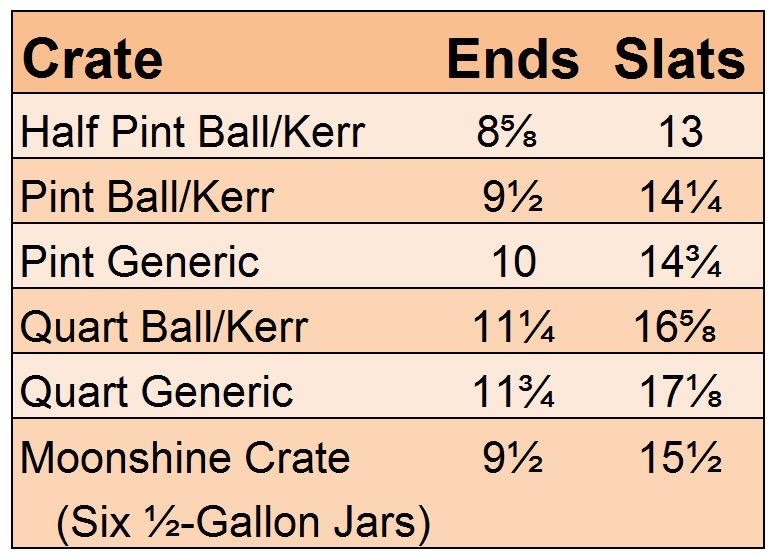
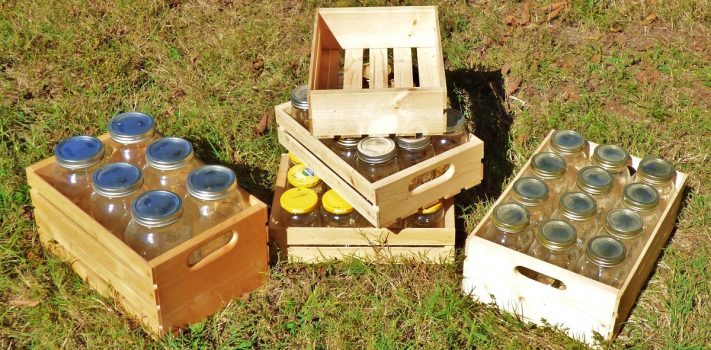
In the table below are the dimensions for the six different sizes of crates that I make. Double-check the numbers to be sure they fit your actual jars before you go into mass-production mode.



Loved the article and the idea! Thank you for the detailed instructions with the photos. I’m sure your Italian mother-in-law would approve of your carpentry skills!
Well done! Really great article and nicely explained w/ excellent photos. Just got rid of some of the cardboard boxes that are sturdy/not sturdy, and not really stackable. With winter coming this will make a fun project (not that I need another project…). Thank you!
Great article! I love some bluegrass gospel.
This is super cool St. Funogas! Very clear directions and all the good pictures made it feel almost like a textbook (except textbook authors are not nearly as funny).
I used to really enjoy woodworking as a teenager. Haven’t made the time lately…wonder why haha. Suspect it’ll make a comeback when the kids are old enough to learn to use the tools.
“…except textbook authors are not nearly as funny.)
Hey Bear, did you mean funny “comical” or funny “weird”??? Either one would be a huge compliment, thanks! lol.
Hopefully you’ll get back to woodworking sooner than later. In the meantime, maybe get your kids some Handy Andy tool sets, that’s how I started out back in my single digit years. My dad even built me my own little built-in work bench right next to his and a pegboard to hang my Handy Andy tools on. He’d be real proud if he could see my shop now. 🙂
https://www.pinterest.com/mjdgood/handy-andy-tool-collections/
Thanks for the article. I made some jar crates maybe 10 years ago when I got into canning in my early 20’s. I considered writing something like this but discovered all my measurements were based off of the Ball/Kerr size and my mismatched jar collection didn’t always fit! I never got around to it, but VERY glad you did! Especially noting not all “mason” jars are the same.
One thing I did way add two slats on the bottom just a kerf or two narrower than the inside dimension and made them slightly taller so they would lock in place when stacked without any pressure on the lids. My son is old enough now I think we’ll have to make some more!
Hey Journeyman, if I’m not mistaken, one of the early drafts of the Declaration of Independence said, “We hold these truths to be self-evident, that all men, but not mason jars, are created equal…”
I saved all my old bread and butter pickle pint jars and lids from the years before I was able to resume canning and was tickled pink to find out they are the same size as Ball//Kerr jars and fit perfectly into the same crates.
Your locking idea is as brilliant as it is simple. I’m going to keep that one in mind and try it out next time I make some crates. Had I thought of that idea ahead of time, it would have been a nice addition to the article to show some of my taller crates with your locking slats added.
JWR and Lily,
I’m not sure where this goes, so I just send it to you. The NCOs who spoke up think no one cares. I hope our SB community notifies our senators to look into this and take some action. Of course, as a veteran, I am especially incensed.
https://theintercept.com/2020/10/23/fort-hood-army-deaths/?utm_medium=email&utm_source=The%20Intercept%20Newsletter
One of the takeaways: One of the staff sergeants said he was disturbed by how allegations of sexual assault are handled, citing the case of a soldier in his platoon who was charged with seven counts of rape or sexual assault while at Fort Hood. One alleged victim was a service member and two were civilians, according to another sergeant familiar with the case. The soldier was held in a civilian jail for several months but was acquitted of the charges in a military trial. He is now back on base.
“The CID couldn’t even put a nail in wood,” said a second staff sergeant. “That’s how useless they are.”
Carry on
St,
Great article, and very clear concise instructions. As a hobbyist woodworker who has built smaller furniture, select ‘storage’ systems, and ‘other’ projects, I always appreciate well thought out and picture supported plans. If I wanted to add height to the end boards (and didn’t want to spend time calculating, or re-engineering the height differences for each size jar crate after creating one of each), what number of inches would be added for each size jar crate so they could be stacked on their wood frames versus the jar tops? I can add exterior lips or decorative steel strap flanges so they ‘lock’ together once stacked. Obviously I might need a couple of more slats as well per case but that’s no biggie. I live in the New Madrid earthquake ‘region’, so this is a timely article. Much appreciation for sharing your knowledge!
As always, hoping you…
Seymour Liberty
Hey Seymour, on the taller crates I made I just stepped up to the next size of 1 x board. A pint would use 1 x 6 instead of 1 x 4 and 1 x 8 for a quart. A quart jar is 6⅞” tall and a 1 x 8 is 7¼ wide so using Journeyman’s idea with a ¼” bottom slat, it would be a very close fit but probably doable. A B/K pint jar is 5⅛” tall so using Journeyman’s idea, a 1 x 6 (5½”) would have the same close, but probably doable, fit.
Another possible idea if the fit is too close and you still want to use 1 x 6’s and 1 x 8’s would be to put a small triangular ¼” foot on each crate, with the triangle fitting down into the crate below it where the jars don’t reach the corners. In order for the foot to keep from breaking off, I’d move the outer two bottom slats inward to accommodate a 2-3″ long triangular board with the foot portion sticking down only ¼” or ⅜”. You’d probably have to play with it to see which method works best. Journeyman’s slat-foot idea is simple and easiest if there’s enough clearance room using 1 x 6’s and 1 x 8’s.
Good luck on this project and have fun with it.
St,
Thanks for the size updates. Always easier when you have the dimensional stuff already done in order to calculate other options.
Hmmmh, that’s a thought on the clearance (shifting from 1×4’s to 1×6’s, and 1×6’s to 1×8’s, 1×8’s to 1×10’s, but on each size shift, it leaves only 1/8″ clearance. I’m thinking the 1/4″ bottom slats are naturally going to have a little sag, mostly toward the centers away from the end boards when filled with full jars (especially quarts and half gallon jars which are much heavier when full) and 1/8″ might not be enough clearance. Something to ponder though…
As Always, hoping you…
Seymour Liberty
St.,
Hope this previous post didn’t sound like a criticism. I really appreciate this article. I’m just trying to figure out a stacking solution (as in how to accommodate everything in limited space), due to the quantity of jars (both canned & empties waiting to be filled). Please keep sharing your knowledge. It’s very helpful.
As Always, hoping you…
Seymour Liberty
Hey Seymour, no, it didn’t seem like a criticism and two heads are always better than one. Multiple people kicking around some ideas can only improve things.
I have a crate sitting in the middle of my kitchen floor so I don’t forget to test these ideas out in the next day or two. I already have some deeper crates so it’s just a matter of putting feet on and seeing which method works best. I’m hoping the method Journeyman came up with will work. As a side note, I keep a little mini crate on my desk as a 3 x 5 index card holder. It holds one pint jar and has jute handles and I use it as a little gift basket when giving away jam or honey. Looking at the ¼” slats on that, they’re more than wide enough so I thinking on the locking slats I could go down to 3/16” or maybe even ⅛” since all they’re doing is locking heavy full crates in place. As far as the sag in the middle goes, I think if that is the case it would only be very slight pressure on the center jars, if any. I’m thinking the slats are strong enough to not sag the full ⅛” but I’ll test that out as well.
I have to hitch up the ponies and head into town today so I want to price out the difference in cost between the normal crates and the deeper ones. I’ll post all the results today or tomorrow in case these comments get included on the SB Archive Stick.
“Toobin” like “Smolletting” is now a verb.
Thank you for this wooden crate idea. It is a great product for jar storage but also a nifty illustration of how putting thought into jigs to make work more accurate and efficient is worth the efforts
I have been canning since my late teens, forty years now. I always keep the jars in the box they came in. When opening the packing I take a scissors and cut around the top on 3 sides, leaving one of the longer sides uncut, flip over the now “cover”, remove jars and complete my canning. After jars have cooled sufficiently I put them back into the cardboard box and flip the plastic cover over the top. The plastic helps to make the box stronger and the plastic on top helps to keep dust out. I stack as many as 5 boxes on each other and have never had any problems. I’m still using boxes I’ve had for 20 years. Now granted, I do not live in a real earthquake zone, so I do not worry about shaking and breaking, and can see how St. Funogas’s crates are a great idea, but if you don’t have earthquake worries or are short on funds, try leaving the plastic on your boxes, it really does help.
Great instructions and pictures!
Very smart! The plastic is still on my cases but I split the plastic on top to open. I store the empty jars and some of the filled jars in the original cases. I will have to keep this in mind and open more determinedly (is that a word?) until I build something else. I’ve also seen or read where people who have wood shelves, build small L-hooks on the front & side faces of their shelves, & hang 4′ x 8′ plastic or wood lattice on the front and sides to keep jars from shifting during a quake. Then they just remove the lattice by lifting it off to access jars, and put it back when done.
As always, hoping you…
Seymour Liberty
Great article!
On the topic of canning jar shortages, my understanding now is that the Newell company will release jars and supplies to their authorized retailers. These are Walmart,Target, Kroger, Ace Hardware, TruValue Hardware, and Michaels. I was in my state capital this weekend and bought two cases of wide mouth pints at Walmart, and two cases at a Target. I don’t know if these were new shipments or left over from this season. If you live near large cities you might check these stores. The only thing that I have not seen anywhere in my area are the lids. Thank goodness I had a large stock of the wide mouths but could use a few more regular mouth lids. The only time I have seen jars at Michaels they were decorator jars and sold individual. I also viewed a You tuber checking jars in the Houston area in a Kroger, and she reported there was a large supply there. Happy canning everyone. Now go fill St. Funagas’s crates.
Sew Nurse,
Saw a press release several weeks ago that Newell was increasing their “sources” for glass jars (didn’t mention lids), but hopefully that doesn’t compromise quality. Is it just me, or does it seem like they are limiting lid production in order to sell more cases of complete jars/lids/bands at a higher price point?
I don’t know if they’re “authorized” dealers, but I found quite a few cases in Aug & Sept at Rural King, Tractor Supply, and Menards in several locations in Missouri so you might check those as well if you have them in your area.
As Always, hoping you…
Seymour Liberty
Great Article! I have a bunch of “scrap” 2 X lumber that I’ve been looking for something useful to build.
Question: you mentioned a staple gun …I have a finish nail gun and a crown staple gun
Would either of these be useful and forgo the need for pre-drilling?
Again, thanks for the articles
Hey John, I’ve seen staple guns used on some pretty thin wood in various craft projects and they seem to work well without pre-drilling.
Good luck with this project.
What great container crates! Thank you, St. Funogas!!!
Saint, This is awesome and so helpful. Someone like me is really helped by the photos, charts and detailed instructions. Thank you! Krissy
Hey Seymour, here are the results on the cost differences between short crates (as in the article) vs taller crates, the slat locking feet clearance, and the amount of sag in the center of the crates when loaded with full jars.
The short version: Generally, making a taller crate so the top crate is not resting directly on the jars beneath it costs about 50¢ more. Slats attached to the bottom as feet to keep the crates locked in place worked great. Sag is very minimal and not enough to touch the jars in the lower crate.
The details: Here are the costs (for just the end boards) on normal vs tall based on today’s lumber prices (10/27/20):
B/K pint – 73¢ vs $1.22 = 49¢ difference
Generic pint – 82¢ vs $1.36 = 54¢ difference (You only get 9 generic ends from an 8″ boards vs 10 B/K ends)
B/K and Generic Qts are the same price based on 8 ends per 8′ board – $1.53 (short) vs $1.98 (tall) = 45¢ more per crate.
On the feet, there is enough room using Journeyman’s slat idea. On the bottom of the crate along the short ends (perpendicular to the bottom slats), I added a ¼” thick x 1½” wide slat to each side. I came in half a kerf as Journeyman suggested but there was just a hair of slop when I tested it on top of a crate so I’d probably put them close enough to the edge to just be able to see some light coming through. The feet cleared the generic jars in the crate underneath by 1/16th of inch (the width of a round toothpick), and the B/K jars by more than that.
The ¼” thick slat was more than thick enough for feet and I’m sure that could easily go down to 3/16ths or even ⅛”. One issue I did run into is that the feet are being attached to other slats, not solid ¾” end boards, so I used a regular staple gun with 5/16th staples and it worked long enough to hold them until the glue dried, but ⅜” would have been better and should be applied from inside the crate to keep the top of the staple from scratching countertops.
I measured all the clearances beforehand using calipers to see if mathematically it would work and everything said it would. Then I made a crate with feet and it worked just as predicted.
On the amount of sag, a pint crate with jars of honey only sagged about 3/32nds. A crate filled with 12 quarts of tomato sauce should have sagged more since the slats are longer but only sagged around 3/64ths. As it turned out, the quart slats were just a hair thicker and honey weighs 29% more than tomato sauce so those two factors would explain the difference. Either way, the sag is insignificant especially since it’s only the center jars that are a concern for sagging and they have ¼” more space above them than the edge jars under the feet.
A final note, I’ve stacked honey as much as five crates high, in the shallower crates so the crates are resting directly on the jars below, and haven’t have any problems with crushed lids. I tested the bottom ones today and they open just as easily as the ones which bore no weight. The locking feet however, would be nice. And at $5.00 extra per 10 crates, probably worth the cost for most people.
Again, thanks to you and Journeyman for the input and ideas.
Hey St.,
You’re very welcome, although you did all of the planning/writing. I just trew out an idea. Thanks for putting so much time into checking this out! It’s very generous of you. An additional 50c per case is certainly worth the extra protection and being able to lock the cases together.
I think I’m understanding what you and Journeyman are proposing, although being a visual guy (it’s always easier if I can see something and then plan it out in my noggin) I’m having a little trouble picturing it confidently.
If I’m understanding correctly, you’re saying attach a couple of similar but shorter slats perpendicularly on each of the two (short) ends to the bottom slats, just inside? of the end boards, and just inside of the side slats, correct? (clear as mud, right?)
That’s why I need to see stuff! Pictures were invented for guys like me. People laugh when they see me not get it until I glance at a picture, and then they can ‘literally’ see the lightbulb go on over my head!