
Email a copy of 'Introduction to Beekeeping - Part 1, by K. in Tennessee' to a friend
32 Comments
- Ad SIEGE belts: The most effective & versatile GRAY MAN accessory that can go-anywhere. Solid 5-7 oz of persuasive power has saved many. The well-prepared never leave home or travel without one. Stunning hand-crafted 1000-Year Buckles. Ideal CCW IWB beltBIG SALE on SIEGE Belts, Stoves and Fire Starters! The world's best engineered bushcraft and survival fire starters, stoves and belts. Unmatched performance and versatility.
- Ad California Legal Rifles & Pistols!WBT makes all popular rifles compliant for your restrictive state. Choose from a wide range of top brands made compliant for your state.
I like your topic! I have kept bees for many years for fun, to help the bees and for a source of survival food. I also began with the box shaped bee hives preferred by commercial bee operations. They are precision cut wood, expensive to buy, as you said, and require chemical treatment for pests. Not what I wanted for a survival situation.
I evolved to using only “top bar” hives. Top bars are horizontal hives. Think hollow log. They have been around for centuries and can literally be built with scrap wood and nails. I buy scrap wood at HD for 70% off. Most top bar hives are run chemical free, produce a bit less honey and more wax (for candles.)
Two good sources of info are “The Thinking Beekeeper” by Christy Hemenway and “Top Bar Beekeeping” by Les Crowder. Both on Amazon.
SBC,
Thanks for your comments. I’m just getting started into “looking” about bees. How do the “top bar” hives fair in cold weather? Based on the fact that we live in the northern latitudes.
45 Degrees!
Bees survive in all kind of cold weather. Using thicker wood, wrapping the hive with insulation or hay are common. But in the end the inside of the hive is only a few degrees warmer than the outside. It is more critical to provide a wind break, keep the door open and make sure they have plenty of honey to eat to get them through the winter months.
Great exchange re: top bar hives… Ours in the past were the traditional box-style hives, but we have been very interested in the top bar hive design, and appreciate very much the additional thoughts shared among SB readers!
I am in the process of building a Layens horizontal hive, the design of which makes more sense to me than other horizontal hives I have seen. The best information about Layens hives is Dr. Leo Sharashkin at horizontalhive.com, including detailed hive plans. I really like Dr. Leo’s approach to natural beekeeping. Several good videos of Dr. Leo explaining his approach can be found at the YouTube page “off grid with doug & stacy”.
Good morning!
This is a wonderful article and I can’t wait to read the next installment. Thank you for being so detailed. I find all of this extremely interesting but I am extremely terrified of bees. I think this fear is from being stung over the years and swelling up after being stung. (Thankfully not enough to be life threatening). I wish I wasn’t so afraid:)
Looking forward to the next installment
Rock on
Hey K., loving the article so far. I’ll save most of my comments for after part 2.
Since we often talk about skills on SurvivalBlog, and acquiring new ones, this would be a good time to mention what a great investment a table saw is. For $600 you can get a fairly decent one brand new, and a used one for less. A table saw can pay for itself many times over, especially if you are younger and just starting out in life. For $15 you can buy a book on the basics of using a table saw and as long as you follow a few simple rules, they are safe to operate. If your shop isn’t very big, you can put locking casters on the legs of your table saw and push it out of the way when not in use. Once you get the hang of it, the sky’s the limit on what you can create. For example, all those hundreds of mason jars we all have? Mine are all in custom-made mason jar crates I make on my table saw. Once you get the first one figured out, they’re easy to mass produce. I use them for empty jars and in many cases full jars, and they’re stackable.
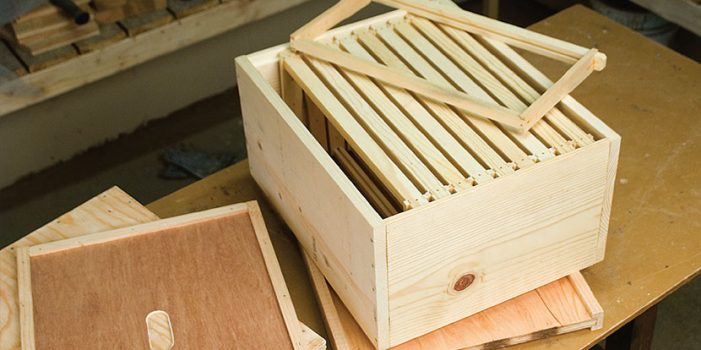
As far as beekeeping is concerned, I build all my own hives and frames for a third of what it would cost to buy them commercially, and they are better built. There are websites with very detailed free plans. I paid hundreds of dollars for bees to get started and only found out later that for $10 I could build two swarm traps with my table saw and catch the bees myself. I love freebies and free bees.
If you don’t own a table saw already, it’s really something worth considering.
St. Funogas,
An excellent comment about having a table saw. My wife purchased one for me as a gift over 25 years ago and I use it often for projects on our Farside Farm including as you mentioned, sturdy boxes for canning jars. Wood for the boxes was salvaged oak from pallets that I disassembled and ran thru my planer for uniformity, but that wasn’t really a necessity. In fact I set out some wood last week to start more boxes when the next rainy day keeps me inside.
I’m thinking perhaps making several hives next winter as my son set out some traps this year and was somewhat successful. If anyone has built some hives and thinks highly of the design would you please share links to the plans. Thanks!
Hey Red Rover, here’s the best place I’ve seen for detailed plans for Langstroth hives and everything associated with them. Next year I’ll try some top bar hives, those have some distinct advantages. I haven’t started tracking down a link on those yet, if anyone has a link, please let us know.
Good luck on building your hives, I have a lot of fun with it.
https://beesource.com/build-it-yourself/
St. Funogas! We are feeling terribly inspired… I am thinking we’ll return to honey bees very soon, indeed! Thank you for the ideas and encouragement!
Hey T of A, good luck to you! I didn’t start having a lot of fun until my third year but I’m glad I hung in there. 🙂 Just the amount of pollination I’m finally getting in my orchard is amazing and well worth having the bees even if I didn’t get any honey.
” Mine are all in custom-made mason jar crates I make on my table saw. Once you get the first one figured out, they’re easy to mass produce. I use them for empty jars and in many cases full jars, and they’re stackable.”
Oh. My. Gosh.
That is exactly what I have been thinking about!
Might you consider writing an article with pictures on your crate making design?
I have tried researching online to purchase some, to no avail. While I do not have a table saw, I can probably borrow one before buying my own.
I think of crates as an important insurance policy of protecting the food storage.
Hey Krissy, I’ll put an article together. They’re pretty basic: the ends are made from 1 x 4’s (pints) and 1 x 6’s (quarts) and the slats are sliced from 2 x 6’s. There are a few tricks to speed things up and a few jigs to make things safer, so I’ll put it all into an article.
Sweet!
St.F, I am looking for a tablesaw,many available on local sites for as little as$50(older/heavily used). Best buy is a older lightly used(made better) or if budget is really tight a table can be made and saw mounted underneath. Most important is SAFETY-eye/ear protection,push sticks,etc. The memory of watching a friend lose half his hand in shop class will never go away.
Hey VT, good luck finding a saw, I couldn’t live without mine.
Amen on safety! Rule #1 is to stay as far away from the blade as possible. I have a wide array of DIY push sticks and one of the jigs I made for making mason jar crates has a handle on top and rides on top of the 2 x 6 which I am slicing into slats. Since I’m slicing off 1/4″ slats, a push stick would be too thin to be safe. I have more fun making the jigs and figuring out how to do things than I do in actually making the final product. But as you pointed out, safety cannot be overstated. And never get in a rush.
Colony collapse disorder is in different regions of the US. Finding an established beekeeper in your area is the best source of information, from my experience. YMMV.
Cool article. Being unemployed suburbanite at the moment don’t see myself doing any beekeeping in the foreseeable future but do enjoy reading the content over morning coffee 🙂
Thank you, K in Tennessee! Excellent article and subject coverage… Looking forward to Part 2. So much appreciate hearing about your experiences!
We are very fortunate to have many bee keepers in our area. One fellow has a small commercial operation and even sells wholesale to the public in 5 gallon buckets! Unfortunately his operation is about 5 miles away. Although a small amount of the sugar content from honey will make me sick, honey will be liquid gold if the supply of raw sugar dries up. In my smaller garden, hand pollination might be adequate, but in a large garden it would be huge task. Planting flowers in the garden is a good way to draw pollinators in. Even with bees in the area, and a massive flower bloom only 20 feet from the garden, I see only a few bees, when I would hopefully hear a bush that size buzzing.
As an aspiring gardener, I’ll be looking for flowering plants that bloom in concert with the garden, and keep the foliage from concealing the vegetable plant blossoms from pollinators. If there were some other method, such as a scent to draw in pollinators, I would like to know. Perhaps growing towering sunflowers might be used as a beacon for bees? This year I can hand pollinate, but next year the garden will be much larger. Should I consider a small beehive? Thanks for the article.
Hi, Tunnel Rabbit, Thought I would share that my dad swears by mason bees for his garden and personal orchard. He told me that one mason bee does the same pollinating work of 500 honey bees. I have not researched them, because I have never had the need. Where I had my orchard for 23 years was excellently pollinated by wild bees. Here is one quick link.
https://www.kcet.org/food/the-most-fascinating-facts-about-mason-bees
Blessings on your week, Krissy
Hi Krissy,
Just took a break from gardening. Warning, gardening can be addictive.
Thanks for the info. I took a look today and found many large bees that do indeed look like a native Mason Bee. They likely live in the clay type soil here. Did a quick search and found that is apparently easy to keep Mason Bees. This might be a good alternative to honey bees, and because they are natives they would require much less effort and expense. To transport them to an area that does not have clay type soil, one would merely have to provide the clay. I’ll be looking to this idea further once my garden is complete. I currently can’t wait to get into the garden first thing in the morning. I am making my own soil because the ground is mostly clay around here… potatoes come out small and few as a result. This means lots of digging and mixing in composted manure, but I’m enjoying it. There will be lots of transplanting yet to do. 3 year old pole beans germinated in 6 gallon buckets in only 4 days in a poly tunnel after being soak in water for 24 hours. They need very warm soil. And the first planting of potatoes had a 2 month head start using a similar technique.
Tunnel Rabbit, to help grow better potatoes in clay type soil, till in some sand into the soil. you can use childs play sand or get some mason or bricklayers sand. the sand will loosen up the soil and let the potatoes grow larger and more plentiful. …….hope this helps
Hi Fred 2016,
Thanks for the much needed tip. We got free sand nearby and I’m just about out of compost, and need a bed for potatoes. Perhaps the sand will help turnips and rutabagas grow as well. I’m going to try it cause that is the cheapest option.
Another tip on potatoes… One of our early lessons with regard to sweet potatoes (and this may apply to other kinds of potatoes as well) is that “soil too nutritionally rich” can result in lots of leafy growth, but smaller potatoes. We are in the process of depleting one of our greenhouse beds in anticipation of larger potatoes!
Sand is such a good modifier. We have found this also, and hope it’s really helping you. In our area we have lots of clay too!
Enjoy the gardening!
Tunnel Rabbit, I have very heavy clay soil and adding sand helped greatly. Another help is using grass clippings as mulch (free and effective) and till it in at the end of the season. Helps in moisture control(less watering),cool roots in hottest weather and makes worm collecting easy(lift grass and collect worms-they love it). 10+ years to get good soil.
How to Set Up Native Bee Hive | Mason and Leafcutter Bees
https://youtu.be/20C3dfDia24
A short and excellent video from Paul Wheaton of Permises.com on Leaf Cutter and Mason bees. This promising for those who need an easy and inexpensive way to insure they have more pollinators and more fruit in their garden.
https://youtu.be/V8vAQ1B5Zj4
Here is where to buy kits that come with these bees and their homes.
For only $24.99 and up, you can be in the bee business. I’ll make my own by drilling 5/16 inch holes into a 5 inch thick round, and use a 6 inch long log screw to attach it to a tree. We got clay mud all over the place.
https://crownbees.com/
Hello Tunnel Rabbit! Yes… We have worked with both Mason and Leafcutter Bees (we buy these from Crown Bees). Our best success in the greenhouse has been with the Leafcutter bees, although this year we started with Mason bees because they were available earlier in the season. We are going to add Leafcutters to our outdoor garden this year, and will see how they do! One neat aspect of the Leafcutters is that they are solitary and non-aggressive (not territorial). They can sting, but all the information we have is that the sting risk is very low (one example would be unintentional physical contact). Our anecdotal experience would confirm this as well. The one challenge is that we haven’t succeeded in convincing the bees to reproduce in the little Leafcutter bee house we purchased and have provided! So… We have yet to figure this out. If anyone else has experience in this regard, we would be delighted for guidance and advice.
Anybody heard how we can defend or prevent murder hornets? They’re in the Northwest, so they’re coming.
The only thing I have seen to fight the hornets is the Japanese bees. They can deal with them, the European bees cannot.
Leafcutter bees are a prime pollinator in the alfalfa seed industry. They will lay in any horizontal hole they can get their body in, including door locks, plumbing etc. We made thousands of homes for them using 4×4 and 4×6 junk lumber. Use any length and drill closely spaced rows of 1/4 inch diameter holes full depth but not penetrating through the board. The bees use these holes to lay eggs in. Hang the boards in any direction with the tunnels horizontal. A rain/sun shade over the top is beneficial.
They are called leaf cutter because they cut circular pieces of alfalfa to plug each egg laid in the hole. How they get the exterior egg to hatch prior to the deepest egg is a mystery.
60 years of working around and no one I know has ever been stung. Truly didn’t know they could. Been tasted a few times to see if proper material for nest plugs. Just a slight pinch.
Bob in alfalfa country