(Continued from Part 1. This concludes the article.)
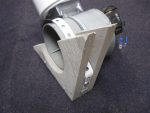
The “L” was constructed from a scrap piece of 1″ thick pine board which was about 9″ long and cut 7/8″ wide. The longer side of the “L”was about 6″ long and the smaller piece about 3″ long. The 3” piece was then screwed to the longer piece to form the “L”. This “L” provides the gap between the two plywood sides, allows a piece of metal strapping to encircle the plastic inlet, and holds the blower securely in place.
To secure your particular blower assembly you will have to design and assemble your own custom cradle structure or find a way to secure your blower to a base of some sort.
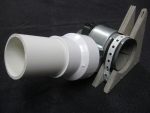
The plastic inlet of the blower was installed in the cut outs of the blower cradle and the metal strap placed over the housing to secure it in the cradle. Before screwing the strap in place, a small piece of bicycle inner tube was placed between the plastic inlet and the metal strap to help secure the inlet in the cradle. This also allows the angle of the blower to be adjusted during the final assembly.
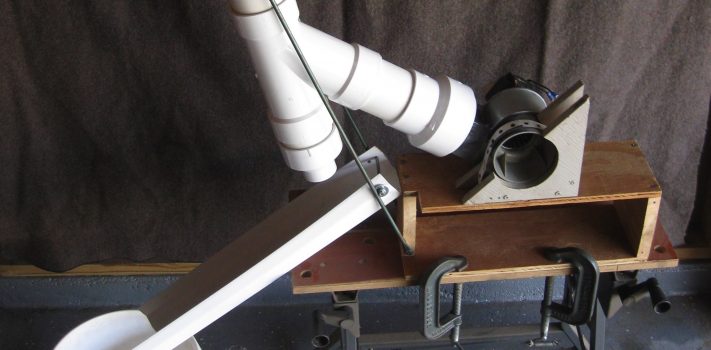
I constructed a small platform of plywood and pine scraps to hold the cradle assembly with the blower installed. This was clamped to my work bench to secure it while performing the trial assembly of the winnower. To repeat, the plans give no specifications on how to complete the final assembly, secure the blower, or support the winnower body.
Fabrication of the blower cradle, the blower adapter, and the platform were easily completed in an afternoon.
Trial Assembly of the Final Design
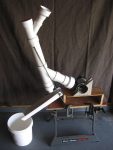
 In my “spare parts inventory” I had 2 thin steel rods about 29″ long with an “eye” at each end. These two rods were perfect for my use. (Wooden supports or channel steel purchased from the home supply store could also be used.) One end of each rod was attached to the platform with screws. The completed winnower body was raised into place and connected to the blower adapter with a 5″ long piece of 3″ diameter PVC pipe. The winnower was positioned so that it was tilted at approximately 100 degrees as shown in the plans. You can check the angle with a protractor or just hold the winnower assembly vertically at 90 degrees and then tilt it slightly away from the vertical. (I checked my installation and as measured from the bottom of the upper wye (component C), a 100 degree angle is about 3″ from vertical.) While holding the winnower in the correct position, I then put the two upper ends of the steel rods near the top of the winnower and duct taped them into place pending a final decision on where to attach the rods to the winnower. Dry wall screws driven through small pilot holes work great for attaching things to PVC pipe projects if they don’t need to hold water.
Testing the Winnower
 With the “trial” assembly completed I connected the blower electrical leads to an electrical cord and plugged it in. It works! Air blows up the main body of the winnower and primarily exits the 3″ hole at the top of the wye (component C). Some air also escapes from the inlet (component A) and also at the bottom wye (component E). The winnower is a counter-flow design where the the grain/chaff falls down the tube and the air flowing upward carries the lighter chaff/grain dust out the top of the winnower while the heavier grain falls out the bottom of the winnower.
Since it is early spring and I have no unprocessed or newly harvested small grain, I tried to think of a way to test the actual performance of the winnower with real grain. I thought a bit about how to simulate a grain/chaff mixture. Then I remembered my cross-cut paper shredder. Grabbing a small hand full of paper shreds I tossed them into the grain inlet (component A) with the blower running and was rewarded with the shreds exiting the top of the winnower (and blowing all over my garage). At least the light weight debris will exit the top of the winnower.
Next, I purchased about 2 pounds of clean wheat from the local health food store and mixed it with some shredded paper to simulate the actual winnowing of uncleaned grain. Yes, the design works and works well! Now I had confidence that the basic design and my adaptations to the plans produced a working unit.
Tweaks and Modifications
One tweak that I made was to offset the grain inlet (component A) to the right in relationship to the blower assembly. This ensures that the person adding the grain to the winnower is not positioned directly over the blower. This makes it easier to add the uncleaned grain. Again, I’m glad I didn’t cement the components together so that I could make this adjustment.
A second modification is to add a 1 foot piece of plastic rain gutter under the grain outlet to allow the grain to flow into a receptacle to the side of the winnower.
Following the initial tests of the surrogate grain/shredded paper mix I made another modification. I added a 3″ long piece of 3″ diameter PVC pipe to the grain outlet at the bottom of the winnower (component E) and attached a 3″ to 2″ reducer PVC fitting. This further reduces the air escaping from the grain outlet thus adding more upward air flow. It also reduces the scattering of grain from the outlet. After this modification some grain still hopped out of the rain gutter. A short piece of an old tube sock attached to the 2″ opening with a twist tie (or zip tie) allowed the grain to fall into the rain gutter without spillage.
 Since I don’t have a velometer to accurately test the airflow output of my winnower I can’t tell you if the performance of my setup matched that of the blower in the original plans. The specified blowers have a cubic feet per minute (CFM) output of either 75 or 176 CFM. Obviously, if the airflow is too high, grain will be blown out the top of the winnower. For my particular blower it might be beneficial to increase the the main tube of the winnower (component D) to two feet rather than one. This would give more time for the grain to fall and separate from the chaff. With my setup the winnower performed as it should but the grain/chaff introduced at the inlet needs to be added slowly so that a small stream enters the winnower and doesn’t overwhelm the upward airflow.
If your particular blower has too high of a CFM airflow, the air inlet to the blower can be partially blocked to reduce the airflow.
Final Assembly and Use
Satisfied that the winnower works as configured, I removed the duct tape form the upper ends of the support rods and attached them to the body of the winnower with drywall screws. For now, I won’t cement the PVC pieces together until I can test with actual grain/chaff.
One thing to note is that the winnower is un-balanced and must be securely bolted or clamped to a table, platform, heavy base or some other arrangement for testing or use. I happened to have a Black and Decker Workmate stand to which I clamped the winnower and it appears to be an ideal height.
Consideration must also be given as to how the grain/chaff is introduced at the top of the winnower. From the base of my platform to the grain inlet is approximately 3 1/2 feet which would require someone to stand on a step stool if the unit’s base is clamped to a Workmate stand.
A shield of some sort should also to be attached to the chaff exit at the top of the winnower (component C) to direct the chaff away from the person adding the uncleaned grain to the winnower. Maybe a 3″ PVC elbow attached to a short piece of 3″ diameter PVC pipe could be used to direct the chaff away from the operator. At the very least the winnower would need to be positioned so that a breeze will blow the chaff away from those using it. These are issues that still need to be investigated.
To Sum Up
For small grain raisers this winnower can be a more effective tool than hand winnowing. Using a 12 volt DC blower with a speed control makes it adaptable to an off-grid homestead.
For large scale grain farmers who want to clean some of their own grain for personal use this would also work to remove fine dust and other debris from grain harvested with a combine.
The design does work effectively, is easily assembled and can be completed by anyone with basic skills using common tools and supplies. My actual out-of-pocket costs were around $30 since I already had the blower and used recycled materials and hardware I had on hand. Even purchasing a new blower and new materials the winnower can be built for around $100.
Good luck with all your preparations!


Excellent work friend although until the very end when you tested-explained the design I was wondering how it worked.
Now we need a thresher to knock off the grain from the stalk. I’ve used the 5 gallon bucket with a drill-bolt-locking nut-section of dog chain as a whip thresher. Very dusty and had on the drill as it sucks that chaff into the cooling of the drill.
Maybe a section of 3/8 inch rod threaded at the working end for the dog chain whip and a sort of a 5 gallon lid shield along with bracing to keep it under control might work better. The original system works with small loads using sort cut straw or simply twists up into a mess.
Thoughts? I hate to reinvent the wheel when someone else has a viable working device like this articles grain winnower.
Hey PapaP, thank you for this wonderful article, it was SO helpful. Excellent photos also. This baby went straight to the printer for future reference.
I’ve been wondering about a grain winnower for some time but hadn’t done any searches yet since I haven’t planted grain until this year. But for years now, I’ve been saving my own seed and growing lots of herbs for cooking and for teas. I have a series of screens I use for cleaning both seeds and herbs, but they are less than satisfactory. For teas, it’s not relevant if there are small stems in the final product. But for herbs, it’s a huge problem if there are stems in oregano and basil for example. Oregano stems are very fine and pointy and downright annoying when you come across them in omelets and other dishes where they don’t cook long enough to soften up. So I’ve been wondering for a couple of years how to separate those out and haven’t come up with a solution until you wrote this article. I think the whole concept of a long tube is the solution for both seed separating and removing small stems from herbs. Of course, it would take different sized blowers and tube diameters but that’s all doable, it’s the concept that’s so ingenious. With oregano, the stems are small and needlelike so they wouldn’t float on the air very well while the leaves would. (The airflow would have to be just perfect.) So, the usable product would actually be coming out the top of the tube instead of the bottom. A series of 90’s could be added to the top of the tube so the oregano is being blown out in a downward direction while the stems are falling out the bottom of the tube. Just reverse of how the wheat is being separated.
I’ve used screens, followed by box fans and blow dryers for winnowing seeds I save but those too are less than satisfactory and I end up losing more seed than I like. A tube setup like you’ve built could be modified for seeds, using a much smaller blower motor, or at least one that had a very adjustable air flow.
There’s a lot to think about here as far as other applications go.
Thanks again for sharing! 🙂
Thank you for this. I have been thinking about small scale grain growing for some time. The lack of threshing and winnowing equipment has been the stumbling block. I think threshing manually could be done with help. But the thought of throwing dirty grain up in the air on a windy day never seemed very practical on a small property.
Would a winnower be basically the same thing as a “fanning mill” or “seed cleaner”? Out in the shed I have an old hand cranked wooden one that came out of an old feed mill, and I was curious if it would do the same thing.
Also, just in case someone needs to buy a blower, there is a company, Surplus Center, that usually has all kinds of goodies like blowers, controls, hydraulic parts, etc, for very good prices. It might be worth checking them out if you need to buy a blower. They have a website and also send out paper catalogs.
Good job, PapaP
Thank you all for you kind comments. I wanted to give back something to the Survivalblog community for all the good articles that you and others have posted.
@wwes: A fanning mill or seed cleaner would be a better way to clean grain. They have a larger capacity. But these are antiques for the most part and hard to find and since mostly made of wood they would rot away if not stored undercover.
Our farm had a fanning mill that sat in the barn unused as far back as I can remember. It belonged to my grandpa who probably used it to clean oats of weed seeds, etc. before planting in the spring. It was sold on a farm auction when my dad retired in 1978.