SurvivalBlog reader KMC sent in this immigration chart with the following comment:
“While reading an article on io9.com, I was really struck by the differences. Then I asked myself what other differences occurred in the first ‘half’ of our country’s history on that chart vs. the second half, and I couldn’t help but wonder how connected they might be? Thought-provoking chart.”
Every bespoke SIEGE buckle goes through an hours-long artisanal process resulting in a belt unlike anything else, with blazing fast performance and looks and comfort to match.
Ready Made Resources is offering three Mountain House Classic Assortment Buckets along with a Sawyer SP 128 mini water filter (capable of filtering 100,000 gallons of water) with the purchase of their MOUD142 Mountain House Entree Pac (36 cans / 6 cases). It’s one of their best offers yet!
#1 Trusted Gravity Water Purification System! Start Drinking Purified Water now with a Berkey water filtration system. Find systems, replacement filters, parts and more here.
This review is a bit overdue. Burris Optics was kind enough to let me borrow their Burris Handgun Scope 2x20mm to try on several projects, but somehow I kept writing about the projects and never got around to saying much about the scope. The short and sweet rating is I liked it well enough to buy it, but I should tell you more.
The first thing I like about the scope is the Burris Forever Warranty, which covers everything other than loss, theft, or deliberate damage. In other words, if I don’t smack it with a hammer after missing a shot, leave it in a train station, or get robbed, Burris will take care of the problem with no questions asked, no need to have registered it, and no need for a warranty card or receipt. Further, and this shocked me, it isn’t just for the original purchaser; it transfers to the next owner. I find this a pretty delightful warranty and wish some other things I’ve owned were covered this well. You do have to pay for the shipping back to Burris, but they cover the return to you. I did do some searches for complaints by customers, and everything I found indicates they live up to the promises.
This is a very compact scope, as one would expect of a 2x scope with a 20mm objective. It only weighs seven ounces and is just less than nine inches long. At the eyepiece, its largest diameter, it is only 1.4 inches wide and just a smidge larger than one inch at the objective. Compared to what we often see these days, this scope is diminutive.
Regardless of size, the scope passes more light through than the average human eye can use. Twilight factor– the amount of light that we get through a scope– is determined by dividing the objective by the magnification, and in this case we get a factor of 10. A young human eye can use up to seven or so, which diminishes as we grow older. This scope gives us more than any of us, save Superman, can use. It could actually be thought of as making the scene brighter than it really is, so we can see more looking through it than we can with our naked eye. Not bad, eh?
I tested the version with the matte black finish that goes for $219, but you can get it in silver for $229. I’m not sure why one would want it in silver, but you can have it that way if you want. What I would like to see would be a version in olive drab or camouflage.
Performance is not on a small scale. It has held up to all of three of the rifles I’ve tried it on– a Mauser in 7x57mm, a Mosin Nagant in7.62x54R, and a Garand in .30-06. It provides a crisp, bright view.
You probably noticed that this is a handgun scope, and you might be wondering why I hung it on rifles. The reason is eye relief. All three of these rifles benefit in mounting the scope further forward than scopes are typically mounted, especially in my hands. The Mauser and Mosin Nagant are bolt rifles, and I am left-handed. A scope mounted over the receiver makes it hard for me to reach over and run the bolt. It also precludes the use of stripper clips for rapid loading. The Garand is a semi-auto, and while it doesn’t need to have the bolt run, it won’t work, other than as a single shot, without its enbloc clips, which must be inserted from directly above the receiver. Mounting the scope forward of the receiver avoids all of the issues I have with scoping these three rifles.
The forward mounted scope, while used on German Army Mauser 98’s in WW II, didn’t get much notice in this country until Lt. Colonel Jeff Cooper, a Marine and the founder of the Gunsite Training Center in Arizona, started writing about what he called the Scout rifle. I’ve written about this before, but the basic concept was a light, responsive rifle for general purpose work. It should use a cartridge of medium power; the Colonel suggested .308 Winchester, be about 6.6 pounds in weight with sights and sling, less than 39 inches long, and have a low powered, forward mounted optic.
To me, the forward mounted optic was the most important feature, because it allows the shooter to maintain peripheral vision and situational awareness. That said, there are drawbacks to the Scout mount. Most of us can’t use more than about 3 power magnification with a Scout scope and maintain peripheral vision. These days, most people want a lot more magnification, despite that fact that most of us aren’t steady enough to use more, unless we have a solid rest.
Another drawback is, if the light is directly behind us, there might be glare on the rear objective. I also find it harder to use at night or twilight, but it helps to close one eye and concentrate on looking through the scope. This does give up situational awareness under those conditions. I know others who do not have these problems, so it may just be personal. My wife has noted that many of my problems are, indeed, personal.
I have also had issues with semi-autos flinging combustion dirt onto the rear objective, if the scope is too close to the ejection port. Drawbacks aside, I really like the forward mounted scope, especially when there is enough eye relief available to move it far enough forward to avoid dirt getting on the rear objective with a semi-auto. That’s where the handgun scope comes in handy.
Scout scopes are usually intermediate eye relief, which gives us 7-8 inches of eye relief, and that puts the rear objective somewhere close to the ejection port on most rifles. A handgun scope will usually have more like 10 to 20 or even more inches of eye relief, which gives us more options about where to mount the thing, and options are good.
The disadvantage of handgun scopes is that handguns are usually used at shorter ranges than rifles, so their parallax is generally adjusted to 50 yards rather than the 100 yards rifle scopes are set to. Parallax is the difference between the focus of the reticle and the target. If the target and reticle are focused at different distances, parallax error can throw us off, if the eye is not aligned with the scope. Thankfully, this matters more when range decreases. A scope set for 100 yards used at 25 yards will give us more problems than a scope set at 50 yards used at 150 yards. I personally don’t think most of us should even think about taking shots beyond 250-300 yards on medium game, and parallax error probably won’t cause too many problems for that scenario. I am a huge fan of scopes with parallax adjustment, but I haven’t run into any long eye relief scopes that feature it.
This scope offers 80 inches of adjustment for elevation and windage at 100 yards, which should allow more than enough for a good zero, unless one is going for extreme long range shooting. If that’s the case, it probably isn’t the right scope to be using, so there you have that. It provides ½ inch of adjustment for each click, according to the specs, and that’s what I got when I zeroed it on each of the rifles I used it on. It also returned to zero when adjusted to other points on the target and then reset back to the zero, so the adjustments are reliable. You can reset the scale on the knobs to zero by prodding them with a small screwdriver. This is helpful in case you ever need to make an adjustment in the field and then wish to return to the original zero.
The reticle is the duplex style that has become pretty typical in scopes today. The cross hairs are thicker on the outside and thin on the center. This helps you quickly center the target for a fast shot up close, while allowing you to use the finer center cross hairs for more precision when there is time or when at distance. I personally thought the center portion of the reticle was slightly on the fine side, but it worked well on close in drills as well as on targets out to 100 yards.
I did wonder about having an illuminated dot in the center. I think that would enhance speed up close as well as improve it in low light or against dark targets. We have lots of pig hunting in my area, and they tend to be dark and black so reticles that don’t show up well on our hogs. An illuminated reticle would, of course, add to the price, but it might be a dandy option for Burris to add to the line.
The one thing I wish I could do is try it on a handgun, but I don’t have any with scope mounts. I should fix that one of these days. I used to scoff at scopes on handguns, but that was when I was younger and my eyes worked better. As the front sight gets blurrier, I am beginning to think that optical sights might be a good idea, even on handguns.
Find your secure and sustainable home. The leading marketplace for rural, remote, and off-grid properties worldwide. Affordable ads. No commissions are charged!
My wife, bless her heart, is always making fun of me about all the flashlights I have all over the house, as well as in vehicles, and even on my person. Right now, there are three flashlights sitting on my two-drawer filing cabinet, next to my computer desk. On the end table, on my end of the sofa, sit three more flashlights, and there are three more on my nightstand. There’s always one in my jacket pocket, too, and let’s not forget the one or two on the kitchen table and some emergency battery-operated lanterns in the living room, and this is all just for starters. My wife stops poking fun at me when the power goes out. We live in the boonies, and quite often lose power. When that happens, what does she do? Yep, she reaches for one of MY flashlights; never mind that she has several of her own.
It doesn’t seem like it was all that long ago that I was patrolling around a nuke power plant from sunset until sun rise with a K-9 partner, but that was more than 35 years ago. I carried a large flashlight, powered by a lantern battery. At that time, it was the only thing available that afforded me a strong enough battery to last a couple nights, and it also threw a decent light beam for a long distance. During my days in law enforcement and doing security work, I was found carrying an Aluminum Mag-Lite of some sort. They could also be used as a defensive weapon in a pinch. Still, the batteries neither lasted all that long nor threw a beam of light as far as I would have liked.
Enter today! We have all manner of very small flashlights that have LED bulbs, can last for hours and hours, and throw a beam of light for several hundred yards, and the batteries last for an extremely long time. To be sure, I have at least half a dozen small flashlights that are powered by either AA or AAA batteries and use various types of LED light bulbs, and they last for hours on their highest light settings, plus they throw a beam of light hundreds of yards. That’s pretty impressive out in the boonies, when you hear something go “bump” in the middle of the night or one of my German Shepherds alerts me to something on our property (usually deer in the front yard or other small critters). In this situation, you need a good, powerful flashlight!
Many of the various little flashlights on the market today also come with an adjustable light beam. A simple turn or push of the head of the flashlight affords me a narrow beam of light that goes for hundreds of yards, or I can turn it in the other direction and have a floodlight that can light up my entire 10,000 square foot front yard. We also have some flashlights that have an adjustable power setting for reducing the amount of lumens it uses, thereby saving battery life, or for turning the lumens up as high as they will go. If that’s not enough, we have flashlights that have a “strobe” beam; it flashes rapidly and can disorient someone coming at me. Add that to a strobe beam that can signal SOS– three rapid flashing lights, three longer flashing lights, and three more rapid flashing lights. Plus, we have little flashlights that can change the color of the beam of light by simply turning the head of the flashlight. Then, let’s not forget little flashlights with a rechargeable feature. Whew!!!
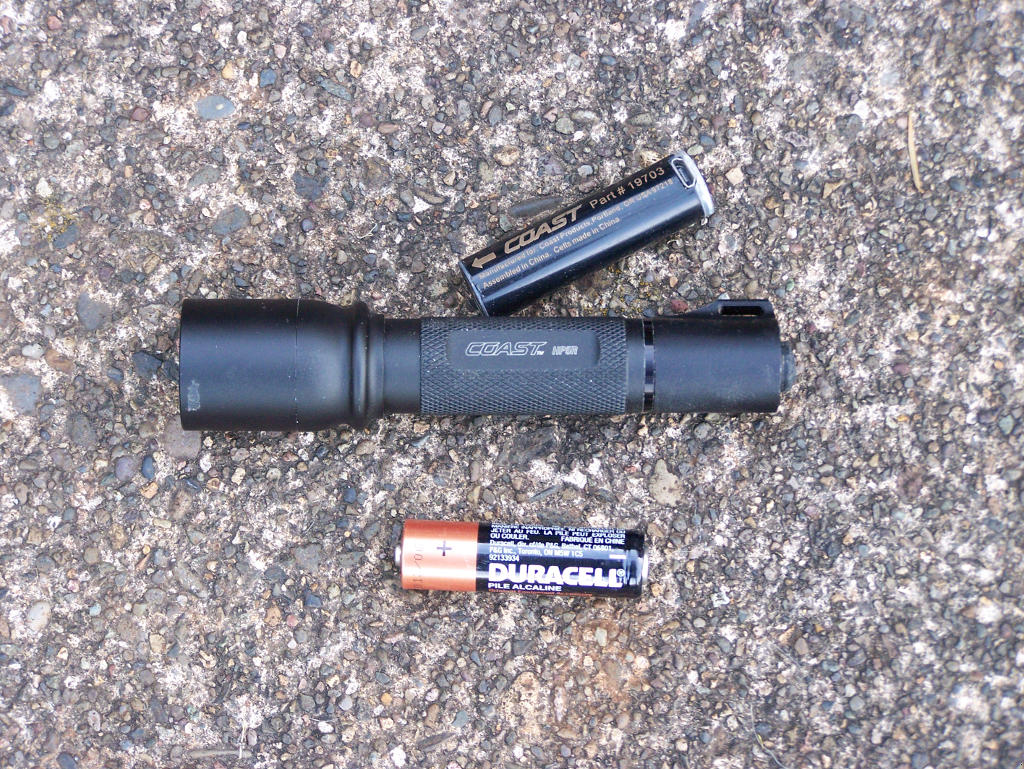
Today, I’m featuring the Coast HP5R rechargeable flashlight, which is being sold by Coast. You can Google their name and find this particular little flashlight all over the Internet. The prices vary, from as low as $60 up to over $125. Coast produces flashlight, knives, and multi-tools, and they have been around for a while. Their website is www.COASTportland.com and are located in my adopted home state of Oregon.
A quick rundown on the many features of this little flashlight is in order. First of all, it operates off either a standard alkaline AA battery, which is included, or two Lithium Polymer AA batteries, whi are also included. What? Wait? It comes with three batteries, and two are rechargeable batteries? Yep; you read that right. It also comes with three different ways to recharge the two Lithium Polymer AA batteries. You can recharge them using the included USB cable from your computer, an AC wall cable, or a DC cable, which once again are all included in the box. You also receive a Nylon belt sheath, a belt clip, or a wall mount in the package. There is no need to purchase anything extra to keep your HP5R flashlight going and going.
The HP5R flashlight housing is manufactured out of aluminum, and there is a lanyard ring on the back end of the flashlight; a lanyard is included as well. This little AA flashlight turns out 185-lumens on high, and it will run more than 3 1/2 hours. Yes, you read that right; it runs 3 1/2 hours with one of the rechargeable batteries installed. Run time is less with a standard Alkaline AA battery. The Coast website states that this flashlight will run 4 1/2 hours; however, in my testing, it was only good for 3 1/2 hours when a battery is fully charged. Keep in mind, we are talking about a single AA rechargeable battery. The beam will travel more than 180-meters, so you can see something way out there, when the beam is focused. There is a rubber, waterproof rear switch that easily turns the light on and off, as well as using the strobe or the low light feature, which further saves battery life. The little HP5R is only 4.875-inches long and weighs a mere 2.6 oz!
Okay, let’s get this straight. This is a little flashlight that operates on a single AA rechargeable or standard Alkaline battery; can run on “high” for 3 1/2 hours, with a 185-lumens output; and can be adjusted for a narrow beam of light or a floodlight focus. Additionally, it comes with three batteries– two rechargeable and one Alkaline battery– with three different ways to recharge the rechargeable batteries and several different ways to carry it? YEP!
Where was this flashlight when I was a cop or doing security nighttime patrols? I was usually packing my Mag-Lite, with 3 D-sized batteries, that produced a beam of light that didn’t travel very far and had a run time that was maybe an hour or a little longer. Several times per week I had to purchase new batteries for it, and even though it was manufactured out of aluminum the thing was still heavy to carry, even on my duty belt.
This little HP5R can also be recharged while a battery in actually inside of the flashlight by simply turning the butt of the flashlight counter clockwise and pulling on it. It will reveal one end of the rechargeable battery’s end; that allows you to plug it into the wall, DC, or USB cable charger, or you can remove the rechargeable battery and replace it with the fresh and fully-charged second one. Remember, it’s included. Then you can recharge the battery that is run down. The charge time is about three hours! Also, you can install a standard AA Alkaline battery, although, as already mentioned, it doesn’t run as long as the rechargeable batteries do; it will run about 2 1/2 hours. Still, that’s nothing to turn your nose up at.
Did I happen to mention that you can also lock the head of the HP5R so that the beam of light stays focused for longer range use? Yep! To adjust the focus on the HP5R, you simply slide the head of the flashlight forward or rearward, depending on your needs. The strobe is sure nice, too. Simply use the rear on/off rubber button on the flashlight to activate the strobe on the flashlight. It really can disorient someone in very short order. Also, push the button to reduce the amount of lumens you need. You don’t always needs 185-lumens, do you?
I first heard about the Coast HP5R from the guys at the local gun shop that I haunt. They saw one at a gun show and bought one. I couldn’t believe what they told me about it, until they demonstrated all the features to me. They only had one. It was at least a month later when they found a source to purchase them for resale. I paid $70 for my sample, and don’t you know it; the wife wanted one, too. Yeah, it was the wife that pokes fun at me for having too many flashlights around.
When I let my dogs out at night for their final kennel break, I reach for the Coast HP5R flashlight. It gives me all the light I need, and the best part is that I don’t have to buy more batteries for it. When it gets run down, I simply replace the rechargeable battery in it and recharge the battery that was in it. I’ve only used the AA Alkaline battery to see how long it would run, not to use it daily in the flashlight.
Remember, you are getting a very small, high-quality flashlight that runs off of AA sized batteries, that you can recharge, and that has a long use life– at least 3 1/2 hours with about 185-lumens, and it comes with all the other features I already mentioned. I have owned some other small flashlights that run off of a single AA or AAA batteries, but none come close to this Coast HP5R flashlight. So, before you lay down your hard-earned money for a bigger and more expensive flashlight, take a close look at this little HP5R. I think you’ll be blown away with all the features in such a tiny package! Shop around for the best price on the Internet, before you lay your cash down.
– Survivalblog’s Senior Product Review Editor, Pat Cascio
Click Here --> The Civil Defense Manual... The A to Z of survival. Looks what's in it... https://civildefensemanual.com/whats-in-the-civil-defense-manual/
FOR SALE: Self-sustaining Rural Property situated meticulously in serene locales distant from densely populated sanctuary cities. Remember…HISTORY Favors the PREPARED!
In a saucepan, combine sugar, salt, and cornstarch. Mix thoroughly; add beaten egg and vinegar, mixing well again.
Add milk, crumbled bacon, and bacon grease.
Cook to a desired thickness.
Cool before (or not) pouring over salad greens, such as one head of lettuce chopped, spinach, dandelion leaves, plantain (pig ear) leaves, and/or salad greens. In the spring time, this is great with dandelion or plantain.
We have a saying here: “Remember where the huskies go, so you don’t eat no yellow snow.” Wash your harvested, wild, spring greens thoroughly. This stores well under refrigeration.
o o o
Useful Recipe and Cooking Links:
Do you have a favorite recipe that would be of interest to SurvivalBlog readers? Please send it via e-mail. Thanks!
#1 Trusted Gravity Water Purification System! Start Drinking Purified Water now with a Berkey water filtration system. Find systems, replacement filters, parts and more here.
In a recent letter, the writer noted he did not know the static water depth of his well. This is easy to determine using a recording device and some free audio software.
1. Remove the cap from the well casing.
2. Clap your hands above the open hole, and listen for the repeated echos.
3. Use an audio recorder of some type to record the echos. Most phones can be loaded with audio recording apps.
4. Transfer the audio snippet to a PC, and use a free program, such as Audacity, to measure the time between two echos, in seconds.
5. Compute the depth with the following formula: depth=echotime * 560. For example: If the echo time is 0.12 seconds, then depth=0.12*560=67ft.
That’s it! There may be free Android or iPhone apps that allow you to do this all on the phone. Look for “oscilloscope” apps.
Many blessings, as we all prepare to rebuild our nation and our freedom. – One Ping Only in Virginia.
Hugh Responds: The engineer in me really likes your solution. However, you could also tie a wrench onto that 300ft fiberglass tape measure that you bought and lower it into the well until you hear the water splash. Then continue to lower it until the wrench hits bottom. You then have the water depth and the well depth. In the very few instances where there is a well or water depth greater than 300 feet, your method works well. (No pun intended.)
“Think pleasantly;
Think of how beautiful you are.
Think of the families you are blessed with.
Think of the dreams you have to achieve.”
? Lailah Gifty Akita, Beautiful Quotes
We are debuting a new weekly column today. “Security for Survival” will profile some modern technology for your bug-in/bug-out location to help with the strain of retreat security. Video surveillance, perimeter security, and communications will be the main focus, with reviews of newer products and a DIY approach. Let us know what you think.
When connecting devices to your security system, there are two basic methods used: wired and wireless. In a later article, I will cover the advantages and disadvantages of both systems and when they are appropriate to use. However, the idea for this first installment was created as I had to repair some Ethernet cabling at a customer’s residence. The customer was familiar with Ethernet connectors and had cobbled together a connector when he moved his computer system to another area of the residence. He had lost a wifi radio to a lightning storm when he shouldn’t have, and we discovered the root of the problem was the connector he installed on the cabling.
EMP is a huge concern anytime you are dealing with electronic hardware, and there are some steps that you can take to minimize the risk of your equipment. Everyone knows about installing a quality surge protector for equipment that must be live, storing unused equipment in a Faraday cage, and implementing other such preps, but few seem to realize that the data cable connecting their computer or security system is just as critical. Long wires attached to your computer represent the greatest danger, as they act as antennae to pick up the magnetic energy from an EMP pulse, whether generated by a nuclear, solar, or lightning event, and they turn it into electrical pulses that damage sensitive electronics.
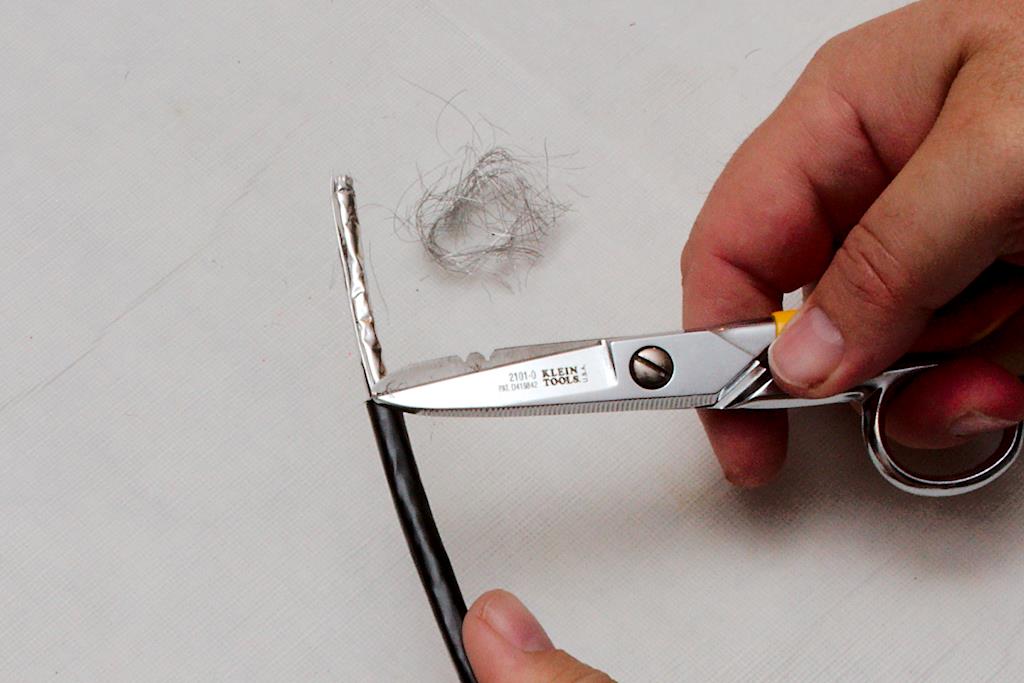
One of the easiest and best methods of protection is to simply provide a better, alternative path to ground for the electrical impulse. Shielded cabling and grounded connectors achieve just such a result. There are many types of shielded Ethernet cabling; the two that we currently use– Ubiquity’s Tough Cable Pro and Tough Cable Carrier– are among the best. We also use Ubiquity’s Tough Cable RJ45 connectors, though you can use any grounded RJ-45 connector. The tools required for these connectors are simple but specialized. Figure 1 Figure 1is a picture of the tools we currently use. The only one required is the RJ-45 crimper tool on the left. This particular model is an Ideal 30-696 and has a ratcheting feature so you can regrip in the middle of a crimp without ruining the crimp. It’s nice but not necessary. Any RJ-45 crimper will work. You will notice the blue cushioned grips are missing on mine. While the cushions are nice, they tend to slip off as you work the pliers. I eventually got irritated enough that I just pulled them off and threw them away. Despite installing thousands of connectors, I’ve never missed them. You can do without the remaining tools, but they will make your work easier. The yellow plastic tool merely cuts the sheath on the Ethernet cable without nicking the conducting wires. Any model will work, but I prefer one with a ring, as it makes it easy to insert your finger and rotate it around the cable. A pair of sharp snips comes in handy, and I like the Klein 2101-0 snips. The yellow handle fits in your palm, gripped with your ring and pinky fingers. Your middle finger slips through the silver ring, and you can open and close them at will, without the age old issue of getting your finger stuck in a ring. This is a nice feature when you are picking them up and using them often during the course of your work. Those of you who’ve had to stop your train of thought to shake the snips off of your finger know what I mean. The multi-tool (with needle nose pliers) is probably the next most useful tool. From crimping the grounding wire to opening up the can of tuna you brought for lunch, it’s hard to imagine life without it. I prefer this Gerber model, but any model will work. The last tool is a general purpose crimper designed to fit yellow insulated lugs. This tool serves a special purpose that will make your life much easier.
Both cables that we use are rated “5e”, but the carrier cable is much tougher. Figure 2The braid provides an incredibly tough cover, and while it certainly works as a shield, I consider the physical protection more important. If we are installing cabling outside or near items that could potentially cut the Ethernet cable, we choose the carrier rated cable. For others, like interior runs, attic installs, or more protected areas, we will use the pro cable. Both cables are UV rated, and even after five years none of the cables exposed to direct sunlight are having any issues. You can get silicon gel-filled cable as well for waterproofing (or direct burial), but the hassle of dealing with the nasty goo just isn’t worth it for us. These cables provide adequate protection, and even in the rare instance where the jacket was damage and allowed water into the cable, there were no ill effects on the data handling of the cable. The few instances where we knew water was in the jacket, we simply sliced the jacket at a low point in the cable to allow the water to drain out. It’s probably not the best policy, but don’t fix what isn’t broken. Besides, this cable is expensive at over $0.20/foot.
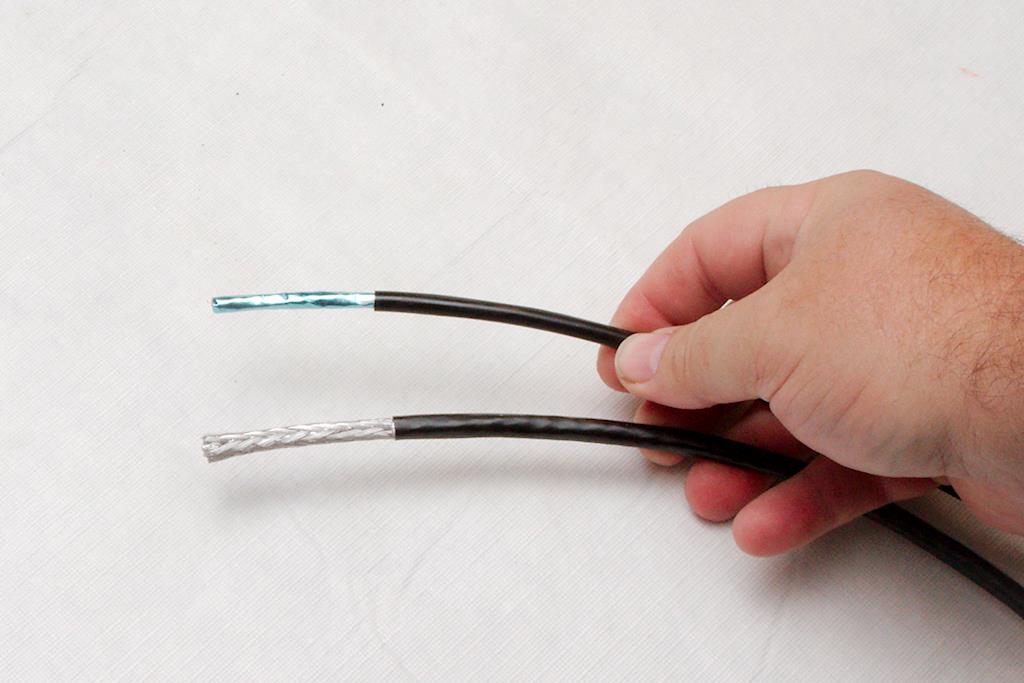
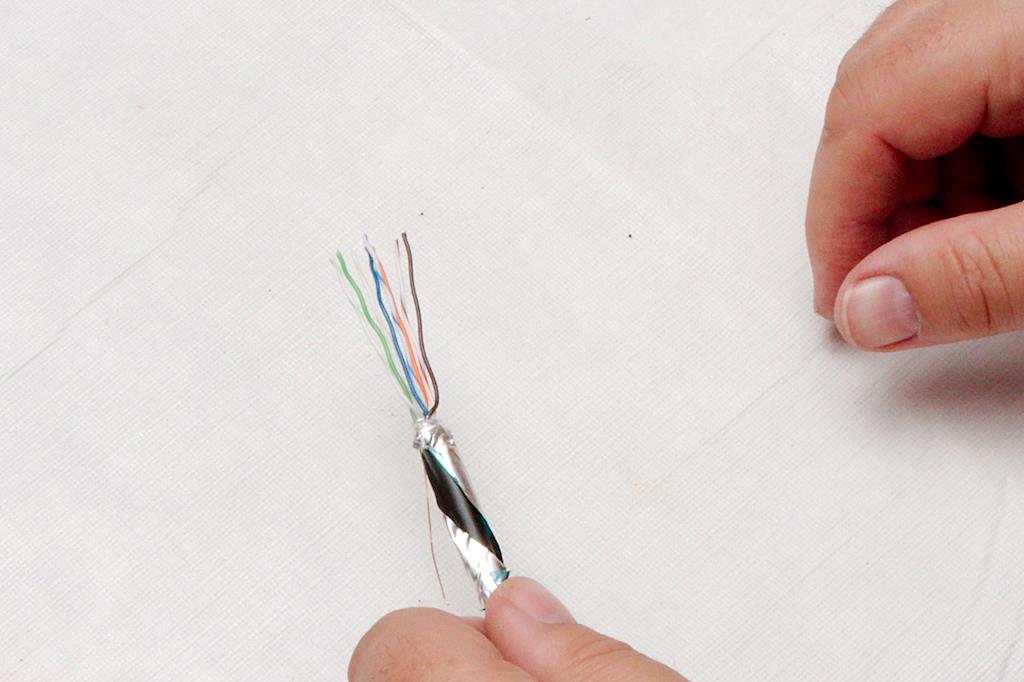
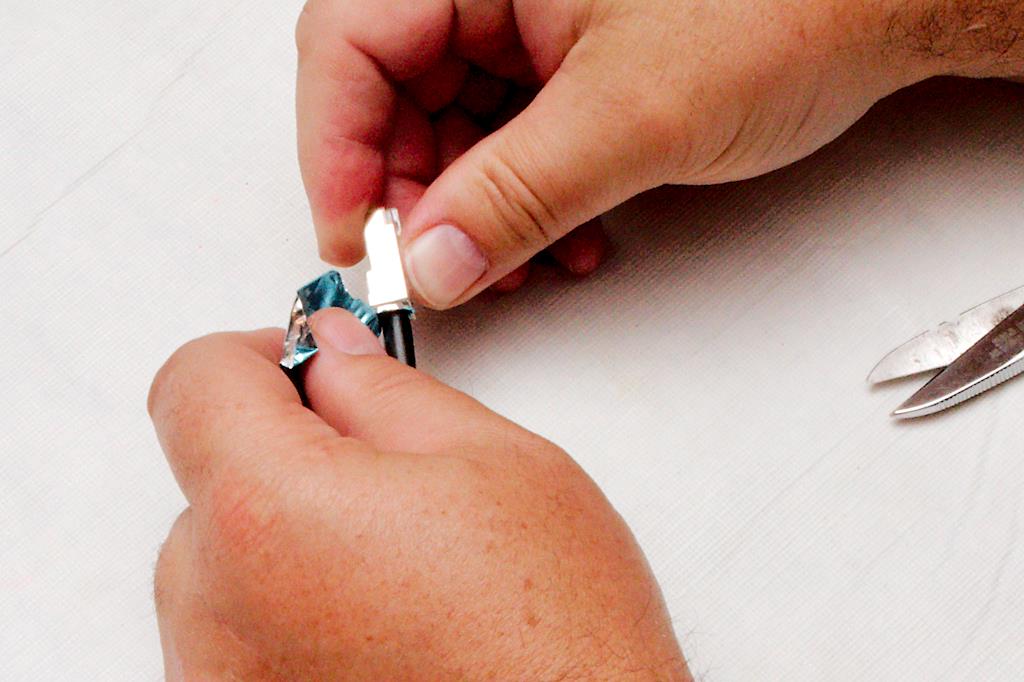
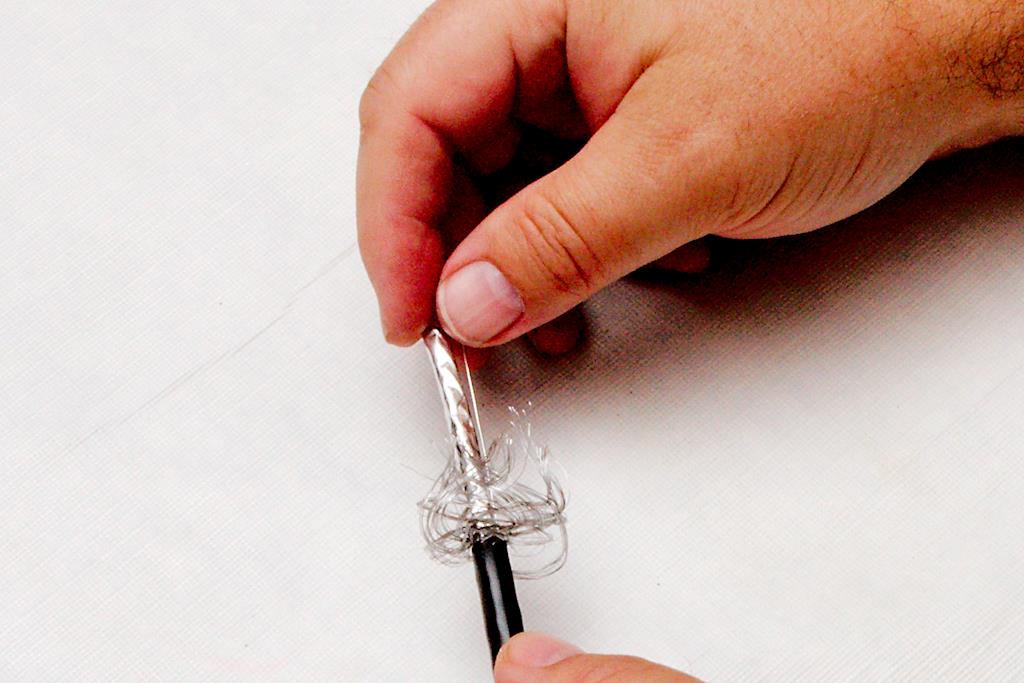
To start, you have to strip the jacket off of the cable. The amount that you strip will be based on your comfort level. Figure 3 As you get comfortable with the procedure, you will strip back less and less. Remember, any thing more than what you need is simply trimmed off and is a waste. We tend to strip back about two inches, which gives a decent tail to work with the wires. Place the Easy-Strip on the wire, let its own spring tension apply the cutting force, and spin it around the cable once or twice. When stripping the Pro cable, you have to be careful not to cut into the foil underneath. Your goal is to just score the jacket so that you can slightly bend the jacket and cause it to split on the score. When properly cut, you can separate the jacket without the foil being damaged like in figure 4. If you cut the foil, you will probably have to try again. Figure 4
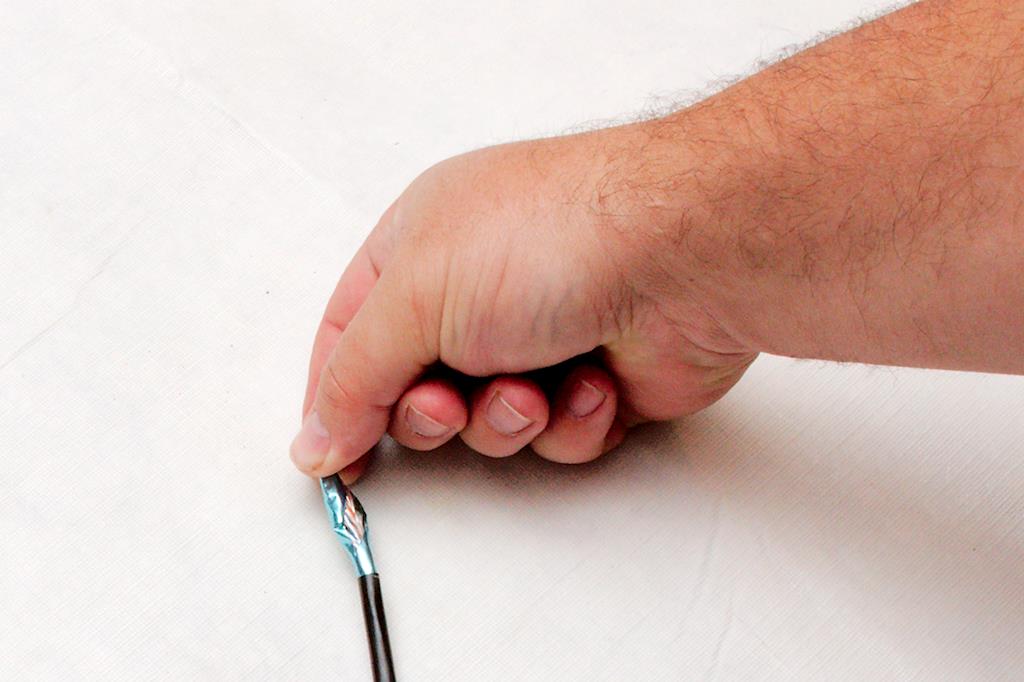
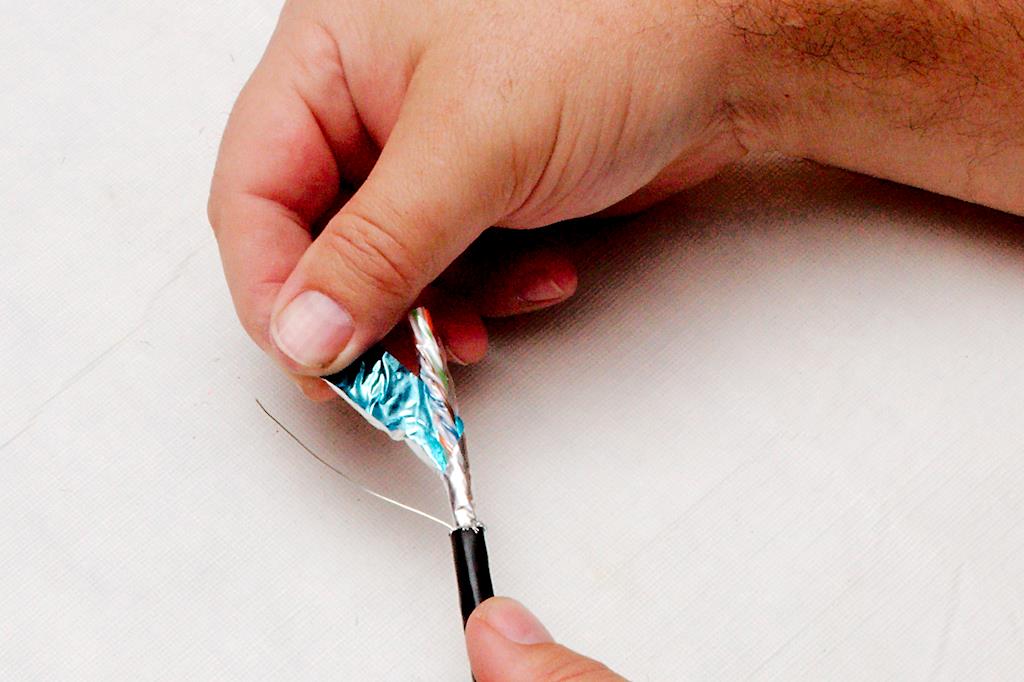
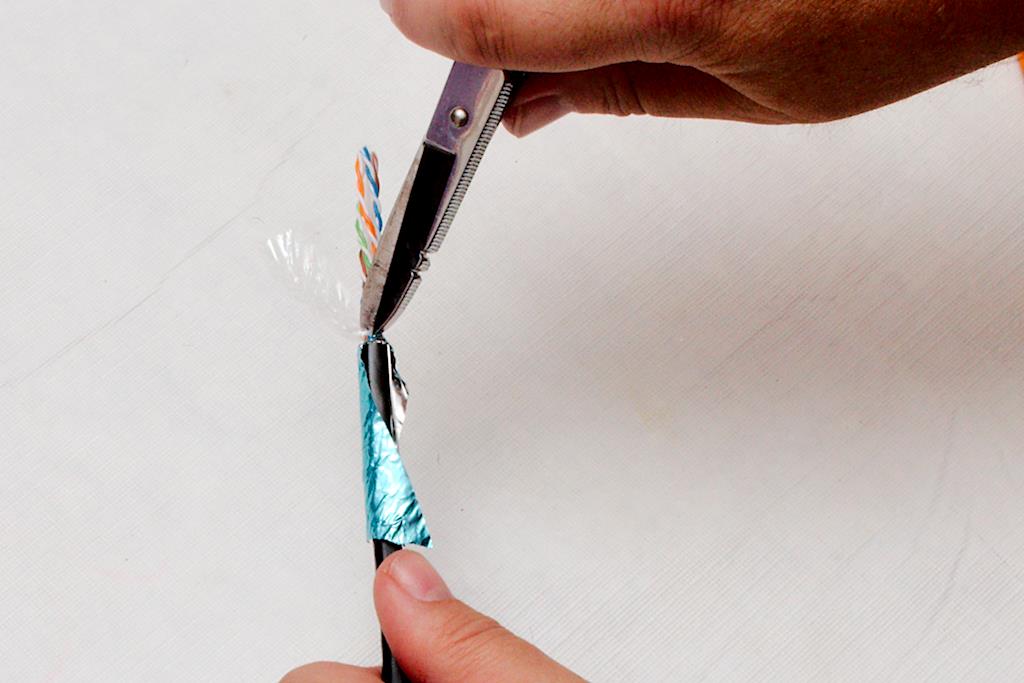
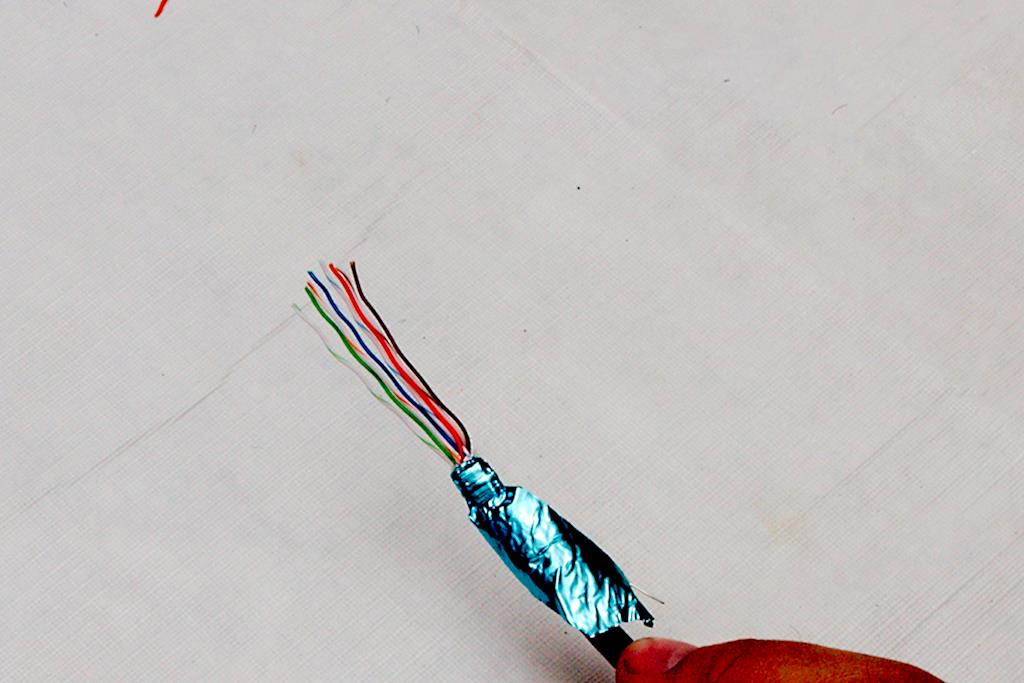
If using the “Pro” cable, you must carefully unwrap the foil ground. This foil is wrapped in a spiral around the cable, and one side will be easy to unwrap, but the other will not be easy, as the foil is tucked under itself. Figure 5 Gently twist the cable to loosen the foil wrap and work it loose. You do not want to tear the foil at this stage. Once you have unwrapped the foil, gently pull it back over the jacket of the cable Figure 6. You need to fold it back right where the jacket stops, and it is important not to tear it here. You can use your fingernail to work the fold right up against the jacket edge. After this, you will have exposed the ground wire and the conductors wrapped in a plastic casing. Carefully untwist the plastic casing, and cut it as close as you can to the foil. Figure 7 It is sufficient to nick the casing with snips and then tear the plastic casing off. Use the snips to clean it up, if it does not tear evenly.
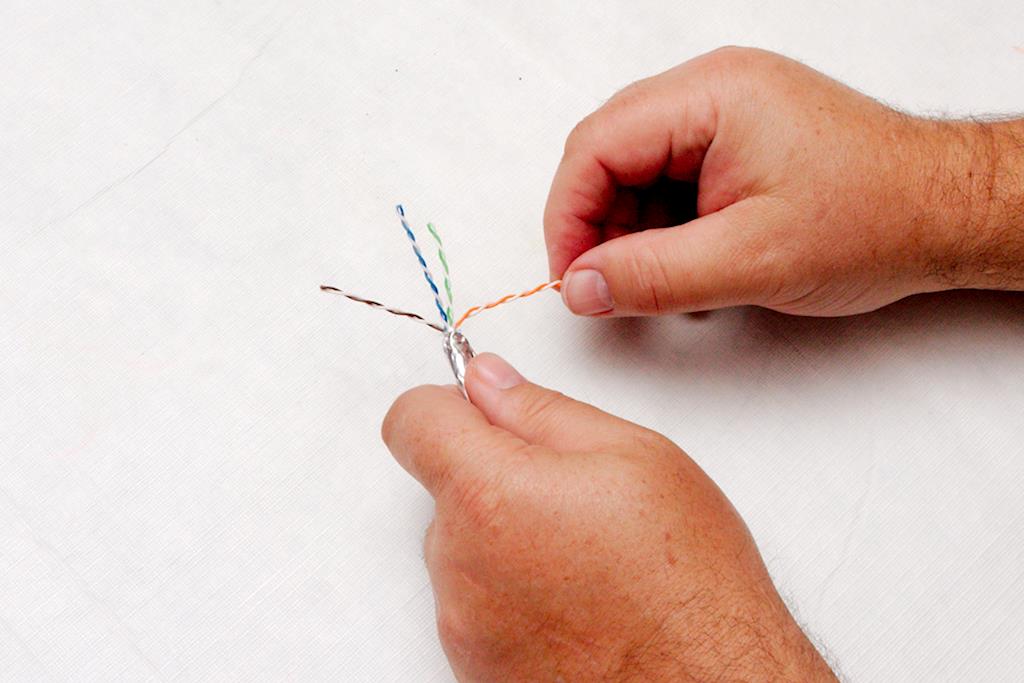
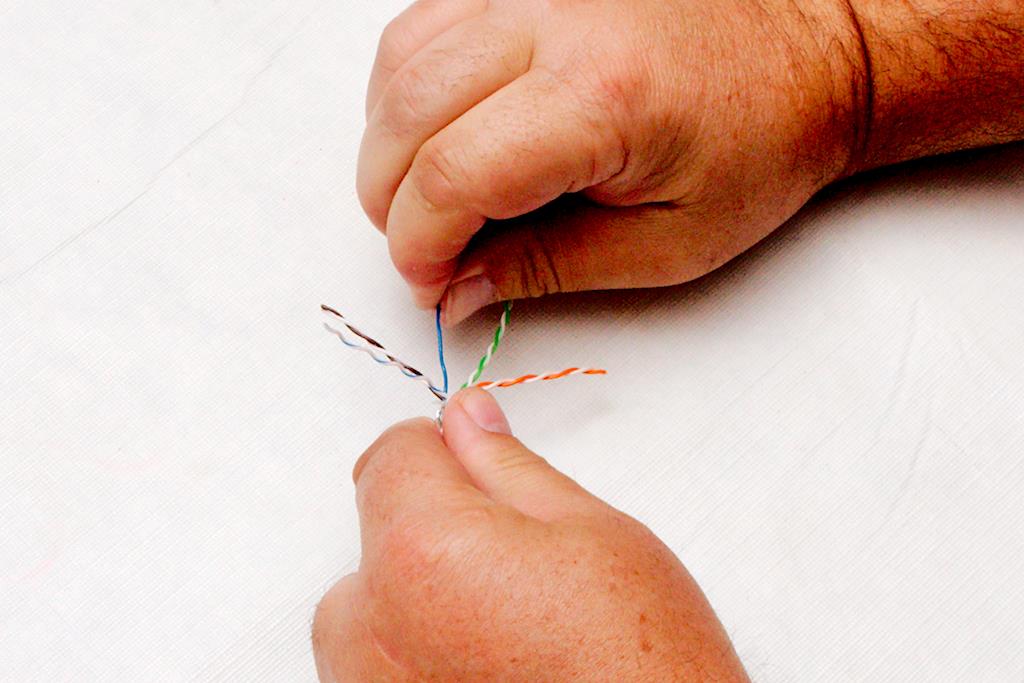
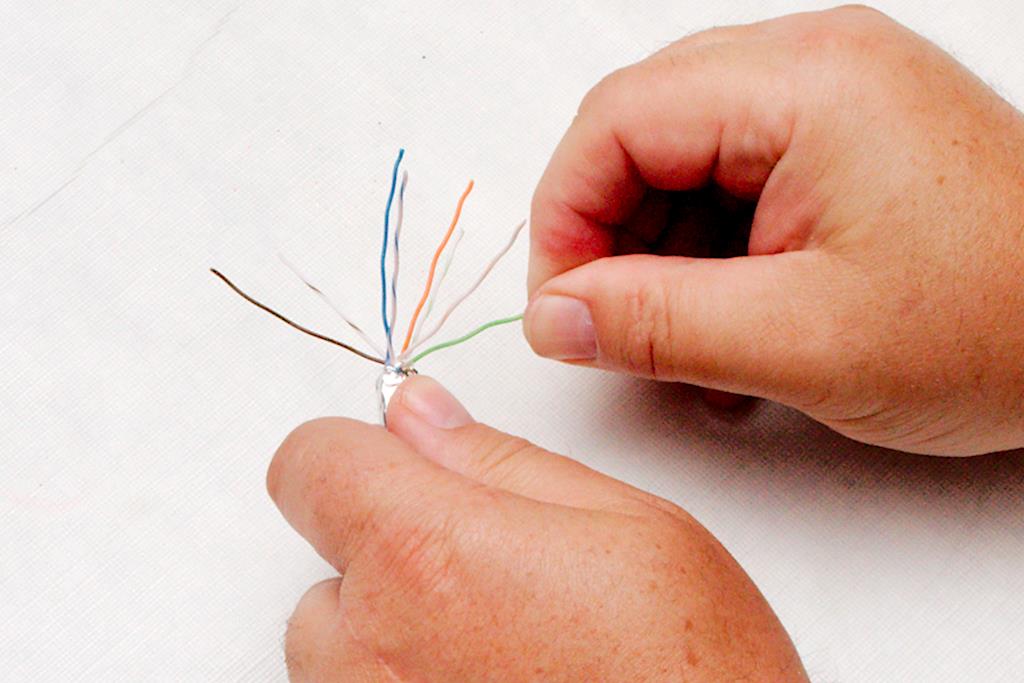
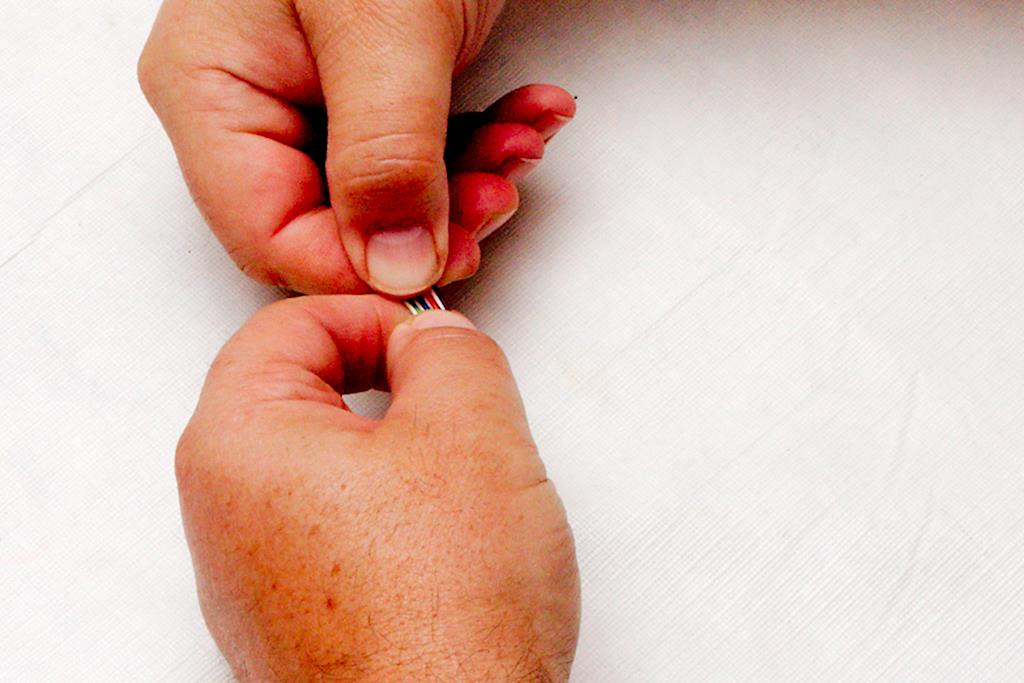
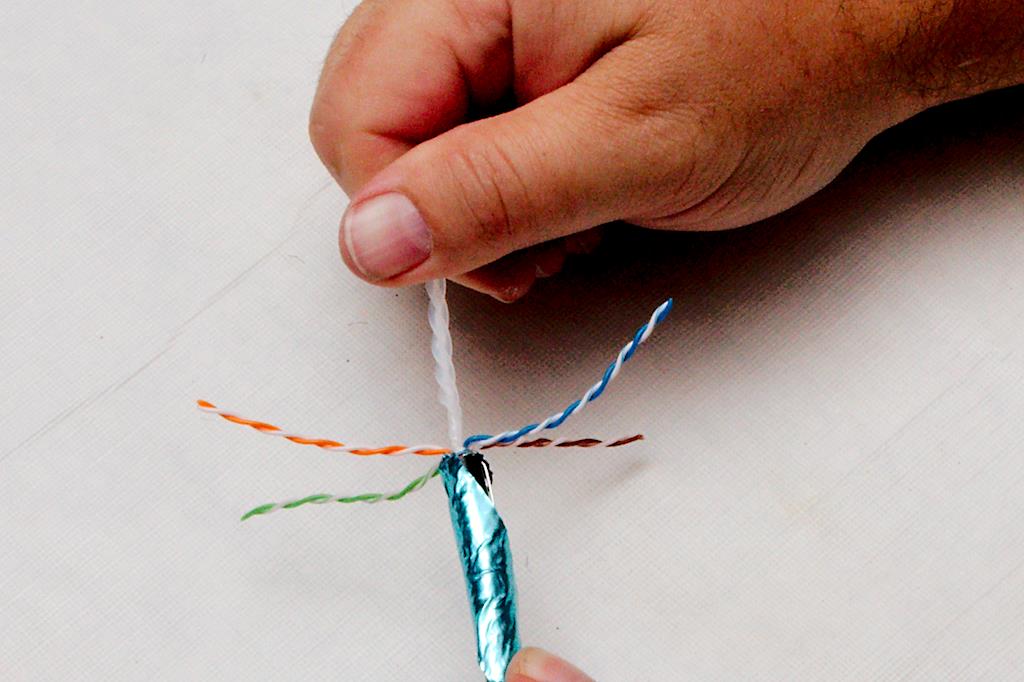
Figure 8 You then want to separate the twisted pairs of wires from each other. Here you will be able to see a major difference between cat 5 cable and cat 5e. On 5e cable, each twisted pair will have a different twist to it. Some will be tighter, and some will be looser. This helps with signal leakage between the pairs and allows for a higher speed of signaling. Once the pairs are separated, untwist them to where the foil is. Figure 9 As you untwist the individual wires, pinch the cable between the fingers of your other hand and pull each individual strand through your fingers to take as much of the kink out as possible. The straighter the wire the easier the whole process will be. You probably want to keep the colors close together, though once separated it may be difficult to tell the white wires with the color strip from each other in poor light conditions. This is one area where a headlamp is an advantage, even in regular room light. Figure 10 When finished, all the wires should be pointing in different directions with no severe kinking in them as in figure 10.
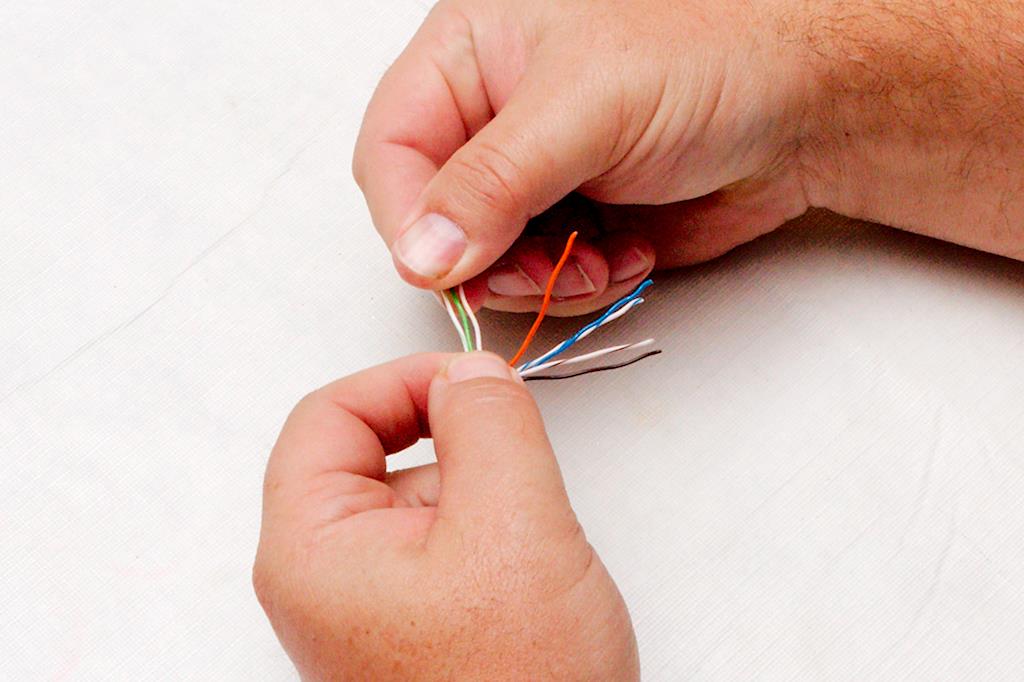
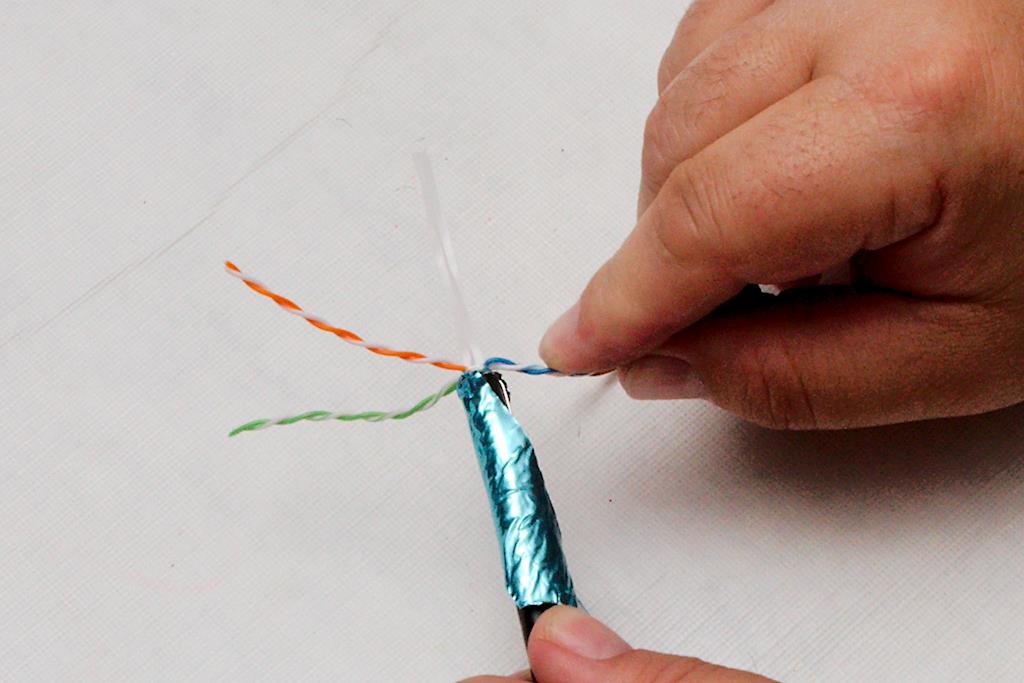
Now, while pinching the wires (at the point where the wires exit the jacket) between the forefinger and thumb of your left hand (for us “righties”), begin to line the colors up. Figure 11 There are two standards, and it doesn’t matter which standard you use as long as both ends are the same. We use the T568A standard with the resulting color lineup of white-green, green-white, white-orange, blue-white, white-blue, orange-white, white-brown, brown-white. Be mindful of how the wires come out of the jacket and don’t be afraid to rotate the Ethernet cable or disentangle the wires. Your goal is to have the wires exit the jacket and be separated into their specific channels as soon as possible. Figure 12 Don’t be afraid to bend the wires to put a “set” in them so that they will hold their positions when you turn loose of them. If they spring out of place when you turn loose, you will really struggle while placing the connector on.
Figure 13 Once the wires are positioned, pinch them in the correct order between the forefinger and thumb of both hands and slightly bend them. Figure 14 Then bend them back the other way allowing the wires to slide between your fingers. Work them back and forth as you slide your fingers from the jacket end to the wire end. What you are doing here is working the remaining kinks out and forcing them to lay parallel to each other in the correct order. Figure 15
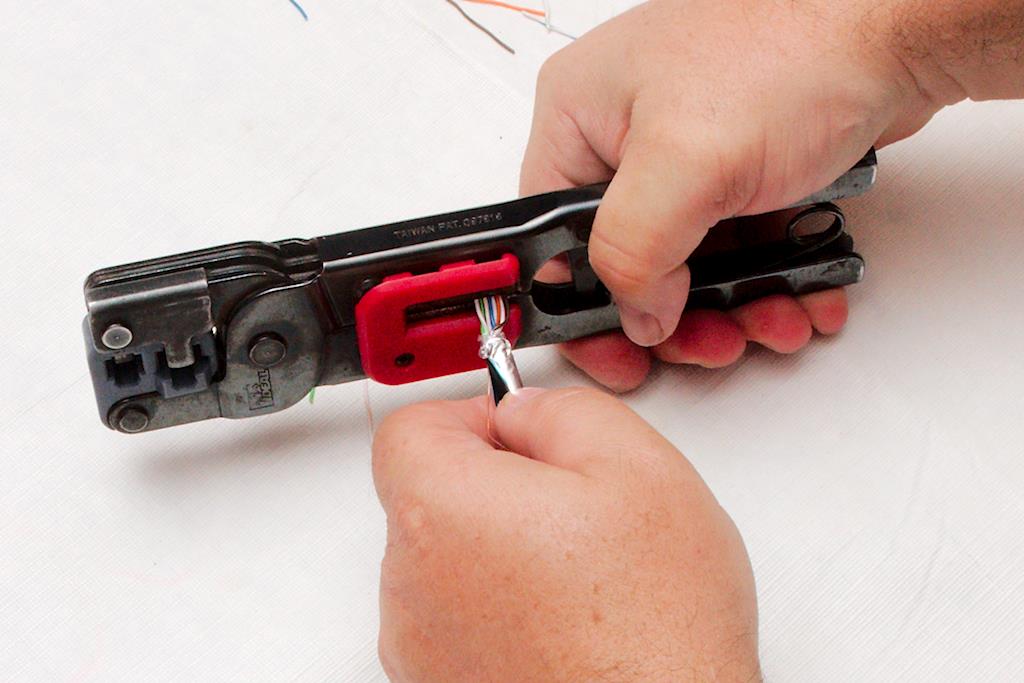
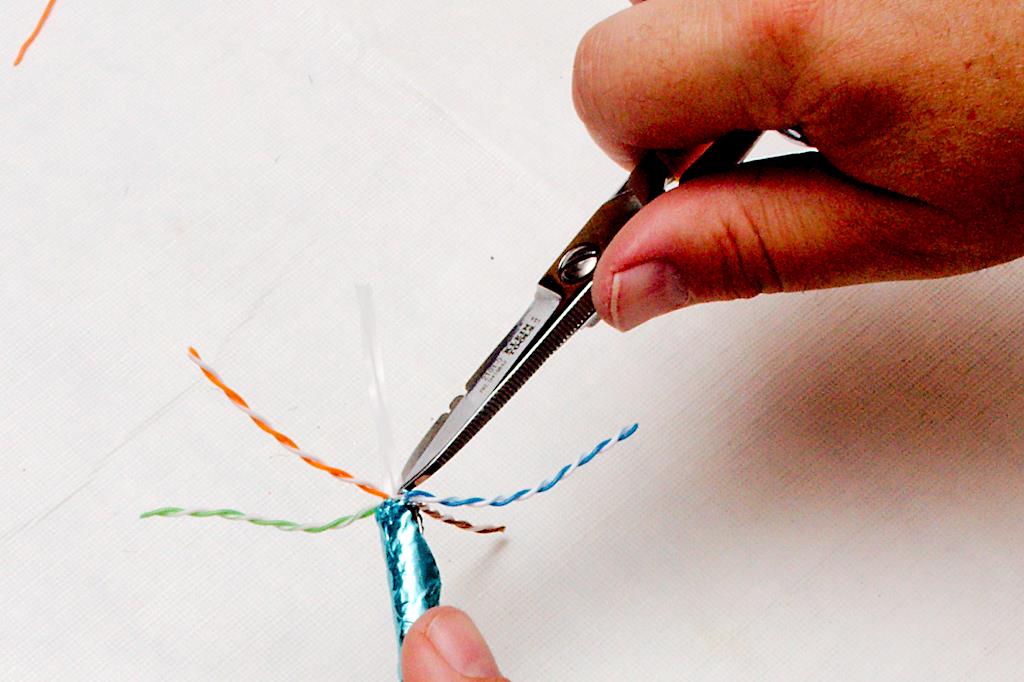
Finally, use the cutting edge of the crimpers to cut the wires to the correct length Figure 16. This may take some practice to get right, but you want enough length that the wires will go all the way to the end of the connector but not so much that you can’t fit the cable jacket in the connector also. The right amount will be somewhere between 3/8” and 5/8”. Cut it long, as you can always take a second cut to shorten it. If you cut it short, you will be starting over from the beginning. Figure 17 To get a good idea, hold the connector next to the cable with the cable sheath as far in the connector as you want it to go. Then cut the wires so that they would be at the end of the connector. Figure 18
Figure 19 Then insert the connector onto the end of the cable with the latch portion of the connector pointed down. This will be a tight fit, and you need to make sure that each wire slips into its proper channel in the connector. This is where those spring-loaded wires will tempt you into cussing like a sailor if you didn’t work the kinks out beforehand. Cock the connector from side to side while applying pressure against the cable to work it into the proper position.
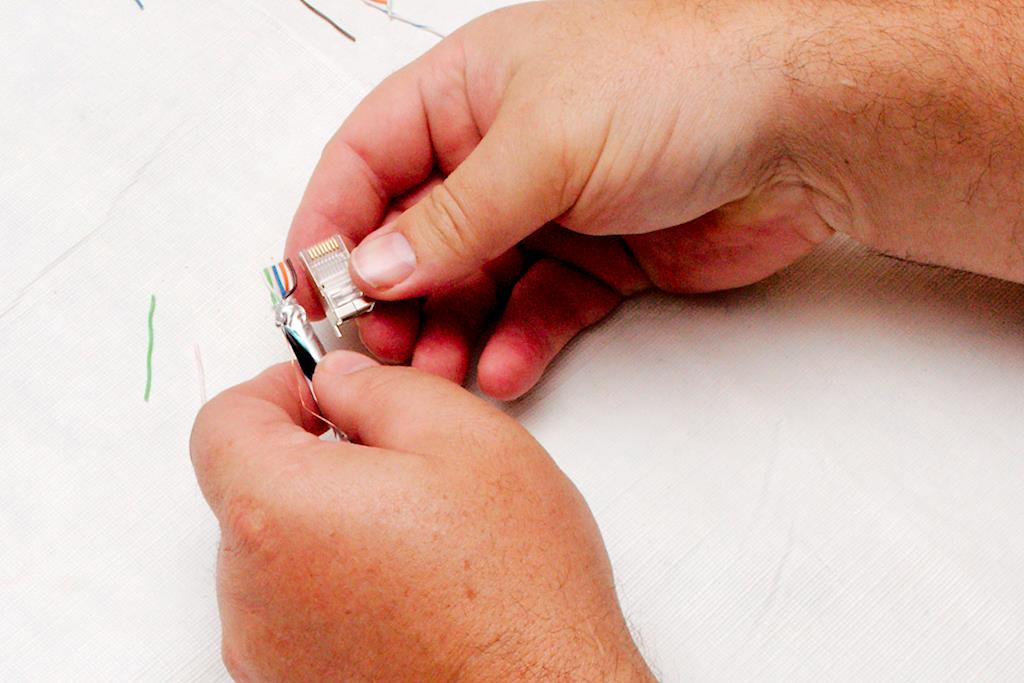
Figure 20 Figure 19 shows where you should end up. If you look at the end of the connector, you should clearly see each wire pushed up against the end of the connector. if the wires are set slightly back, it may still be okay, as the electrical connection is made about 1/8” back into the connector. Occasionally, the wire will slip back into the jacket with the pressure you apply if you do not pinch the jacket hard enough. If you can’t get the wires all the way in, don’t be afraid to pull the connector off and adjust the wires, but this is the make or break time. If all goes wrong, it’s back to the first step you go.
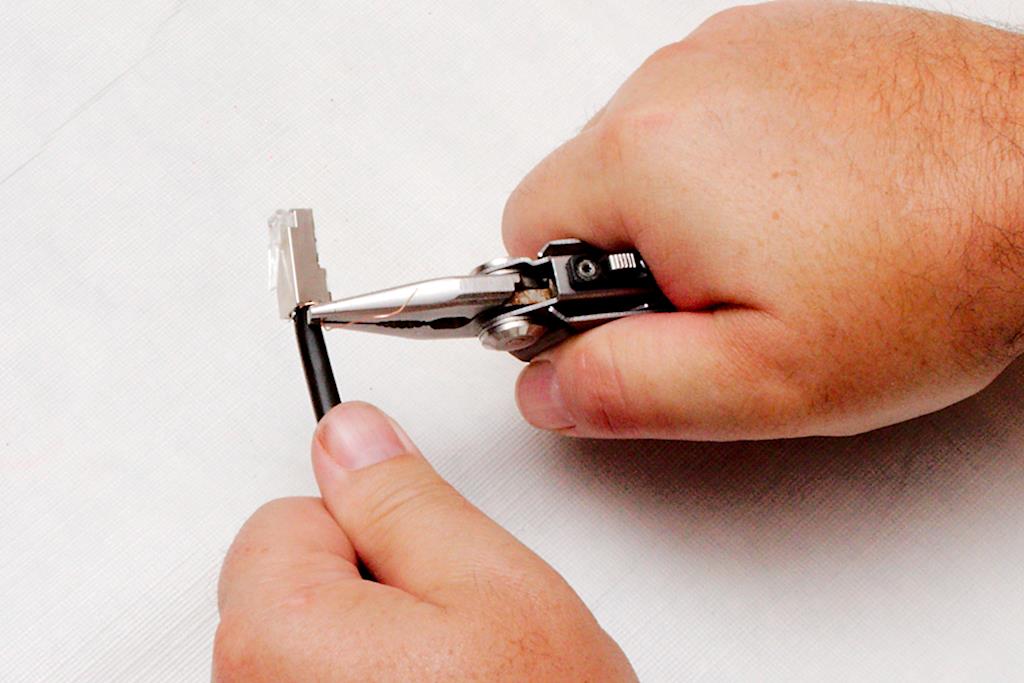
Before you crimp, take another look at the wires in the connector; use a magnifier if you need one. Make sure each wire is positioned in the proper channel. Finally, insert the connector into the crimper, and crimp it all the way down while making sure your wires don’t pull out in the process. Figure 21. The best way to ensure this is to use a ratcheting crimper, and apply pressure into the connector with the cable as you crimp. Crimp until the crimper is all the way through the ratchet cycle.
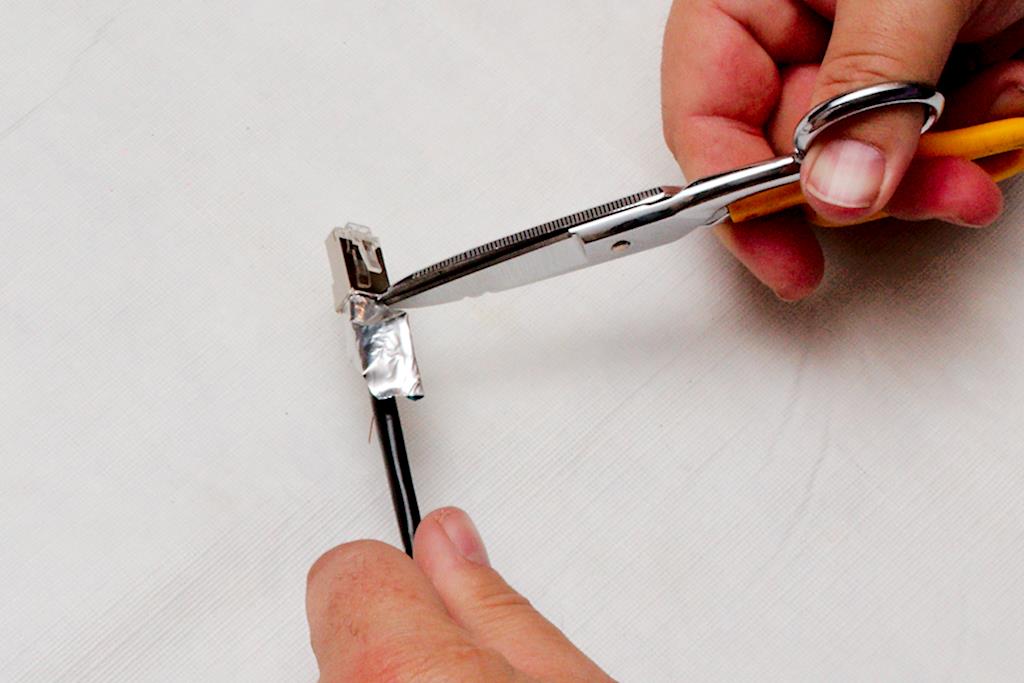
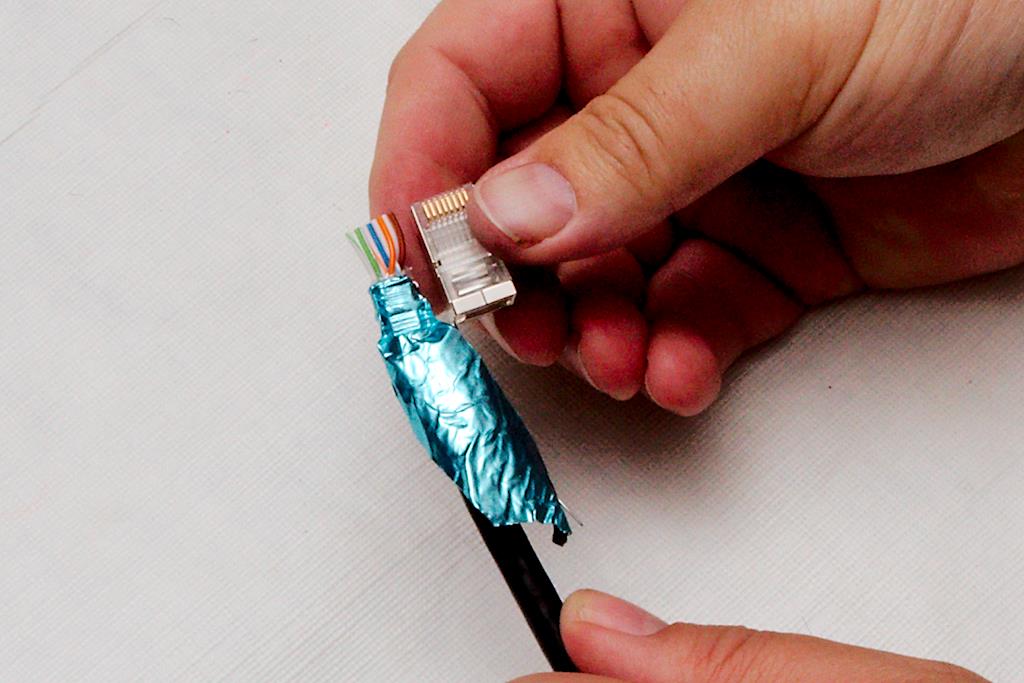
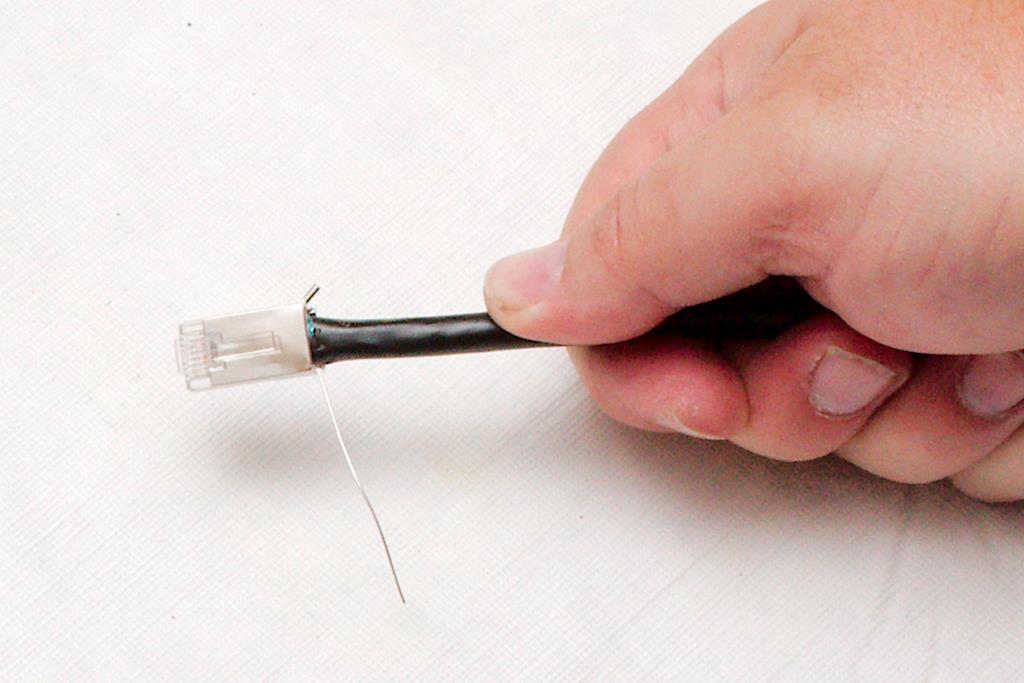
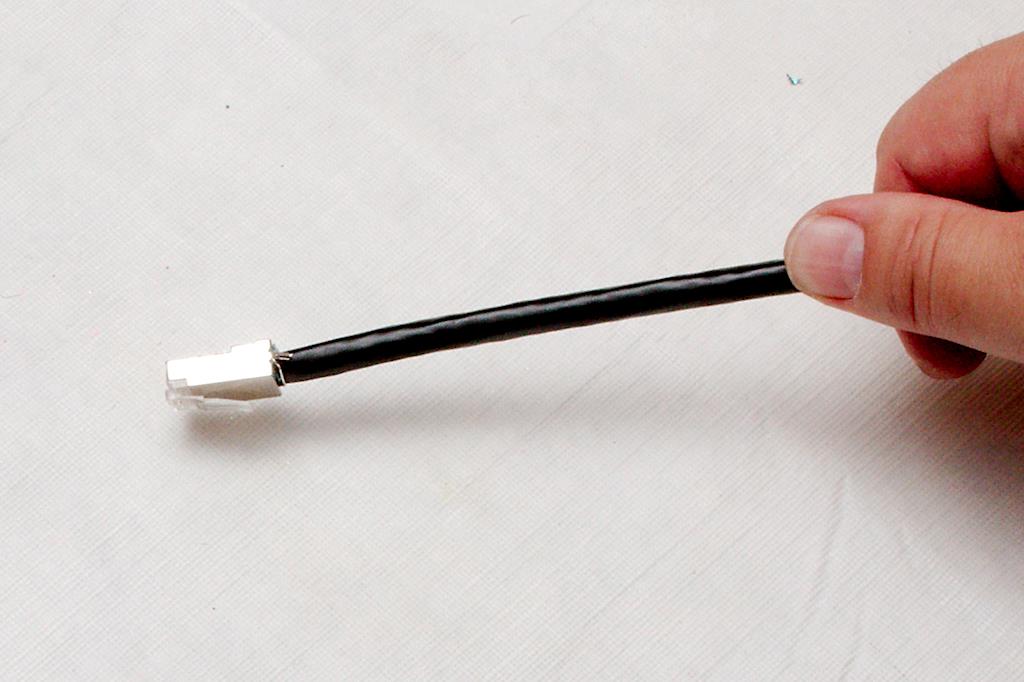
Next, use your snips to nick the foil right up against the connector Figure 22; and tear the foil off Figure 23, making sure not to pull the connector off or damage the ground lug on the connector or the grounding wire. The closer you tear the foil off to the connector, the cleaner it will look. You can also take your fingernail and push any jagged edge of foil that you can’t tear back up into the bottom of the connector. Then either using your needle nose pliers or your fingers, thread the ground wire through the connector into the ground lug. Figure 24 Make sure to thread it from the front to the rear. Once you have it threaded all the way through, use your needle nose pliers to crimp the lug onto the wire. If you are not plugging this into a socket that is grounded, you can crimp a loop onto the end of this wire and ground it to a nearby ground with a screw. Otherwise, clip it off next to the ground lug as in figure 25Figure 25; and push the ground lug back toward the cable jacket so it doesn’t snag on anything.
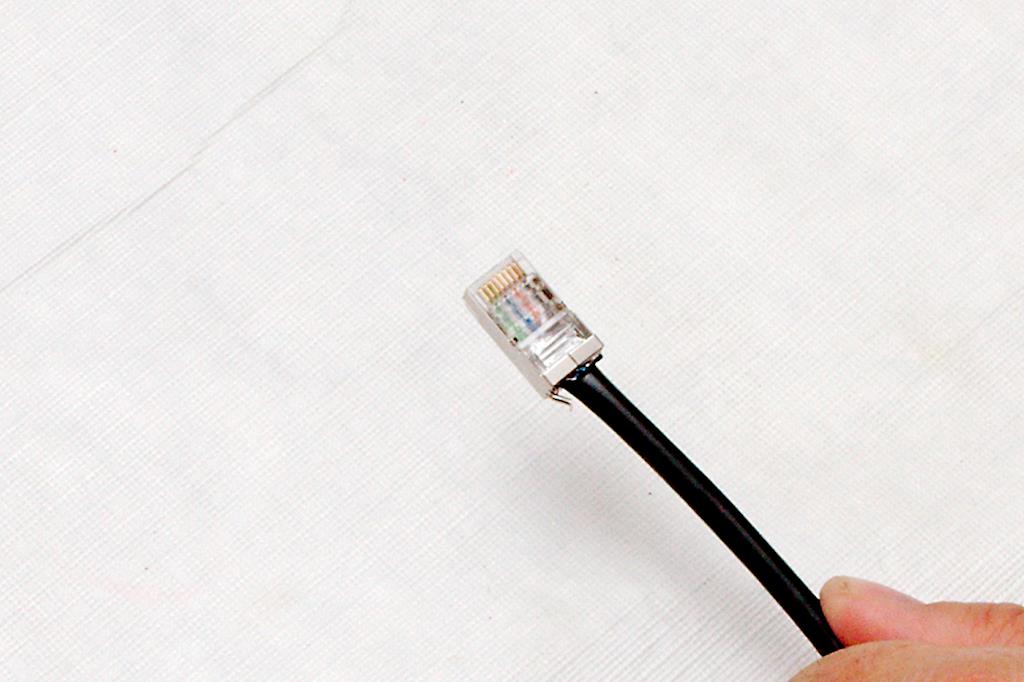
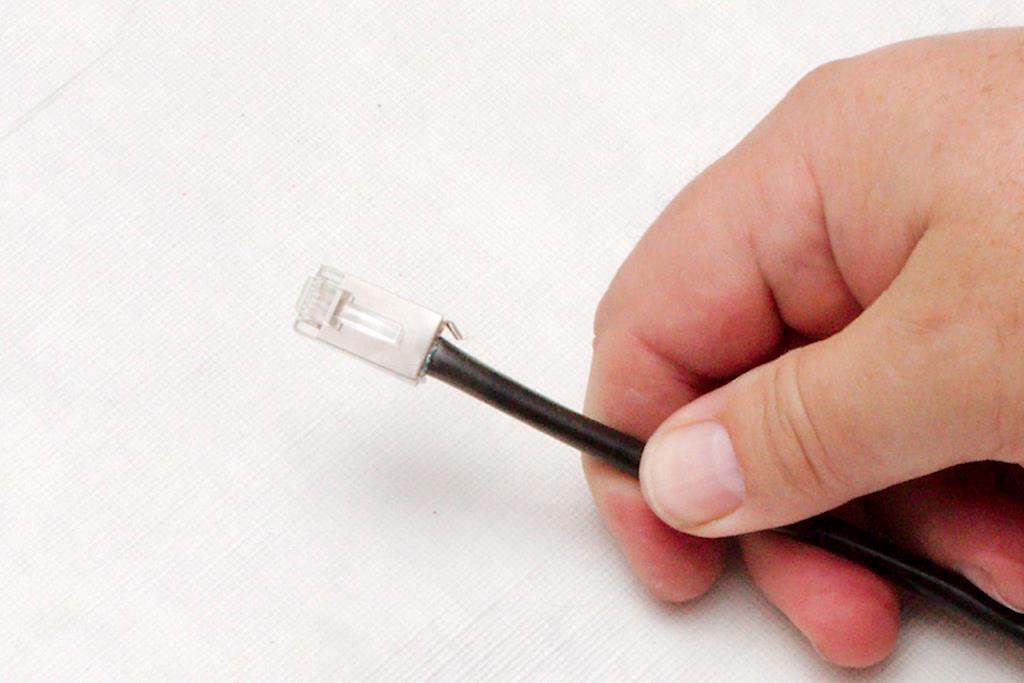
When done, inspect the connector. Figure 26 You want to make sure that 1) all the colors are in the right order. 2) the jacket and foil are inserted into the connector beyond where the plastic crimps the cable, 3) the metal on the cable makes good contact with the foil, and 4) the ground wire is undamaged, crimped appropriately and correctly positioned so that it won’t snag on anything like in figure 27 Figure 27
Working with the carrier cable is very similar but a bit more difficult. First of all, you have to deal with the protective braid shown in figure 28.Figure 28 After you have stripped the jacket off of the cable, you need to push the shield back onto the cable to loosen it. This cable is much easier to strip the jacket off of because you don’t have to worry about nicking the foil underneath. If you nick a few strands of braid, it’s no big deal as you will trim these off anyway. Once you’ve loosened the braid by pushing it back, it will start to unravel. Don’t worry about that, but push it hard enough that the braid will stay perpendicular to the jacket when you turn loose of it as shown in figure 29.Figure 29 Then carefully take your snips and cut the braid as close to the jacket and foil as you can, without hurting either one. Figure 30
You will notice that the ground wire is now located outside of the foil rather than inside of it. make sure you do not cut this drain wire when cutting the braid off, as it is integral to the grounding operation of the connector. Figure 31; Unwrap the foil and bend both the foil and ground wire back along the cable jacket as you did before. Depending on which end of the cable you are working on, you may have to twist the signal wires to be able to untwist the foil. Once the plastic casing is exposed, cut it off as before. figure 32
When you are bending the signal pairs back, you will notice an anti-crossover device in the center of the wire Figure 33. This makes sure that the wires to not get twisted up and greatly improve the signal handling capability. Even though this wire is rated 5e, these are features that you find on cat 6 wire and work wonders when dealing with gigabyte speeds. Figure 34 Remove this device by clipping it gently with your snips, being careful not to cut the wires as shown in figure 34. I find that clipping two wings is generally enough, and then you can twist it to break it right at the clip as in figure 35. Figure 35
Now go through and separate the wires, and then line the colors up as you did before. Here is where you will run into trouble and where our method differs from the manufacturer’s instructions. A significant part of the structural integrity of the connector/cable interface is having the cable jacket crimped inside of the body of the connector. However, this cable is a much larger diameter than regular Ethernet, nearly approaching the size of RG-58 coax. It’s like putting the proverbial round peg into the square hole. The manufacutre will simply have you put the crimp in off the jacket, but if you do that, you will notice that it creates a weak point. If any bending tension is on the cable when you insert the connector into the socket, the bend will turn to a kink right at the back of the connector. it also puts the strain of the connection directly on the grounding foil. To over come this weakness, we used to use a pair of pliers and form the round end of the cable into a rectangle that would fit into the connector. Then one day, I happend to notice that the yellow compression crimps were just the right size. After you line the wires up, insert the cable into the crimpers as in figure 36 Figure 36 so the end of the crimper is at the end of the jacket and the wires are inline with the crimper jaws. Then run the crimper through the full ratchet cycle. it will press form the round jacket into a rectangular form that will just fit inside the RJ-45 connector. Figure 37 This cable is stiff and hard to work with so don’t be afraid to twist, bend and work the wires as you line them up just right. Follow through with the trimming of the wires as you did before, using the connector as a guide for length. Figure 38 It will be more difficult to work this cable into the connector, and you will probably need more wire length than you will using the Pro cable. In figure 39, you can see that there wasn’t enough length on the wire,Figure 39 and the ends do not go all the way to the end of the connector. I will have to cut this off and restart from the beginning to make a usable end. Don’t skimp here. Marginal connections will drive you nuts on POE (Power over Ethernet) or Gigabyte installations.
Once the cable is inserted into the connector properly, crimp it as before and tear the foil off.Figure 40 Notice in figure 40 how the jacket of the cable is slightly distorted by the crimping process. The signal wires are not damaged, and the structural integrity of the connection is greatly improved by getting the cable jacket inside the connector when you crimp.
One last note. Figure 41 Take a look at figure 41. About half the time, the ground wire will be on the opposite side of the cable as the ground lug on the connector. You might think that it would be an easy matter to simply rearrange the wires so that the ground lug is always on the proper side. However, because of the stiffness of this cable and the tight tolerances that you are working with, it is always easier to arrange the wires where they are least resistant and then simply run the ground wire along the bottom edge of the connector to slip it into the ground lug of the connector. Figure 42 When done properly, the connector is still strong and neat and you won’t really notice the extra travel of the ground.
Now, go and soak those hands in warm water. If your fingers are not aching after about the third or fourth connector, you are superhuman.
Another option the author might consider is a well bucket. I bought mine from Lehman’s as a short-term solution to possible electrical power failure until I have my PV system fully up-to-speed. I think it was around $70, plus shipping, and it provides me an affordable alternative water source. -BPF
HJL responds: This is a viable alternative as long as you realize that your submersible pump will have to be pulled in order to effectively use this setup. For those who are uncomfortable with working on your own well, beware that this option may not work for you.
o o o
Hugh,
PLEASE, PLEASE do a write up on the bison pump that you have on today’s post; the guy has it set up near his sink and plumbed into his well. This is really a good idea. – B.L.
HJL responds: I spoke with the author today, and I believe he is planning to do just that. There was enough responses to his pictures that he is interested.
Today, “60 minutes” Lara Logan reports on the plight of Christians forced to flee ancestral homes in Iraq. This might be a good program to watch, if you can.
HJL adds: We used to build these back in Boy Scouts. I’m not sure anyone’s life was ever saved from such a sparse kit, but it was fun and good practice.