


Last year, SurvivalBlog decided to find out exactly what all the hubbub was about, and we bought a Ghost Gunner along with a number of AR-15 80% lowers. We wanted to know just how easy the unit was to use. We also wanted to make a determination as to whether the unit was worth the money or if it was just an exercise in declaring your inherent right. What we found was interesting to say the least.
Delivery, Packaging, and Setup
The first impression of a product is dependent upon the time it takes to receive it and the condition in which it arrives. Packaging is a key part of this. Then, there is the ease in which it is assembled for use and instructions that are easy to follow to aid in this endeavor.
Delivery
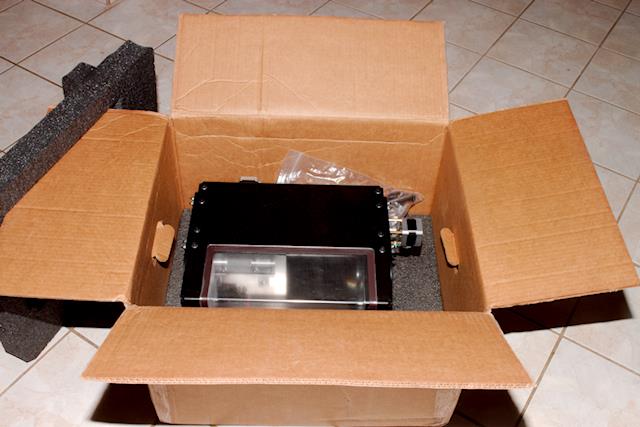
The box that came was sturdy enough to handle the USPS delivery without any issues. It arrived within the expected amount of time with the box in good condition.
Packaging
The package was heavy, with the Ghost Gunner weighing in at a hefty 50+ pounds. However, the cardboard was obviously designed to handle its weighty contents.
I’m one of those people who saves the packaging/packing materials for most small- to medium-sized things. While storing empty boxes does require some storage space, when it comes time to resell the item, original packaging can go a long way towards getting a premium price. If you have the original box something came in, people know that you tend to take care of things. One of my gripes is when a company skimps on packaging. In their short term thinking, some believe that the goal is to just get the product to you and then their obligation ends. A company that produces cheap packaging on a product that is likely to pass through many hands of ownership is shortsighted.
A Carefully Designed Box
 Once the box is opened, you can see the care that they put in the design. The packing is obviously designed to be reused. About the only way they could really improve it would be to move to a wooden crate or wooden framed box. However, I don’t think that is necessary in this case. If the product pushed north of 75 pounds, I might expect that, but the current packaging fits the product quite well. The foam is the same closed cell foam you find in upper-end cases like Pelican.
 You’re going to want to find a place to keep this box in good condition. Depending on your needs, you will need it to pass the Ghost Gunner on to the next owner, or you may need it to have it upgraded to the newest improvement, like we did.
Following Directions
There is a written manual, but you really don’t need it. The whole process is about as simple as you can get. I used a 15 foot USB cord so that I could set the Ghost gunner on my dining room table and still reach my main computer. However, you could also use a laptop sitting right next to the machine. Connect the machine up to your computer, power it on, insert the included USB stick, and run DDcut straight off of the USB stick. No installation is required.
Windows and Linux Computers
My particular setup was a bit more complicated because DDcut is designed to run off of the Windows operating system, though all of my computers in house are run as Linux computers. I could have borrowed my son’s computer, but instead I had a contingency. Every once in a while I run across software I need that requires Windows, so I keep a copy of VirtualBox on my system with Windows 10 loaded on it. I only boot it up on occasion, but some programs don’t like to be run in an emulator. Thankfully, DDcut had no such issues and ran just fine. Once DDcut is started, it tells you exactly what to do, when to do it, and is easy to follow. I do like the fact that it is self contained on the USB stick and no installation of software is required.
Setting the Jig Up
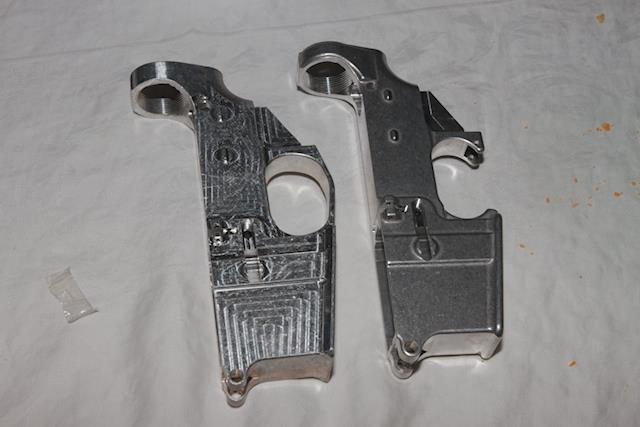 I had two different sets of AR lowers. The first one I ran was the lower, purchased from Defense Distributed. This lower has had more machining operations done on it than the others I’ve had from Tactical Machining. While both lowers provided an excellent finished product, the Tactical Machining lowers required some modifications to the jig in order to work. There were a few places on the lower that had more material on it than did the Defense Distributed (DD) lower. I actually prefer the Tactical Machining lowers because they have a cleaner look with subdued edges right out of the box. There are fewer finishing operations required on these lower to achieve an excellent look, but it’s only cosmetic. Structurally, the lowers are the same, and both are easy to use.
Modifications to the Jig
 The modifications needed to the jig were simple. Mostly, these involved using a file or a Dremel tool to open up some of the recesses or remove material from the jig where the jig expected a sharp corner and the Tactical Machining (TM) lower had a rounded corner. It took about an hour of fine tuning the jig so that it would fit well with the TM lowers, but I also didn’t rush the job. Since this was the first time I had played with the jig, I wanted to make sure that I wasn’t hurting anything as I removed small amounts of material.
For the DD lower, the jig just fit right the first time. Following the direction on the computer screen, the DDcut software walked me through the process with written instructions and picture guides with no problems.
First Cut
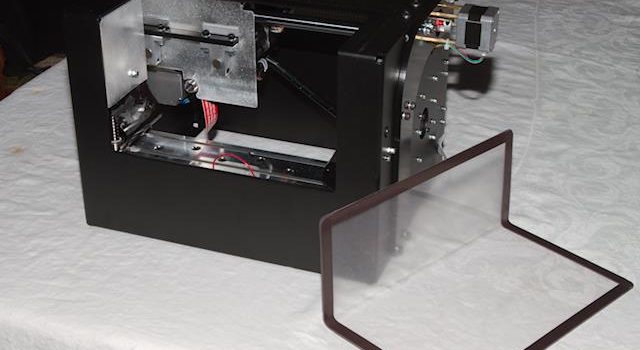
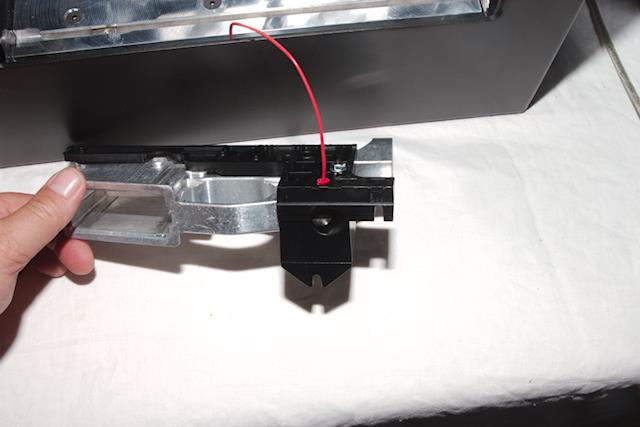
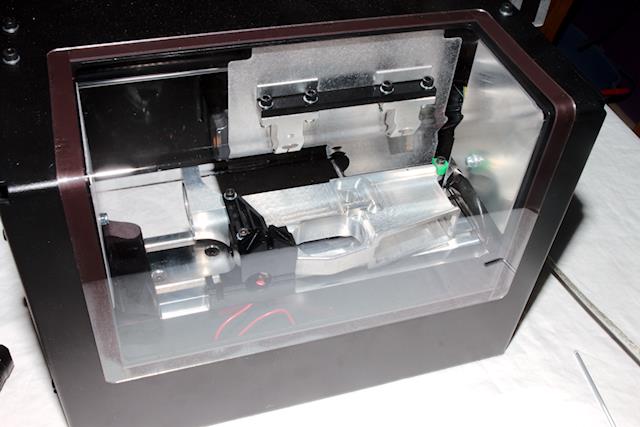 Once the jig and lower were fastened in the machine and the appropriate milling bit mounted, the DDcut software prompted me to start the process. It was actually quite interesting to watch. I’ve never played with a CNC machine before. The machine will touch the lower without the bit turning to establish exactly where it is. This is why it’s important to have that red ground wire that you see in the pictures properly attached to the lower. Without that, the machine has no way to reference exactly where the lower is on the fixture, and it won’t run.
Chips Begin To Fly
Once the location is recorded, the spindle starts up and the chips begin to fly. This is not a large, heavy machine tool. The bit is small with a fast rate of spin to obtain the proper cut speed, but that also means the bit is flexible. As as a result of this flexibility and the lower torque of the machine, the unit takes very small cut steps.
Watching the Process
For the first thirty minutes or so, I watched as the Ghost Gunner nibbled away at the aluminum receiver. The process runs dry and the spindle turns at a high rate of speed, so the chips thrown off are small. But, throw them, it does.
Chip Guard
You will certainly want to have the chip guard in place as you run this machine. Some people leave the foam packing in the bottom of the machine as a chip tray, but because the unit only weighs 50 pounds, I chose to just set it on a piece of cardboard. I’m not sure that’s even necessary, but I was running it on Mrs. Latimer’s dining room table so I thought a bit of protection for me was in order.
Noise
You should know that the milling process is noisy. I wouldn’t recommend running it in an area where you need to have normal conversations. During the run, that whole side of the house was relegated to sign language and no phone usage. It’s not at the level where it would cause hearing damage, but it’s loud enough that carrying on a normal conversation is difficult. If you have people who are hard of hearing or depend on a hearing aid, you can forget verbal communication.
Dinner
I really had no idea how long the process would take and was unprepared for the wait, which interrupted our dinner plans. I guess I expected it to take larger bites of metal. The main milling part took approximately two hours. I planned poorly, so the family was relegated to eating dinner on TV trays in the living room.
Two Hours Later
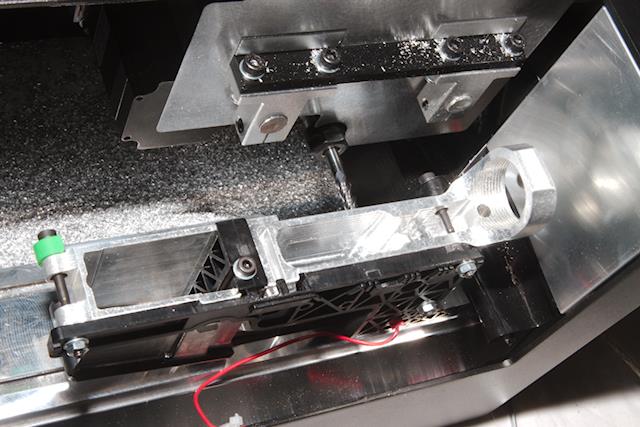 When the main milling operation was completed, you could certainly see the receiver taking shape. The primary operation hogs out the material from the receiver necessary to fit the fire control group, including the hole where the trigger protrudes into the trigger guard assembly. You eventually get used to the sound, which is repetitive. So when machine milled into a hollow space, I thought something had gone wrong. I was jolted from my semi-hypnotic state that the droning of the machine had put me in, and I rushed to see what was wrong. Happily, nothing was wrong. The machine continued until the operation had completed. When it was ready, the spindle retracted and the computer displayed instructions for the next step.
Another Twenty Minutes
 It took a few moments to move the jig to the new position and continue. This is only a three axis machine, so you have to rotate the part by moving the jig. You only have to move it one time, from the horizontal to the vertical position, so that the holes for the fire control assembly can be drilled. You do have to change the milling bit out for a drill bit, but the display on your computer walks you through the entire process. When you are ready, the machine starts up again, and in twenty minutes you have a completed lower.
Tomorrow, we’ll talk about overall quality of the machining as well as discuss some of the problems that I encountered along the way.
I had absolutely no interest in attempting this until I read your article. I am looking forward to Part II. Please discuss costs associated with the process and many thanks!
very nice review. I wonder if a a guy could buy one and rent the usage of the machine. If a single use is about 3 hours, it would not take long for ROI.
Unfortunately there have been well-publicized prosecutions of folks who conducted “AR build parties”. The LEGAL way to share the cost of a GhostGunner would be to buy it, then crank out a mix of of 30 AR-15 and AR-10 receivers for your immediate family. Then SELL IT to a friend for $200 less than your purchase price, and document that with a bill of sale. Then ask them to repeat the process. (“Lather, rinse, repeat.”) By the time it is in the hands of owner #9, the machine will sell for only $100. End result: 270 sterile (unserialized) ARs are in the hands of freedom-loving and responsible gun owners.
JWR – interesting strategy you’ve outlined. An idea for a slight mod to your thought would be to sell the machine to a guy for $1500, then have him sell it back to you for $13-1400. Requires a higher degree of trust, but might be a way to turn some revenue. I’m intrigued enough by your post and follow up comments that I’ll want to ask an attorney – I might be in the market.
I recently used the 80percentlower.com Gen 2 jig and milling bit with a small hand held router to complete a lower. It turned out great. I purchased several lowers and will do what JWR suggested with respect to others using it. The government doesn’t need nor have the right to know what guns I own. We have already allowed it too much power, we shouldn’t give another inch.
Thank you for reviewing the Ghost Gunner! If you could possibly point out with the next part more information (possibly videos?) on what is needed in addition to the machine, jig, and 80% lower to assemble a fully operational liberal nightmare? I’m very new to the idea of building a gun myself and have never disassembled anything more complicated than a glock, and would appreciate anything you can share to help me along this route.
Would also be interested in authoritative articles for selecting the rest of the parts for a complete, good build; ending up with an accurate, dependable, rugged firearm.
Hey E. Amused, you could easily buy the book “how to build an AR” from your nearest Barnes & Noble, but I built mine with no more than 30 minutes of YouTube instructions.