
Email a copy of 'Packing Antique Iron - Part 2, by The Lone Canadian' to a friend
21 Comments
- Ad SurvivalRealty.com: Sell Your Remote LandAdvertise your hard-to-sell remote land to eager buters. We specialize in rural, remote, and off-grid properties worldwide. Affordable ads. No commissions are charged!
- Ad Elk Creek Company - Federally-Exempt No-Paperwork GunsPre-1899 Antique Cartridge Guns -- No FFL Required. Can be mailed to your doorstep with no Federal paperwork!
Why not purchase one of these for the stitching?
Youtube videos show it going through three layers of leather and it would greatly simplify the process.
https://www.amazon.com/Machine-Cobbler-Mending-Clothes-Trousers/dp/B07YHKFMSX/ref=pd_ybh_a_3?_encoding=UTF8&psc=1&refRID=CQE4VXKW37NVGBCA292B
Honestly Randy, I didn’t even know they existed. My experience tends to be with old boot and harness makers that had sewing machines worth several thousand dollars. Now I need to check these out and see how thick of leather they’ll sew. Shoe repair could be the next thing to learn for TEOTWAWKI.
Randy,
I’ve had one of those “Chinese Shoe Patcher” machines for three years and found it to be less useful than I thought it would be. The learning curve is very steep and requires a LOT of adjusting for your individual machine. Even with years of sewing machine mechanicing, it was a challenge since these are not manufactured to tight specifications. The only feed dog is on the presser foot so the layers will slide unless glued together first. (High end leather machines have feed dogs upper and lower to feed evenly.)
The machine is useful for “rough” work (tool belts, utility pouches, heavy canvas etc.) but not for “finished” look items like holsters and sheaths since it can’t accomodate 1mm threads and the stitch quality just isn’t anywhere near a neat saddle stitch.
Also the prices on these things has varied a whole lot. Three years ago it was $99, with no added shipping through Amzon, now the price is double-plus with hefty shipping charges most places. All that said, I do consider it a good tool around the homestead for heavy utility sewing and it is a useful non-electric skill in a grid down situation.
For garment weight leathers and general sewing, keep an eye out for Singers made up to the 1950s (tan color 300 and 400 series and earlier) since they have all metal gears and were all designed for simple treadle or hand-crank conversion even though they don’t look like treadle machines. My workhorse machine is a Singer 401A that is nearly 70 years old.
As a preparedness note, a heavy duty sewing machine is useless without heavy duty thread. Regular sewing threads will wear and break in thick materials so stocking up on good upholstery thread (synthetic to resist rot) is essential. The same goes for stocking the needles for the machine.
Thank you for sharing your experience. I will look into the the old singer machines.
Thanks for the link. I’ve been looking for something to use for leather working, particularly my shoe making/repairing I garnered some years ago.
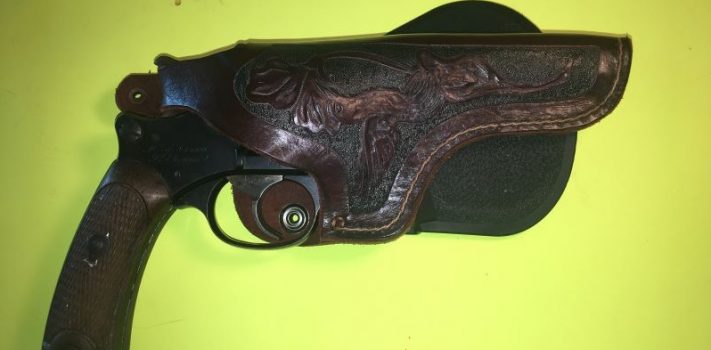
Great article, and you do very nice work. I’m curious as to why you don’t design the holsters to cover the trigger and trigger guard. Wouldn’t that make them safer?
Yes? No? I’m really not sure. I’ve done holsters with the trigger guard covered. I’ve even done a military flap-style. With the thumb break, or a strap over the hammer you can’t pull the trigger, so it’s safe in that regard, and being a fixed firing pin, like in the “old west” you would always have an empty chamber under the hammer.
Again we come back to purpose or intent. If you’re going to carry it, you may need to use it. I just feel that an open trigger and thumb break is faster, although it does sacrifice some security.
Thanks for the article ! You have inspired me to go ahead and make the holster for my band new Remington black powder revolver.
Have you considered wrapping the gun in Saran Wrap when wet forming the holster?
Smart!
Steve, I have. I read an article years ago that suggested it. You could definitely do it, but I’m just pointing out not to trust it. Saran Wrap is pretty thin, and one small hole from a sharp edge and the integrity is gone. If you trust it, you could wind up with rust before you knew it.
Why not heavily oil it and THEN wrap it with Saran Wrap?
I don’t like rust either.
Really good article! Leather can be fun, functional, and frustrating…well done; detailed and informative.
Great job for a novice. I have been doing custom leather for 53 years, and currently make custom gun leather in Idaho. You seem to have learned “the right way”. Good article.
Dan: from somebody with your experience all that I can say is that I am humbled. Thank you for your kind words.
Your pattern is the same as I have used for many years. I have a press with HD foam that I shape them, but other than that….keep up the good work!
Hey LC, thanks again for taking time to write this article. I think too often people read the title and maybe the first paragraph of some articles and too quickly decide, “This doesn’t apply to me.” From where I’m sitting, this was an article about working with very thick materials using a leather holster as the example.
As I read this second part, I was thinking how many other applications this would have in a TEOTWAWKI situation. The concepts apply to any material which is very thick and not able to be sewn on your treadle Kenmore. I’ve tried sewing canvas before where there was a triple layer folded over, and it’s pretty difficult. Using some leather working tools and techniques would make the job easier.
When I think about a TEOTWAWKI setting, most of us won’t have enough shoes and boots in our preps so they’ll need patches and we’ll have to learn how to make new ones, even if they’re just moccasins, and our jeans will wear out in ways they don’t wear out now. For example, I used to carry a pair of 5″ vice grips in a scabbard on my belt. I lost the scabbard somehow and just carried them in my back pocket, which soon developed a large wear spot which turned into a hole which turned into lost vice grips. Some people carry a pistol in their pocket which will do the same thing to our jeans once more people are carrying after the SHTF. So making leather holders for those will not only give us quick access, but also slow down the wear and tear on our jeans. How many of us have large enough, strong enough needles to sew jeans or other heavy materials when making our own post-SHTF clothes? Leather-working needles are an excellent choice for some of that. And how about rifle slings that most of us don’t have? Those will be much more important post-TEOTWAWKI.
I saw a kid once and the back pocket of his jeans was lower and at an odd angle. Come to find out, he had a hole in the seat so his brilliant mother removed the pocket and shifted it to cover the hole. She was sewing through three layers of denim, the seat of the jeans and the folded-over pocket hem. Most of us lack treadle sewing machines and doing that post-SHTF will be much easier using leather working tools. When you think about it, these skills have a ton of applications in a grid-down, TEOTWAWKI world, and making a leather holster is just one use among hundreds.
I was also thinking this morning that of my 5 pistols, only one has a holster. You’ve inspired me to learn a new skill and I’ll be making some holsters as soon as I get some leather. I’ve seen leather-working tools at auctions but made the mistake of thinking, “I don’t do leather work.” If 3AD Scout doesn’t beat me to it, I’m going to bid on the next ones I see.
Thanks again for the article and the inspiration to learn a new skill. As I’ve said before, there’s a deep satisfaction that comes from learning new skills and knowing we can do things for ourselves, and we’ll feel our muscles bulge while looking at a finished item we’ve made or something we’ve fixed.
St. Funogas: great perspective. I guess that’s the true spirit of prepping. It’s surprising how often I learn a new skill in one area, and them find that it carries over into other areas. I think it’s the way I grew up. I was taught to think outside the box, and when it comes to fixing or repairing items this is invaluable.
As you point out, shoes will need to be patched/repaired. I’m thinking there will also be a lot more saddles and harnesses around post-TEOTWAWKI. There are no skills that we learn that are a waste of time – you just never know when they’ll come in handy.
Good work, Sir!
I concur that, on a revolver with an exposed and secured hammer, it is not necessary to cover the trigger. However, any holster that fails to secure the hammer, needs to cover the guard.
Certainly, proper carry methods are barely secondary to owning the tools. And I highly recommend that every working man or woman learn the basics of leather and thermoplastic.
For rifle slings–get yourself a 100-yard roll of polypropylene or nylon webbing, and at least 50 tri-glides (and, if possible, ladder-locks). Then stock up on swivel studs, and Uncle Mike’s-style quick-detach sling swivels. Once the gun has swivel studs on it in the correct places, you’re ready. Using two tri-glides (or one tri-glide and one ladder lock) on a suitable length of webbing, you have a sling in action with no stitching. And it can be disassembled just as easy.
For the classic Ruger 10-22– if you want an “across the front” 2-point tactical sling, take the screw out of the top of the buttplate, and replace it with a swivel stud. Then make sure you have enough webbing (5 or 6 feet). This makes a great setup for carrying a rifle on the riding lawnmower, when the rodents are out!
And a last sling-related item– my great-grandfather was known for putting slings on about everything by taking a leather thong, slitting one end, putting a cinch around the barrel behind the front sight, and then securing the opposite end around the wrist of the stock behind the pistol-grip. It carried a bit low in the traditional position, but also doubles quite well for tactical carry across the chest.
I just set one up using paracord instead of leather thong.
If you want an inexpensive stitching tool for thick materials such as leather, why not try an sewing awl? A professional leatherworker who makes scabbards for swords and knives recommended this tool to me, and I’ve used it to repair sheepskin boots, make a leather sporran for my ren-faire costume, and repair the straps on my son’s backpack. It saves constantly stabbing yourself with the eye-end of the needle or the constant breakage of a leather hand needle and, with a bit of practice, the stitches come out looking nice and straight like they were machine-sewn.
HERE: https://www.amazon.com/dp/B000HGIJQ4/