


Among the different weapons I own I have several Russian WWII Mosin Nagants. I have wanted for some time to find some kind of chest rig and or web gear to use with these rifles so they could possibly be used as battle rifles. I have several of the Russian surplus ammo pouches that came with these rifles but I wanted something that could hold more stripper clips and was more modern. I searched numerous times on the internet and could never find a dedicated Mosin Nagant chest rig. Finally, I found 1 seller on Ebay who was selling a chicom SKS style Mosin Nagant chest rig. The seller wanted over $70 for this 1 rig. That was way out of my price range at that time. This did give me a good idea though for making my own Mosin Nagant chest rig. Although this article explains how I made my Mosin Nagant chest rig the idea is to show how you can make a similar rig for your specific weapon.
After seeing this 1 Chicom style rig on EBay, I remembered that I owned a Chicom SKS chest rig. I took it out and went over it examining it to see how it was built and what I would have to do to make something similar. The common SKS chicom chest rig is made of olive drab colored canvas fabric. There are multiple pouches used to carry 7.62x39mm ammunition on 10 round stripper clips. They also have canvas webbing straps used for shoulder straps and waist straps. These also usually just tie around the waist without any buckle and also tied around the shoulder strap to adjust the strap length. The flaps that secure the pouches are secured with a wooden dowel and loop system. These rigs are bare bones and work very well. They were used in Korea and later in Vietnam.
So I decided I was going to make a chest rig and see how it worked out. Just for some background though, I have to admit I know nothing about sewing. I never learned to sew and never had a reason to sew. I had bought my wife a sewing machine several years earlier as she wanted to learn to sew but she also has no experience sewing. So I decided I would learn. I opened up the user’s manual for my wife’s sewing machine and read it cover to cover. When I was done I turned on the switch and started practicing. I am in no way an expert in sewing and I am sure I have been doing a lot of things wrong. That being said, I want to share my experience making this Mosin Nagant chest rig as best as I can. Please forgive me if I do not use the correct sewing terminology.
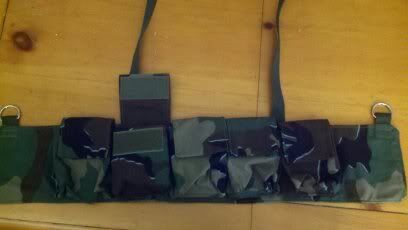
I figured that I needed to begin purchasing some supplies before I began. I started with fabric and began looking online for fabrics I wanted to use. I planned on buying military camouflage fabric that was actual surplus stock. I also thought I should maybe buy some nylon cordura. The four fabrics I initially chose and bought were the US surplus woodland ripstop camo, US surplus 3 color desert NYCO ripstop camo, OD nylon 1000 denier coated cordura, and coyote brown nylon 1000 denier coated cordura.
I also looked at the USMC MARPAT in woodland and desert surplus fabric, CADPAT, MARPAT nylon cordura, DPM, desert DPM, and Flecktarn cordura. Maybe later I will purchase one of these other fabrics to use for this project.
I then searched for an bought nylon webbing strap. The original Chicom SKS rig used cotton webbing straps. I found and bought 1″ OD nylon webbing strap and 1″ coyote brown webbing strap.
Next I went looking for hook and loop closure (Velcro) as I did not want to use the wood dowel and loop system on the SKS rig. I am sure a button and button hole or snaps would be the perfect solution as hook and loop is noisy but my very limited sewing skills made me use the hook and loop. I found at a local fabric depot multiple yards of OD 1.5″ hook and loop and off Ebay I bought beige/tan 1″ hook and loop. I decided to stick exclusively with the beige/tan for all my tan colored projects as coyote brown hook and loop was very expensive compared to the other available colors. More current demand maybe.
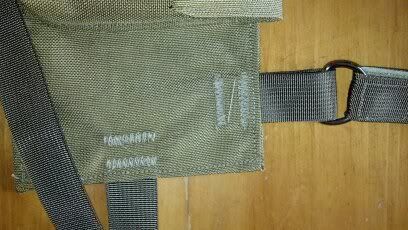
I then went looking for the hardware pieces for the rigs. First I looked for “D” rings to use on the back side of the shoulder straps to be used to adjust the length for different sized people. I found many different kinds of “D” rings on the market, chrome, colored, metal, and plastic in all shapes and sizes. I skimped on this part and ended up buying a 4 pack of 1″ steel “D” rings at Wally world as it was a nearby source and cheap. I also realized I did not want to just tie the waist strap around my body like the design on the original SKS chest rig. The easiest fix was to add a side release buckle. Again there were multiple choices, colors, sizes, and styles. Even ones with emergency whistles built into the buckles. I settled with a black 1″ plastic buckle again at Wal-Mart since it was right next to the “D” rings.
When I bought my thread I looked around at what was available for strength and sunlight resistant. I knew that there were different kinds of threads and some were a lot stronger than others. I found 1600 yard spool cones from a US seller on Ebay. I bought 1 OD and 1 Coyote brown spool of #69 bonded nylon T70 thread. This particular thread is made for use in luggage, tents, upholstery, and other heavy duty applications. It is also chemical and sunlight resistant.
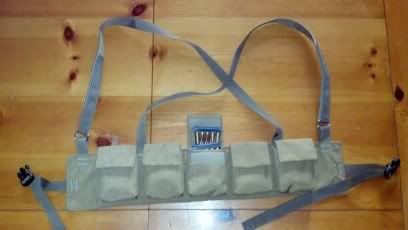
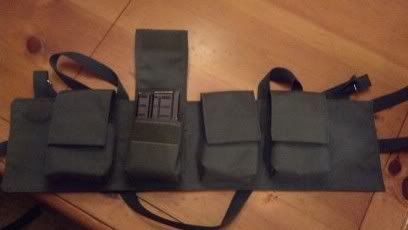
My next step was to make a pattern so my pieces could have some kind of uniformity. I decided to use poster board for the pattern pieces. Again, I took out my SKS chest rig and compared and borrowed some of the measurements from it. Next, I took 3 loaded 7.62x54r Mosin Nagant stripper clips and stacked them staggered one on top of the other. I then measured their combined height, width, and length. I wanted my rig to hold 15-20 full stripper clips so I planned for 5 pouches with hook and loop fastened flaps. I measured so that each pouch could hold 3 or 4 charged stripper clips.
When the pattern was complete I had 3 pieces of cut poster board. One for the base piece of the rig, one for the pouches, and on for the flaps. When I made my measurements I took into account that I wanted to double each piece of fabric. I wanted the same material seen on the outside of the rig also seen inside the pouches and the bottom side of the flaps. I also knew this would add more strength to the rig.
Here are some links with pictures of the chest rigs I made:
http://i1253.photobucket.com/albums/hh599/jeffinaz/1346192682659.jpg
http://i1253.photobucket.com/albums/hh599/jeffinaz/1345947292807.jpg
http://i1253.photobucket.com/albums/hh599/jeffinaz/1337126802846.jpg
http://i1253.photobucket.com/albums/hh599/jeffinaz/1346192685418.jpg
Here are the measurements for my Mosin Nagant chest rig pattern:
Base= 27 3/4″ long x 5 3/4″ wide
Pouch= 12″ long x 6 3/4″ wide
Flap= 10″ long x 3 7/8″ wide
Hook and Loop= 3″ long x 5 pieces both male and female sides
Here are the general instructions for how I then built my chest rig. I started by laying out the desired fabric face down on a table. I then traced the pattern pieces onto the back of the fabric for each piece I needed to cut out. I found that a Sharpie marker worked best on the Cordura and a dark colored pencil did a great job on the camo ripstop fabric. In all I traced 2 base pieces, 5 pouch pieces, and 5 flap pieces.
I started with the flaps first. I folded each piece of fabric length wise and then ironed a crease to make a visible seam in the middle. Then I opened the piece up and placed a male side hook and loop piece centered and 3/8″ from the middle crease and sewed it onto the flap piece. I then folded the flap in the opposite direction so the pattern or outside was inside and then sewed the two long sides with a 1/8-1/4″ seam. I then pulled the flap right side out and used a ruler corner to push out the corners. last, I pressed out the seams I had just sewn so the flap had the correct shape and sewed another seem across the first, along both long sides about 1/4″ from each side. I left the bottom of the flap open at that time as I later would sew across it when I attached it to the base. This was done 5 times for each flap.
Next, I went onto the pouches. As I had done with the flaps, I also folded the pouches in half length wise and ironed a crease in the middle. I opened the piece up and placed the hook and loop female piece centered and about 3/8″ from the crease and sewed it on. I then refolded the piece at the crease and sewed a seam across the crease about 1/4″ from the it to make the top of the pouch. Then I marked a 1 3/4″ x 1 3/4″ square on both bottom corners of the pouch and cut them out. I then folded the pouch out at the inside corner of the 1st cut so the two perpendicular lines of the cut were resting on top of each other. There I sewed a seam down to create the pocket(bottom corners) in the pouch. I left 3/8″ at the bottom of the seam un-sewn. Afterwards, I repeated the same thing on the 2nd cut of the pouch. Before turning the pouch right side out I cut a triangle piece about 3/8″ off the corner of the bottom of the seam I had just sewn(reason why I left 3/8″ unsewn on seam). This later helped when folding the corners in to sew it to the base. As before, I did this 5 times for each of the 5 pouches.
On to the base of the chest rig. This part takes the most attention as you have to add and sew the webbing into this piece along your “D” rings. To begin, I mated the two base pieces together with the two faces against each other and the inside denier coating facing out. I pinned the two pieces to keep them together and from moving while I sewed. First, I sewed 1 of the long sides with a seam about 1/8-1/4″ from the side. Next, I took the first waist strap(cut to your desired length) and placed it inside the 2 base pieces. I extended it outside about 1.5″ from the side and centered and then sewed a similar seam to the first along the 1st side.
The 2nd long side would be more work than just sewing a seam. I would have to add 4 more pieces of webbing along that side. before starting I measured 2″ from each end and marked the Cordura and then again at 8″ from each end. At the two 2″ measurements I placed a folded 6″ piece of webbing strap with a “D” ring on it making sure the “D” ring was again on the inside of the two base pieces. As I had done with the 1st waist strap, the 2 ends of these two pieces stuck out of the base about 1.5″. At the 8″ measurements I took my shoulder straps and folded them so they would both fit in between the base pieces with the other webbing straps. One end of both straps again extended 1.5″ from the base at the 8″ measurement marks. Once these 4 webbing straps were anchored at their measurement I sewed another seam across the 2nd length equal to the first.
This left the 2nd side open. Here I would then pull the base of the rig right side out with all the webbing straps now exposed. To help keep the true shape of the base I would again push out the corners with a stick or ruler and press the seams out. I then would sew another seam over the three seams on the outside of the base. To close the base I would insert the 2nd waist strap 1.5″ and centered on the side and fold the ends in to make a similar seam as the others and then sew a 1/4″ seam across it.
To finish the base, I sewed a staggered stitch at 2 points across each of the six 1.5″ pieces of webbing strap that were inserted into the base’s side. This added strength to the webbing straps where they were attached and took the majority of the weight off the side seams.
The last major piece to be sewn is to attach the flaps and the pouches to the rig base. This is done in 2 steps. First I placed the center flap on the rig base centered and 1″ from the top and pinned it in place. Second, I pinned the remaining 4 flaps in place 3/4″ from each other again at 1″ from the top of the rig. I then sewed the 5 flaps in place across their open ends to the rig base.
The pouches take a little work to get in place the first few times. I would take the first pouch and fold in the bottom 3/8″ piece at the end. Then center the pouch over the corresponding flap where it will be sewed on. I would pin the bottom of the flap 1/2″ from the bottom of the rig base and then sew across the folded 3/8″ attaching the bottom of the pouch. Once the bottom is attached you fold in each of the two remaining sides 3/8″ as you did to attach the bottom. Align each side from the bottom in a straight line up to where it will overlap the corresponding flap at the top edge. Pin the 2 sides in place and sew them equal to how the bottom was sewn. Once this is done that pouch is finished, continue with each pouch until all 5 are complete.
To finish the chest rig, I cut and sewed two 8″ pieces of male and female hook and loop onto the ends of the shoulder straps. This allows you to adjust the length of the straps as needed for different sized people. Cross the shoulder straps and run the end through the opposite “D” ring and secure with the hook and loop closure. Add the side release buckle onto the two sides of the waist straps and the chest rig is finished.
The cost for making these rigs was a bit more for me as I purchased 4 different kinds of fabric and 2 different kinds of thread and hook and loop. I did this to be able to make numerous rigs. Here is a list of the items I bought and their cost plus shipping. With exception to the “D” rings and the side release buckles purchased at Wally world I bought all the components from US sellers on eBay and or local fabric shops in my area.
- 5 yards Olive Drab 1000 denier coated cordura $34
- 1 yard Coyote Brown 1000 denier coated cordura $15
- 2 yards 3 color desert US surplus NYCO ripstop $16
- 1 yard Woodland US surplus ripstop $12
- 10 yards, 1″ Beige Hook and Loop (male and female) $7.95
- 5 yards, 1.5″ Olive Drab Hook and Loop (male and female) $12
- 70 yard roll, 1″ Olive Drab nylon webbing $34
- 4 yards, 1″ Coyote brown nylon webbing $15
- 1,600 yard spool, #69 T70 Olive Drab nylon thread $7
- 1,600 yard spool, #69 T70 Coyote brown nylon thread $7
- black 1″(25mm) side release buckle $1.97
- 4 pack of 1″ D-rings $0.78F
For each yard of fabric I was able to make almost three complete chest rigs. I might have been able to get all three from the 1 yard of fabric if I had maybe laid out the pattern pieces in a different way.
For those who stuck with me through this article I wanted to add this rig will work with other calibers and weapons stripper clips. After making the first rig I realized I could also use 3-4 8mm Mauser stripper clips in it and they fit perfectly. I am sure you could use the above chest rig with the same measurements for almost any 30 caliber sized high powered rifle on its corresponding stripper clips. This could include .308, .30-06, 6mm Swedish Mauser, 7.5 Swiss Schmidt Rubin, 8mm Mauser, and many others. You can adjust the measurements above to fit any size charged stripper clips you want to use. I had even thought of maybe sewing in a looped elastic band inside the pouch so you could place and carry individual rifle rounds if you did not have any stripper clips.
After perfecting my rig for my Mosin Nagant I wanted to see if I could make a chest rig for my G3 magazines. Aside from surplus German Flecktarn G3 magazine pouches and some rubber or plastic double pouches there are not a lot of choices for chest rigs for the H&K 308 style rifles on the market. I measured out the magazines as I had done above with the stacked stripped clips. However, I goofed and measured wrong. My pouches were too short when the magazines were inserted and the flap would barely close. My fix was easy though, I tried putting FAL magazines in the pouches and they fit perfectly. So now my G3 pattern is my FAL pattern. Later I will redo the G3 chest rig with longer pouches.
These chest rigs are very minimal and would work perfectly worn under a Rucksack or BOB without causing too much discomfort. Some of the larger MOLLE and similar vest and chest rigs are a lot bulkier. But you can carry more gear in them. For me having both gives me a choice of either.
I may have to upgrade the shoulder straps to a wider webbing strap and or padded shoulder straps. 1″ nylon webbing may be to narrow and cause pain over the shoulders with increased weight from larger and heavier magazines. I wanted to weigh one of the rigs loaded with strippers before finishing this but I do not have a scale. I did load up one of the rigs and found the weight was very negligible compared to any chest rig with loaded magazines.
I also noticed the surplus ripstop fabric was not as strong as the nylon cordura. Although I really like the look of the surplus fabrics they might not hold up as well as the stronger cordura. I figured if I wanted to I could back the surplus fabric with a piece of cordura. Another thing I found while searching for fabrics to buy was there were numerous nylon cordura fabrics with matching patterns to many of the surplus patterns. My next purchase of fabric will probably be nylon cordura in woodland MARPAT design.
Currently I am working on making a chest rig for my daughter’s four 25 round Ruger 10-22 magazines. This rig is a little different as it is almost 10″ tall and the sides are angled instead of squared. Maybe I will make a chest rig for AK-47 30 round magazines and H&K93 40 round magazines. I also am thinking to try my hand at making different style rigs like SADF Pattern 70, NCStar VISM, AK-47 drum rigs, etc.
I guess the main reason for this article is to show that if you cannot find the gear you need, then make it. Remember, I have no experience in sewing and I have made six of these chest rigs from scratch.