This is the third in a series of home canning articles dedicated to ways of making your home canning experience easier, quicker, more efficient, and less stressful. My hope is that they’ll add something new to the mix by offering some canning techniques which many home canners may not be aware of.
My first two articles in the series were:
Canner Water-Level Conundrum
One of the big frustrations for beginning home canners, and for many veterans as well, is trying to figure out exactly how much water to boil in the canner for the number of jars in a given batch. If you use too little, the jars won’t be completely submerged as they need to be. Too much water and you’ll waste propane. If you get way too much you’ll end up with the dangerous task of scooping boiling water out of the canner so you can get the last jars in without the kettle running over.
These problems are easily resolved with a simple DIY measuring stick that tells you how much water to fill the canner with based on the jar type and batch size. Once you make and begin using one of these water-level measuring sticks, you’ll see how beneficial they are. They’re quick and easy to make at home with a pen and ruler and this article describes how.
This article has three parts. First, I’ll explain how to use the measuring stick during canning. Second, how to make your own stick using the measurements and simple instructions given below. And third, how to make a measuring stick for your non-standard-size kettle.
Three important clarifications before we get started.
1. The volume of a canner or kettle is the total amount of water it holds when full, not how many jars it holds. A standard 21-quart canner does not hold 21 one-quart jars, it holds a total of 21 quarts of water but only 7 one-quart jars.
2. The numbers on the measuring stick represent the number of jars, not volumes.
3. All measurements are made without using the canner basket. Canner baskets are unnecessary, especially in a 21-quart canner that has raised rings on the bottom.
Measuring Stick Options and Variables
Take a look at the various measuring sticks in Photo 1. You’ll see they can be made from almost any straight object: a smooth sanded piece of hardwood, a spatula, a large stirring spoon, or a piece of mulberry branch from the north forty (head and face optional.) These are just a few of the infinite options.
 [3]
[3]
Next, you’ll see the top four sticks are each marked differently with the numbered lines farther apart or closer together than the rest in the group. Each stick is different depending on the size of the kettle and whether you’re canning quarts or pints.
There are three variables that determine how much water the water-bath canner requires for each batch:
- The size of the canner
- The size of the jars (quart/pint)
- The number of jars in the batch
The water-measuring stick removes all the guesswork by taking these variables into account. By putting the appropriate stick into the center of the kettle and filling the water up to the line indicating the number of jars in the batch, you’ll have the exact amount of water that you’ll need to cover the jars to the recommended depth of 1” above the lids.
How to Use a Canning Water-Level Measuring Stick
As an example of how to use the stick, let’s say we want to use our standard 21-quart canner to process 7 quarts of green-tomato pie filling. Our three variables in this instance are:
- We’re using a standard 21-quart canner
- We’re using quart jars
- There are a total of 7 jars in the batch
With this information, we select stick #1 which says “Large Canner” and “Quarts” at the top. (The flip side of the stick is for pints.) Once we’ve chosen the appropriate stick, we then hold the stick in the bottom center of the canner and fill water up to the line marked “7,” indicating 7 jars in that batch.
That’s all there is to it. With the water up to the “7” line, that will guarantee when all 7 jars of pie-filling are in the canner, the water level will rise up to the red line indicating it’s 1” above the tops of the jars. That’s all that needs to be done to get the exact amount of water in the canner. Ah, if only the rest of life were that simple.
It seems counterintuitive but keep in mind that the more jars in a batch, the less water you’ll need to boil. For that reason the larger numbers are at the bottom of the stick.
Brands such as Golden Harvest and most Chinese generics are slightly larger than other mason jars but the difference is negligible so the same quart stick works for any size quart jar. The same applies to wide-mouth vs. regular-mouth jars, as well as for those older Ball/Kerr quart jars which are ¼” taller than the newer ones.
The bottom line is: For each different canner/kettle, one stick size fits all and the measuring stick for quart jars will work with any quart jar regardless of the brand or mouth size. The same is true for pint jars.
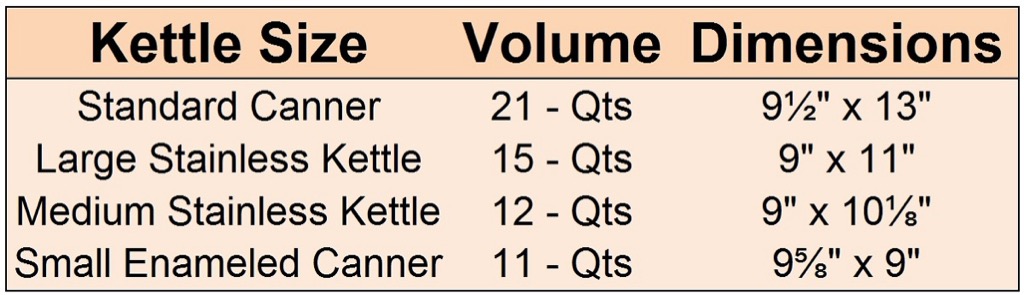
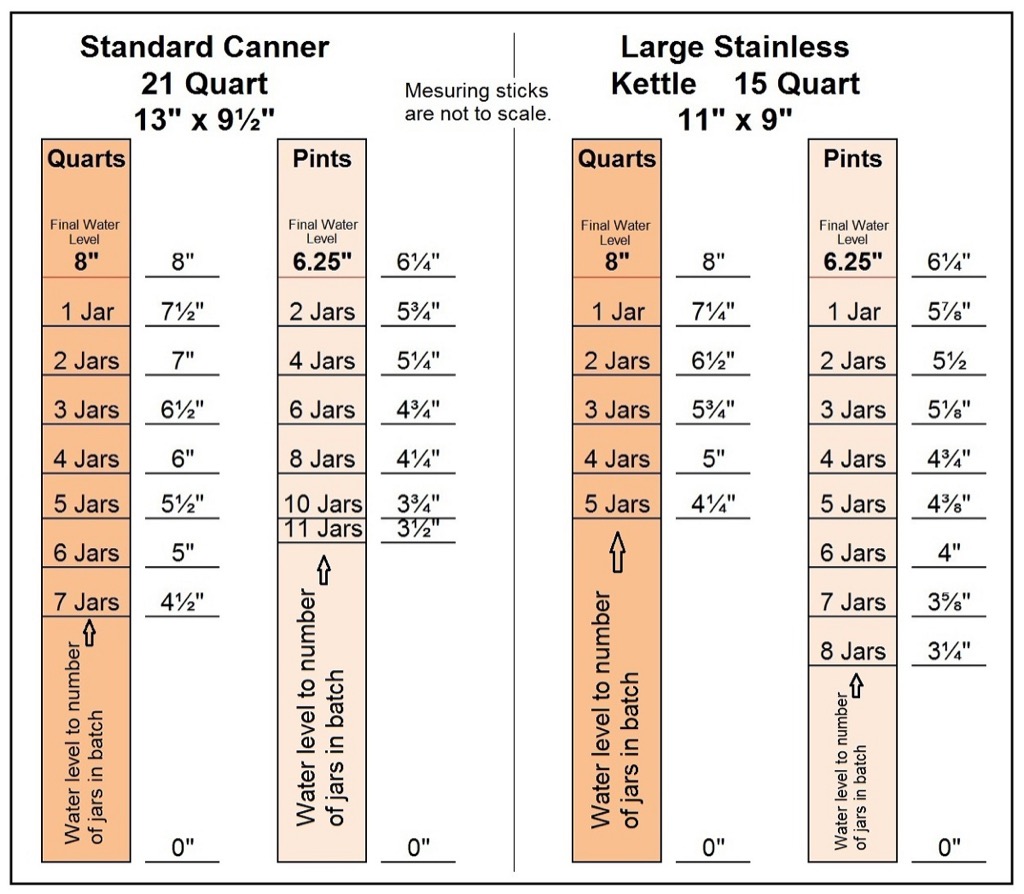
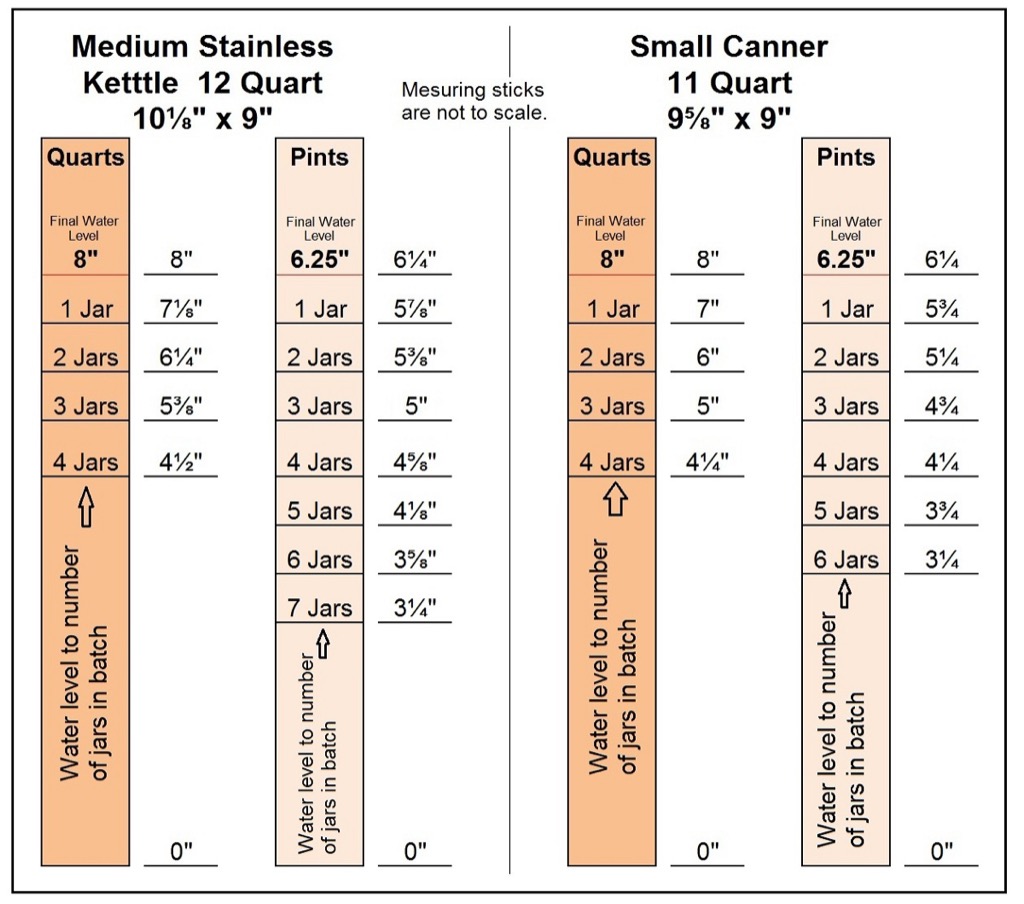
Measure Your Canner and Various Kettles
Look at Chart 1 to see if your various canners or standard stainless-steel kettles match the dimensions listed. If they match or are pretty close, you can use the measurements provided in Charts 2 and 3 to make sticks to fit those. Making a stick will only take 10-15 minutes once you have your stick, ruler, and Sharpie ready to go. If your kettle sizes differ from those in Chart 1, part three of this article shows you how to measure and make measuring sticks to fit whatever sizes you have.
 [4]
[4]How to Make a Measuring Stick for Your Canner
For this tutorial, let’s make a stick for a standard 21-quart canner with quarts on one side and pints on the other.
When choosing a stick length, here are some of the options:
If the only canner you use is a standard 21-quart canner you’ll only need one stick. You can keep it simple by using a stick 12” long, with just the lines and numbers, and “P” or “Q” at the top. A spatula or spoon will work well as seen in Photo 1. A 12” length fits neatly into the canner for off-season storage.
I use four different kettles and I prefer 16”. I can write which stick it is in big letters and with a space large enough to not visually clutter the lower end of the stick (Photo 1.)
If you use multiple kettles you’ll need multiple sticks with the kettle size written on each but a 14” stick can work and will fit inside the canner for off-season storage.
 [5]
[5]
 [6]
[6]
Now let’s make a water-level measuring stick…
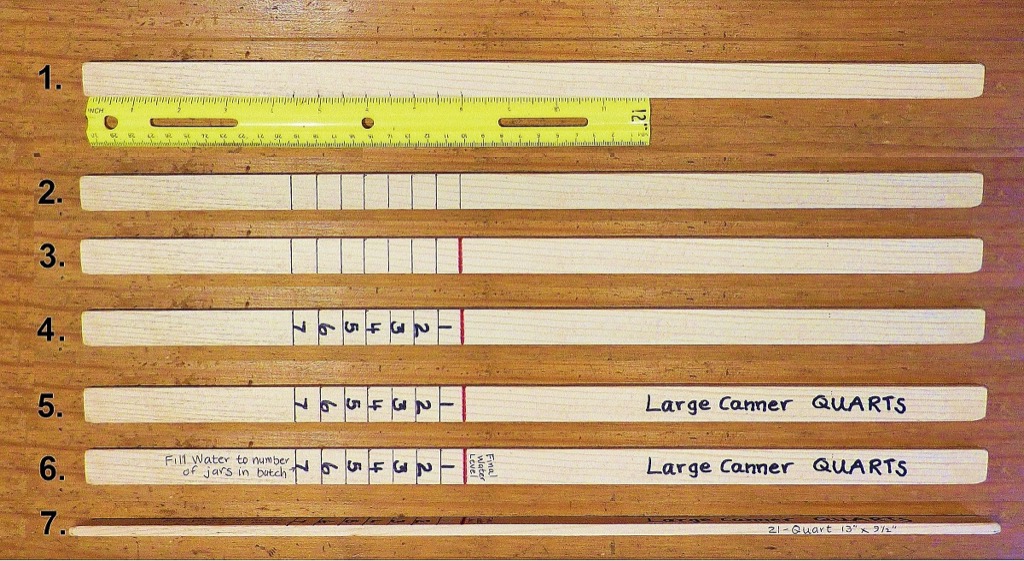
For this example, first find the measurements for quarts on the left half of Chart 2 where it says, “Standard Canner” and use those for marking your stick as explained in the steps below. The numbers in Photo 2 correspond with the numbers in the instructions.
 [7]
[7]
1. Whatever object you’ve chosen to use as your stick, lay it horizontally in front of you with a ruler below it. Look at the incremental measurements for quarts in Chart 2 and from the bottom of the stick, make a small pencil mark at the 4½” line. From there, make the rest of the marks as indicated: 5”, 5½” etc. (Please note in the photo the ruler and the pencil marks do not appear to be lined up properly, This is due to the camera angle, not to the author’s current stage of LOMR.)
2. Before using ink, take notice and if you think some of the lines are too close together you may want to only mark every other line as I’ve done with stick # 3 in Photo 1. If you have a square, use it with a pen or a Sharpie to mark all the pencil marks clear across the width of the stick. If you don’t have a square eyeballing it will work just as well.
3. Mark the top line in red to indicate this will be the final water level in the kettle when all the jars from a given batch are inside.
4. Write in the numbers for each line.
5. At the top of the stick write which kettle it goes with and whether it’s for quarts or pints.
6. At the bottom of the stick, you may need to write simple instructions on how to use it so you’ll remember in the next canning season.
7. On the edge of the stick write the kettle name and dimensions so you can double check which kettle it’s for if there’s ever any question, or when checking to see if it will fit a new kettle.
8. Flip the stick over and do the same for pints.
If all you use is a standard 21-quart canner, you can get by with just one stick, with quarts on one side and pints on the other. Again, one size fits all and this stick will work for any kind of quart jars in a 21-quart canner. Ditto for pint jars.
If you’re only using the standard 21-quart canner or one of the other three kettles in Chart 1, you can skip this next part and go straight to the Conclusion.
Making a Measuring Stick for a Unique Kettle Size
It’s fairly simple to make a water-level measuring stick for any kettle no matter how large or small, and for jars of any height.
I’ll explain the process using quart jars but the same technique works for all jars. Keep in mind that while a quart jar holds a quart, it actually displaces 1.15-1.20 quarts of water when it’s put into the water-bath canner.
You’ll need the following:
- Kettle
- Full jars (use water if nothing else) with lids, for displacement
- A 12-inch rigid ruler
- Pencil
- Paper
First, measure the jar capacity of the dry kettle by filling it with as many quart jars as it will hold. If it holds five, write the numbers 1-5 on your paper in a column.
Second, using the rigid ruler measure the height of the jar. A basic quart canning jar is 7” tall so add 1” to account for the final water level you want in the kettle during the water-bath process. The standard recommendation is 1” above the top of the jar so that brings our desired water level during the water-bath process to 8”. This will be the top line on the stick and will be marked with a red line.
Third, add one jar and fill the kettle until the water is 1” above the top of the jar, 8” in this example.
Fourth, remove the jar and after the water settles, measure the new water level. Let’s say for example, the new water level is 7½”. This will be the beginning water level for processing one jar so next to the number 1 on your paper, write 7½”.
Fifth, this time add two jars to the kettle, then remove enough water (slightly more than a quart) so the level is back down to 8”. Remove the two jars, take the new water-level measurement (perhaps ~7” in our example), and write that next to the number 2 on your paper. Keep repeating this process until you have all five jars in the kettle.
If your measurements don’t come out in exactly even spacing, which is likely, average the five measurements so the lines on your measuring stick will be evenly spaced. Sometimes the last jar will be less than the average if the bottom of the kettle is not flat or has a higher center like standard canners do.
After you have your rounded numbers, test them by adding jars and water to the kettle and re-measuring. If all works out as it should, your numbers are good. Now write them on a stick using the instructions above.
Conclusion
Once you start using this water-level measuring stick you’ll wonder how you made it this far in life without one. Using one will give you one less thing to worry about in the heat of the moment by ensuring you’ll have just the right amount of water in the canner before you start adding jars to it. Having to remove boiling water from the canner so you can fit those last jars in is not only dangerous but stressful as well. For me, one more helpful canning tool is always welcome.
These sticks are super easy to make for both young and old alike. If you’re not sure you can do it, then give it a practice try first on something inexpensive like the back of a 12-inch ruler or a piece of cardboard.
I hope you find this information helpful and as always, have fun with your canning this season!