This article describes how to build a compact (folds up to a 4’x3’ travel size), portable (setup or takedown in a couple minutes) range barricade. This version uses hinges to make transporting and assembling it easy. In part 1, we walked through the approximate cost in terms of hours and financial commitment, the materials, and the first five steps of the project. Let’s continue our building project with the remaining steps.
Step #6
As Step #6, attach hinges to plywood barricades as instructed in the following:
- On the plywood barricades, use the attached plans to locate and mark the hinge locations. All four will be “A” leafs (three knuckles), and they will be installed on the downrange side of the plywood.
- On the bottom of the barricade, the hinges are installed 1” inset from the tall side and 13” inset from the low side. This should leave you 27” between the 2×4 feet. Hinges are set so that the swaging sits against the bottom edge of the plywood. Mark the holes for the hinge.
- Where the supports attach to the barricade, the hinges are inset the same distance either side as the bottom hinges. If you are using the same standard dimension door hinges as this project uses, measure up from the bottom to 29-7/8” and scribe a line across. Place the bottom edge of your hinge leaf, opposite the knuckles, on this line. The knuckle will be above it. Mark the holes for the hinge.
- Remove the hinges and drill the marked holes out with a ¼” drill bit.
- Flip the barricade over and on the up-range side of the plywood hammer a #8 Tee nut into each hole.
- Flip the barricade back over, set your “A” type hinge halves in place, and screw them in with #8×3/4” screws.If you elected not to build this as a folding barricade, you should now be ready to assemble it. For a folding barricade, continue with steps # 7 and #8.
Step #7
For a folding barricade, step #7 is to cut the barricade into a shorter section and attach with hinges. If you started with the three smaller pieces of plywood (4×3 and 4×2) and cut your barricade shapes out of those, this is the step to join them together. If you cut it out of a single piece but wish to add this folding option, measure 36” up from the bottom and scribe a line across your barricade. (It should tie in to the existing step on the staggered side.) Cut it with your skill saw or jig saw.
 [1]Set your two pieces together on a flat surface with the up-range (shooter’s) side up, and place two complete hinges over the seam, one inset 1” from the tall side (in line with the leg and support hinges below) and the other inset 4” from the staggered side. NOTE: If using half swaged hinges, you should sand the edge of the plywood down along the cut area to allow closer hinge placement and a tighter seam.
Mark the holes on each hinge, remove, drill ¼” holes, flip the plywood over to install the tee nuts on the downrange side. Now, flip it back over again and install your hinges to join the pieces together with your #8×3/4” screws. You now should have a barricade that folds over into a 4’x3’ package to carry, or unfolds into a full 5’ or 6’ tall barricade. You now need to make it rigid!
Step #8
In our final step #8, attach a support to hold the folding top up during use. Using a single 2x4x24” piece for each barricade, mark and drill ¼” holes in the following locations, centered across the width of the 2×4 (1-3/4” from either edge): 2”, 8”, 14” and 22”. Place the 2×4 bracket on your barricade on the down-range side as indicated on the plans, and mark the outline. You can continue the ¼” holes from the previous step through the plywood by using the drilled 2×4 as a guide, or remove the 2×4, measure the same pattern of holes above, and drill them. Holes may be slightly enlarged to ease assembly and disassembly.
Using your 3/8 or ½ drill bit, counter sink the holes on the side of the 2×4 that will face the barricade. Drill these larger holes ¼ deep. This will allow you to seat nuts flush to the surface, and the nuts will hold the bolts to the 2×4 at all times.
Place four ¼”x2-1/2” carriage bolts or similar in the holes in the 2×4 bracket. Add nuts to the side that will face the barricade, and tighten so the nuts seat in the countersunk holes drilled in the previous steps.
Unfold your barricade and place your bracket with carriage bolts onto the uprange side of the barricade and into the holes you drilled for the support bracket. It should hold your hinged section upright. NOTE: The plans show the bracket attached to the downrange side, but I ended up installing them on the uprange side so as to have a cleaner profile facing the shooter.
Add washers and ¼” wingnuts to the carriage bolts on the other side of the barricade. Tighten these to hold everything together.
Put Legs and Supports Together and Stand Up
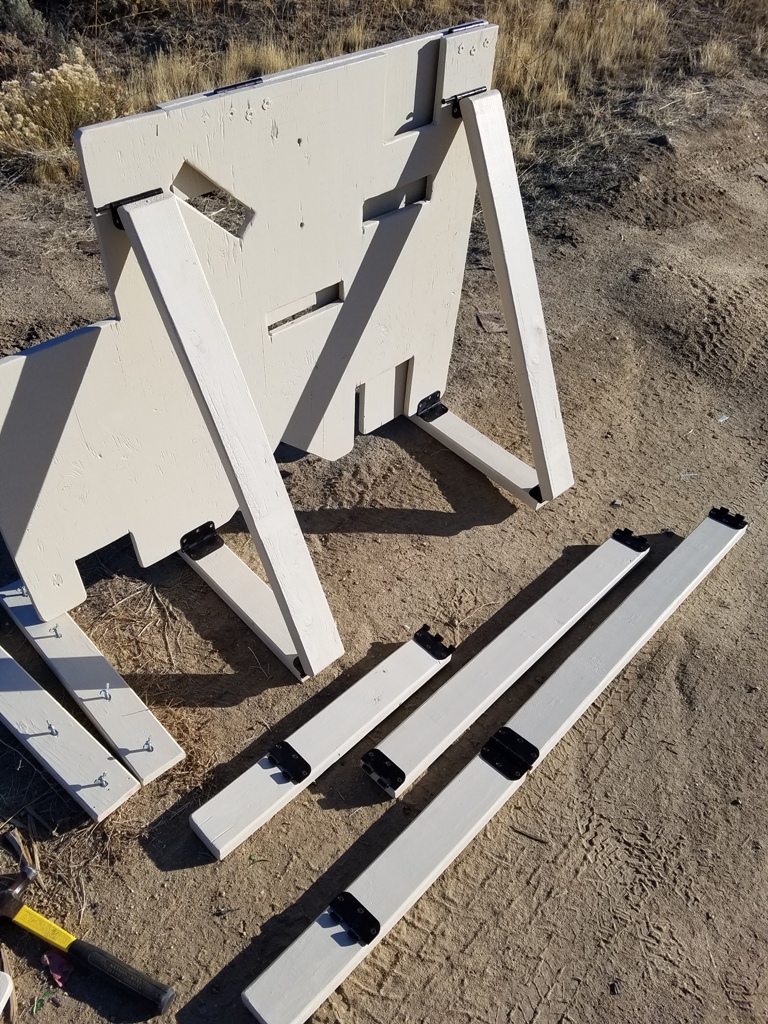 [2]You are now ready to put the legs on the barricades. If you have not already joined the hinges on the feet and supports together, do so now. Next, join the hinges on each foot to the bottom of the barricade and insert the hinge pins. Finally, stand one support up at a time and attach it to the higher hinge half on the down-range side of the barricade.
Interchangeable or Label
You now have a compact and easily portable barricade (or two!) for training. If you did everything correctly, your legs, supports, and brackets should be interchangeable with either barricade. If this is not the case, you can always label which piece joins where for ease of assembly.
Hinge Pins
Depending on the hinges you bought, some hinge pins will be easier to remove than others. I suggest keeping a hammer and punch with you to remove them in the field. Alternatively, you can find a section of steel rod to replace your hinge pin, cut longer than the existing pins, and bend one end over to allow easier inserting and removal.
Paint and Number
Finally, primer and paint is suggested but not required. For additional training and fun, you can number various shooting positions for some competition or instruction, similar to a Wilson Wall. On my two barricades I numbered various positions as 1-6, with some numbers between positions or openings, giving the shooter a choice of which to use.
Simple Ways of Running For Training
There are two simple ways of running this for training:
- Single barricade. Here, the shooter has to fire and hit a target once from each position in numerical order.
- Two barricades. In this arrangement, the shooter can fire and hit a target once from each position of the same color, i.e. Black 1-3 on the first barricade, then move to the second and use Black 4-6.
Effectively Engage Targets From Various Positions and Cover/Concealment
Be creative; be safe. Learn how to effectively engage targets from various positions and cover/concealment. How many cars surround you in every day life? Are you proficient at shooting over the hood, around the bumper, or beneath it with minimal exposure? Can you do so while hitting your target? (Be aware of height over bore of your sights!) This barricade is a great way to safely learn those skills.
This barricade is not a replacement for quality instruction, but it is another tool you can use as you continue practicing, learning, and training others. Next time you head out to the range, don’t settle for a shooting bench on a square range. Shoot, move, communicate, and pass it on!
Plans
These are the drawings that you may need for the barricade
See also:
SurvivalBlog Writing Contest
This has been part two of a two part entry for Round 79 of the SurvivalBlog non-fiction writing contest [7]. The nearly $11,000 worth of prizes for this round include:
First Prize:
- A $3000 gift certificate towards a Sol-Ark Solar Generator from Veteran owned Portable Solar LLC. The only EMP Hardened Solar Generator System available to the public.
- A Gunsite Academy Three Day Course Certificate. This can be used for any one, two, or three day course (a $1,095 value),
- A course certificate from onPoint Tactical for the prize winner’s choice of three-day civilian courses [8], excluding those restricted for military or government teams. Three day onPoint courses normally cost $795,
- DRD Tactical is providing a 5.56 NATO QD Billet upper [9]. These have hammer forged, chrome-lined barrels and a hard case, to go with your own AR lower. It will allow any standard AR-type rifle to have a quick change barrel. This can be assembled in less than one minute without the use of any tools. It also provides a compact carry capability in a hard case or in 3-day pack (an $1,100 value),
- Two cases of Mountain House freeze-dried assorted entrees [10] in #10 cans, courtesy of Ready Made Resources (a $350 value),
- A $250 gift certificate good for any product [11] from Sunflower Ammo,
- American Gunsmithing Institute (AGI) is providing a $300 certificate good towards any of their DVD training courses [12].
Second Prize:
- A Model 175 Series Solar Generator provided by Quantum Harvest LLC (a $439 value),
- A Glock form factor SIRT laser training pistol and a SIRT AR-15/M4 [13] Laser Training Bolt, courtesy of Next Level Training, which have a combined retail value of $589,
- A gift certificate for any two or three-day class from Max Velocity Tactical (a $600 value),
- A Three-Day Deluxe Emergency Kit from Emergency Essentials (a $190 value),
- RepackBox is providing a $300 gift certificate to their site, and
- Two 1,000-foot spools of full mil-spec U.S.-made 750 paracord [14] (in-stock colors only) from www.TOUGHGRID.com (a $240 value).
Third Prize:
- A Royal Berkey water filter, courtesy of [15] Directive 21 (a $275 value),
- A large handmade clothes drying rack, a washboard, and a Homesteading for Beginners DVD, all courtesy of The Homestead Store, with a combined value of $206,
- Expanded sets of both washable feminine pads and liners, donated by Naturally Cozy (a $185 retail value),
- Two Super Survival Pack seed collections [16], a $150 value, courtesy of Seed for Security, LLC,
- Mayflower Trading is donating a $200 gift certificate for homesteading appliances.
Round 79 ends on November 30th, so get busy writing and e-mail [17] us your entry. Remember that there is a 1,500-word minimum, and that articles on practical “how to” skills for survival have an advantage in the judging.
Comments Disabled To "How to Build a Compact, Portable Range Barricade- Part 2, by I.S."
#1 Comment By CORD7 On November 25, 2018 @ 1:39 pm
Old stagehand trick with hinges is to find a appropriate sized nail (which is secure – yet easier to remove & repin) 1-1/4in longer than the hinge pin and bend the head end of the nail at a 90 degree angle. Tether it on the 90 with para cord and screw the tail end into the plywood as a keeper.
Love the plan and the need for it. Thanks
#2 Comment By RD On December 3, 2018 @ 3:26 am
Excellent plans and instructions. Thanks for sharing this.