


This is my story, as a retired grandmother of raising small livestock and our experience of going from piglets to bacon. In part one, I shared about preparing the pen, selecting the piglets, and basically getting them set up and situated in their new space. But after that, it was time for them to grow.
Growing the Piglets
When the girls were young, we fed them twice a day. They got a varying mixture of healthy non-GMO swine pellets, soy meal, fresh eggs, and hot oats on cold days, any table scraps that the rabbits and chickens didn’t get, and all the acorns and pine cones they wanted.
When they got to about 150 pounds, we fed them once a day. We increased the amount of feed as they grew. And at about 200 pounds, we introduced cracked corn to their diets. This seemed to help them feel satisfied. Plus, it increased the protein percent and fattened them up.
Predators
I was worried about predators, such as bobcats and a pack of coyotes that might target the young pigs. These concerned me, as they would occasionally run through my property. The youngsters only got out of their enclosure once– when they lifted the gate off its hinges. In this instance, the chain held on the lock side, but farm gates only weigh about 50 pounds (depending on width). So, the girls (who weighed about 125 pounds at that time) were out exploring for a while until the dogs began barking and we went running to shoo them back to their enclosure. After that, we locked down the hinge side so we would not have that excitement again.
About three months later, I saved two Anatolian Shepherd dogs from death row at the pound. These are 100+ pound perimeter guard dogs and very territorial. I have about three to four fenced acres around the house and barn that these dogs patrol. Since they arrived, I have not had any problem with the coyotes or loose hogs.
Slaughtering and Butchering
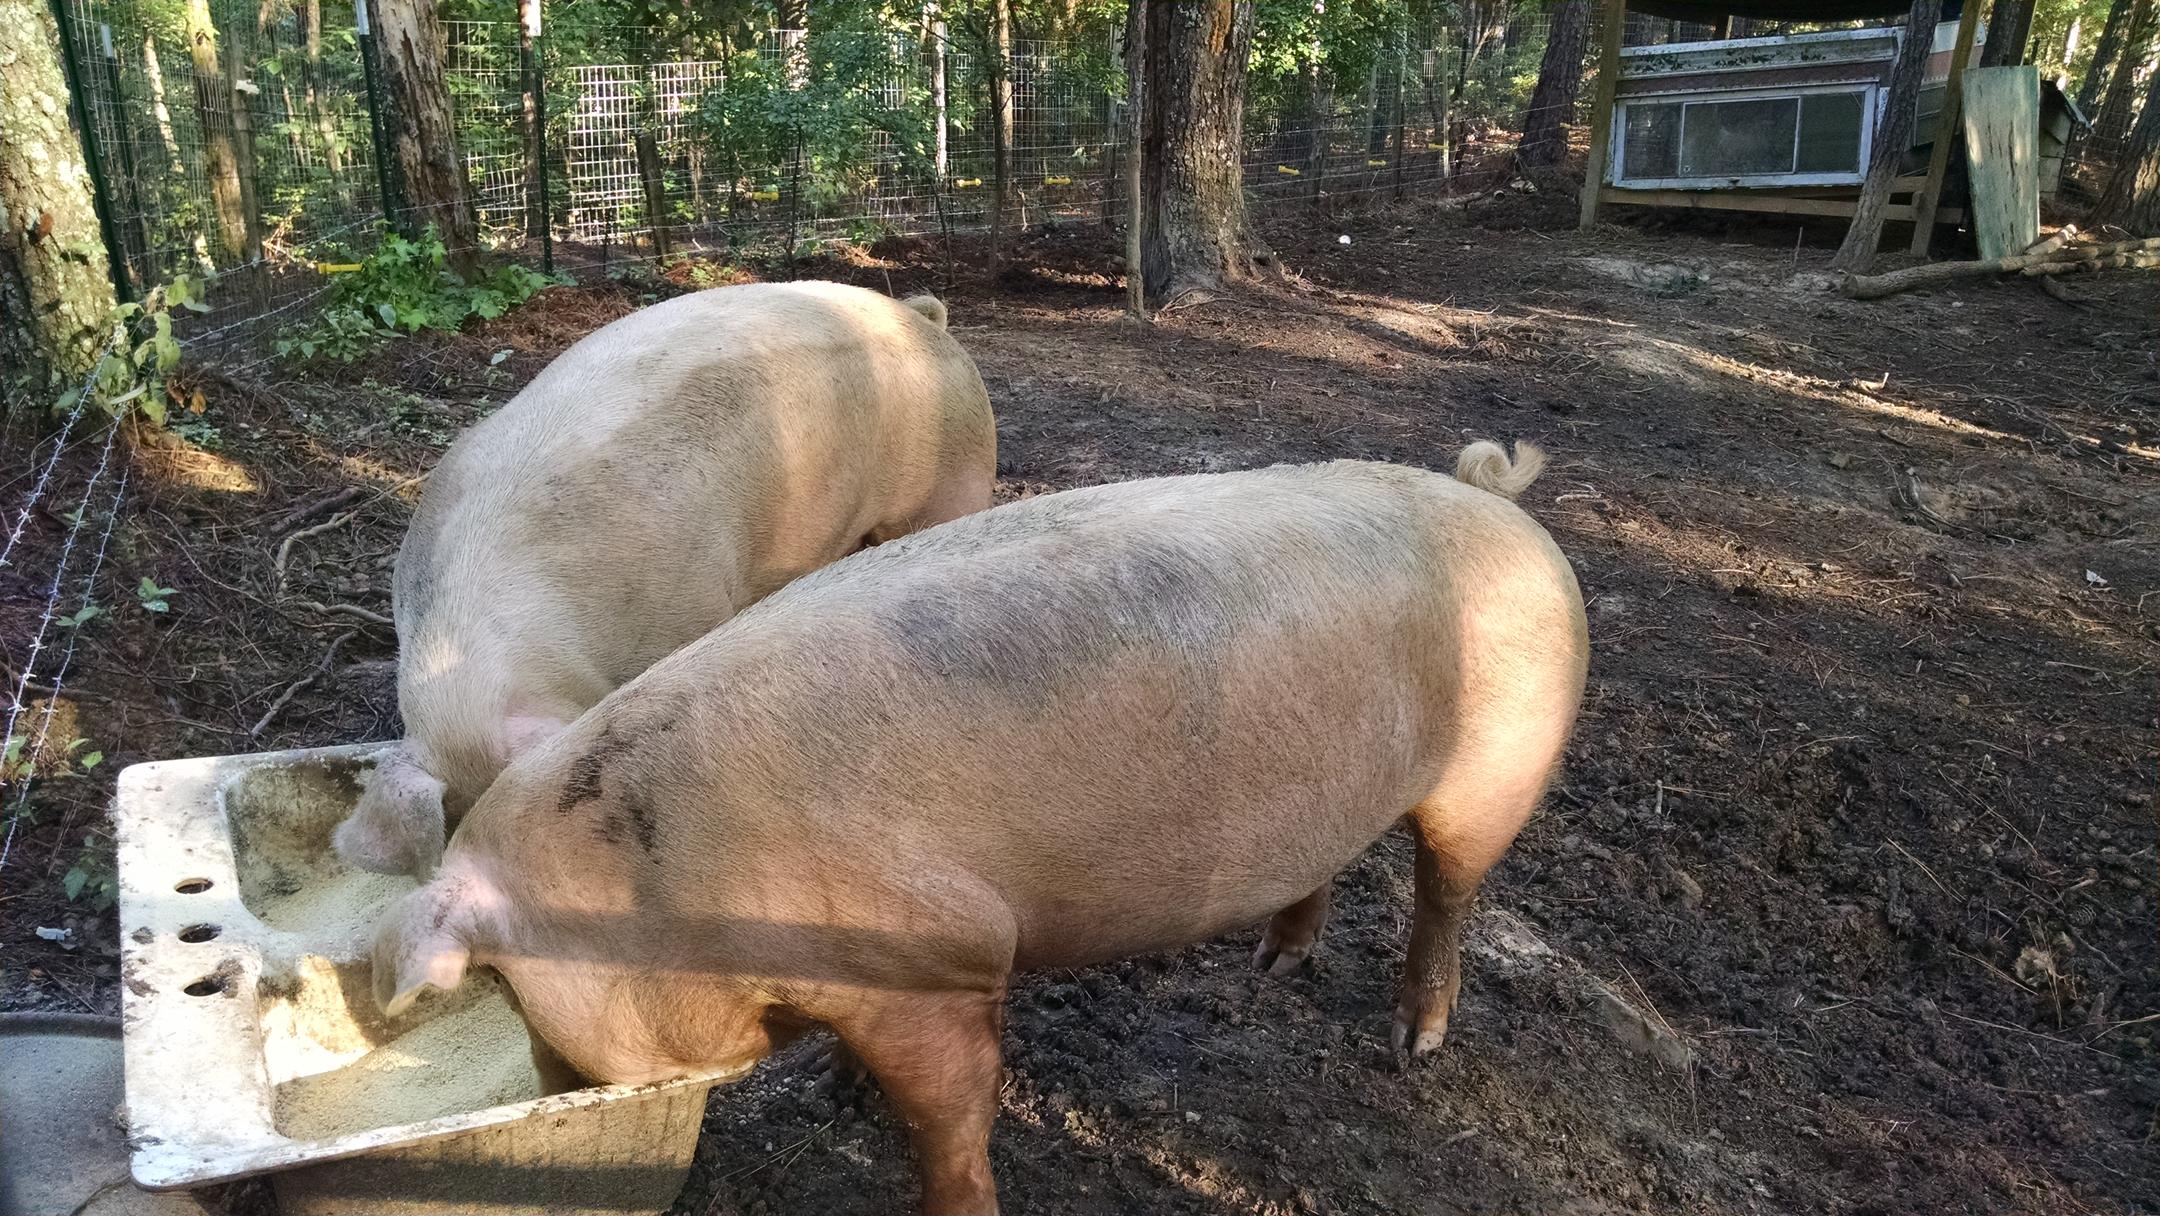 Before I knew it, the piglets became pigs and then grew to 400+ pound hogs! It was time to harvest the hogs.
Everyone I asked for help turned me down and told me not to even try to harvest them myself. Friends and neighbors told me I didn’t have the strength, the knowledge, the right tools, or a processing area. I mulled this over for a while. I also watched all the “Alaska” shows, the “Mountain Man” shows, and videos on butchering animals.
What Pushed Me Into Doing My Own Butchering
What pushed me into doing the butchering myself was first trying to herd two 400+ pound hogs onto a trailer to transport them to a processor. The second motivation was when I saw the processor’s price list! I’m not saying the processor doesn’t deserve his or her money; it is hard work and processors provide a good service. But for only two hogs, it hardly seemed worth the expense and trouble. It would have been much easier if an experienced person would have helped us, but that was not to be.
My Experience Killing and Butchering Farm Hogs
What follows is my personal experience in killing and butchering farm hogs.
You really need two or three people to harvest a large hog. My truck-driver son and one of his lady friends helped me, even though they had never butchered animals either. However, just having someone to hand you a sharpened knife, pull on some skin, or just to ask “what do you think” is a huge help when wrestling with 400+ pounds of pork.
Organizing the Hog Harvest
I had in my mind I would harvest the hogs in February, as in the mid-south the weather is usually 40°F during the day and below freezing temperatures at night. Unless you have a walk-in cooler/freezer, you need to harvest large animals at these temperatures. However, nature gave us 77°F temperatures for two weeks in February 2017. We watched the advanced weather forecast and finally identified a day and night with temperatures of 40° and 25°. The harvest would happen then!
Next, I wrote down the items I thought we would need. Then, I did an inventory of what I had and what, if anything, I needed to order.
Big Items Needed
The biggest items needed are:
- A tractor or something to pull and lift 400+ pounds. I used my tractor and a utility vehicle with a strong winch.
- A freezer to store the pork.
Basic Items You Will Need
The items listed below are those I used mostly because I had them on hand. I have used amazon to give you examples of what you may need to butcher and process the hog. However, these are just guidelines.
- Something to kill the hog. I used a 9mm hand gun, but on a 400+ pound hog I probably should have used a 45. You could use a rifle, if you don’t have a hand gun. Another option is to stun the animal and then slit its throat.
- A heavy duty chain to pull and hang the carcass, and a gambrel of some kind to keep the legs separated.
- Butchering knifes
- Rags and degreaser (I used vinegar) to clean your knives and blades before sharpening.
- A good knife sharper. I have at least a dozen sharpeners, but this is absolute for skinning a thick skinned animal.
- A meat cleaver
- Meat “S” hooks
- A heavy duty tarp or something similar to put under the hog when butchering so parts don’t get dirt or leaves on them.
- A meat saw. You can use a 20/22-inch blade meat saw, if you have the strength. You could also use a large hack saw.
- A reciprocating saw. Mine is 15 years old and worked well.
- Extra blades for the reciprocating saw.
- At least six buckets with trash bag liners for blood, offal (innards) you want to keep, skin, excess fat, gut parts you don’t want to keep, and parts for making dog food and chewies.
- Some form of tables to put your tools on and on which to cut and wrap the pork.
- An extension cord to a power outlet, if you are using electric tools.
- Access to water and a hose.
- String or twine to tie off the pizzle and bung.
- A stick type thermometer to get a reading on the carcass temperature.
- Two large coolers to hold the half carcass and quartered parts while you are working.
- Freezer paper
- Freezer tape
- Thick markers to label your products.
- Guide books. Buy a real paper book, not a kindle or e-book. You need to study it and memorize the pictures. I have at least five books on butchering animals, but I have one I consider to be the best book on butchering.
The Plan
The general plan was to do one hog on this day, as this was our first time.
- Killing. We would need to shoot the hog in the enclosure as we did not have any separate place. We would shoot the dominate one first, as we did not know how the second hog would react to the shooting. Then we had to get the hog out of the enclosure and up to the barn area.
- Moving the hog to hang and bleed. The plan was to hook a chain on the hog and use the tractor to pull her out of the enclosure. Then we would lift her using the bucket and take her to the barn area to hang and bleed her.
- Scald and scrape the hair off. I made the decision to skin the hog rather than scald and scrape the hair off. Most professionals will scald, scrape, and keep the skin attached to get more money. As a novice, I didn’t want to expend the extra energy and time to do that, as I was not selling anything.
- Gut and skin. The next step would be to gut and skin the animal and then split the carcass so it would cool in the below freezing temperatures over night. You have to bring the animal’s temperature down to at least 40°F within 24 to 30 hours.
- Quarter, cut, and package. After cooling the carcass, the plan for the next day was to quarter both sides, put one side in each of the two large coolers, and begin the butchering process. I figured I could cut and package one side a day, completing the entire killing, cleaning, butchering, and packaging within two and a half days or a max of three days.
That was the plan. Tomorrow, I will tell you what really happened.
See Also:
- 1 – From Piglets to Bacon- Part 1, by Animal House
- 3 – From Piglets to Bacon- Part 3, by Animal House
- 4 – From Piglets to Bacon- Part 4, by Animal House
- 5 – From Piglets to Bacon- Part 5, by Animal House
SurvivalBlog Writing Contest
This has been part one of a five part entry for Round 75 of the SurvivalBlog non-fiction writing contest. The nearly $11,000 worth of prizes for this round include:
First Prize:
- A $3000 gift certificate towards a Sol-Ark Solar Generator from Veteran owned Portable Solar LLC. The only EMP Hardened Solar Generator System available to the public.
- A Gunsite Academy Three Day Course Certificate. This can be used for any one, two, or three day course (a $1,095 value),
- A course certificate from onPoint Tactical for the prize winner’s choice of three-day civilian courses, excluding those restricted for military or government teams. Three day onPoint courses normally cost $795,
- DRD Tactical is providing a 5.56 NATO QD Billet upper. These have hammer forged, chrome-lined barrels and a hard case, to go with your own AR lower. It will allow any standard AR-type rifle to have a quick change barrel. This can be assembled in less than one minute without the use of any tools. It also provides a compact carry capability in a hard case or in 3-day pack (an $1,100 value),
- Two cases of Mountain House freeze-dried assorted entrees in #10 cans, courtesy of Ready Made Resources (a $350 value),
- A $250 gift certificate good for any product from Sunflower Ammo,
- Two cases of Meals, Ready to Eat (MREs), courtesy of CampingSurvival.com (a $180 value), and
- American Gunsmithing Institute (AGI) is providing a $300 certificate good towards any of their DVD training courses.
Second Prize:
- A Model 175 Series Solar Generator provided by Quantum Harvest LLC (a $439 value),
- A Glock form factor SIRT laser training pistol and a SIRT AR-15/M4 Laser Training Bolt, courtesy of Next Level Training, which have a combined retail value of $589,
- A gift certificate for any two or three-day class from Max Velocity Tactical (a $600 value),
- A transferable certificate for a two-day Ultimate Bug Out Course from Florida Firearms Training (a $400 value),
- A Trekker IV™ Four-Person Emergency Kit from Emergency Essentials (a $250 value),
- A $200 gift certificate good towards any books published by PrepperPress.com,
- RepackBox is providing a $300 gift certificate to their site.
Third Prize:
- A Royal Berkey water filter, courtesy of Directive 21 (a $275 value),
- A large handmade clothes drying rack, a washboard, and a Homesteading for Beginners DVD, all courtesy of The Homestead Store, with a combined value of $206,
- Expanded sets of both washable feminine pads and liners, donated by Naturally Cozy (a $185 retail value),
- Two Super Survival Pack seed collections, a $150 value, courtesy of Seed for Security, LLC,
- Mayflower Trading is donating a $200 gift certificate for homesteading appliances, and
- Two 1,000-foot spools of full mil-spec U.S.-made 750 paracord (in-stock colors only) from www.TOUGHGRID.com (a $240 value).
Round 75 ends on March 31st, so get busy writing and e-mail us your entry. Remember that there is a 1,500-word minimum, and that articles on practical “how to” skills for survival have an advantage in the judging.
I am curious to hear whether or not you had a vet perform a test for trichinosis. Where i live here in Europe, it is a good idea to have the test done as lots of pork meat is eaten in a raw / near raw manner, and isn’t always cooked at temperatures that will kill the trichine eggs. Although i have been butchering pigs, both wild and domesticated for over 35 years, I have never actually experienced a positive test result (in over 750 pigs) but still have it done every time as it is un-curable in humans. The test for trichinosis, swine fever and cesium 236 (for wild boars, from eating chernobyl radiated grubs and mushrooms) costs about 5 dollars, and i get the results within 48 hours. I guess if you insured you cooked the meat thoroughly this wouldn’t be a concern. I don’t even give anything to my dog until i get the test results back, just to be sure.
Mike; I asked the man I bought the piglets from about needed vaccinations. He told when he started raising pigs he had his vet come and vaccinate all his breeding animals at a cost of $35/pig. He said he had is young pigs tested but none were positive.
I grew up in the Pennsylvania Dutch region (north Berks county) we saved the small intestine from the pigs to use as the casing for fresh & smoked pork sausage and the stomach for a dish called “Hog Maws” (Pig Stomach). Turn the intestine and stomach inside out and carefully pull through a notched stick or board to scrape the insides clean be careful not to tear it. Then turn them right side out. This process is easier if you turn an end over and pour water into the “cupped” end. The water does the work. Grind your meat, add what spices (salt & pepper) and let sit 24 hours. put into a sausage stuffer and fill the casings. As the casings fill about every 16 inches give a twist for smoked sausage and Smoke some chops. Take the stomach that you froze and thaw out and sew one end shut. Fill the stomach with a salted mixture of quartered onions, potatoes, carrots, celery smoked sausage and or pork chops and stuff into the stomach stretching it a hard as you can. It should look like a football. Sew the other end shut and bake in a roaster 350 degrees covered until done 1-2 hours. All the flavors and juices mingle and is quite good. I personally feel the stomach mussel is the sweetest part and the vegies take on a smoked flavor from the smoked meats. Then there is Scrapple Look the recipes up on your computer.
Soybeans are a complete protein source and a dietary staple in many cultures. Soy contains phytoestrogens called isoflavones that may mimic the activity of the hormone estrogen in your body. The effects of soy isoflavones on human estrogen levels are complex.
Soy is bad for the male body. You wonder why there are more beta males than real alpha men these days. Wonder why girls younger and younger are “busting out” at a earlier age than when we were kids. Soy is in almost everything these days and it ain’t good!!
You don’t need a 9 mm or a .45 acp to put down a hog. A .22 lr hollow point or round nose will do the job, you just have to know where on the pig’s head to shoot.Draw and imaginary X on the pig’s head from the eyes to the ears and where the X crosses is the spot to aim for. It is the same on a beef. the other spot or place to shoot is right behind the crown of the head, pointing your .22 more or less in a striaght line down the head towards the brain, again this also works for beef ( if you can get close to them ) ( I also know of a guy who used a 45/70, 500 gr on a beef at 50 ft ( he was a fence crawler ))
Most small meat processors that I knew growing up or worked for later on used a single shot 22 lr bolt action rifle and they were usually in the range of 2 ft to 4,5,6, ft away from the critter. In the packing plant we had electric hoists and air operated stun guns.
I’ve read that it becomes less cost-effective to grow pigs beyond 200-250 pounds. They require more food to eat per pound they grow compared to the smaller pigs. I’ve raised some up to 400 pounds but the smaller pigs’ meat is much more tender, less tendon-y… our last round weighed around 225 pounds and it’s been our best batch yet.