(Continued from Part 1. This concludes the article.)
In Part 1, I presented an overview of the Super Safety and why it was chosen. Now, I will move on to describing some details on installation and function checking. This will cover the modifications to install a Super Safety on only a standard 5.56mm AR-15. The MP5 and AR9 models of the Super Safety are very popular but do require extra parts as well as some other considerations. A successful 5.56 install will help you get used to what you’re dealing with, since it is by far the most straightforward.
Parts List
You will need:
1. A Super Safety, (cam and lever)
2. A mil-spec low-shelf or M16-pocket AR15 with a full-auto BCG and mil-spec fire control group. Be advised that the Super Safety is compatible with low-shelf or no-shelf AR lower receivers ONLY. A high shelf lower cannot accommodate them. If the shelf in your lower behind the safety sits right up next to your takedown pin hole you have a high shelf lower and are out of luck unless you are comfortable with removing some material.
The trsnsition to a “high shelf” was done on some older-fashioned ARs to deter would-be rapid-fire enthusiasts from drilling the third hole or installing a drop-in autosear (DIAS). I believe that older Bushmasters and some Colts are like this. PSA, BCM, all 80% lowers, and Aero precision lowers are low-shelf or M16 cut, but double-check yours to make sure as manufacturing specifications can change, over time.
3. A modified AR-15 trigger and a modified AR-15 safety detent (we will get to the modifications shortly).
4. A Dremel miniature grinding/sanding tool with some basic grinding wheels and sanding drums as well as a polishing end. Hoffman’s own guide suggests 320, 600, and 1500 grit sandpaper as well as polishing compound.
5. Basic punches, wrenches et cetera for working on an AR-15.
Optionally, you can also use:
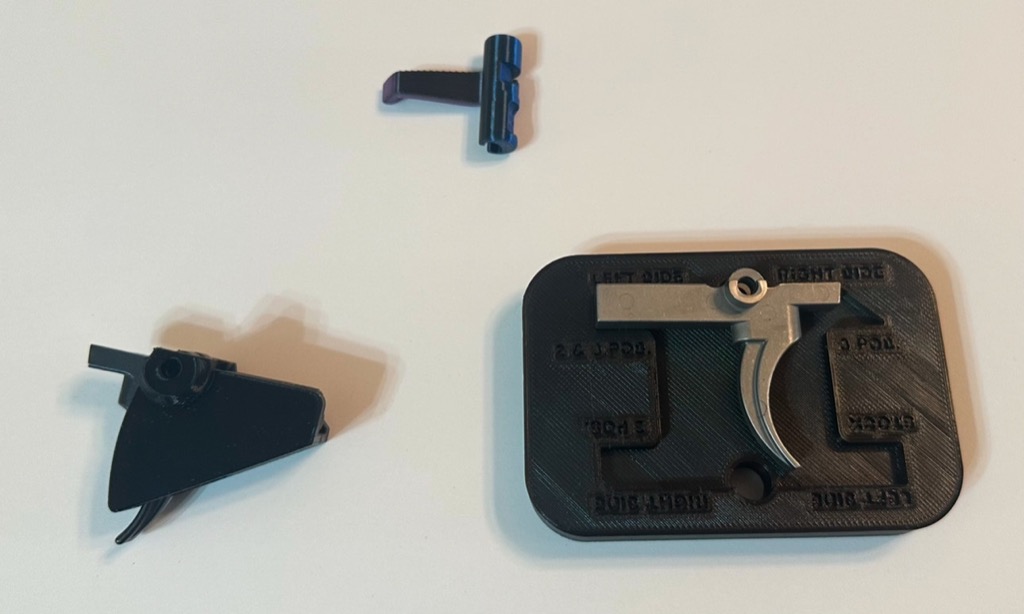 [1]1. A 3D-printed trigger cutting jig (at left, shown with a completed trigger inside). Several manufacturers will bundle this in with your Super Safety when you buy it, but if you have a 3D printer set up this is a good quick print to do and will make your life a whole lot easier. This only works for the bog-standard mil-spec triggers; I tried it with one of the old Anderson (RIP) stainless steel triggers and it did not fit in the jig, while the mil-spec Palmetto and BCM ones I’ve worked on do fit fine; the shoulder height on the Andersons above the trigger makes it tilt and not fit in the jig. To get the STL to print it yourself, go on Odysee and search “Super Safety Jig.” I printed mine at 35% infill, and you don’t need supports per the “readme” file but I add them just in case. I was able to get a good cut on the Anderson by free-handing it, it just took more time and care.
2. Secondly, a 3D printed go/no go gauge for the trigger cut is supremely helpful (shown above with a not-yet-modified Anderson trigger). This takes the form of a plastic tray with shaped depressions to accommodate a properly cut trigger into which the trigger is inserted, with the trigger pin hole lined up with the appropriate hole in the tray. As you can see, the Anderson will not sit neatly into the tray as it is not yet cut.
 [2]Search Odysee for “Super Safety Gauge.” I did not have one on my first install and was thus compelled to periodically check my fit as I was sanding and polishing the trigger. This was exceptionally tedious as it involved over seven disassemblies and reassemblies before I got the trigger pull to feel good. This will help you avoid that as well as make sure you relieve enough material; if you have a horrendously hard trigger pull in Super Safe mode, excess material remaining on the trigger is likely the culprit; relieve a bit more material and polish it before checking if it’s something else.
Depending on your exact setup, you may encounter bolt bounce or other issues. Many of these issues can be fixed by adding a heavier buffer to ensure reliability. This is not always the case, and will vary depending on your gas system and barrel length as well as your caliber. The best bet is to buy an H3 buffer of good quality. H3 works for most people who encounter bolt bounce and similar issues, and if you need to go down to an H2, having an H3 and a carbine buffer will let you pull out the tungsten and steel weights from each and assemble most common configurations of bolt weight. The weights need to move around inside the buffer- some of the cheap no-name gun show ones are technically the same weight but are filled solid and these are terrible.
Modifying your parts
The Super Safety uses two parts modified from standard mil-spec AR-15 components: a trigger and a safety detent. Both can be purchased ready to go, but if you want to save money and DIY it, they can be modified as follows:
Rounding your detent: Dremel off the sharp tip of the detent. Sand it off until the pointy end is replaced by a round, smooth end, being careful not to actually change the overall length of the detent. Make sure not to blunt the edges. Polish it. If you mess this up or don’t want to bother, KAK Industries sells these detents purpose-made in affordable multi-packs as “detents for push-button safeties.” The word “Super Safety” is not anywhere on the listing but that’s what they are. This is then installed along with the Super Safety and performs the exact same function it does as in a normal AR15.
[1]Cutting the Trigger: Place your trigger into the jig and fix it in place with the trigger pin. Use a marker to make a line on the right side of the trigger tail. Then, take your grinding wheel and cut a U-shaped relief in the back of the trigger tail first. I have attached a picture of this initial cut. Once this is done, cut away the right side of the trigger tail as indicated on the jig. You can leave it in the jig but it may melt. Make sure to cool off the trigger and go slowly.
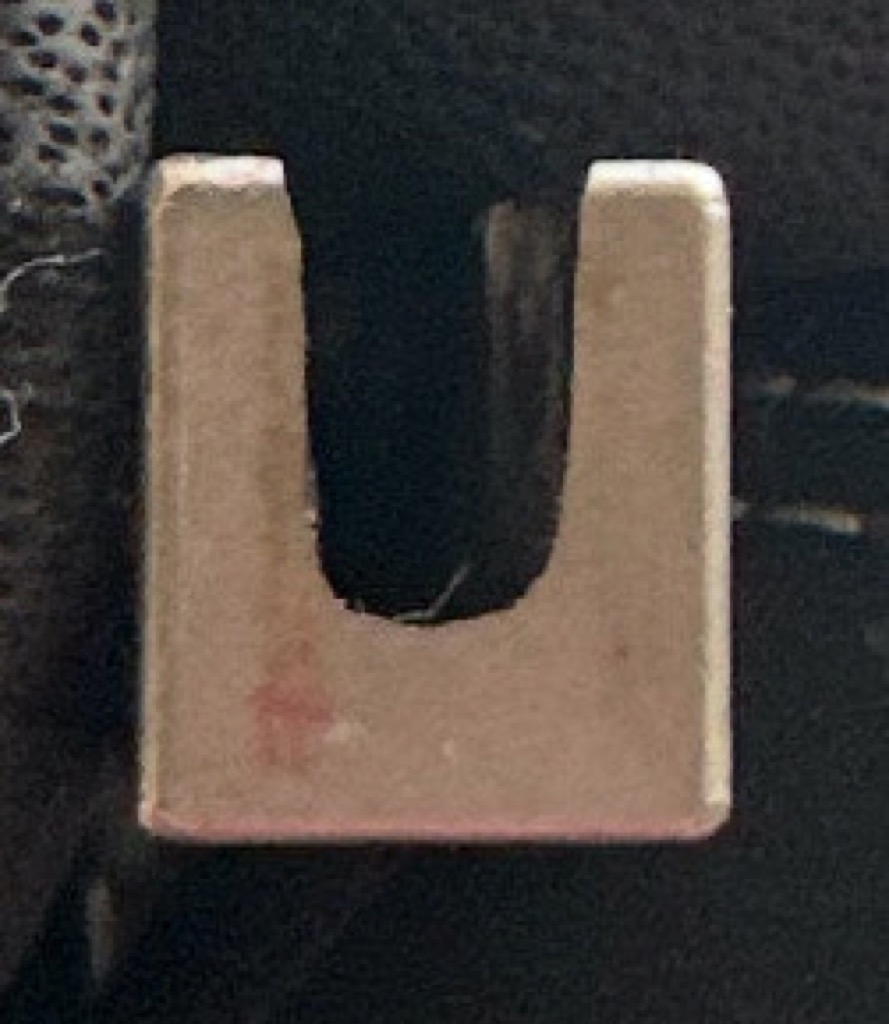 [3]You need to leave the leftmost 0.080” of the trigger tail untouched. I messed this up on my first attempt, bit into the left side, and had to go raid my spare parts bucket for the aforementioned Anderson that didn’t fit in the jig. In other words, the left wall of the trigger should be completely intact. (See photo at right for a sufficient U-cut). Sand and polish the rough edges. After you are done, you should have an angular wall on the right side of your trigger. See the picture of the complete trigger job for the angle. For those of you in the know, this will resemble, but is not identical to, the cut made on an M16 trigger. This step spooks some people but NOTHING you are doing here is compatible with any of those NFA-regulated parts. Again, we are building a federally legal “Reset Rifle” here, not a machine gun. (That wasn’t legal advice either.)
Next, get your sanding equipment and replace the trigger in the jig. The other side of the jig reflects the desired profile. Mark it with a marker and then proceed to sand it down. Use a stroking motion to round off the corner on the left end of the trigger, Go easy and slow, and use your go/no go gauge to check the profile. Measure twice, sand…a whole bunch of times. When you’re close, polish, install and function test the safety. It should have a positive, firm click to all three positions, and the lever should wiggle freely.
Installing the Super Safety
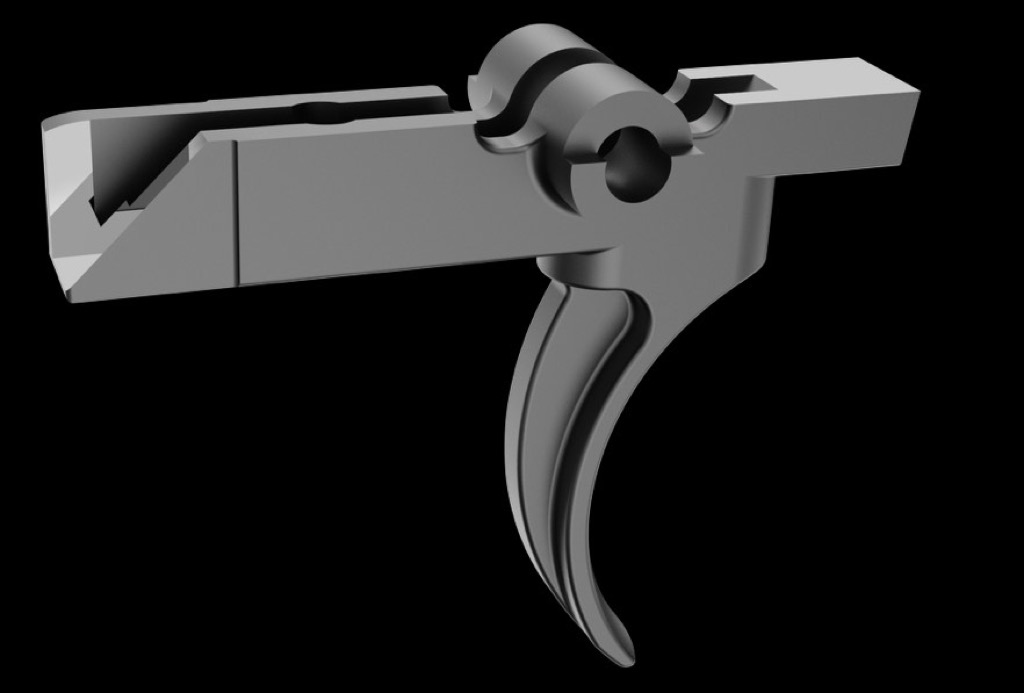
Once you have all your parts made and polished, you are ready to attempt installation. Disassemble your lower and take everything in the FCG out as you normally would. Install your newly modified trigger, then your hammer and disconnector, etc, as you normally would. Once the trigger is in, and the hammer is able to be cocked back, cock the hammer. Look through the safety hole; if either trigger arm is still obstructing the safety hole while the hammer is cocked, you did not remove enough material. With the hammer cocked, slide the cam through the safety hole. The “HT” logo should be right side up facing the left side of the gun, (most have this on them, my buddy’s steel ones do not) and the dovetail should be pointed up. Slide the cam halfway through the lower and grab the lever by the tip and slide the lever into the dovetail as shown below. The lever’s tip should be pointed towards the buffer tube. Once the lever is inside the cam, push the cam through to the other side of the safety.
 [4]
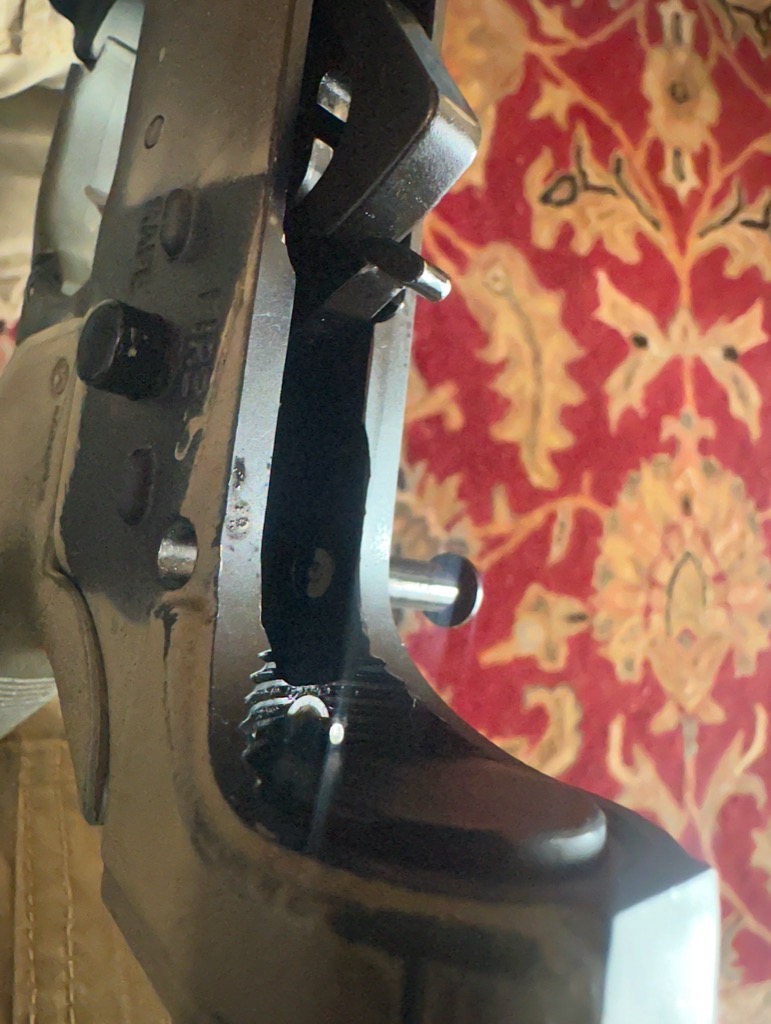
[4]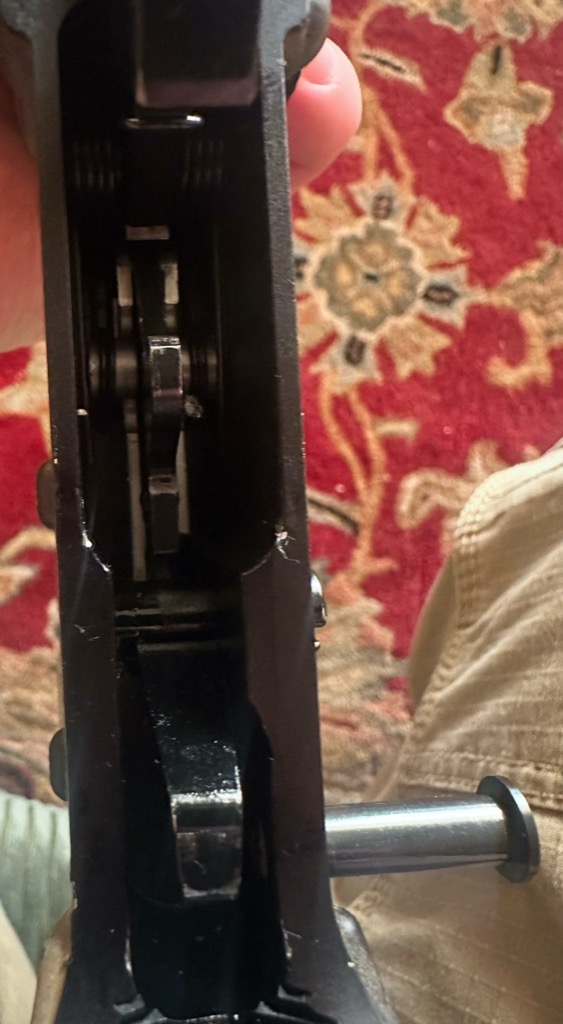 [5]Once it is inside the safety hole, hold it in place inside the hole while you re-install the detent and grip. This is done in the same manner as with a standard selector and grip re-install. You may want to have something to hold the safety in place inside the lower while you put the detent and grip in; I’m fortunate enough to have a wife, and so roped my darling bride into my project in the service of my gun modding to hold it in place while I screwed the grip in. If you don’t have a wife, then tape will work. Once the detent and grip are in, click the Super Safety back and forth between SAFE, Super Safe, and FIRE. It should have a firm and positive click for each distinct position. There should not be any positional ambiguity; if the button slides out of the Super Safe/active reset mode to the right (towards regular Semi) when charging, then you likely took too much material off of the left wall. The lever should wiggle back and forth freely with the hammer cocked. To finish re-assembly, push the lever all the way forward, and close the upper onto the lower and put the takedown levers back in. After this, the Super Safety is installed. See my remaining photos for an example of a proper installation.
Function Checking
With the hammer cocked, slide the Super Safety between all three positions as before. It should be relatively easy but not too loose. It should feel slightly heavier than a Ruger 10/22 or Remington 870. If it is too tight or too loose, then something is wrong, probably with your trigger cut. If the Super Safety trigger pull is way too heavy, as mine initially was, you did not remove enough material from the rounded corner. The Super Safety mode works by using the little shelf on the bottom of the cam to push against that rounded trigger corner to effect the reset, so that’s the likely culprit.
Rack the rifle and test the Safe, Super Safe, and Fire modes again. Safe and fire should work as normal. In SS you should be able to pull the trigger, get a click, then as you charge the weapon with your finger holding down the trigger, feel the Super Safety push against the trigger and force your finger forward, resulting in an audible and tactile full reset. You should then be able to pull the trigger again. You may get a stuck bolt depending on your rifle. This happened to me with my first build. If you charge the rifle and the bolt sticks to the rear and does not come out, so that it’s not able to be sent forward with the bolt release, what you are probably experiencing is a BCG clearance issue, specifically with your gas key and lower gap. There is an old trick to fix issues with this gap. Take one or two US .25¢ pieces and place them inside your buffer tube behind the spring. Various companies also sell spacers for this and some people will use washers, but quarters are well-known and reliable for the simple reason that they work. You can drill a hole in them if you’re worried about drainage. Just don’t waste any silver pre-1965 ones. Mine required two coins and works like a charm.
You should be able to rack and dry-fire the AR multiple times. If anything feels weird, disassemble or reassess. It should not be gritty, overly tight, or overly loose. It should feel like a normal stock trigger pull in both modes. If it does not, something is wrong. I personally experienced an absurdly heavy trigger pull once I got my first one in, as well as a stuck BCG on my second one. These things will happen if you mod your own trigger, but it’s well worth the money saved and the experience gained, in my opinion. If this intimidates you, you can always do a quick web search and buy a pre-cut trigger, but be careful and check for reviews because some of the companies are in fact scammers. As I mentioned, I bought mine from a real-life acquaintance, and intended to buy from Hoffman himself, but sellers with good reputations include:
- Grey Market Research
- AS Designs
- Z3 Productions
- …and several more.
Another source is Supersafetyshop.com but I would not buy from him. This guy heavily implies that he is Tim Hoffman in his email address and other communications but he is NOT, according to posts by Hoffman himself. I do not condone this behavior. But he is one of the cheapest sources of decently-reviewed steel super safety kits and is listed here accordingly. Caveat emptor. Hopefully, Hoffman’s legal troubles end and we can all buy from the actual inventor.
A Philosophy Rant, In Closing
I originally wrote this to be at the beginning of the article, but I am sick of recipe blogs that tell you the heart-wrenching tale of three generations of grandmas’ struggles and warm cozy breakfast nook memories before getting to the part that tells you how to make chicken picatta. While proofreading, I realized that I was doing the same thing. Here is my philosophy on The Super Safety and FRTs, if anyone cares.
The Second Amendment, on the national level, has recently made gains that I would have not thought possible. As of this writing, the unconstitutional tax on the NFA has paradoxically (and likely only temporarily) been reduced to $0, a Twitter mutual of mine registered a potato as a suppressor, the arm-braced pistol victories have made the SBR classification almost meaningless, and now we have FRTs exploding onto the market with two recent court victories behind them. Repealing the NFA and Hughes Amendment now looks much more possible then it did in 2013, when a little 12-year-old St. Leibowitz was dismayed and sorely grieved to learn that he could not, in fact, concealed-carry a G18 or buy an M16A1 when he turned 21 (I played a bit too much Call of Duty as a wee lad). Tragically, the liberty-hating actions of prior generations forced me to settle for my Yugo SKS, a Chicom rig, and my second-hand copy of Alas, Babylon. Enter the 2020s, and the FRTs.
Why Do I Want One? The short answer is because the NFA blows chunks and it’s our civic duty to protest it by devising as many means of getting around it as possible. The shorter answer is because they’re really fun. But really what made me decide to finally go ahead and source a few of these things was the July 4th, 2025 Prairieland attack; you may have forgotten the details on this one but one of the commie terrorists in question, Benjamin Hanil Song (presumably of the Mayflower Hanil Songs) actually used an AR-15 with a binary trigger in that attack. There have been other incidents in which similar devices have been recovered from their ilk, not to mention the astute gentlemen of the inner-city-denizen community openly flaunting actual illegal MGs all over Instagram. Now we in the 2A community have long coped with the loss of our MGs by saying things like “rapid fire is useless anyway!” Well, unlike your Uncle Joe at the shotgun club, these unfortunate mostly peaceful individuals seriously intend to actually shoot their guns at armed bipeds, and they appear to have decided that rapid-fire-enabling devices are in fact quite useful, enough to bother with the extra expense of acquiring a binary. This particular terr was a Marine, and as my other point of data for my desirability argument I will point out that if rapid fire were really “useless” for a rifleman the military would have removed select-fire from their service rifles, but none have done so since the end of the battle rifle era. If the terrs wants rapid-fire suppression capability, then I want it too. And with the Super Safety I can, and yet avoid the risk of going to federal prison. I have had close friends sent to prison by the ATF and they do not recommend the experience.
Also, finally, my great-grandfather was issued a select-fire XM16E1 while on long-range patrols in Vietnam and it’s frankly ridiculous that I can’t easily own an AR-15 of similar capability a whole sixty years later. Imagine if in 1926 a 25-year-old man had to pay $2,000 in gold pieces and get fingerprinted to buy an 1860s Sharps single-shot rifle. Anyway, that’s the end of my rant. FRTs are cool, and that’s why I want one. Throw one in your gun if you want. Practice, train with, and employ the new functionality in the same manner as you would its trigger-slap-free cousins.