There have been a number of articles on SurvivalBlog on the use of mobile devices like cell phones and tablets in survival/disaster scenarios (including one I wrote – ‘Tactical Technology for TEOTWAWKI’ parts 1 [1], 2 [2], 3 [3], 4 [4], 5 [5], 6 [6]). In that article, I briefly introduced the idea of setting up and using a home server/network infrastructure for a disaster scenario, which can provide you with a lot of options for planning, organizing, coordinating, sharing, and communicating information among your team, family, group, or community. In this article, I’ll discuss one possible approach for configuring such an infrastructure for disaster situations. Note that this is based on an actual configuration that I regularly use a couple of times a year at a friend’s off-the-grid cabin out in the wilds of Maine; a group of us outdoor geeks get together to go hiking, fishing, hunting and to practice bushcraft, and we use the network infrastructure to plan and document our activities, as well as for occasionally playing multiplayer video games when the weather is too bad to go outside.
For the purposes of this article, I’m going to focus more on the what you can do versus how to do it, although I do provide some instructions for the initial setup. There are lots of detailed ‘how to’ instructions available for most of the hardware and software I’ll be discussing, which I’ll provide links to, but be aware that a moderate degree of technical computer know-how is required.
As usual, I’ll start off by defining some goals for the project:
- Moderate technical knowledge – I wanted something that didn’t require extensive expertise of things like networking, Linux, etc. – just a moderate level of technical computer skills like plugging into the Internet, downloading and installing software, navigating around your computer using a file explorer and working with files. It also helps if you’re reasonably skilled at searching the web for help when you run into problems.
- Options – The infrastructure should support a wide range of standard technologies such as Windows, MacOS, Linux, Chrome OS, Android, iOS, WiFi, Ethernet, etc.
- Flexible cost – The core infrastructure should be under $150 USD, with both higher and lower-cost options based on your needs and budget. Note that this cost doesn’t include mobile devices/cell phones or a laptop computer, since I assume most people already have those.
- DC powered – The ability to power everything from a 5V DC USB port or a 12V outlet.
- Compact – The core components (excluding the laptop) should fit into a .50 cal ammo can that’s been modified for EMP protection.
- Ease of use – The network and supporting components should be fast and easy to set up and use.
- Expandable – You should be able to add more capabilities in the future.
- Independent – The infrastructure should be able to function entirely on its own without any connection to the Internet, other than during the initial setup and occasionally for updates and upgrades.
- Reliable – Something that can run for years.
With those goals in mind, the next thing to do is to understand what functionality we want the system to provide. Note that this is the bare-bones minimum that I wanted when I initially designed this – there are a lot of other features and functions you could add that I won’t be covering in detail in this article. The core of the solution is a small wired and wireless network combined with a small compact server running a self-contained cloud service. Mobile devices like cell phones and tablets as well as larger systems like laptop computers can all connect to the cloud server to access and share data, access various services, communicate, etc. Some of the basic functionality I wanted to start with includes:
- Mapping
- View and share detailed maps among team members
- Add notes, pictures, etc. to maps and share them
- Plan and share routes
- Share and manage documents/photos/videos
- Reference materials
- Manuals/Standards Operating Procedures (SOPs)
- Reports
- Intelligence
- Entertainment
- eBooks
- Videos
- Games
- Collaborate
- Notes, thoughts, observations, experiences, etc.
- Manage schedules and events
- Create, assign, and track tasks
- Communicate
- Text, voice, video
Here’s a diagram of the overall concept for the system:
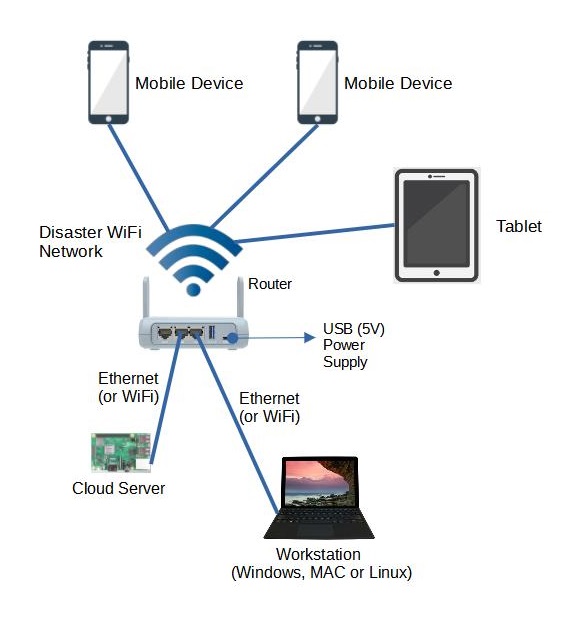 [7]
[7]
Hardware
To start with you’re going to need some hardware. The core components are:
- Network router
- Server computer
- Workstation/laptop
- One or more mobile devices
The network router is the central hub for the whole infrastructure – the server, workstation(s) & mobile devices connect to it to communicate and share data. Given the goals of relatively low cost, compact form factor and DC power I decided on a router from a company called GL.iNet that makes a number of travel routers that fit the bill nicely. There are four options that work best for my defined requirements are:
- GL.iNet GL-SFT1200 [8] (Opal) ($40)
- No microSD slot, USB 2.0 port
- GL.iNet GL-AR750S-Ext [9] (Slate) ($70)
- microSD, USB 2.0
- GL.iNet GL-MT1300 [10] (Beryl) ($80)
- microSD, USB 3.0
- GL.iNet GL-AXT1800 [11] (Slate AX) ($119)
- WiFi 6
The models increase in functionality and performance as you go up in price, adding things like a microSD card slot and USB 3.0 ports to share data files on the network as well as better performance, increased bandwidth, and increased range. I chose the GL-MT1300 model, since it was the best option available that met my requirements when I first built this system. All of the models listed are USB-powered (5V) and come with a USB power AC adapter and a single Ethernet cable.
The next thing you’ll need is a server computer to run applications, including the cloud application I use called ‘Nextcloud [12]’. This will be a local cloud service (no Internet required), which provides a lot of the functionality we’ll be configuring and using later on. The good news is that you don’t really need an expensive computer to support a very usable version of Nextcloud, so we’re going to use a small single-board computer intended or hobbyists called a Raspberry Pi [13], which runs the Linux operating system. For those of you panicking right now thinking that you’re going to need to become a super Linux hacker to get this set up, don’t worry – I’ll explain how to get the system configured and running even if you have minimal expertise on the Linux operating system.
There are a lot of different models of Raspberry Pis available, but based on my testing I recommend one of the following:
- Raspberry Pi 3 Model A+ [14] ($25)
- Raspberry Pi 3 Model B+ [15] ($35)
- Raspberry Pi 4 Model B [16] (1GB/2GB/4GB/8GB ($35/$45/$55/$75))
(A Raspberry Pi 3 is depicted at the top of this article.)
I ended up using the Raspberry Pi 4 with 8GB of memory, but the 4GB model should work just fine. I prefer to use a wired Ethernet connection instead of WiFi to connect the Raspberry Pi cloud server to the router, since wired Ethernet typically consumes less power over time and provides a faster and more reliable connection, and the two B/B+ models listed above have a wired Ethernet port built in. However, the Pi 3 Model A+ doesn’t have Ethernet but it does have a single USB-A port, so you can use an inexpensive USB Ethernet adapter [17] if you go with that model. All three of the models listed also have WiFi support built-in if you decide to connect it to the router using WiFi instead of Ethernet. Note that you might be able to get by using a really low-end Raspberry Pi Zero 2 W [18] ($15) with a microUSB Ethernet adapter, but I wasn’t able to try out that configuration so I can’t say for sure what the performance will be like.
A quick note on the availability of Raspberry Pis: As of the time I’m writing this it’s hard to find a Raspberry Pi for sale that hasn’t been marked up to an exorbitant price. The China Flu and resulting chip shortage fiascoes have seriously impacted their availability, and there are unscrupulous scalpers out there who are charging $150 for a $15 Raspberry Pi Zero 2 W. This has started easing a little recently, and there’s a great web site called rpilocater.com [19] that shows who has them in stock worldwide. Raspberrypi.com [13] also lists the official vendors for each model in the ‘Buy Now’ section of the page for that model, and I recommend sticking with those vendors. Check back every few days with each of the vendors and the one you want will eventually show up pretty close to the manufacturer’s suggested retail price (MSRP). Some vendors also allow you to sign up for an e-mail notification when they’re back in stock.
(To be continued tomorrow, in Part 2.)