Being able to generate even small amounts of electricity post-SHTF will be very valuable. A simple, human-powered, 12-volt generator can be constructed easily and for very little money. I started with a used bicycle that I picked up for $50 bucks. I recommend a bike with multiple gears as you are probably going to be using a very low gear most of the time. Single-speed bicycles tend to be geared very high, and it would take a large amount of effort to pedal one of those while powering a generator. To construct this system, at the very least, you will need a bicycle, a stand of some sort to keep it stationary, a 12-volt alternator, a long belt, wires and cables, switches and fuses, and a 12-volt battery. All of these items can be used, and could even be sourced after an apocalyptic event. Just remember, especially when considering electronic and mechanical devices with moving parts that two is one, and one is none.
Piecing It Together
As mentioned earlier, I started with a used bike, but I purchased a new bike trainer stand to make the whole thing stationary. I also bought a sheet of 3/4” plywood to use for mounting everything. Using “U” bolts and eye bolts, I mounted the stand to the plywood. You could use different methods of mounting your stand, but it is important that you be able to adjust the position of the bike from front to back as this will be your adjustment for tightening the belt. I removed the rear tire and inner tube from my bike and purchased a new pair of bicycle rubber rim strips. I used both of these on the rim to prevent unnecessary wearing of the belt. Now is a good time to go ahead and install your belt while you have the rear wheel off the bike. Though a used one would work, I purchased a brand new (remanufactured), 3-wire alternator for a 1970s model Chevy with the old-style pulley using a v-belt. Be sure to get one with an internal regulator.
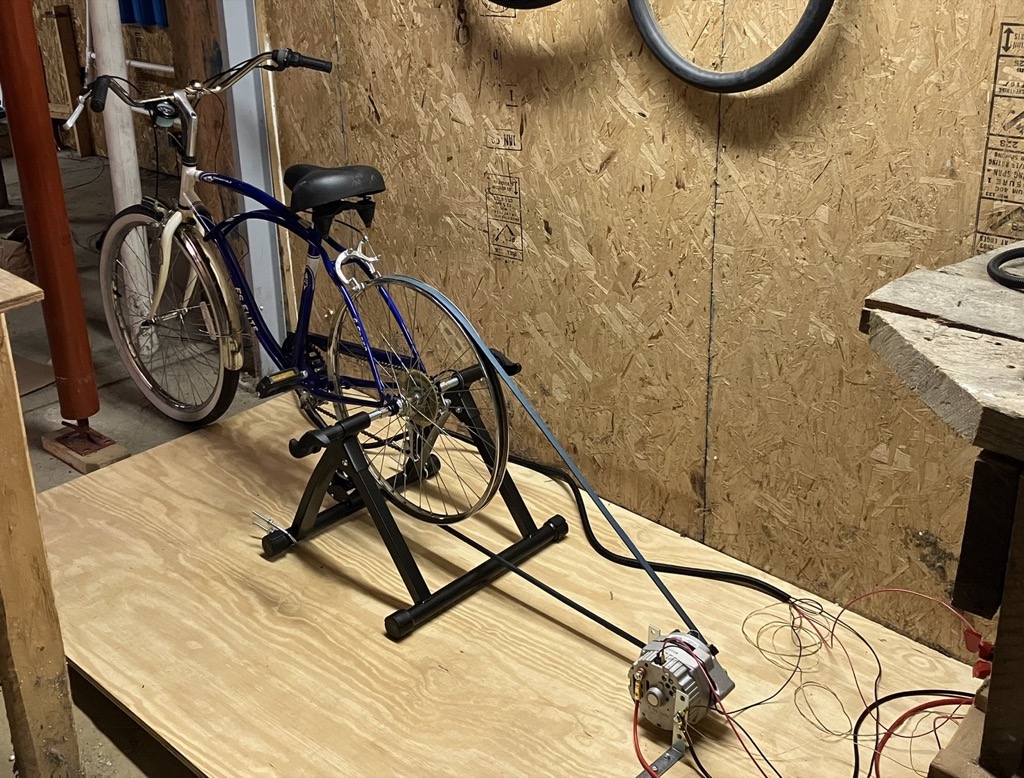 [1]Mounting brackets for the alternator are simple pieces of angle iron that I picked up at the hardware store. I purchased the longest belt at Tractor Supply. It measured 108 inches. The length of the belt is not really critical as long as you have room to make it all work. When mounting the alternator on the plywood, you will want to place your belt on the alternator pulley and pull out the slack from the rear bike wheel. It is very important that you do this while your adjusting bracket (U-bolts) are at the extreme rear (loose) position. You want to be able to tighten things up enough that your belt won’t slip. You could also design a system of instead moving the alternator for adjustment. Do whatever works for you. Once you have the bike and alternator together, and you have tested your pedals to see that the alternator spins, you are ready for the last necessary component of the system.
Because the DC voltage produced is so erratic, you will need a battery — or a battery bank — to make this system work. A used one from a car, truck, ATV, or even a lawn mower will work in a pinch, but if you are going for long life and good storage capacity, I recommend a couple of brand new 6-volt, deep-cycle golf cart batteries connected in series to produce 12 volts. I am a fan of American-made batteries, and I purchased two Deka Pro Master GC-15 models made in U.S.A.. As with all electrical connections, it is best to install your batteries as close as possible to the alternator and keep your cables as short as possible to prevent voltage drop.
Wiring it up
 [2]You will need three connections to make this system work using the 1970s-era alternator:
1- Cables from the battery to the alternator.
2- A jumper from the 12v positive cable to the voltage sensor terminal (#2 in the diagram)
3- A wire from the positive battery terminal running through a momentary switch and connected to the exciter terminal. (#1 in the diagram) My pictures and instructions are for the 1970s-era Chevy alternator.
The planned usage and demands on your system will determine the size of your main battery cables. I would go with the largest cables you think you might ever need. If you add to your system later, you will not need to upgrade cables if you start big. If you are sure you plan to only charge a few phones and maybe power a radio or light, you could get by with 10 gauge cables from the battery. I strongly recommend using 2 gauge cables. They aren’t that much more expensive.
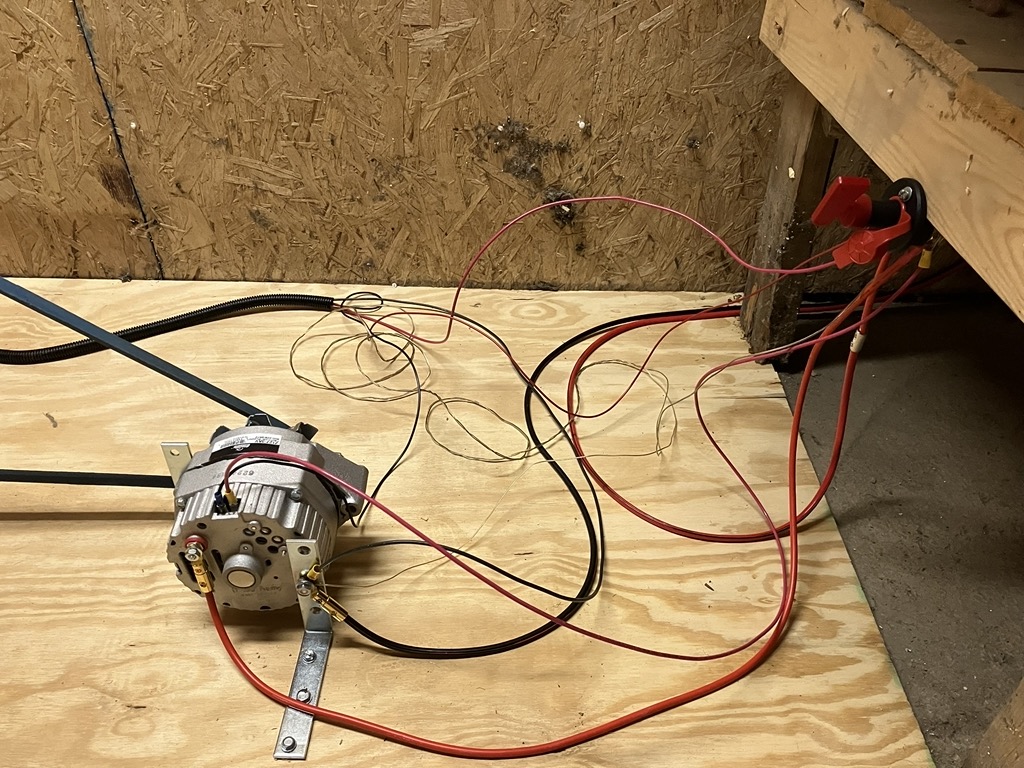 [3]The negative cable will run from the negative battery terminal and mount solidly to the outer case of the alternator. Your positive cable will run from the positive battery terminal to the large bolt connector on the back of the alternator. Now is the time to talk about Mr. Murphy and how his laws are going to bite you if you ignore safety. You absolutely must have an appropriate fuse and DC switch on the positive battery cable. If you know your charging loads will be very light, you could use a 10 amp fuse. I installed a 50 amp fuse because I plan to use mine to power some household items. The 50 amp fuse will allow you to draw as much as 600 watts from your battery and charge that back from the alternator. (volts x amps = watts)
You also need a good switch to shut off the entire system if needed. You can find many marine or vehicle battery DC cut-off switches at your local auto parts store. [A more common AC switch is not safe to use.] The voltage sensor wire can be very small as its only purpose is to tell the alternator the voltage of the system. You can run a short jumper from the main positive cable connection on the back of the alternator to terminal, #2 in the diagram.
In some systems, this connection can be omitted, but mine would not work without it. In a car, this circuit is connected to the ignition and it momentarily sends a 12-volt current to the excitor terminal as you are starting your car. This can easily be replicated in this system by using any momentary switch. I used a cheap horn button from a tractor. You will simply run a small wire from the positive terminal of the battery to your horn button and run the wire out of the button to the exciter terminal, #1 in the diagram. Though not necessary, a small voltmeter or ampmeter to monitor charging would also be nice. I prefer an analog voltmeter, and I got a small one for a tractor. It came with a bracket that I used with clamps to mount it to the handlebars of the bicycle.
Ready to Generate Some Power and Use It to Charge Something
You will need a connection from the battery to your phone, tablet, laptop or whatever you are charging with 12 volts. The easiest connection is a simple 12-volt power outlet with clamps for the battery plus that all-important fuse. With this connector, you can plug in anything that you would in your car to charge. Though the clamp-type power outlet will suffice for very small loads, I recommend something a bit more robust and permanent with multiple outlets. With everything connected, you are ready to install your main fuse between the battery and alternator and turn on your main switch. Turning on the switch should cause no sound, no motion, and definitely no sparks.
Hop aboard and start pedaling. You should begin pedaling the bicycle using its lowest gear. After a couple of times around, go ahead and push your horn button and hold it for about three seconds. You will feel a very noticeable increase in resistance as the alternator begins to generate electricity. You can let go of the horn button. The system will continue to charge as long as you keep pedaling. If you stop, you must begin the process again by holding the button for a few seconds. Note that this system will charge your devices from the battery without having to pedal, but you will need to put in some pedal time at some point to keep your batteries topped off.
JWR Adds: You can also use a traditional DC motor, re-purposed to act as a generator. That is what we use for our exercise bicycle DC generator, here at the Rawles Ranch. Ours uses a 30-volt DC motor. The wiring is a bit less complex than using an alternator. But take heed that you will need to add a blocking diode, or your battery power the motor, and it will start turning the pedals! (A diode only allows an electric current to flow in one direction.)
Kicking it up a Notch
During a power outage, whether it be temporary or a grid-down-it-ain’t-ever-coming-back-situation, it would be nice to power a small household appliance, television, fans, or maybe even a washing machine. It would also be nice to keep those 12-volt batteries charged up all the time using free sunlight or wind. Think about your personal situation and why you are interested in this type of system.
For myself, I decided to add a small, 1,000 watt inverter and two 100 watt solar panels with a charge controller. A small, 400-watt windmill would also be a nice addition, but I decided to skip that. Windmills are noisy, ugly, and could compromise your operational security in a lawless situation. They might even draw unwanted attention from your neighbor, community, or town. Still, in the right place with steady winds, they often keep batteries charged when the sun doesn’t shine. I will not go into installation details on the solar panels and inverter as those come with very comprehensive instructions in the box.
Up Yet Another Notch
Water is extremely important, and many survival-minded people get their water from a well. My well water is pumped by a submersible pump operating on 250 volts and cannot be run from my small system with its 1000 watt inverter. I purchased a 35 gallon tank and a 12-volt water pump from an RV dealer. This is a fairly simple install by connecting a short washing machine hose from the 12-volt pump to the drain on the pressure tank for the well. Now, 35 gallons of water will not keep your family of five going for a week, but it will wash a load of clothes or offer a nice shower for someone when the power is out. Do you have a hand pump for that well? You should. So, all these add-ons are certainly not necessary for a human-powered, 12-volt generator, but they can be added at any time. Start small, and keep your devices charged.