(Continued from Part 1. This concludes the article.)
Battery
The next item to consider is a portable USB battery, frequently referred to as a USB power bank. These range in size from a little credit card-sized 2500mAh up to massive power bricks with over 60,000mAh. Note that USB power banks that provide QC or PD charging levels have recently started hitting the market, and they tend to be somewhat more expensive than the older ones that only provide 5V/2A outputs.
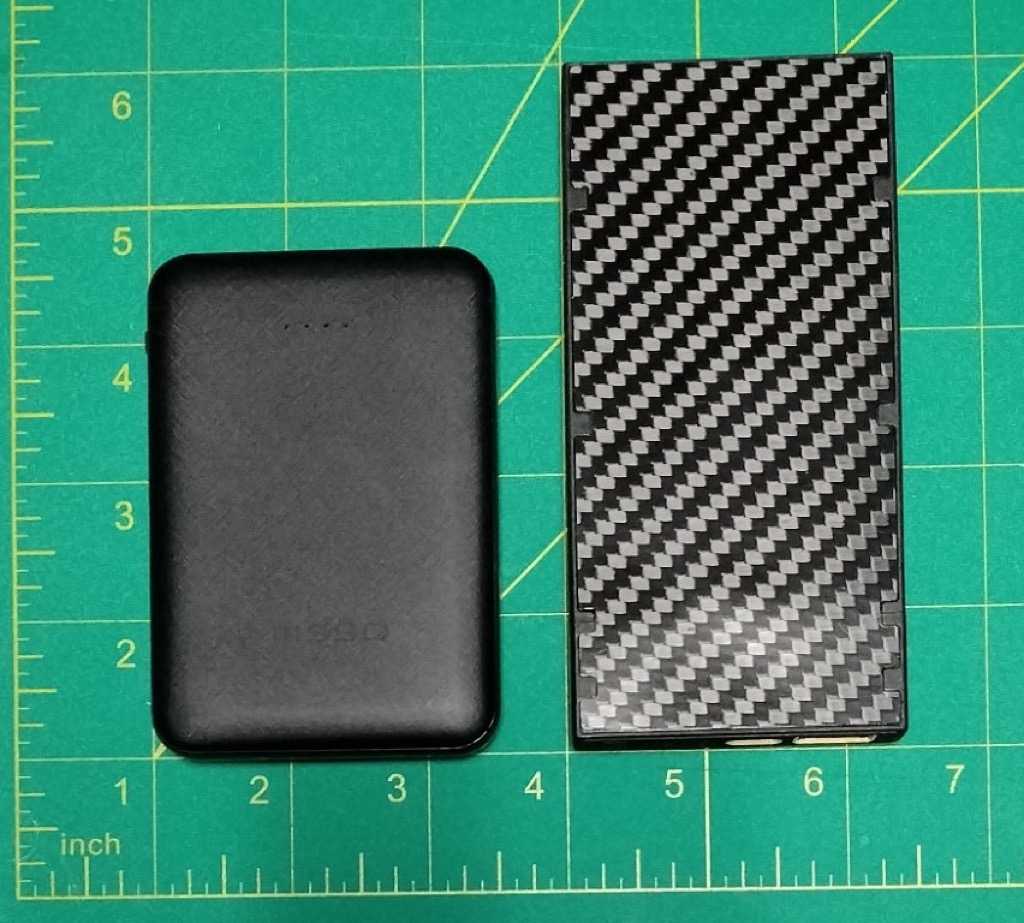
I ended up using one that I picked up a while back, which is the Miisso 5000mAh model [1]. It provides two USB A output ports, is capable of providing up to 2A per port and weighs 3.5oz. It can provide a little over one full charge for my phone, or multiple smaller charges across different devices. I’ve found that it’s more than enough for a 3-4 day backpacking trip when I start off with all of my devices fully charged (I keep my all of phone’s wireless communications turned off when I’m backpacking and only use it for navigation).
If you want a battery that can provide a lot more power and supports faster charging, I recommend the Nitecore NB10000 Gen 2 [2], which has 2 QC charging ports and provides 10,000mAh of power storage. It weighs 5.3oz, so for 50% more weight/size you get twice the rated power. It also supports QC for charging input, so you can recharge the battery a lot faster if you have access to a QC power source. The NB10000 Gen 2 also supports pass-through charging, which means you can have power coming into the USB-C port charging the battery and at the same time have a device plugged into the USB-A port for charging.
Here’s a picture of the two batteries:
 [3]
[3]
AC Power
AC outlets are everywhere, and even in a disaster scenario you may occasionally have access to a wall outlet, just like you would for ‘normal’ travel, so it makes sense to include a wall charger in your power kit. In keeping with my goals of small and light I evaluated three different options—all of them are slim devices with folding AC prongs (US), but there are some significant differences:
- BUDI 17W Extra Slim Portable Wall Charger [4] – This is an older (6 months old) charger that I had. It weighs in at 1.6oz and can usually be found for around $12 on the internet. This one has two older USB-A output ports and can provide up to 2.4A of output (no QC or PD), so it won’t charge your newer devices very quickly.
- Trebleet 20W ultra-thin USB-C PD/QC [5] – This charger has one USB 3.0 QC port that provides up to 18W and one USB-C PD port that provides up to 20W. It weighs 1.7oz and you can find it for around $12.
- BUDI 65W PD3.0 USB C GaN Charger [6] – The ‘GaN’ in the name means it utilizes Gallium Nitride in its microchips, which generates a lot less heat, so you can fit more power output into a smaller package without burning everything up. However, it’s the heaviest and most expensive at 2.8oz and around $40. It has a USB 3.0 QC port that provides up to 18W and a USB-C PD port that provides up to 65W, so it’s the fastest charging one of the bunch (assuming the devices you’re charging support PD)
Sticking with my ultralight goal I selected the Trebleet charger for my kit, although the BUDI 65W one will probably eventually replace it as I get more electronics that can be charged faster with higher-powered PD charging (65W PD vs. 18W PD on the Trebleet).
12V Car Charger
Another potential power source you may come across in both normal travel as well as during a disaster is a 12V car charging plug. You may be driving or getting a ride, and many generators include a 12V outlet, so I decided to include a 12V car USB charger in my kit. Note that even if an older car or generator has a built-in USB charging port it may only provide a lower-powered 2A, so you may get a faster charge if you use a 12V charging adapter that supports faster charging options. As with the wall charger I reviewed a couple of different options:
- Anker Powerdrive 2 [7] – This is a compact charger that has two USB 3.0 ports that provide up to 2.4A per port, weighs .7oz and costs around $10. It supports Anker’s ‘IQ’ charging, which is not compatible with the USB QC standard, so you’ll only get standard 2A charging speeds on most devices.
- Ainope 54W Car Charger [8] – Another compact charger with one USB QC port that provides up to 18W and one USB-C PD port that provides up to 30W. It has a metal body, weighs 1.3oz and costs around $20.
- Ainope 60W Car Charger [9] – This one is the lightest (.5oz) and most compact option and costs around $15. It has one USB QC port the provides up to 30W and one USB-C PD port that also provides up to 30W.
It’s probably not a surprise but I went with the Ainope 60W option, since it’s the lightest, smallest, and provides the most power, plus it supports both QC and PD charging. It also has a small folding handle that makes it a lot easier to pull out of a tight 12V socket.
Harvesting Big Batteries
One limitation with using a 12V car USB power adapter is that many cars have to be running or at least have accessory power turned on for the interior 12V outlets to provide power. In a major disaster scenario, you may come across a lot of abandoned cars that have run out of gas but still have plenty of power left in their battery, so having some method of harvesting that power without having to hot-wire the car would be useful. To that end, I’ve put together a small device that makes harvesting USB power directly from a car battery pretty easy.
It’s based on a small module that takes any input voltage from 6V-32V and provides a 24W USB QC-compatible output. Here’s a picture of the module:
 [10]
[10]
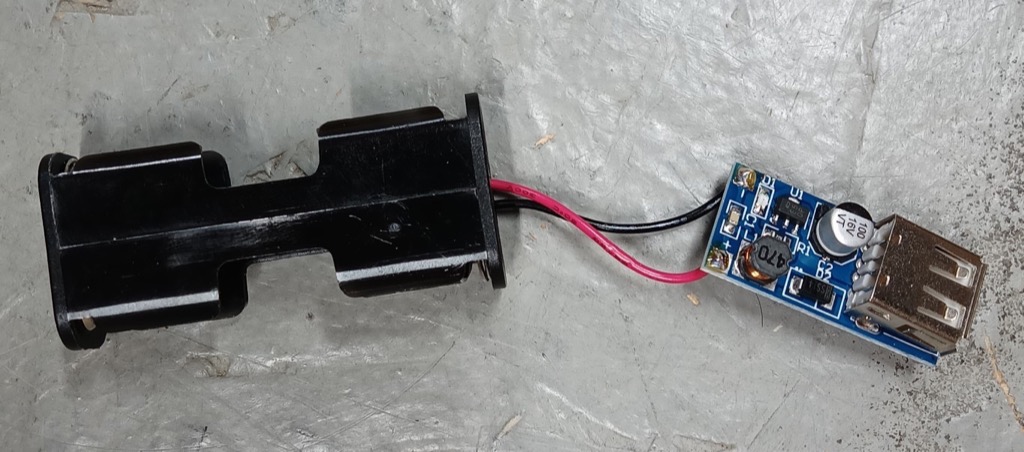
You can find these for around $5 each – just search the web for ‘DC-DC Buck Step Down Module 6-32V 5V USB QC [11] ’. They have 2 holes in them labeled ‘+’ and ‘-’ that you solder wires into that will connect to the ‘+’ and ‘-’ terminals on the source battery. I wanted a method for connecting to a car battery that was compact but made it easy to quickly and securely attach and detach the harvester, so I decided to use cables with a magnetic attachment. I bought a Trustfire UC-10 [12] battery charger and cut the two cables off, then soldered them on to the module (pay attention to the plastic caps on the magnetic connectors – they have ‘+’ and ‘-’ signs molded into them). Here’s the completed module:
 [13]
[13]
And here’s the module connected to my vehicle’s battery:
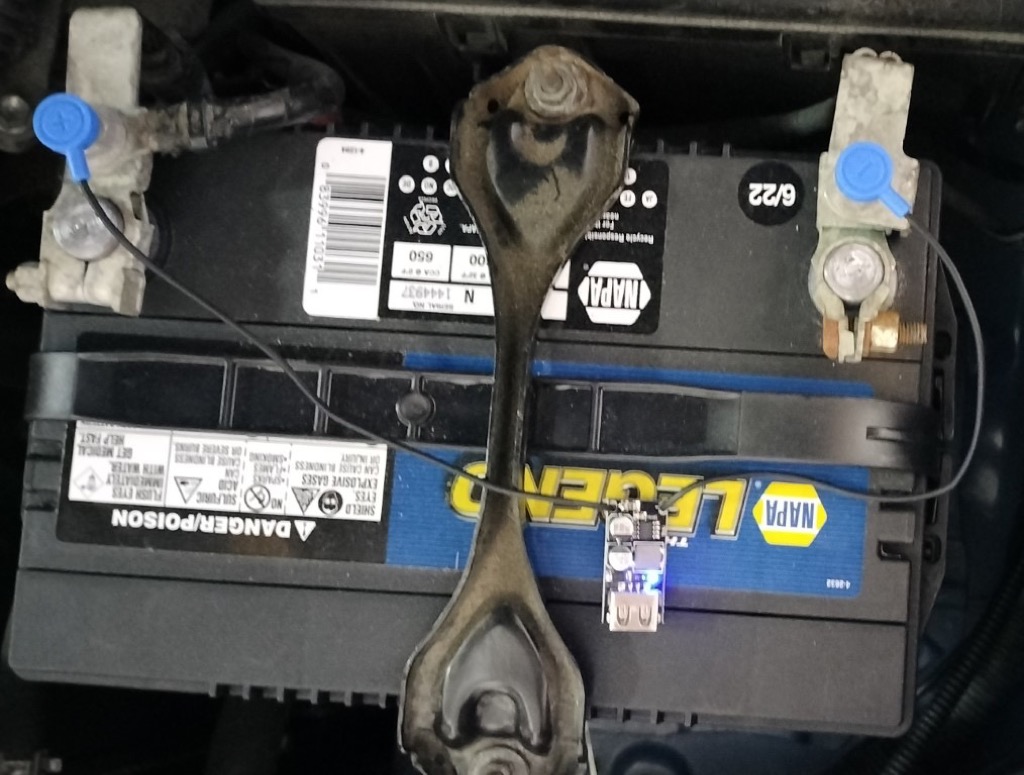 [14]
[14]
After I made sure everything was working I painted the board with some conformal coating [15] to increase it’s resistance to water and covered the whole thing with some shrink-wrap tubing to provide some additional protection. Note that the module can handle any input from 6V to 32V, so you can use this to harvest power from other types of batteries such as golf carts, battery-powered kids riding toys, older cars with 24V electrical systems, etc.
Harvesting Small Batteries
Even though I’m moving away from mobile electronics that require regular AA/AAA batteries, I do realize that they are common enough that you may come across some of them in your travels and it would be nice to be able to use the power they can provide. To leverage the power of those batteries for USB charging I created another harvesting device using a ‘DC-DC Converter Step Up Boost Module 600MA USB Charger 0.9V-5V to 5V [16]‘ module – it can take the output of two AA or AAA batteries and provide USB 5V .6A power to charge your devices with. I soldered the wires from an Eagle 12BH222-GR AA battery holder [17] to the module (red to ‘+’, black to ‘-’), conformal coated the module and covered it with heat shrink tubing. Note that springs in the Eagle AA battery holder I used are long enough that they can hold AAA batteries in place as well as AA, just not as tightly. Now if I come across some AA or AAA batteries I can pop them in the holder and plug my USB device in to charge it. Here’s a picture of the unit prior to adding the heatshrink tubing:
 [18]
[18]
Packaging
I was able to fit all of my power components (minus the solar panel) into a single 4”x7” Dyneema pouch – here’s a picture of everything together:
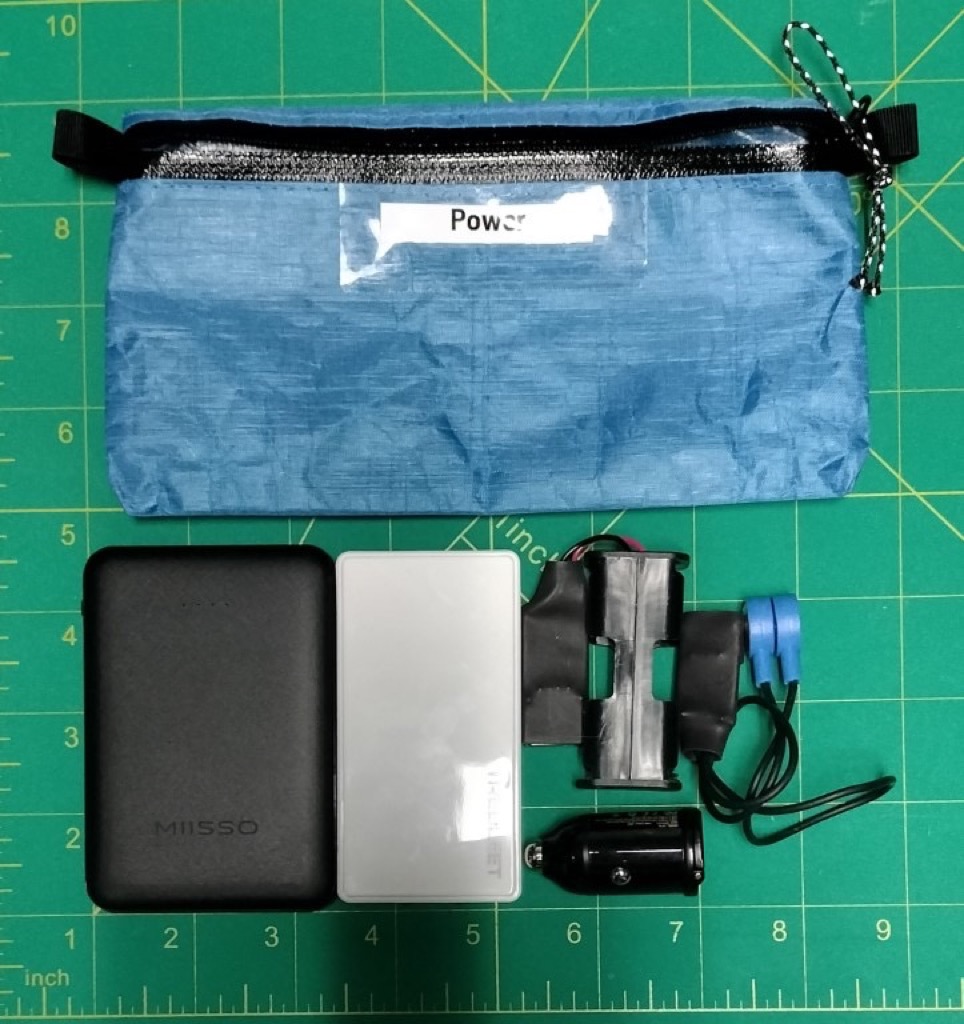 [19]
[19]
The whole thing weighs in at 7oz, which is pretty good for a system that can provide you power from so many potential sources.
Cables and Adapters
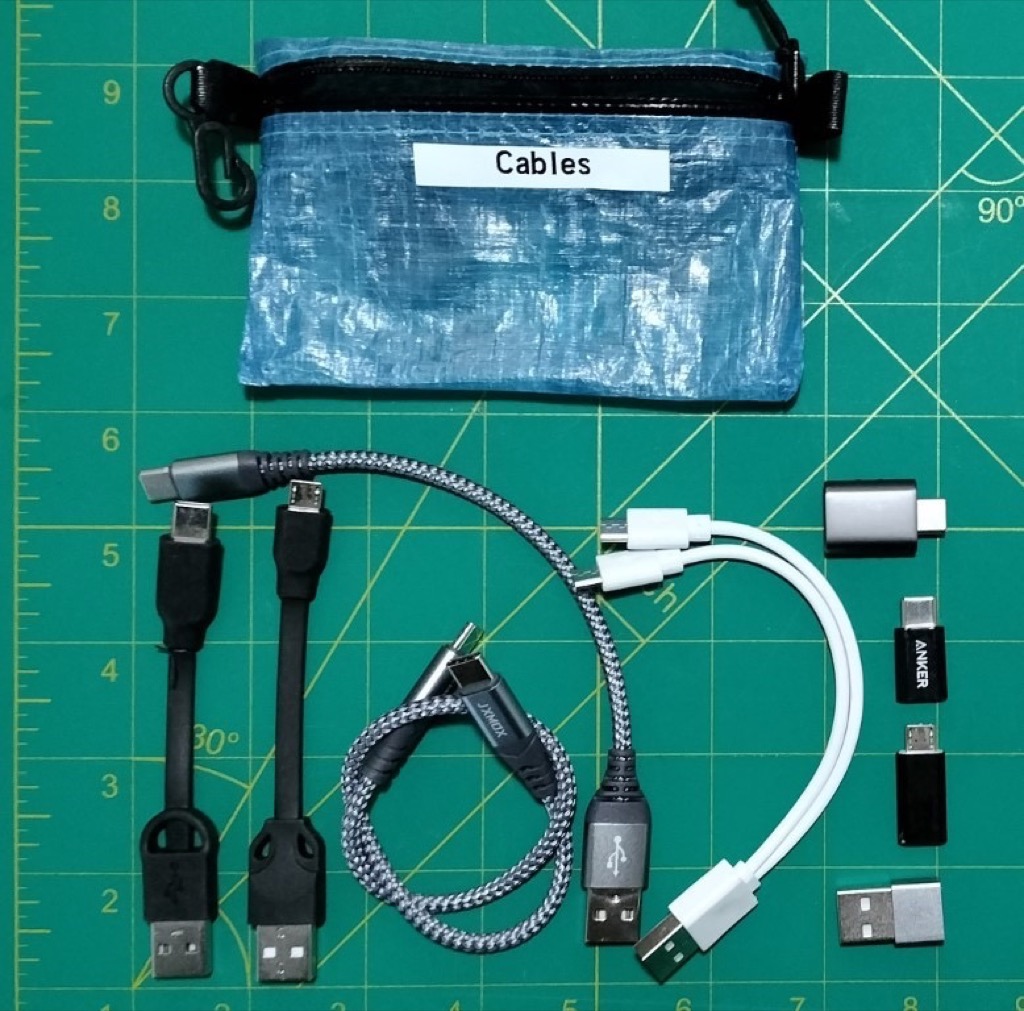
You can have a charger that provides 100W and a device capable of consuming all 100W for charging, but if you don’t use the right cable and/or adapters to connect them together you’ll probably end up only charging at slow 5V/2A (10W). As I mentioned earlier you should do an inventory of the devices and chargers you plan on carrying to determine which charging standards they support (standard/fast/PD/QC), then make sure you have cables that can support them. My cable kit consists of a 1’ USB-C to USB-C PD charging cable, a 6” USB-A to USB-C fast charging cable, a couple of short micro USB charging cables (for some older devices I have), a dual micro USB charging cable (for the two USB rechargeable batteries I have) and a couple of adapters. Here’s a picture of the cable pouch contents, using a 3”x5” Dyneema pouch:
 [20]
[20]
My cable pouch weighs in at 2.6oz. Note that you could lighten it up by only including a single cable, but since the wall charger, 12V car charger and the USB battery all provide two charging outlets I wanted to be able to charge at least two devices at the same time. I highly recommend understanding your charging requirements and capabilities before buying cables, and testing all cables and adapters you buy to make sure you’re going to get the fastest possible charging time.
Summary
My initial goal was to provide a lightweight kit that would allow me to charge or power my mobile electronics during normal travel, day-to-day activities, backpacking and disaster scenarios. The solar panel, charging pouch, and cable pouch together weigh in at 13.1oz, which is pretty good for providing the ability to charge from 6 different sources (solar, USB battery, AC wall outlet, 12V car outlet, 6V-32V batteries and AA/AAA batteries). You could save a couple of ounces by splitting the wall and car 12V chargers off into a separate pouch and dumping them in the event of an EMP or just carrying a USB battery and some cables, but that’s entirely dependent on what disaster scenarios you’re worried about and how long you think you may need to be mobile if you need to get home after a disaster.