During our harsh winter weather, I look for projects that increase our preparedness, but that can be accomplished in the warmth of my garage; preferably with a minimum of cost. This winter, my wife and I were reviewing the strengths and weaknesses of our preparations. We were inspired by the SurvivalBlog articles that have implored us all to examine and test our preps. We considered how we would do our cooking in a grid-down situation during summer, when cooking on our inside wood stove would be impractical. We already have (a few) gas-fueled camp stoves; but what about that day when no gas is available, and the wood you fell and chop is your primary source of heat?
Under such conditions, I always thought I would simply use an open fire, since I’ve done that many times camping. However, open fires are very inefficient for cooking. One uses more wood (which I believe would be in shorter supply in a grid-down situation) and more smoke is produced (which helps other –perhaps unwelcome–people know when and where dinner is about to be served). So we began searching for ways to build a small, efficient wood stove that was durable enough to be kept outside.
We browsed online line to see how people cook food in rural, undeveloped countries with limited wood supplies. We saw fascinating examples of permanent, mortar-based cooking stoves, where people use simple materials to create very efficient stoves that cook with a small amount of wood. Newer versions of this type of stove are sometimes called “rocket stoves” because they can produce a lot of heat in a confined space, with minimal fuel. They also produce a minimum of smoke. There are many ways to make or purchase such rocket stoves. Most of the ones I’ve seen would be perfect for a bug-out situation. But we were looking for something stout for a homestead situation; something that could be left under four feet of snow in the winter if need be. So our search continued.
We browsed further and found a giant collection of YouTube videos of people building such stoves from cement. The following is a description of our resulting project. But don’t be limited by our decision. If this project appeals to you, have fun looking at other examples online, or design your own outdoor cook stove. There are other things people build using homemade cement form: tables, chairs benches, the sky is the limit. It’s a fun project to do on a snowy day!
Assembling the Materials
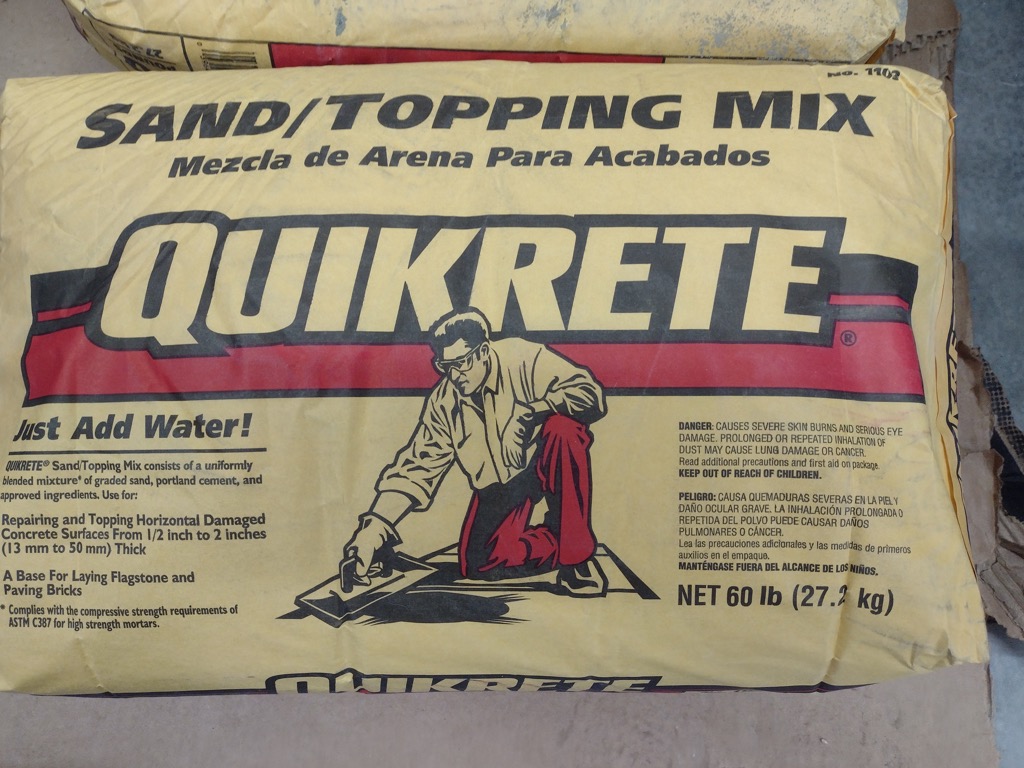 [1]We spent a total of $18 on two, 60-lb bags of Sand/Topping Mix variety of Quikrete. We put down a large broken-up cardboard on the floor as a work surface. Then we collected materials around the garage: a few short lengths of rebar, a bent salt block holder, some scraps of half-inch hardware cloth, and some boxes and packing material from ordering Christmas presents. (This is a great time of year to get that perfect-sized box!) We also collected a few scrap pieces of plywood, a broken feed bucket, and a couple bar clamps that we would use to support our form. That is what we happened to dig up; you might use something else for your project. The photos in this article show our collected materials, and the sequence of using these materials to get our final product.\
The Build
The cement needs to be mixed first, as you will fill the form with cement as the form is being put together. We used two bags of a sand-based finishing Quikrete cement at nine dollars per bag. This type of cement doesn’t have gravel in it (so your resulting stove is not lumpy and crumbly).
When you add water to the cement, it needs to be relatively ‘dry’ and not runny. It needs to be able to sit atop a trowel without running off. More like biscuit mix; not pancake mix. If the mix is too runny, your product will be inconsistent in its strength, fall apart too soon, and take forever to dry.
We chose a cardboard box to use as a form that was approximately the size of the stove we wanted to build. The box we used was about 12” x 12” x 20”. We wanted something large enough to be able to heat a frying pan and bake a couple potatoes–perhaps even have space on top to set something; but not so big that it would use a lot of wood, or be too heavy to move with a handcart.
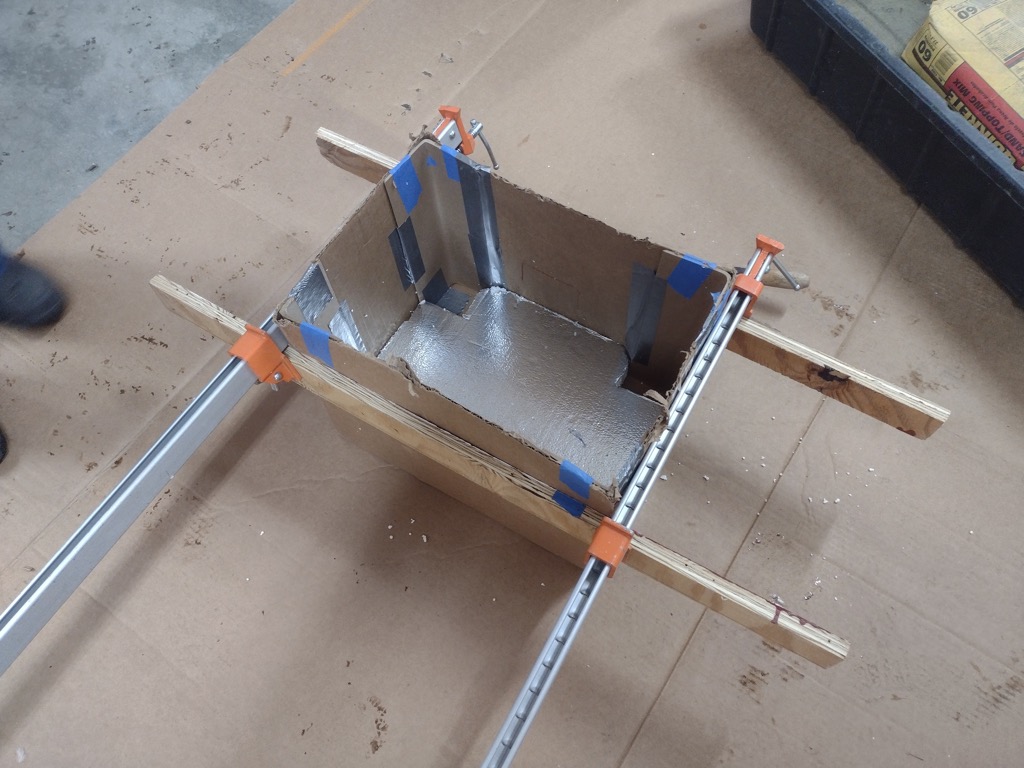 [2]We placed strips of wood and bar clamps around the middle of the box to support the force of cement pushing out on the box. We temporarily used Styrofoam-like packing material as forms to take up space, so that the cement would not fill up in our mold. One way to do this is to think of your cement stove a layers of different shapes stacked on top of each other, starting from the bottom.
The first layer forms the legs. So Styrofoam would temporarily occupy nearly all of that layer, except the corners where the cement legs would be. These would be the corner ‘feet’ of the stove. When we filled these feet with cement, we stuck a few nails into the cement to reinforce the feet and to help connect the feet to the layer of cement that would go above the feet.
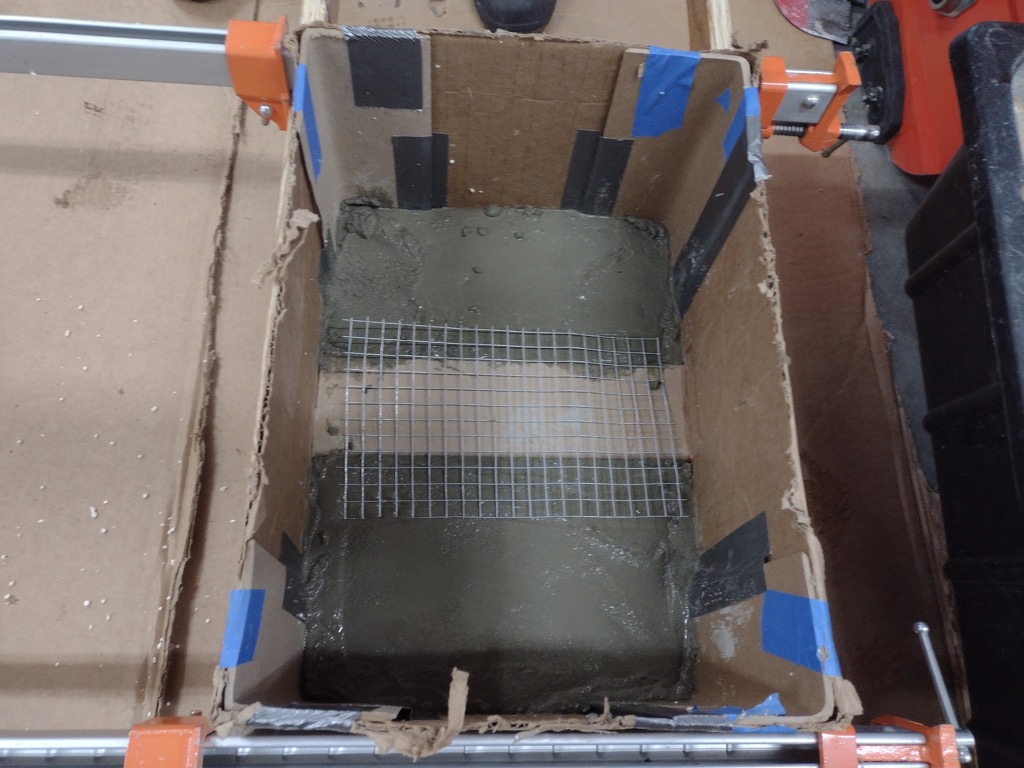 [3]The next layer up from the bottom is the solid floor of the stove, so there were no Styrofoam forms to put in this layer. We put about 2 inches of cement on that layer, reinforced by a sheet of half-inch hardware cloth, just to be sure the floor doesn’t collapse under its own weight. The layer after that provides a floor vent for the firebox area of the stove. We used some folded cardboard to provide the form that would create a channel so that air could go directly into the bottom of the firebox area. This helps generate a hot fire with a small amount of wood. On top of that cardboard, we placed a rectangular piece of hardware cloth, so that wood from the fire didn’t fall down and choke off the vent.
 [4]The next layer forms the largest, and last remaining layer: the firebox space. We set an old broken plastic bucket in the middle to create the space for the primary firebox area. Then we cut a Styrofoam piece as a form to put in between the bucket and the front, to create the opening through which wood would be fed into the fire. With this design, there is one opening to vent air from underneath the fire, an opening toward the front to feed wood into the fire, and the top opening to vent smoke and heat. This creates a fire that can burn hot in a small space, where combustion is fed by oxygen without being choked by wood or smoke. This, makes the perfect fire for cooking, using the least possible amount of wood and producing little smoke (since smoke is mostly composed of impartially oxidized microscopic particles of fuel.)
With each layer of cement, we placed semi-random pieces of steel hardware cloth and rebar to reinforce the concrete. We wanted to be able to move our stove around (with a hand cart) and not have it crumble under its own weight. For this reinforcement, you can use whatever you have on hand.
 [5]
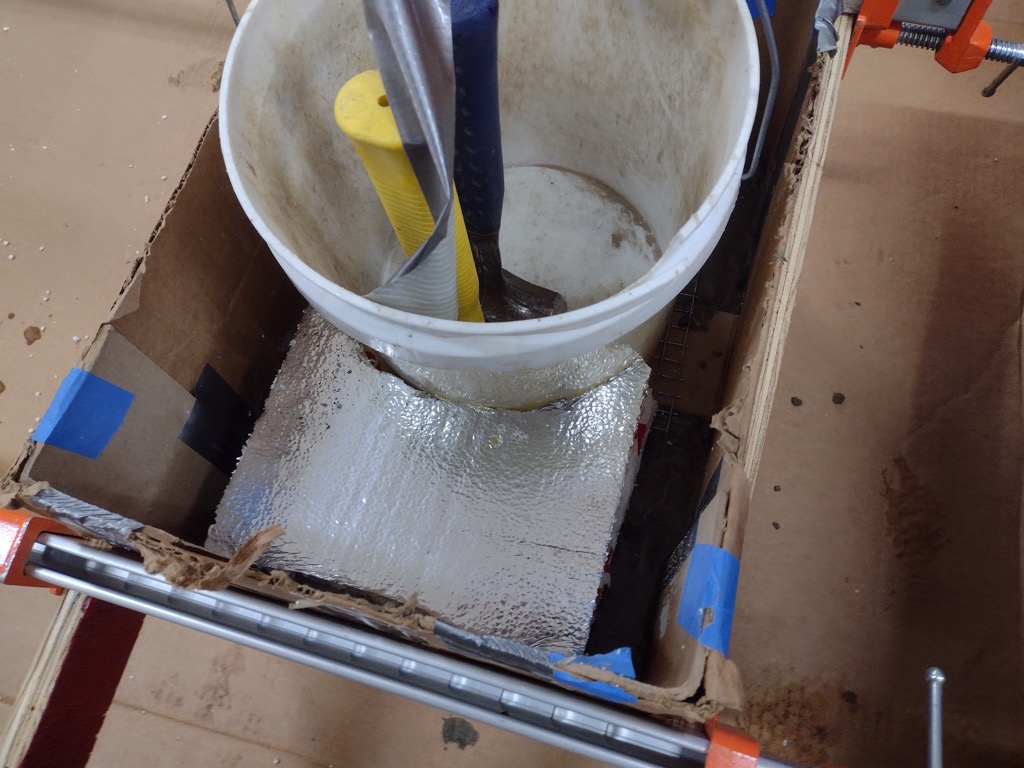
[5]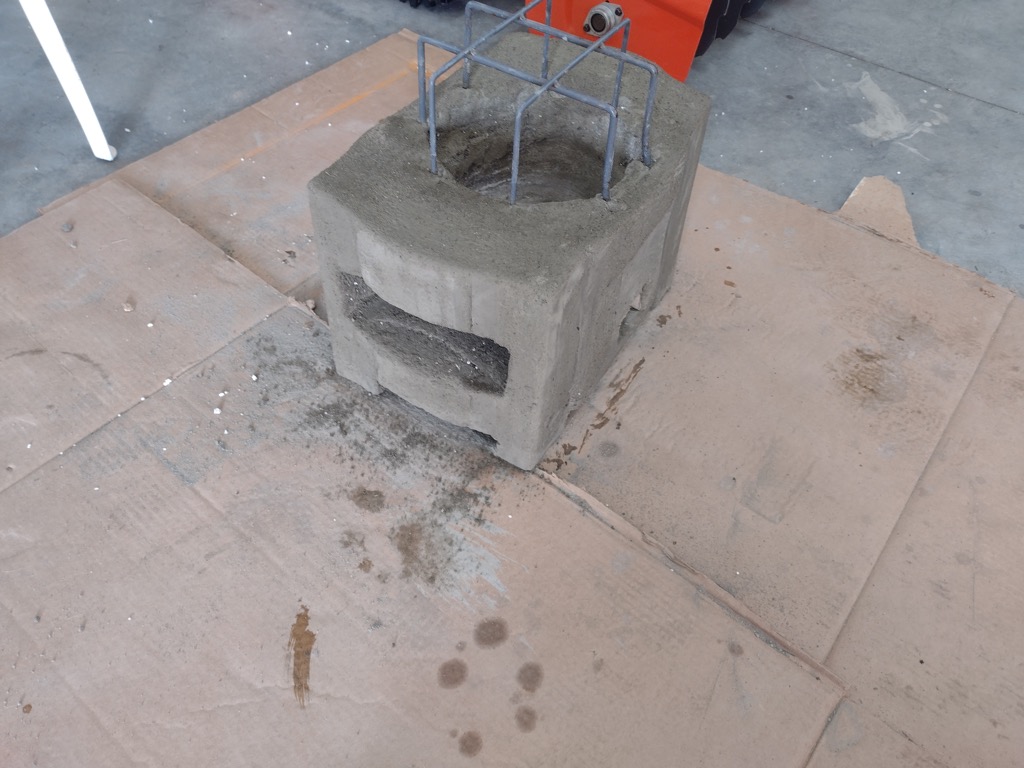 [6]Once the last form was in place (with the help of some duct tape and heavy tools to keep everything in place), we filled up the rest of the box with cement. After about a day, the cement was more dry, but still wet enough to imbed a portion of an old, broken base of a salt-lick holder over the top. This would be the ‘grate’ on which we could place a frying pan or stock pot over the fire. (Darn! The pictures show that we didn’t get that straight. Oh well, it doesn’t need to be perfect to whip up a good meal.) We let it cure a couple more days, until the cement was lighter colored and not wet looking.
As a general note: You may want to build a different type of stove, or a larger masonry stove–perhaps with an oven, or with a dedicated place to store firewood. All these are possible–either separately or together; but for larger projects you may want to build them in sections that come together after drying. One form for the oven, another for the stove, another for the woodbox.
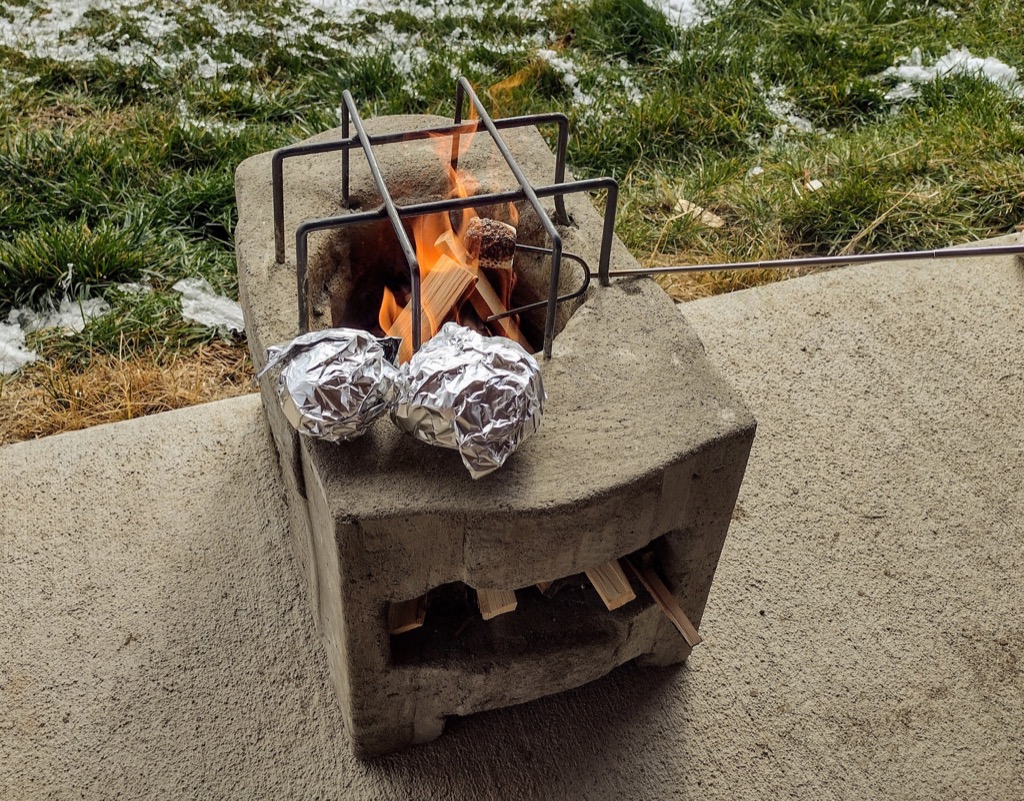 [7]After the cement looked dry, we peeled off the cardboard box form and, Voila!… a new outdoor cook stove. A meal of baked potatoes and hamburgers, topped off with smores, christened the new addition to our preps. Now we have a firm plan in place should we be cooking outside on a semi-permanent basis; and, it’s not a bad way to sit around a safe, contained fire with friends and family, even if we’re living under normal conditions.
So, for $18 and some scrap materials that we were otherwise going to get thrown away anyway, we had fun together, and developed a solution for what we would do if we had to cook outside during the summer.