(Continued from Part 1. This concludes the article.)
Our Primary Rainwater Capture System
When the time came for us to put in a new garage, we had the opportunity to install a larger rainwater system that could also capture snow melt, as well as store water during the winter.
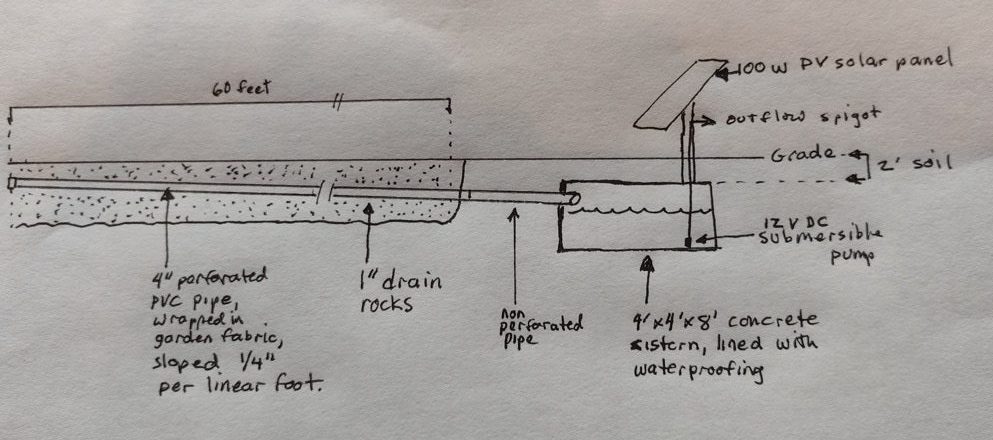
The collection system is an in-ground French drain running the 60-foot length of the building, between the eaves of the building and the hillside. The drain empties into a 1,000-gallon concrete underground cistern. We put in a septic tank for the toilet in the garage, so we just dropped a second septic tank to use as a cistern for this system. We use a small Eco-Worthy 12 volt DC submersible pum [1]p, powered by a 100-watt PV solar panel, to retrieve the water. An alternative retrieval method we use is an inexpensive Milescraft 1314 transfer pump [2], powered by an electric drill, to suck the water the 8 feet from the bottom of the cistern.
(When choosing a solar panel and a pump, make sure that the panel is rated at the voltage and power that matches the requirements of the pump. This way, the panel may be wired directly to the pump without any charge controller.)
The interior of the cistern is coated with a waterproof sealant, as the concrete is porous and would otherwise only hold water for a limited time. We used BASF MasterSeal 583 [3], which also fills cracks in addition to providing a durable seal. The cistern is next to outdoor raised beds, a greenhouse, and the cow pen. Our well-fed hydrant is also nearby, so we can use either the well water or the cistern water on the garden, greenhouse, and animals.
Common wisdom dictates that underground cisterns should be placed below the frost depth. For us, that should be 32”. However, our two septic tanks are only about 18-24” below grade, and they are similar concrete tanks with liquid–albeit microbial action in a septic tank may generate some heat. Even so, we placed our concrete cistern 24” below grade and have had no problems with freezing. We think the three feet or more of snow that sits on the ground during the winter insulates the ground and prevents frost from affecting our septic systems and cistern. But to be safe, I would suggest putting the top of your underground tanks at or below the frost level for your area. For a more complete discussion on cisterns in cold weather, see the Alaska Building Research Series HCM-01557 “Water Cistern Construction for Small Homes.” [4]
One small winter precaution that we found useful is to drill a small (1/8” or smaller) “drain back” hole at the approximate water level of the PVC coming out of the pump. This will allow water to drain back into the cistern after use, rather than remaining in the pipe and freezing on a cold day.
Figure 5 shows the simple design of the French drain. We built ours by digging a three foot trench, lining the bottom with plastic and a shallow layer of 1” drainage rocks. Then a perforated pipe with the outside wrapped in garden fabric is laid in the trench, then covered with 10-16” of 1” drainage gravel. The gravel and the garden fabric act as the filter to remove debris from the runoff before it enters the perforated pipe.
In Figure 4, you see a 60 foot long building on the right, and an uphill slope on the left. Next to the building, there is a French drain (you can see where dew running off the roof has darkened the rocks). Beyond the building, you see a PV solar panel, which is on top of our underground cistern.
 [5]
[5]
One of the major benefits of collecting the rainwater from the ground in a French drain is that this system also collects the water from the snow that melts over this drain. In our case, snow falls onto the drain from the roof from one side, and from plowing our uphill driveway from the other side. It is not uncommon to have eight feet of compressed snow on that location in mid-March.
Other Methods of Collection
There are other ways to capture the rainwater that are not described here, but might be relevant in your situation. Here are a few examples.
1. Parking areas and driveways: Do you have an apron in front of your garage? A parking space for your RV? A long driveway? Any impervious surface–such as asphalt or cement–can empty into a French drain.
2. Hillsides and low spots in the land: Water running off a hillside, or pooling in a low spot in your land, can be shunted to a cistern or tank.
3. Graywater drains: water that is used for washing, showering, sinks, or laundry can be diverted with drains that are separate from your normal toilet drain-waste-vent system and re-used to water plants or flush toilets. Be sure to check to see if you have to have your plan approved by your state plumbing inspector for this type of set up.
Treating Rainwater to Drink
Although this article is not about water treatment per se, any discussion on the use of rainwater would be incomplete without some mention of what to do in a dire emergency when you would have to use rainwater for drinking. Most readers are probably very aware of this information, but it is so important and useful in many settings that it bears repeating here. A more thorough discussion of this topic can be found on a previous SurvivalBlog article, “Thirsty Are Those Who Do Not Prep.” [6]
If I had to design for myself a household scale, permanent water treatment system, I would begin with a filter to take out large particles, then move the water through a UV water purifier, followed by an RO filter (reverse osmosis), followed by a carbon filter. However, we have been blessed with high-quality groundwater. We simply pump it up from 400 feet underground and drink it. If we weren’t able to do this and had to drink our rainwater to survive, we would use some combination of the following techniques.
1. Boiling water: The CDC [7] recommends that you should boil water at a rolling boil for one minute before it is fit to drink. Okay, so we can’t always rely on the CDC, but in the case of this proven, generic axiom, I think we can trust this advice. Boiling water works well, but it may be difficult in the field without fuel, in a hurry, or in very large quantities.
2. Chlorox: Chlorox.com [8] tells us that plain Chlorox disinfecting bleach (do NOT use the “splashless” or other varieties with additives) is a reliable and safe way to disinfect questionable water. Several hurricane survivors (who did not have fuel to boil water) found that water was drinkable after adding 4 drops per quart of water, after first filtering out any visible impurities, and then letting the water sit for 30 minutes.
3. Betadine/Providone Iodine: This is one I have used many times. Betadine is a fantastic prep because it has so many critical uses. It is perhaps the best product to use to clean wounds and prevent infections. Dr. Peter McCullough has advocated using a dilute betadine solution as a nasal rinse prevents COVID infections to a point, and minimizes the seriousness of the infection once someone has contracted COVID. To sterilize water for drinking. High-altitude-medicine.com [9] suggests putting 4 drops of 10% betadine solution in a 1-liter Nalgene water bottle, and then letting it sit for 30 minutes, is a great way to make water drinkable. Done it many times.
4. Life Straw [10]: Everyone should have a few of these in their preps–in bugout bags and vehicles particularly. They may not be the solution for the long term, but they will get you through a jam in a hurry.
5. LDS water bottle: There is no doubt that the LDS organization has much to offer those who prepare for the worst. For example, the bulk, long-term storage food is the cheapest and best available. Anyone, regardless of whether or not one belongs to an LDS church, can purchase this food at any number of “home storage centers”, whose locations are listed here [11]. Most of those centers also sell water bottles of the kind that are given to the LDS missionaries that go throughout the world, and drink all kinds of water. These water bottles are very affordable, and are designed extremely well. They have a built-in filter that works very well in making water drinkable.
6. Berkey Water Filter: The reviews for these filters are very favorable, and they represent a viable emergency treatment to convert non-potable water into drinkable water. Berkey Filters are available from many online vendors, including SurvivalBlog advertisers Directive 21 and Readymade Resources.
Lessons Learned and Future Goals
There are several things I would do differently, or intend to do in the future:
1. As I planned each building or develop each area, rainwater harvesting needed to be a part of the initial planning–just as I would consider a foundation for a building, or the choice of surface for a parking lot. It is MUCH easier and cheaper to incorporate water capture techniques as a plan is being hatched, rather than retrofitting ideas once a new project is in place. Additionally, I should have made a water plan for every growing space we put in–preferably having the garden space downhill from some type of stored water.
2. I would have gone bigger, sooner. Even now, I underestimate the amount of water that can come down between April and July. If I had planned to store higher volumes in the spring, I would be pumping a lot less water from my well.
3. I would not use concrete again for an underground cistern. I would use some of the resins/plastics available, making sure that they can withstand the weight of soil on or around them. Our concrete cistern has been vulnerable to cracking.
4. Our next project will have a 1,000-gallon tank inside a greenhouse and hold water year-round. The greenhouse will capture and retain solar energy. A reflective background behind the tank will help focus winter sun on the water, further storing solar energy. There will be a geothermal heating system providing heat from the earth to further heat the area. However, we will need to filter the water and cover the pond to prevent algae from growing in it.
5. Looking forward, I should put temporary gutters on our main house and put at least 1000 gallons of low-lying storage under the adjacent deck, perhaps with IBC tanks in series. The spring rains would be more than enough to fill this amount of storage. Then I would have gravity apply the water to the nearby– slightly downhill– 16 raised beds, where we grow most of our produce.
Conclusion
All of us have to invest our time, energy, and money in a way that gives us the biggest bang for our buck; the benefits of everything we do must outweigh the risks and costs. Water is so important to our very survival, and it takes relatively little investment to capture large quantities of this vital resource. Therefore, harvesting rainwater represents “low-hanging fruit” among the tasks that compete for our attention. Having a significant further source of water has had a huge impact on our confidence in our preparations, and significantly increases our sense of security. If we ask ourselves whether capturing at least a portion of the formidable amount of water that reaches our land is worth our time and energy, the answer is clear: how can we afford not to?