Many prepared individuals have an alternate living location. It might be called a “retreat,” a “bug-out house” or simply their “vacation home.” Perhaps in a “safer” location or in a state with more favorable legal climate on important features of self-provision and security. This alternate living location will typically be stocked with valuable implements and provisions, likely including firearms, ammunition, cash, precious metals and other valuables. Sitting vacant much of the time, it might become a lucrative target even in “normal times” before the national situation has even significantly deteriorated. A thief entering the vacant home would have ample time to work at overcoming locks and safes — so the quality of such equipment becomes key to the long-term usefulness of the alternate living location.
Unfortunately, many of us are not independently wealthy (especially earlier in our lives) and therefore we sometimes make choices in the quality of fire/burglar safes, and gun safes, that we later regret. This is the story of how I recognized a poor choice of a gun safe, and found ways to improve its security. In the process, I will attempt to review the key features of higher quality security containers.
OPSEC: Moving It Myself
Like many, I purchased a moderate-cost gun safe (TS 12-30) from a well-known farm equipment chain store and was able to get it home and installed in my alternate home, with no help from strangers (OPSEC benefit). The first security goal with a safe is to prevent the thief from simply carting it off the premises to work on it at their leisure in THEIR home. Therefore the gun safe was securely bolted into the home. If the floor is a concrete slab, appropriate hardware can secure it; if a wood frame house, then careful selection of bolts / screws can secure it. The thief cannot reach the head of the bolts or screws (which are inside the safe). The goal is to make it difficult to rock the safe, or get a pry bar behind any surface and create significant leverage. Arranging the safe so that the door opens properly, but there is little room to get a crowbar at any gap is important. Make your safe INCONVENIENT for the thief!
For many, the risk of fire exceeds the risk of theft in normal times. The primary safe technique used to protect from fire is significant thickness of gypsum board inside the walls of the safe, or possibly concrete in a higher quality burglar safe. Each 3/4″ thickness of drywall adds about 30 minutes more fire protection. Cheap gun safes may have none at all. The wise owner may choose to encase the safe in a cocoon of inexpensive drywall, sealing the edges with the appropriate joint tape and “mud” (joint compound) — and significantly improve the fire-worthiness of a cheap safe. A crude “door” of one or more thicknesses of drywall can even be arranged to cover the face of the safe, perhaps inset, or cleverly attached to a closet door in front of the safe and roughly meeting the added sidewalls. The required drywall & mud can be purchased at a home improvement store without attracting attention and scored with a utility knife, cracked along the scored lines to form a very inexpensive fire-shell significantly improving a cheap safe. But this won’t add much at all to its ability to resist a thief.
Fanciful Security Ratings
Safes’ resistance to thieves are rated in various and confusing ways [1], and most inexpensive safes or gun safes provide truly very little protection. In order to get a safe with a meaningful 15-minute (TL15) rating against a well-equipped thief, you can expect to be spending well into 3 figures, and likely need professional installation. When I purchased my gun safe, this wasn’t an option. I took what I could get, and something that I could move by myself.
There are several features of a safe that truly resist professional attack:
The first is WEIGHT. The goal is to make it even more difficult for a thief to cart off the safe to a location with many more tools. Truly burglar-resistant safes’ walls are filled with concrete to make drilling and sawing much more difficult, and also to simply increase the weight toward or beyond 1,000 lbs. This may be impossible to handle without great assistance, and likely professional assistance. Various youtube presentations explain the specialized equipment movers use with these dangerously heavy safes.
The second is metal-thickness. Steel comes in various states of hardness and heat-treatment. Mild steel (non-hardened) can be easily drilled and cut with carbide or other bits or saws. An angle grinder or cutoff saw can simply cut a hole in the side of a safe, or remove the top completely. A plasma cutter or acetylene torch can burn right through steel like it was butter. If you’ve never experienced acetylene torch metal cutting, you may be stunned. Techniques to counter these attacks include LOTS of steel and concrete to resist the torch or dull the saw, and hardened steel. Cheap safes (like mine) pose little problem to a well-equipped professional.
 [2]
[2]
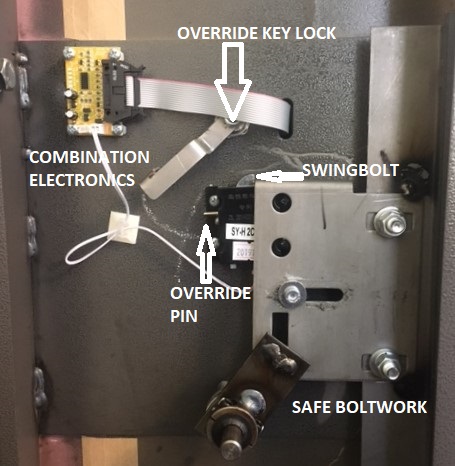
And finally we come to the LOCK. Cheap safes provide incredibly vulnerable lock systems, and without realizing it, I bought just such a safe. It had an “override key” capability. In this case, that was simply a cheap cylinder lock that operated a lever to press a release pin on the cheap electronic lock. When I purchased the safe I didn’t realize that even I could learn how to defeat a simple cylinder lock in only moments by watching youtube videos….and then picking the override lock would have me inside the safe scot-free. No Really Secure Safe Includes An Override Key! I learned that I had purchased a truly insecure safe.
JWR Adds: In addition to lag-bolting your safe to both your floor and any adjoining wall studs — preferably on three sides, I also strongly recommend concealing your gun safe with a false wall. Burglars won’t attack it, if they don’t realize that it is there. Anyone with rudimentary carpentry skills can put up a sheet of painted plywood held by a bit of Velcro, and topped with a sheet of pegboard over 1/2-inch spacers. Hang something of low to moderate value — such as inexpensive hand tools, fishing tackle, sewing/craft items, a collection of hats, or costume jewelry on that pegboard, as bait for burglars.
DISASTER. The real coup de grace came later. Eventually, on a trip to my alternate living home, I was stunned to find that the electronic keypad no longer worked. No beeps from half the keys. Changing the battery (it was plenty strong) didn’t help at all. All my firearms and quite significant other valuables were nicely locked away and I would need to exercise my newly-learned destructive or lock-picking techniques (the override key was back at the “normal” home and likely lost) to gain access to them again, all because of a really cheap no-name electronic lock…
A Battery Change
Thankfully, I chose to do a bit of web-surfing before physically attacking the broken “safe.” It quickly became apparent that this was a well-known problem with safes purchased from my particular vendor. Removing the battery, holding the “zero” button depressed for ten seconds to thoroughly discharge electronic internals of the keypad, re-installing the battery and Hooray! the lock worked again and I was back inside the safe. You can imagine the relief!
What a pitifully-designed lock! I had to paste the “repair” instructions outside, in case I forgot. I started studying safes and learned the information presented above — and learned about UL-rated locks and replacement techniques for safe locks, even how to replace an electronic lock with a quality S&G dial lock. Quality safes are often built with a standard lock layout and changing from one lock to another merely requires care and attention from a reasonably handy owner.
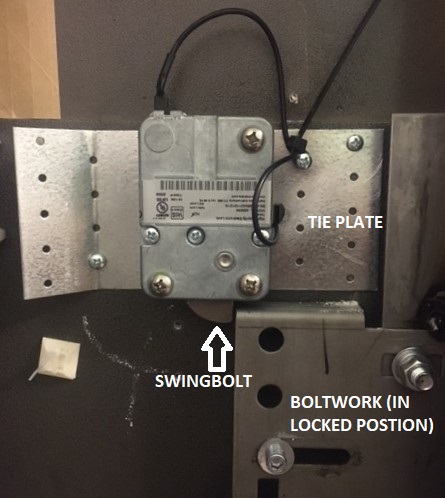
Now with somewhat more financial resources, I arranged to purchase and install a much better built but still modest fire/burglary dial-lock safe (Gardall FB1212) for the more valuable and more dense financial assets, and started studying the possibilities to replace this known-defective electronic lock on the gun safe. The defective lock was a cheap no-name proprietary lock, comprised of a keypad, a small printed circuit board mounted on plastic standoffs inside the door, and a non-standard mounting swing-bolt actuator that blocks the bolt mechanism of the door to prevent entry. I can’t even find it on the Web. With its over-ride pin allowing anyone to pick the cylinder lock and gain entry, it is really undesirable.
Note that the “combination” is never in the keypad. It is always physically inside the safe, in this case on the small printed circuit board. Standard name-brand burglar-resistant electronic locks are now generally marketed as a substantial rectangular metal box with the combination on internal electronics, and the swing-bolt built as part of the box itself. The Kaba/LaGard 5715 appeared to be the recommended replacement electronic lock for my cheap lock.
The LaGard 5715 is a much better lock and the price was reasonable. (Specifications, here [3].) It is widely available, and the outline and mounting holes of the 4200M lockbox are far more standard. It is EN1300 certified at Class B. (See details, here [4]. ) One could even purchase a spare keypad, since the combination is in the internal lockbox.
You may choose an even better class of lock, such as one from Sargent & Greenleaf (S&G), typically with the same overall shape and mounting. I purchased the LaGard lock/keypad and practiced with it. Unfortunately, the instructions to maintain the Super Master Reset (which allows multiple combinations to be maintained) were too complicated for me, and I lost out with that, but was easily able to program ONE combination and change it at will. I carefully verified that the one-time Super Master Reset code had indeed been destroyed (a wise security protocol of the lock manufacturer). While I can’t add 8 more combinations, more importantly no one could come after me and reset my lock from the keypad. (With a specific hardware box, and access inside the safe, you can start all over if you need.)
 [5]
[5]
Making the Switch
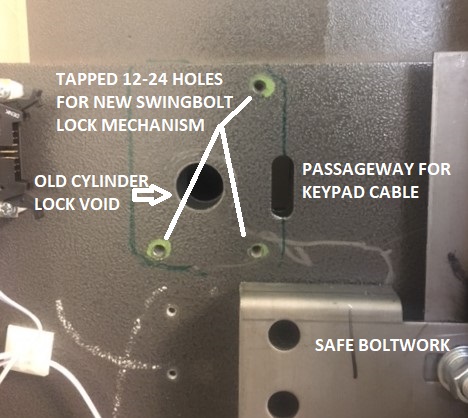
My original cheap safe lock was secured with four screws, with the swing-bolt solenoid below the line of the boltwork horizontal edge. The new Kaba/LaGard 4200M swingbolt lockbox would have to be installed above the line of the boltwork, with the swingbolt on the bottom — this is the common positioning in several videos I reviewed. Removing the old lock system completely just took some screwdriver time, but I was unable to remove the plastic standoffs, screwed from the hidden inside of the safe door. The vulnerable cylinder lock was easily removed — but left a big HOLE. A piece of mending/tieplate from the hardware store would be used to cover that defect from the inside. It isn’t perfect, but it helps prevent simple attacks.
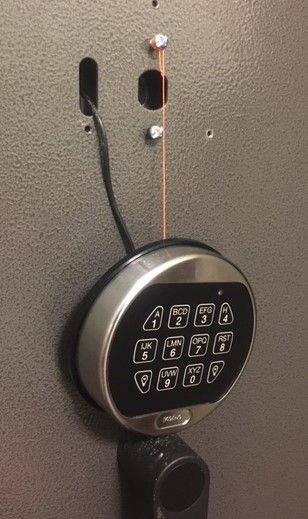
The three mounting holes on the swingbolt lockbox appear standard, and are suitable for M6 or 1/4″ screws/bolts. I chose to use #12-24 machine screws, 1-1/4″ long to give me some leeway should my new holes not be perfectly situated. Bosch tap sets with the tap and proper drill-bit are only $6 each, and guarantee you have the right drill bit, so I bought a set for 12-24 to mount the swingbolt lockbox. The new keypad is equipped with a plastic mounting bracket set to hang from two screws in a vertical pattern. This was different from the original keypad. I purchased an 8-32 tap set (with drill-bit) for another $6 to set the screws for the keypad, and a tap-wrench to hold either tap.
The easiest way to mark where to drill and tap for swingbolt lockbox mounting was to use a fingernail polish applicator through the holes. (Pencil won’t fit.) I arranged for the boltwork to have a 1/16″ gap from the swingbolt at rest, and to contact the swingbolt midway along its face — copying the way the original lock had met the boltwork. Drilling was not difficult (the welded reinforcement base was clearly not hardened steel) and tapping was easy, remembering to turn backwards just a bit after every 1/4 or 1/2 new turn. The 12-24 machine screws fit easily. I drilled larger holes in the mending/tieplate to make its alignment less crucial. The swingbolt lockbox went on relatively easily.
 [6]
[6]
The keypad required tapping 8-32 holes, using the same basic technique. I sleeved the bottom screw with some plastic as a bushing to make the keypad fairly secure on the safe front. Once the proper screw head height is discovered for engagement with the keypad mounting slots, the screws can be fixed in place with either Loctite or a tiny drop of 5-minute epoxy if desired. I added a bit of fishing line to tether the keypad to the top screw so it won’t DROP completely when changing the battery and possibly pull out the all-important wire to the lockbox inside. I also added a securement for the lockbox cable to make this more impossible.
 [7]
[7]
It is important that NOTHING can mechanically interfere with the operation of the boltwork. That’s why there is an inside cover on the safe door. After testing the lock operation multiple times, I reinstalled the inside cover, and then tested the lock/unlock function another half-dozen times before finally closing the safe and locking it. It now works perfectly and no longer depends on the defective lock or its incredibly vulnerable override key. This is still an inferior “safe” but at least now it has a reasonable quality lock that may provide many years of service.
A Relocker is Better
Higher quality safes include a “relocker” that will permanently lock the safe (requiring destruction or professional locksmith to enter) if the thief attempts to drill or damage the lockbox. Some are quite simple, more advanced units involve a breakable glass plate. The simple ones are just a vertical smooth bolt riding in a guideway, and held upwards by a finger from a flange physically attached to the lockbox. If the lockbox is jammed inward enough to allow the safe boltwork to escape the swingbolt, the flange will also be moved inward, and its finger will come out from underneath a protruding pin on the vertical bolt. With no further support, the vertical bolt will then drop under gravity/spring and permanently lodge in front of the boltwork, preventing any entry.
It would be relatively simple to add a relocker to my safe, using a common house door barrel bolt latch mounted vertically, and a little sheet-metal work to make the “finger” and to extend a shaft from my boltwork over to the vertical bolt. It would make the lock even more secure against physical attack– but it won’t fix the limitations of an otherwise cheaply made, thin-steel gun safe.