A few months ago I was approached by a friend of a friend who asked me for some help. She’s a medical device service technician and her job takes her around most of New England visiting hospitals and other healthcare facilities to do service work on medical equipment. She lives in New Hampshire, and she and her husband have a nice spread with chickens, goats and a large vegetable garden and greenhouse. We’ve had talked several times about preparedness in general and how she would home after a disaster if she were on the road, and she finally decided it was an area she needed to address and asked me for some help putting together a lightweight Get Home Bag (GHB). I actually learned a lot myself while researching and helping her put the kit together, so I thought I’d share my experiences with SurvivalBlog readers.
I first spent some time talking to her and collecting information, and here are some critical points I came away with:
- She and her husband both do a good amount of hiking and biking, so she’s in good physical condition.
- Her company facility is located just outside of Boston, and she frequently goes into the office.
- She covers customers all over New England, usually located in or around major metro areas (Boston, Portland, Concord, Warwick, Hartford, Burlington, etc.).
- She hates to drive, so she takes public transportation pretty much all the time for anything more than a half hour away. She also doesn’t like to fly, so she takes trains, commuter rails, subways, busses, Uber, etc.
- Her customers tend to schedule maintenance for the graveyard shift when the equipment isn’t in use, so she frequently stays overnight at a local hotel for any trip that’s not local. For overnight trips she brings a roller suitcase in addition to her carry bag.
- She has a company-issued laptop and toolkit for working on the equipment.
- She gets paid pretty well, and recently she received a nice bonus that she’s willing to spend part of on a decent kit. However, she’s also Yankee born and raised, so she’ll want to save money where she can.
- She’s around 5’8” and 145 lbs. (And wasn’t that an awkward question…)
- We figured it would take her around 7 days to walk home from her furthest customer site (Burlington, Vermont), assuming only moderate obstacles (e.g. no major blizzard, city not locked down, etc.) She spends more than half her time in the greater Boston area, where she figures it would be a 2-3 day walk.
- She wears disposable contacts most of the time, but has a set of glasses for backup.
- She’d like to be prepared for a wide range of emergencies, not just walking home after a disaster.
Since she has to carry equipment for work, the first thing we took a look at was her current work loadout. In addition to a ratty backpack she’s had since college her company provided her with a large padded shoulder bag for carrying laptop and tools, but it’s heavy and starting to fall apart and the company doesn’t actually require her to use it. I recommended consolidating everything into a new backpack, which would be a lot easier to carry, and she agreed with the stipulation she didn’t want anything ‘military’ looking. I identified a couple of options for her and she really liked my 5.11 LV18 [1] in Night Watch blue, which weighs in at 2.8lbs., so she bought one of those. It’s not in the ultralight category, but it’s rugged enough to last a long time and it offers a lot of flexible storage options. [JWR Adds: These packs are now available only in black. Also note that they are made in mainland China, for those who pay close attention to country-of-origin, for their gear.]
A pretty useful addition that’s available for the LV18 is the 5.11 LV6 sling pack [2]. It’s a small 3L bag that can be carried in multiple configurations (sling, waist, etc.) and is designed to attach to the front of the LV18 backpack. It could be useful for scenarios where she wanted a smaller detachable bag to carry a couple of basics without bringing her full backpack. She bought one but I didn’t include it in this project.
The next area we focused on was her work gear, since carrying that was non-negotiable. Her company was in the process of replacing their old Dell 16” 3lb.+ service laptops with new Lenovos which weigh 1.6 lbs., so she had her manager order one for her. She also has some tools that she uses which the company also provided. It’s a pretty heavy-duty tool kit with lots of extra bits she never uses in a heavy plastic case, so I helped her pare it down and lighten it up:
- Replaced 6 different screwdrivers with a lightweight titanium driver [3] with a couple of specific driver bits.
- Replaced the full ratchet driver set with a lightweight titanium adjustable wrench [4] that could handle all of the small nuts she needs to remove.
- Replaced a small steel pry bar with a lightweight titanium one [5]. She uses this for opening sticky panels, but it could also be useful for opening doors, cabinets, etc. in the event of an emergency.
Her company isn’t too particular about the tools they use as long as they can get the job done, and she took her new toolkit into the test lab at their office to make sure she could do everything she needed to. Updating and paring down her tools reduced the weight from around 3 lbs. to less than 1 lb.
So far her work carry-weight (backpack, laptop & tools) is around 5.4 lbs., which is almost half of what it previously was. I also mentioned to her that in the event of an emergency she should leave her laptop and most of her work tools (except for the pry bar) at whatever customer site she was at before heading home, which would shed 2.5lbs., leaving her with a 2.9lb. starting weight for the GHB kit by itself (the empty backpack and the pry bar).
When looking at the rest of the possible gear I decided on a few criteria:
- I would be an ounce counter (versus a gram counter) in order to minimize weight. I do a fair amount of hiking and backpacking, so I’ve spent a lot of time researching ultralight gear.
- When looking at various options I had to avoid the tendency to say ‘but this one only weighs a little more and it’s a lot better’ – I wanted to focus on the minimal possible weight that would help get her home alive.
- She’s not carrying the backpack continuously during the day, just on her way between transport and customer facilities.
- When possible, things in the kit should serve more than one purpose.
- I roughly followed the ‘Rule of 3s’ for prioritizing the contents of the kit:
- 3 minutes without oxygen or when bleeding heavily.
- 3 hours without a stable core body temperature.
- 3 days without water.
- 3 weeks without food.
- I tried to balance gear with skills. For example, I included a couple of lightweight fire starting options versus having her rely solely on primitive fire starting skills.
- For organizing things in the backpack I used Dyneema [6] and lightweight nylon pouches to further reduce weight.
- The goal would be to enable her to get home as quickly as possible, so I wanted to provide enough gear and skills so she could focus on moving instead of just surviving.
- The kit should be as self-contained as possible with no external dependencies other than water sources.
- I’ll assume that motorized transport isn’t an option. If she can get any kind of ride in the direction of home all the better.
For the gear, I recommended I tried to weigh everything myself to verify manufacturers’ claims, but some things she ordered and had delivered to her house so I just went with the published numbers. Anything that didn’t register on my postal scale (<0.01 oz.) I just listed as ‘DNR’ (Did Not Register). I also took some pictures of the various bits, but I didn’t always have access to the stuff she ordered directly. I didn’t include every copy of each item in the pictures – they’re more to provide an idea of size and scale.
Medical
Since the first ‘Rule of 3s’ is oxygen/bleeding I started with a compact medical module that should cover the most critical problems.
- TK4 tourniquet [7] (2.8 oz.)– Can also be used to secure a pressure bandage.
- QuikClot Gauze [8] (0.32 oz.) – For severe bleeding.
- Flat Compressed Gauze [9] (1.4 oz.) – For bleeding.
- Nitrile gloves [10] (3 pair, .6 oz. total) – For self-protection if she’s helping someone else, or for handling potentially contaminated or dangerous material.
- Gauze pads (3 pads, DNR) – For bleeding, and can be cut into smaller pieces and combined with the Frog Tape for small bandages.
- Frog tape [11] (6 pieces, .5 oz.) – For attaching gauze.
- 3M Steri-Strip wound closure strips [12] (1 sheet, DNR) – For closing larger wounds.
- Water-Jel Burn Gel with Lidocaine [13] (2 packets, .2 oz.) – For treating burns.
- Triple Antibiotic [14] (5 packets, .2 oz.) – To prevent infections.
- Pain relievers (Advil, Tylenol, etc., 1 tube, 1 oz.) – For the inevitable aches and pains.
- Ultra-thin Folding Mirror [15] (.8 oz.) – For getting stuff out of eyes, checking for ticks, treating wounds you can’t see, etc.
- Moleskin (.02 oz.) – For the inevitable blisters.
- EMT Mini shears [16] (.4 oz.) – For cutting away clothing to get access to wounds
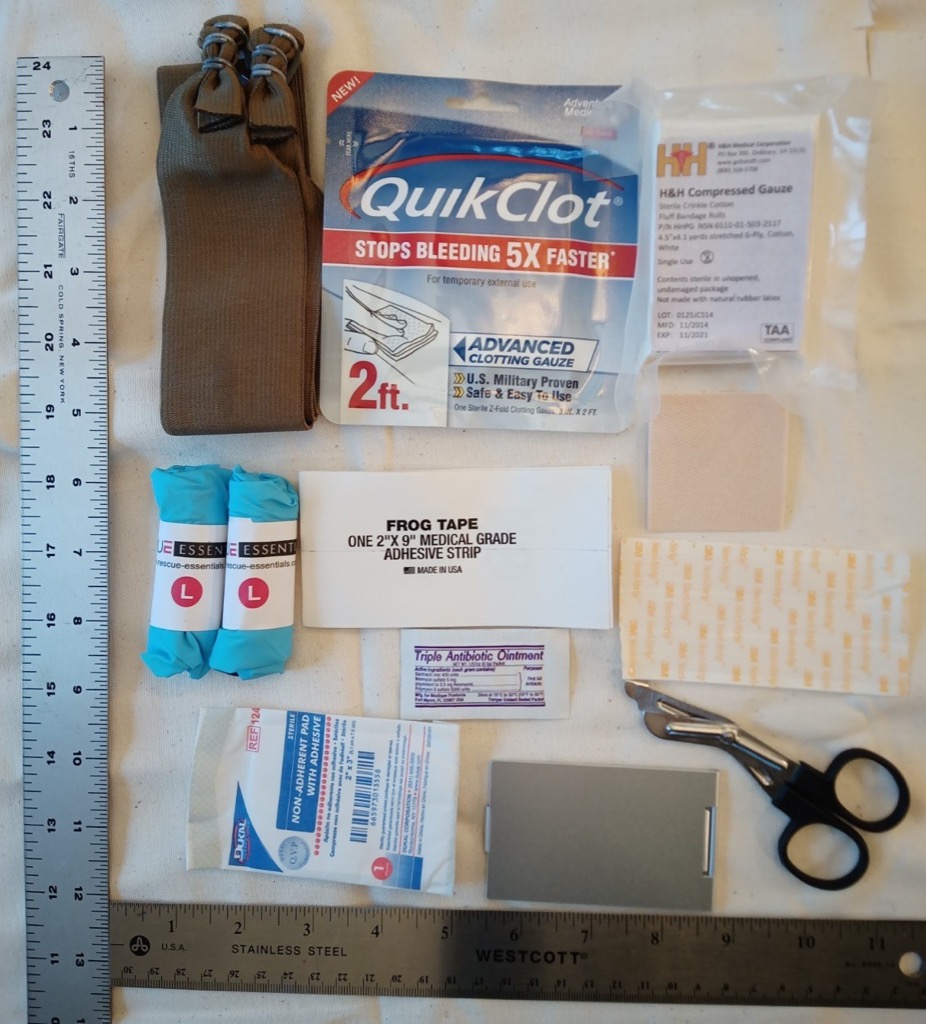 [17]The total weight of this module is 8.4 oz., and it should cover the most likely injuries. With this added to the starting weight of 2.9 lbs. her total kit is up to 3.4lbs. (54 oz.). The medical module is stored in the front pocket of her backpack for quick access. I also suggested that she take some online and local training courses to learn first aid and how to use the equipment in her module:
- Stop The Bleed [18]
- Wilderness First Aid [19]
Safety
 [20]If you’ve read my previous article in SurvivalBlog about surviving the immediate aftermath of a disaster (‘Surviving the Disaster Golden Hour – Part 1’ [21], 2 [22], 3 [23], 4 [24]), you’ll know that I’m a big proponent of having the right skills, mindset and gear to get yourself out of immediate danger, not just surviving longer-term. I made sure she read that article and the recommended books and put together some gear options that I believe would be optimal for her situation. Here’s what I came up with:
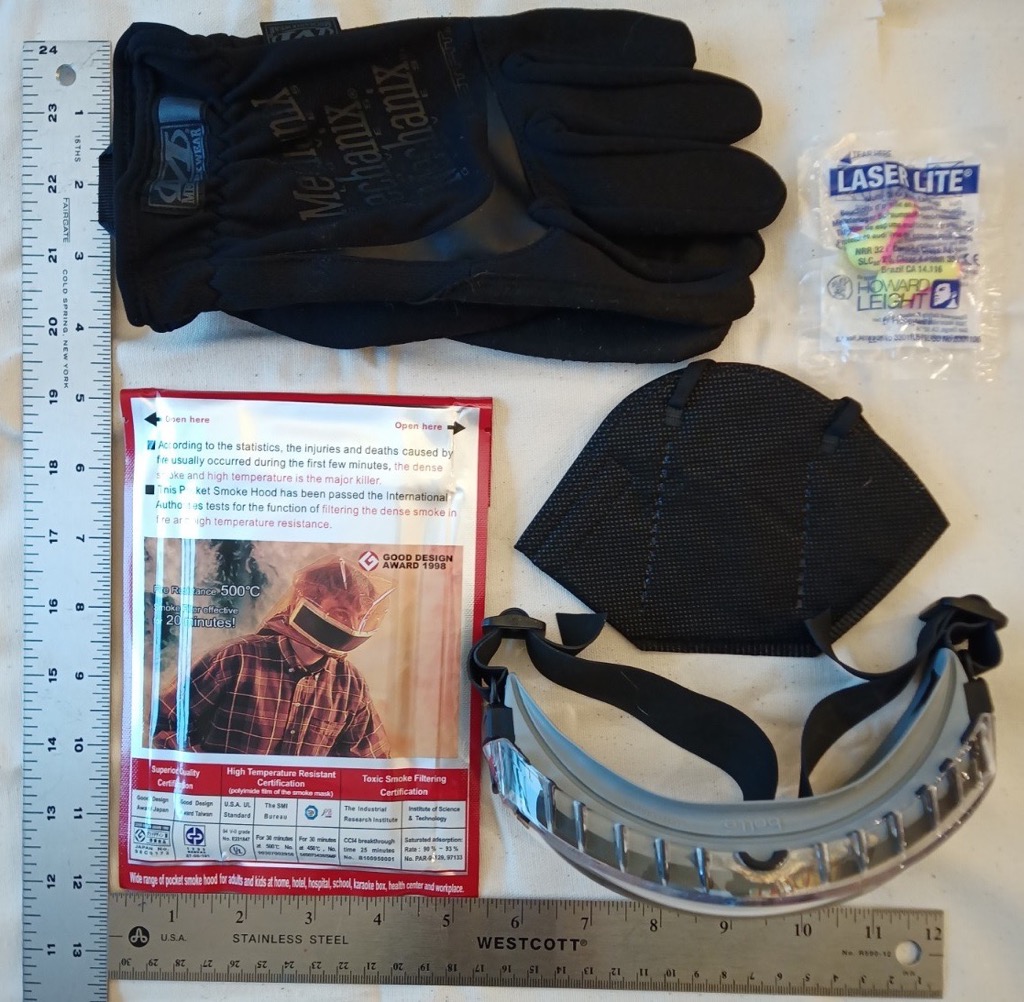
- HK Pocket Smoke Mask [25] (2 oz.) – For escaping a burning building. It’s good for about 20 minutes. This needs to be either in a jacket pocket on her or in the front outside pocket of her backpack where she can access it quickly in an emergency. Given how frequently fires occur in hospitals and medical facilities [26] the odds are good she’ll encounter one someday.
- Fold flat N95 masks (.6 oz.) – For longer-term air quality issues like fires, dust, etc. Her company issues these to her, so I had her put a couple aside for emergencies. I also made sure she got the gray or black ones to reduce her visibility.
- Work Gloves [27] (1.9 oz.) – For moving debris, digging out, handling hot stuff, etc. I recommended standard MechanixWear Fast Fit gloves.
- Safety Goggles [28] (3.1 oz.) – These are to protect her eyes from dust, debris, snow, rain, etc. Since she might be wearing her glasses I went with the Bolle Safety Pilot 2 Neo goggles, which fit over most smaller pairs of glasses and are ANSI rated. I also included an anti-fog cloth [29] for both the goggles and her glasses.
- Foam ear plugs (DNR) – These are to protect her hearing and possibly help her sleep at night.
This module weighs in at 7.6 oz., which brings the total weight so far up to 3.9 lbs. (61.6 oz.). Like the first aid module this goes into the front pocket of her backpack for quick access.
(To be continued, in Part 2.)