Comments on SurvivalBlog last winter about some folks having issues starting their morning fire in the woodstove got me to thinking about how crucial fire-building skills should be in our skill-set preps, as well as an important every-day skill for those of us who heat with wood or build fires on a regular basis. If TEOTWAWKI becomes a reality and a wood fire becomes common for heating and cooking, this knowledge will be essential.
Much has been written on the many aspects of building a fire, mostly geared towards wilderness emergencies, but they typically only address how to ignite tinder, not how to set a fire up properly so it will take off on its own once the tinder catches fire. This article concentrates on that most important fire-building skill: the technique of building a quick fire the first time, every time you try. This method applies to home-woodstove fires and wilderness campfires as well.
An important life skill we should learn whether we have a woodstove or not is how to build a fire quickly and efficiently without using dangerous highly-flammable fuels such as lighter fluid or gasoline.
YOUR GOAL AS A FIRE BUILDER
The best piece of advice I can give to anyone learning to build a fire is to practice until you can make one quickly on the first try. Your goal is to be able to set up your materials for a fire, light a match, walk away, and have your fire take off on its own, all in a relatively few minutes. First become proficient in this method and then you can move on to other methods of igniting tinder for survival situations, TEOTWAWKI, or just for the fun of it.
First, I’ll explain how to set up a proper fire so after striking the match, your fire will be at the roaring stage in just a few minutes. Then I’ll discuss in finer detail the components for building a proper fire.
I’m using the word “proper” here to mean a fire constructed by safe methods, not with gasoline, lighter fluid, blowtorches, etc., and without using tinders from man-made products which won’t be readily available in a grid-down world.
FIRE-BUILDING MATERIALS
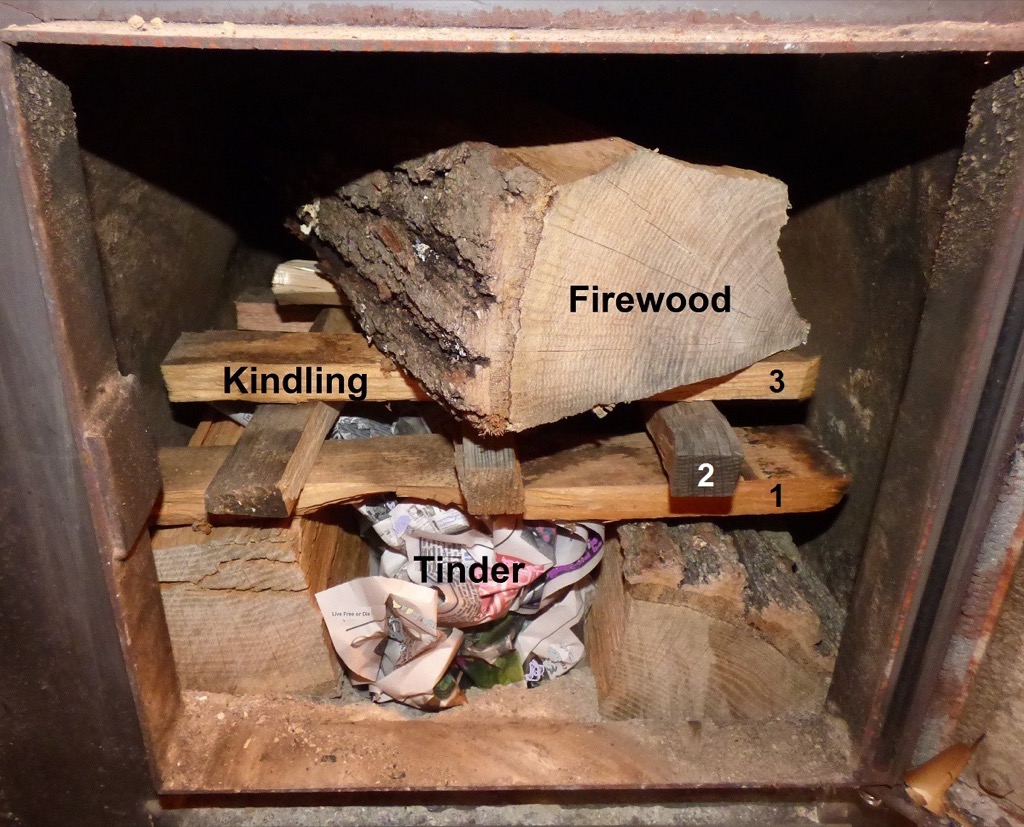
Building a fire requires (1) an igniter, (2) readily-burnable tinder to get the tiny flames growing, (3) narrow pieces of kindling wood to get the flames large enough to be able to ignite (4) the firewood. Photo 1 shows one example of what a properly constructed fire should look like before lighting the tinder. Notice the tinder pile underneath, the three tiers of kindling supported by the side logs so it won’t crush the tinder as it burns, and the firewood stacked on top of the kindling.
 [1]
[1]
WHY FIRE-MAKING Often FAILS
If you remember nothing else from this article, understand the three biggest mistakes causing fire-building failure are: 1) not enough of the right kind of tinder, 2) not supporting the kindling with pieces of firewood to prevent it from crushing and extinguishing the tinder, and 3) not having all your fire-building components in place before lighting the tinder.
With the kindling supported it cannot collapse and snuff out the tinder before it has a chance to do its job. As the tinder ignites and begins to burn, the flames it creates reach up and ignite the supported kindling. Having everything in place before the match is struck: tinder, kindling, and firewood, lets the fire take off on its own once the tinder ignites. Should your tinder fail to get the fire going, the supported kindling allows you to add more tinder underneath to give it another try.
WOODSTOVE AIRFLOW CONTROLS
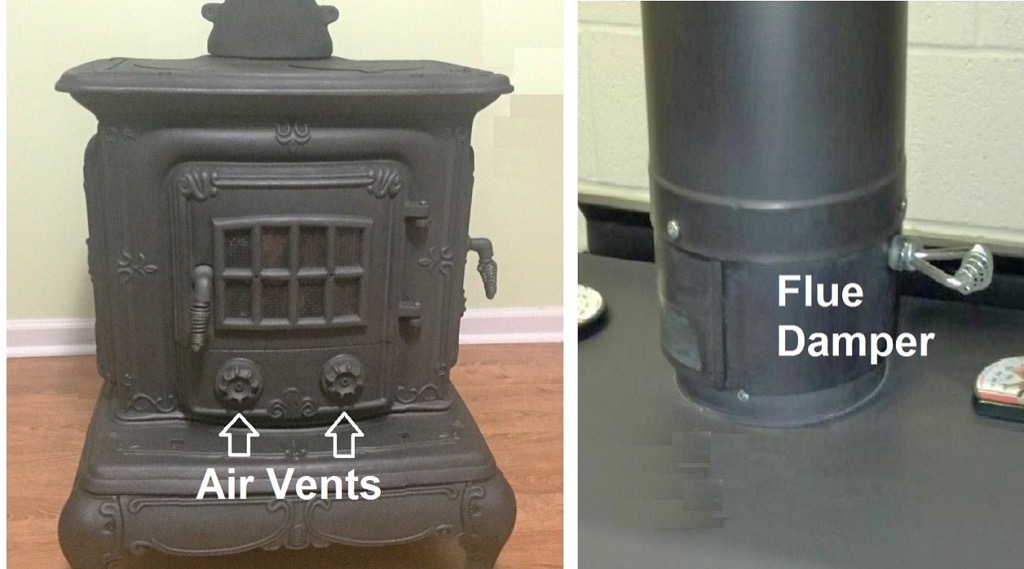
One more concept and then we’ll build a fire. Photo 2 shows the two ways to control the airflow in a woodstove: the chimney flue damper and the air vents (aka airflow regulators.) Operating the chimney damper correctly is important to keep the chimney from overheating as well as to increase or decrease the amount of updraft in the chimney. The airflow vent controls the amount of air flowing past the fire to provide it with oxygen as well as to help create the updraft. Both the chimney damper and the airflow regulator affect how quickly the fire burns. Too quickly and all the heat goes up the chimney and wastes firewood, too slowly and the fire will burn inefficiently or go out altogether. Experience will help you become proficient at using these two airflow devices.
 [2]
[2]In the chimney damper photo notice the handle with the spring on it. The damper is a flat plate of iron inside the chimney and the handle on the outside lines up with the damper to indicate its position. In the photo, the handle shows that the damper is almost completely closed. When the damper is wide open, the spring handle will be straight up and down.
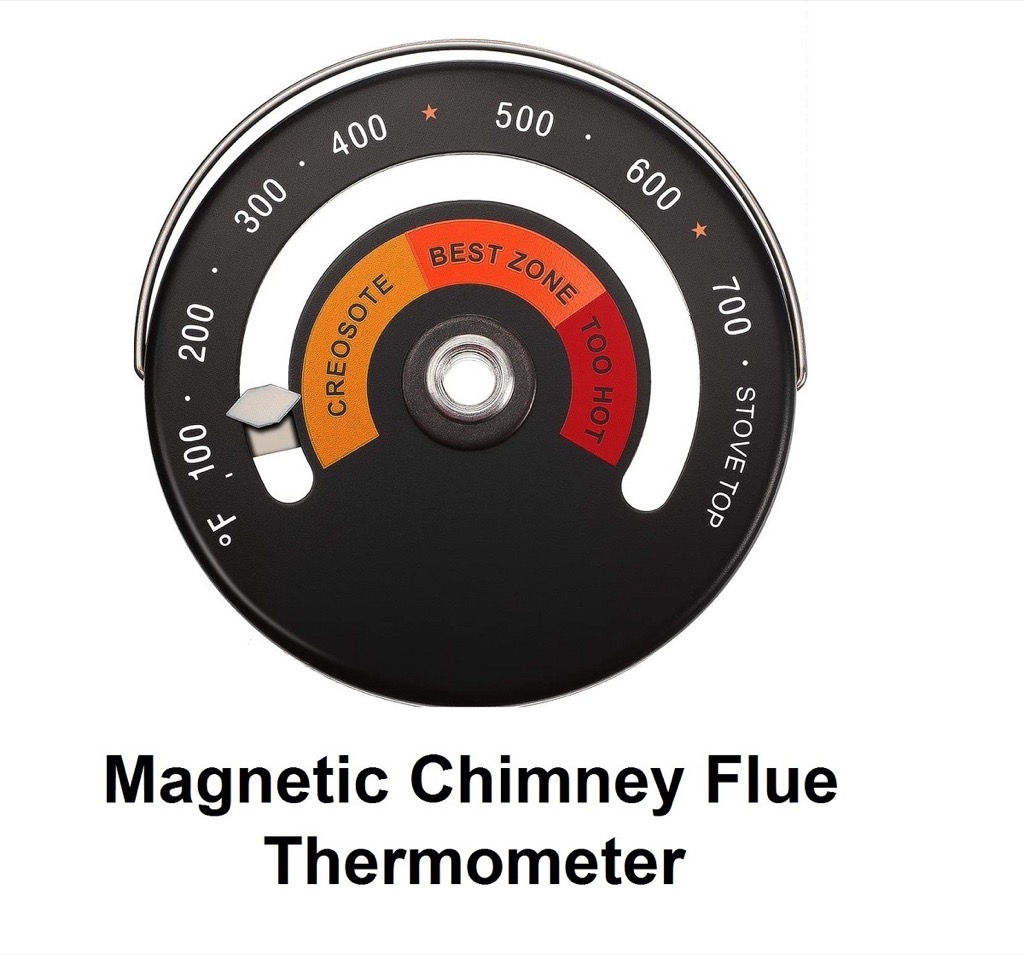
When the damper and air vents are left wide open while a fire burns, the chimney pipe will start to glow red beginning at 750°F. An interesting spectacle but very dangerous! I very strongly recommend you buy a magnetic chimney thermometer (Photo 4) and stick it on the chimney flue 8-10” above the damper. Not only will it greatly improve safety with your woodstove, it’ll help you master air control much more quickly. It’s also a good indicator of when to add more wood to the fire. For me, a chimney thermometer takes all the guesswork out of managing the fire in a woodstove.
 [3]
[3]
LET’S BUILD A FIRE
To start a fire in my woodstove I first open the chimney damper, then the airflow vent on the front of the stove. This allows an adequate amount of air to pass through the woodstove as the fire starts burning. Next, I place two pieces of ~4″ diameter firewood inside, up against each sidewall of the stove to form a valley between the two pieces. For tinder, I fill the valley with six sheets of wadded-up white newspaper (the color ad inserts don’t work). I then build a three-tiered lattice by laying three evenly-spaced pieces of short kindling across the valley so each end is resting on the logs against the walls. I then add three longer pieces of kindling running lengthwise on top of the first layer, followed by a third layer of shorter pieces. Lastly, I add a large piece of firewood on top of the lattice. This should have some exposed wood, not a round piece with all the bark still on. You’ll notice in Photo 1 that I’ve placed the piece of firewood slightly askew with opposite corners situated above the two side logs. This ensures that after the kindling burns away the firewood will be resting on the side pieces with plenty of air space around it, allowing the fire to get off to a stronger start. Later it will be pushed into the valley and more firewood added
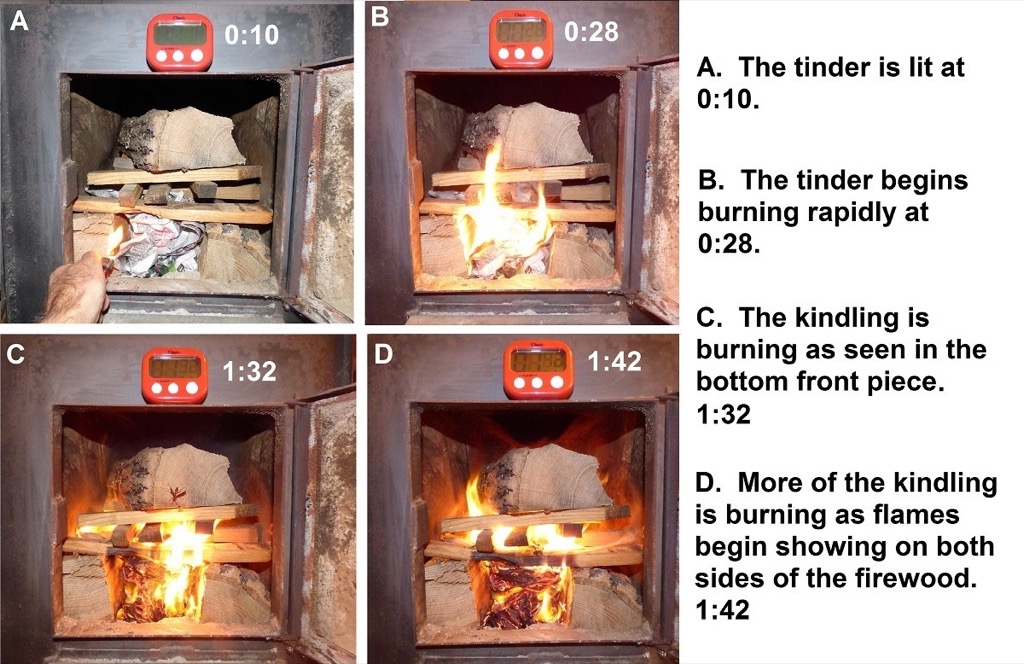
After getting your fire set up as described above, light the tinder in just one or two spots near the front. Once you get proficient you’ll close the woodstove door as soon as the tinder is lit. For now keep the door open so you can observe the progress of the fire. You’ll hear crackling as the tinder catches fire and the kindling starts to burn. A few minutes later when the piece of firewood catches, you’ll soon hear the roar of a successfully built fire. Let the fire roar for a minute or so and then adjust the damper (I close mine about halfway) to prevent the chimney pipe from overheating. As the fire increases in strength gradually close the front air vent but don’t shut it completely. Again, experience will be your best teacher for damper and vent control.
In Photos 4 and 5 you can see the progression of a properly set up fire from the moment of lighting the tinder until it reaches the roaring stage.
 [4]
[4]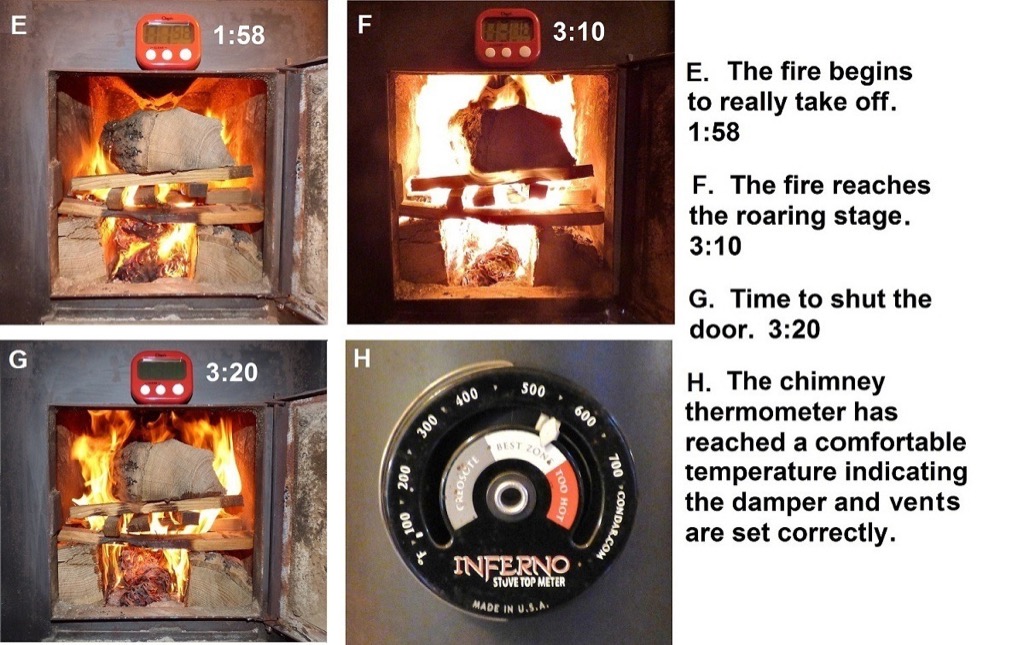 [5]
[5]
Hopefully, you’ll accomplish a quick fire on your first try. If not, add more newspapers to the valley under the kindling and try again.
Another benefit of building a fire this way is setting up my fire the night before so on those geezer-freezer mornings as soon as I get up I can just light a match and walk away to get the coffee pot roaring next.
Now, some of the finer details.
CONVENTIONAL FIRE IGNITERS
Butane Lighter – This is my preferred method to light a fire. Beware if you leave the flame burning too long it melts the plastic holding the striker in place and it’s impossible to fix, so light the tinder quickly. Wand-type butane lighters eliminate this problem.
Matches – Wooden matches are the old standby and can be waterproofed by dipping the heads in paraffin which also makes the flame last longer. As a teenager hiking in the woods and desert, whenever I went out I carried paraffin-waterproofed matches in an empty 12-gauge shotgun shell, sealed with electricians tape. Once I became more affluent I spent $1.99 on a waterproof match case.
UNCONVENTInAL FIRE IGNITERS
In a TEOTWAWKI world, matches and lighters will eventually run out so less-conventional igniters must be used. This article doesn’t discuss those in detail but they include banking the coals, ferro rods, parabolic mirrors, flint and steel, and magnifying glasses among others. A simple rectangular parabolic make-up mirror or a 4+” diameter magnifying glass will ignite tinder in less than 20 seconds so don’t write these off as mere grade-school curiosities. As long as the sun is shining, they’re much quicker than things like ferro rods and require no special tinder. I suggest you do an internet search on various methods, beginning with banking the coals, and get proficient at several of them.
FIRE-BUILDING MATERIALS
Tinder
You cannot build a proper fire without good tinder. Various materials can be used as long as they readily ignite with a match and produce a large enough flame to ignite the kindling.
Newspaper is the easiest and quickest tinder for lighting the morning fire. Free newspaper is available from most newspaper offices and I have a 5-year supply tied in bundles stacked in my garden shed. After the SHTF I can stretch it further by banking the coals, using fewer sheets, and waiting a little longer for the fire to get going.
Wood shavings and larger splinters are also useable for tinder and are easily created with a pocket knife, machete, or hatchet from the larger pieces of firewood in your woodpile.
Aside from newspaper, I’m not a fan of using man-made products such as petroleum jelly for tinder, especially for non-emergency fires. Anyone building fires on a regular basis should learn to build a proper fire with more traditional tinders. Petroleum jelly is bulky and way up there on the gooberization scale so for emergency kits I prefer 2” x 3” patches of paraffin-soaked linens (Photo 6). A $3.00 pound of paraffin will make 250 patches and they’re much more compact than petroleum jelly. Also, 20 of them stack well in an Altoids tin, readily ignite when wet, and there’s no gooberage to deal with. Each one provides 3-3½ minutes of burn time, long enough to ignite tinder or fine kindling under almost any conditions. To make, melt paraffin in a double boiler, dip the cloth patches, then dry on a board or wax paper. Don’t depend on these other than as an item in your emergency kit.
 [6]
[6]
Kindling
For me, the best kindling is ~¾” x 1” and whatever length works in your woodstove. When splitting wider boards for kindling, I shoot for a ¾” x ¾” piece but many end up closer to ¾” x 1” or 1½”. The smaller the width and rougher the texture, the more easily it will catch from the tinder.
The most readily-available kindling is made by splitting firewood into long thin sticks. There are also many sources of boards to split for kindling.
Look around with a repurposing mentality and see what’s available. Sawmill short ends are my preferred kindling source as well as any short pieces of scrap wood. Free pallets are popular for kindling I use an ancient thrift-store Skilsaw to cut them up. Don’t try this at home but with the blade guard tied back I can cut up a pallet much more quickly with less frustration. Wear your chaps! Removing nails is too labor intensive so pound them flat and saw around them.
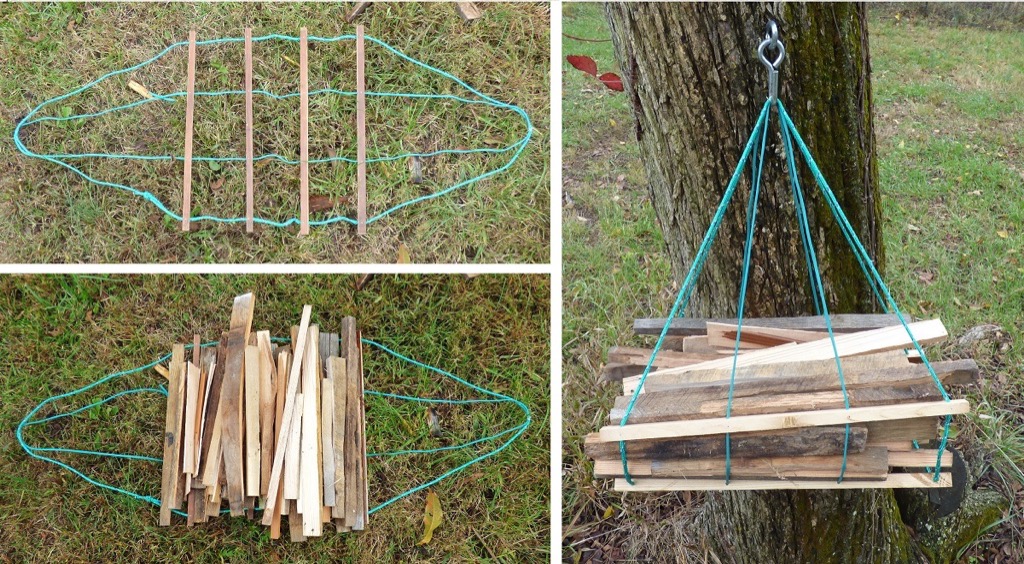
A kindling carrier (Photo 7) makes it much easier to get a week’s worth of kindling into the house in a single trip.
 [7]
[7]
CONCLUSION
Today efficient fire building is an important skill for anyone using wood heat and for those who spend a lot of time in the wilds. If you can’t light one match, walk away, and have a successful fire going in a few minutes, you should practice until you can do that 99% of the time.
In a TEOTWAWKI world, knowing how to build a fire quickly on the first try will be an essential life skill. Practice now to become proficient and learn to do it like our ancestors did, using only traditional resources. Not only will you impress family and friends, but you’ll be way ahead of the curve when the grid goes down forevermore and the propane man is just a distant memory.
Good luck and have fun with this!