(Continued from Part 1. This concludes the article.)
The First Range Session
I went to the range behind my barn, placed the Caldwell Lead Sled 3 and the homemade lead sled on a table at the position from which I wanted to fire, and then placed the rifle on the Caldwell sled.
I removed the bolt, and bore-sighted the rifle on the bottom center target. I then checked the aim point of the iron sights, and found them to be in the same general ballpark.
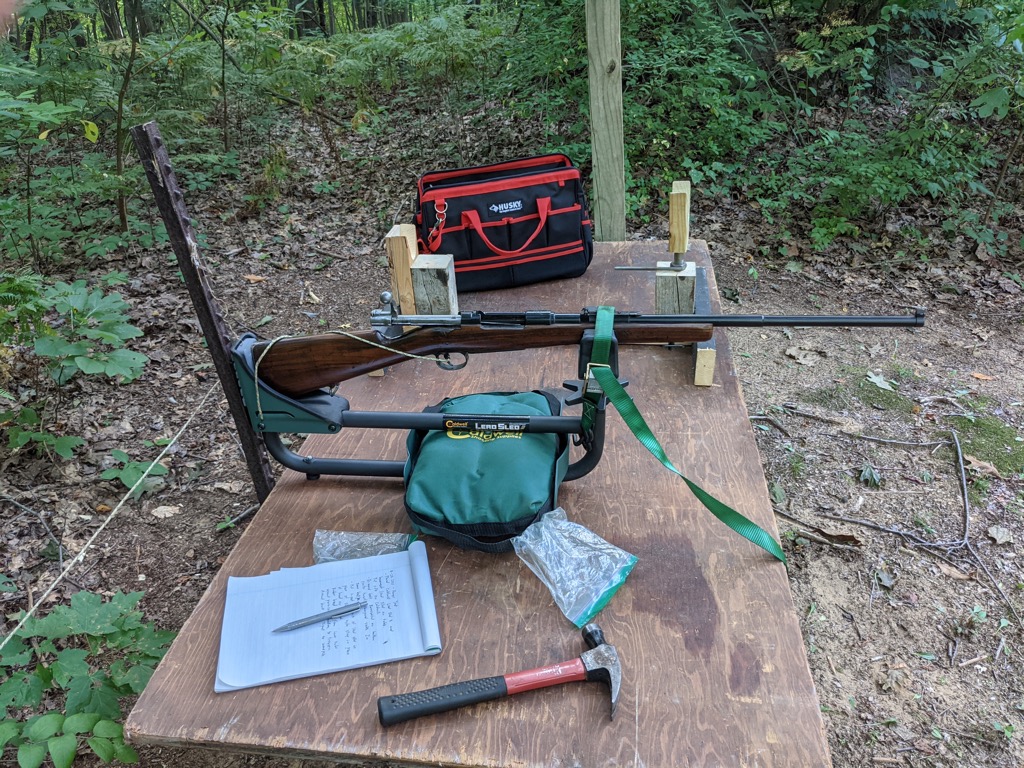 [1]Next, I pounded a t-post fence post in the ground at the back of the lead sled to serve as a substitute for my shoulder. I used a nylon strap as a substitute for my hand to secure the forend of the rifle to the front rest of the sled. I took a rubber band cut from a bicycle inner tube, put it around some paracord, and used it to hold the paracord in place on the trigger. I ran the paracord around the back of the t-post, and ran it over to the wood stack that I planned to shelter behind while firing the first shot. I then tested the arrangement by cocking the rifle on an empty chamber, and dry firing it from behind the wood stack. The experiment was a success.
Next, I chambered a round, took shelter behind the wood stack, pulled the paracord, and fired the round. I ejected the brass, and examined it for any signs of deformity, bulging, or a blown primer. The brass appeared completely undamaged. I also carefully inspected the breech and bore for any signs of problems. There were none.
Based upon this successful test firing, I chambered another round and fired it normally, using the lead sled. The shot hit low and to the right. I fired two more rounds using the same aim point but without adjusting the sights. One bullet hit high center, and one hit low left. I checked to see if the sights might be loose, causing inconsistency in the point of aim. That was not the case.
I fired an additional two shots using the same aim point. They were a bit closer than the previous shots, but nothing to brag about. An examination of the target suggested that the bullets were tumbling in flight, producing keyhole-like tears in the targets.
 [2]Next, I fired a couple of shots from the homemade lead sled. The Caldwell sled was definitely more comfortable to use. The holes produced by these shots appeared a little smoother, and were slightly more accurate. This suggested that the barrel might be smoothing out from repeated use. The rifle was still only slightly more accurate than the evening news, which is to say, not very accurate at all.
This left me with a number of possibilities to explore. The M1893 was originally designed for cartridges with 173 grain bullets. It was possible that the rifle was having trouble stabilizing the lighter 140 grain bullets that I was using. I needed to experiment with ammo with heavier bullets.
It was possible that the barrel needed to be re-crowned. There was a bump by the muzzle that might be destabilizing the bullet as it left the barrel.
It was possible that there was an irregularity in the barrel, possibly associated with corrosion or the re-bluing process. This irregularity might smooth out with more shooting, or the rifle might need a new barrel in order to shoot well.
It was possible that the ammunition that I was using had under-sized bullets.
It was also possible that I had not yet learned to shoot this particular rifle well. With more practice, I might get more consistent.
In any case, the first range session was not particularly encouraging. At that point I considered the rifle to be the least accurate firearm in my gun safe. Further work was needed.
Old Spanish Ammo for an Old Spanish Rifle
Ammunition can remain good for decades if it is stored in a cool, dry place. The problem with buying old ammo is that the buyer does not know if the ammo has, in fact, been stored in a cool, dry place.
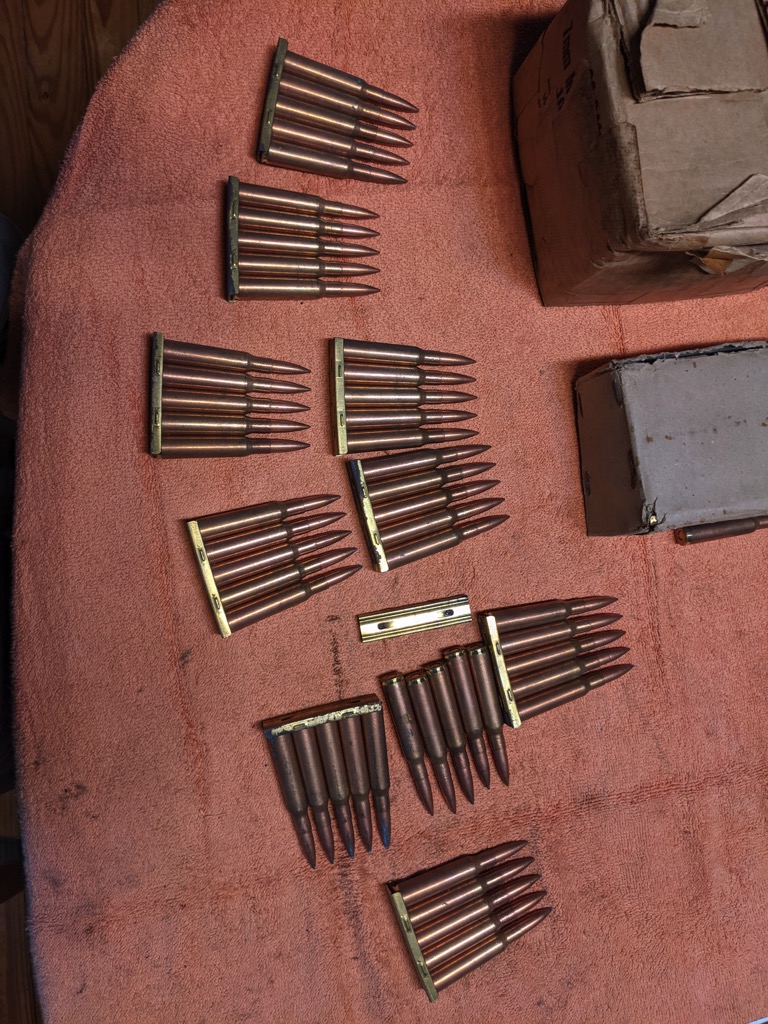
In preparation for further testing, I bid on three boxes of old 7×57 ammo on Gunbroker. In the pictures of the ammo, one of the boxes showed signs of exposure to moisture, and there was some evidence of corrosion on some of the cartridges. I took the risk of bidding on this ammo because it came in stripper clips, and the value of the stripper clips alone was almost as much as what I was bidding on the ammo.
Three dangers of shooting old ammo are the squib, hangfire, and corrosion.
The squib occurs when the pressure of the gases created by the combustion of the powder is not sufficient to drive the bullet from the end of the barrel. Then the bullet becomes lodged partway between the chamber and the muzzle. If another round is fired while the barrel is blocked by a squib, the barrel may burst. So if you are using old ammo, and a shot sounds kind of anemic, make sure that you check the bore to make certain that it is clear before taking another shot.
A hangfire occurs when there is a delay between pulling the trigger, and the combustion of the powder in the cartridge. If a round fails to fire, keep the gun pointed in a safe direction for at least five seconds, then eject the cartridge.
 [3]Corrosion is also a risk, because older ammo often uses corrosive primers. When metallic cartridges were first developed, they used mercury fulminate in the primers. Mercury fulminate tended to degrade over time. About 1898 or so, mercury fulminate began to be replaced as a priming compound by potassium chlorate or sodium chlorate. Ammunition using these chemicals in their primers was shelf stable for longer periods of time. The problem was that when these chemicals were burned, they produced potassium chloride and sodium chloride respectively. You may remember from high school chemistry that sodium chloride is common table salt. If you live near the ocean or in an area that uses salt to melt ice on roads in the winter, you are probably painfully familiar with what salt water can do to steel. Potassium chloride has similar effects. If a firearm is not cleaned almost immediately after shooting ammo with corrosive primers, the inside of the barrel and any other metal parts that have been exposed to the primer residue may begin to rust.
In any case, I won the auction, and my old ammo eventually arrived. I spread an old towel on the kitchen table, and opened the box. There were two boxes from Fabrica Nacional De Toledo, and one box from Interarms. Boxes #1 and #2 each contained 50 rounds held in 10 stripper clips of 5 rounds each. These rounds were headstamped “FNT 1952″. Box #3 contained 83 rounds held in 17 stripper clips (16 clips with 5 rounds each and one with only 3 rounds). The box also contained the brass from two expended cartridges. The rounds in Box #3 were headstamped “FNT 1953″. Since I was not able to confirm otherwise, I had to assume that this ammo used corrosive primers.
I removed each round from the stripper clips, and wiped the stripper clips and the rounds with a rag wetted with Breakfree CLP, and then wiped away any excess. I was prepared to use steel wool with CLP to remove corrosion, but the cartridges cleaned up better than expected with just the CLP on the rag. As each stripper clip and cartridge was cleaned, I replaced the cartridges in the stripper clips.
I separated out the cartridges from which I had removed the most extensive corrosion. I wanted to test them first. My theory was that if the worst cartridges fired well, then the better cartridges would probably also fire well.
I was really happy that the old ammo I bought turned out to be Spanish ammo. This ammo was specifically designed to fire in the M1893. Testing with this ammo would give me a sense of whether the inaccuracy I initially experienced was due to bullet weight, or if it was due to some other cause.
The Second Range Session
 [4]I started the second range session by loading the worst-looking round that I could find into the rifle. It fired fine, and produced a nice smooth round hole, in contrast to the jagged keyholes that I had experienced at the previous range session using newer ammo with lighter bullets. I then fired the remaining four rounds taken from the old stripper clip, each loaded singly into the magazine. The result was an acceptably tight group that was low of center.
I put five rounds of the newer, 140 grain ammo in the now empty stripper clip, and reloaded the magazine. It loaded well from the stripper clip. I then fired all five rounds. I noted that the newer ammo with the lighter bullets still did not group as tightly as the old ammo with the 173 grain bullets.
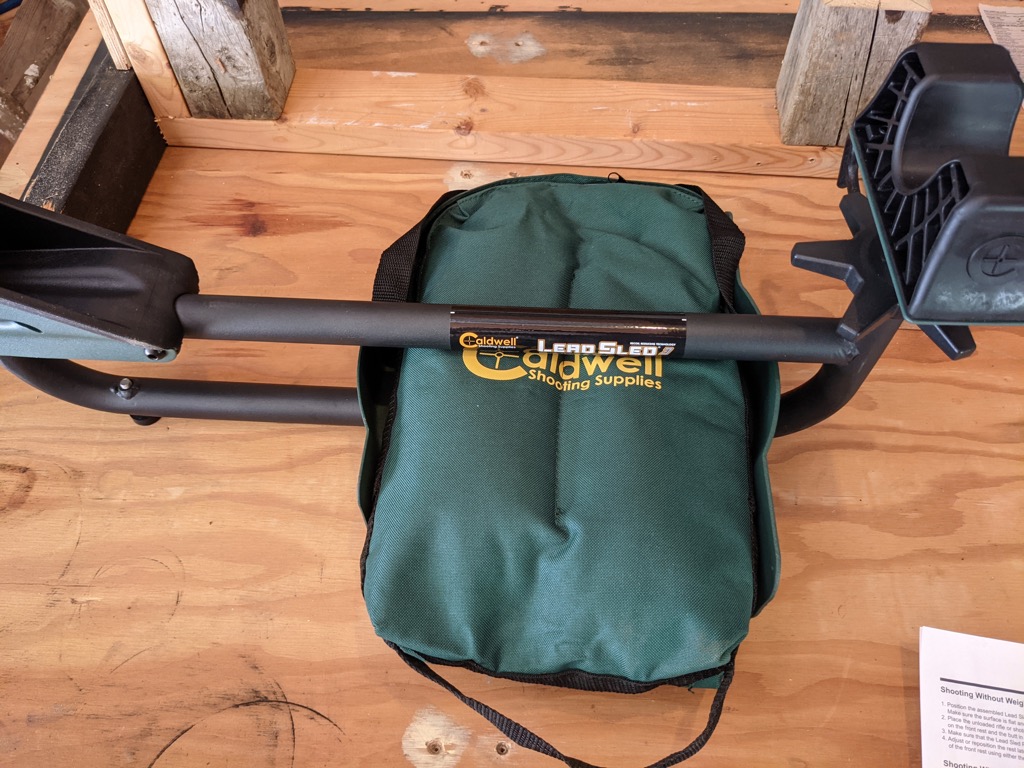
I had fired these first ten rounds off of sandbags, but now switched to the Caldwell Lead Sled for the remainder of the range session. It was remarkable how comfortable it was to fire from the lead sled in comparison with firing off of sandbags.
The next five round group of old ammo was nice and tight, but about two inches low. I adjusted the sights, and tried another five round group. The fifth round of this group did not fire. I waited about ten seconds in case of hangfire, and then ejected the round. The primer was deeply dented by the firing pin. I reinserted the round in the chamber, and tried again. It once again failed to fire. After waiting an additional ten seconds or so, I ejected the round and left it laying on the ground while I went to inspect the target. I was still hitting low. This ended up being the only round that failed to fire during this range session. I was pleased to have a 95% success rate using ammo almost 70 years old that appeared to have been stored in humid conditions.
I elevated the sights again, and shot another group with the old ammo. Accuracy was better, the group was still a little low, but it was acceptably tight. During my next range session, I will need to elevate the sights some more.
So my old eyes, using iron sights, were able to achieve acceptable accuracy from a 123 year old rifle firing ammo that was almost 70 years old. I was very pleased.
Cleaning Up After Corrosive Primers
Immediately after the range session, I took the rifle to the barn, lit a twig stove, and put an old coffee can containing a quart of water on the stove to boil. Hot water is the best solvent for removing corrosive salts.
 [5]While I was waiting for the water to boil, I cut a length of plastic tube about the length of the bolt, and attached it to a funnel. I then removed the bolt and inserted the tube in its place, with the funnel sticking out of the back of the rifle. Next I put on insulated rubber gloves, pointed the muzzle of the rifle down into an empty coffee can (the “catch can”), removed the now boiling water from the stove, and poured the water into the funnel, from whence it ran through the barrel and into the catch can.
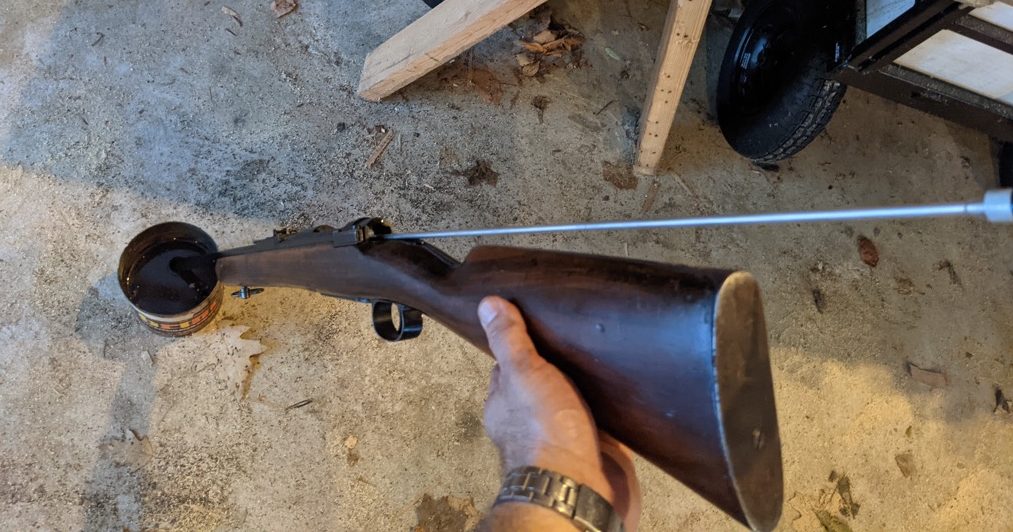 [6]Then I removed the tube and funnel, put a patch on the end of a cleaning rod, and ran it through the bore and down into the catch can. I then used the rod and patch like the piston on a pump, drawing hot water up and down the barrel from the catch can. After running the wet patch back and forth through the bore about ten times, I removed the muzzle of the rifle from the catch can, and used a dry patch to remove excess water from the bore. The plastic cleaning rod tip had warped from the heat of the water. Next time I will need to use a metal tip.
This initial cleaning session in the barn took about 20 minutes.
Next, I took the rifle inside, and cleaned it as I normally would after a range session. I ran kerosene patches down the bore until one came out clean. Then I ran a dry patch down the bore to remove excess kerosene. I was happy to note at this point that the bore was now shiny. It had previously been somewhat dark.
Then I cleaned the exterior metal surfaces, the bolt, and the bolt face with a kerosene rag. I removed the excess kerosene with a dry patch.
Finally, I ran a patch with Breakfree CLP through the bore, and wiped the exterior metal parts and bolt with Breakfree CLP.
Conclusions
I am very pleased with my M1893 Mauser from Elk Creek Company. It seems to fire 173 grain bullets quite accurately, although it has trouble stabilizing lighter bullets in flight. It is nice to own this interesting, useful, and historic rifle.
I am also very pleased with the Caldwell lead sled. It makes sighting in a rifle much easier, and more comfortable. It changes bench rest shooting from being one of the most punishing aspects of shooting a rifle to one of the least punishing aspects.
I am happy to recommend both Elk Creek Company, and the Caldwell Lead Sled 3.
Disclaimer
SurvivalBlog Senior Editor JWR was kind enough to cover the cost of shipping and insurance on the M1893 that I ordered from Elk Creek Company. He also sent me the gift of autographed copies of two of his books. When he did these things, he did not know that I would write an article about the M1893, so this cannot be considered an inducement to mention Elk Creek Company.
Caldwell provided me with a Lead Sled 3 and weight bag for my testing.
I tried not to let the kindness of either JWR or Caldwell influence my evaluation of the products that they provided.
I did not receive any other financial or other inducements to mention any vendor, product, or service in this article.