If you had to list ten things that would be most missed in a post-TEOTWAWKI world, opening a tap and having free-flowing hot water whenever you want it would have to be near the top of the list for a lot of us.
In this article I’ll present an inexpensive solar water heater (SWH) which has gotta be the most efficient for the cost. I use this on my homestead almost six months of the year and in a non-freeze situation such as a greenhouse, this could be used year-round. Even with minimal skills and hand tools, you can build this yourself.
This can be a stand-alone system or incorporated into your normal hot-water home-plumbing system, allowing you to take advantage when the sun is shining, then by closing two valves, you easily fall back on your propane/electric water heater on cloudy days. In a separate SB article, I’ll show how to connect alternative water heaters to the main plumbing lines so your regular water heater can be a quick backup.
This is one more solar project that pays for itself in energy savings today and will provide an easier transition to a post-TEOTWAWKI world tomorrow.
WHY A SOLAR WATER HEATER?
Due to the high density of water, it takes much more propane to heat water than it does to fry bacon and eggs. The last thing I want to do when the SHTF is waste propane heating water if the propane man is going to be just a distant memory I’ll tell my great-grandkids about. With nothing more than the sun, a 25-watt solar panel (or a battery from your post-SHTF vehicle and a $15 solar trickle charger), you can run this solar water heater for years. There’s very little work involved in heating water: open two valves, flip a switch, and ignore it until a few hours later when it’s time to turn it off. How long would it to take to heat 30 gallons on your woodstove or campfire in the backyard? How dangerous is it walking around with pots of hot water on your way to the bathroom or kitchen? How nice are hot showers compared to a sponge bath?
BASICS OF BLACK-TUBING SOLAR WATER HEATERS
The general idea of this water heater is to take warm or cold water from a storage tank, circulate it through coils of black tubing to absorb the sun’s energy, then return it to the storage tank a little hotter than it was when it left. After enough cycles, it picks up enough heat to provide you with the day’s hot-water needs.
This SWH uses small-diameter tubing with a large amount of surface area, making it highly efficient. Using a flat coil made from Rain Bird T70 irrigation tubing, a SWH can be made with one large coil or two smaller coils connected together. Since T70 is above-ground irrigation tubing it’s highly resistant to UV degradation, rated for 70 psi (average home uses 30-50 psi), and every testing agency I checked gives polyethylene tubing a life span of 50-100 years, even longer than CPVC.
With a 500’ roll of ½” tubing costing only $39, you can make some fairly large, low-cost coils up to six feet in diameter when utilizing all 500 feet. The larger the coil, the more of the sun’s energy you can harness to either produce more hot water or decrease the time it takes to heat up the 20-30 gallons in your home water heater. Using 400’ will make two side-by-side, 46”-wide interconnected coils, fitting neatly into a SWH the size of a sheet of plywood. Either version will heat up a lot of water even on partly cloudy days. In northern regions with lower solar irradiance, bigger is better.
I put this together this SWH in less than two days at a cost under $70 (slightly higher now with increased building costs), and on the test run it raised the temperature of a 15-gallon tub of water 40° in three hours to a final temperature of 120°F.
RAIN BIRD SOLAR WATER HEATER IN A BOX
A very simple Rain Bird solar water heater be made quickly and inexpensively, and coils up to 6’ in diameter can be placed on a roof or flat surface to make the least expensive SWH of all, though more difficult to move when needed and depending on the location, more difficult to cover at the end of each day’s heating cycles. Lastly, at typical North American latitudes, the flatter the surface, the less efficient it is. But again, very easy to put together and the least expensive.
 [1]
[1]
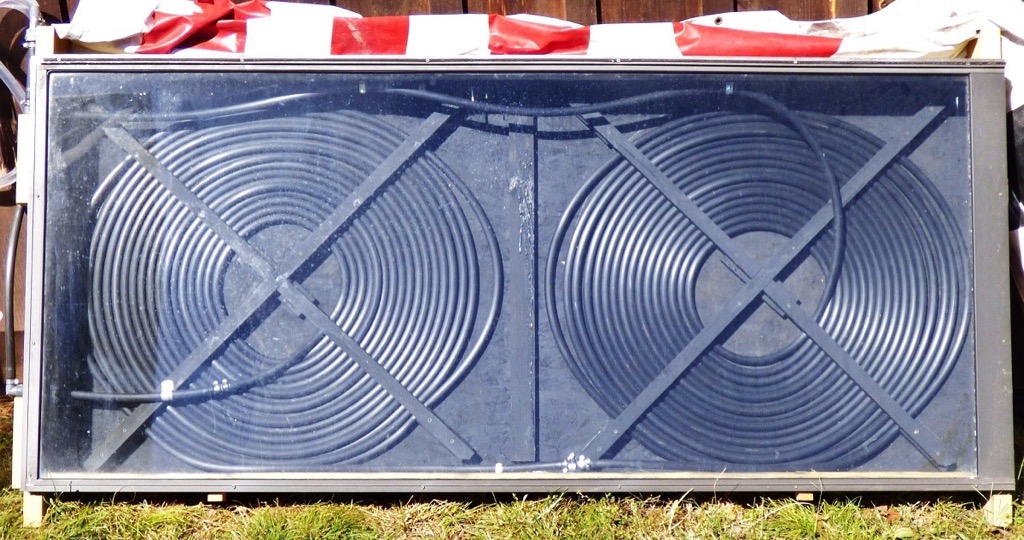
This article discusses a much more efficient version enclosed in a black box as shown in Photo 2. This version is easy to move, store for the winter, covered each afternoon, and efficiency can be maintained by adjusting the angle of the box to match the changing angle of the sun during the year.
My SWH has two side-by-side coils in a rectangular 79” x 34” box with a total of 200’ of tubing. It uses not only direct solar irradiation for heat but also the greenhouse effect provided by enclosing the coils in a glass-covered black box. This raises the temperature inside the box to anywhere between 120°F –170°F+ from late spring to early fall.
The one big downside to any coil-type solar water heaters is that they’re inconvenient to drain and should only be used during non-freezing months, or used in such a way to prevent freezing. Placing it in a greenhouse or in front of a south-facing patio door inside the home would be two such examples.
MATERIALS NEEDED
Irrigation Tubing – The first thing you’ll need is a roll of ½” irrigation tubing, specifically Rain Bird T70-500s or a reasonable equivalent. At $39, HomeDepot was considerably cheaper than other sources I checked. Rain Bird T63 is also ½” but doesn’t work with the inexpensive gray barbed fittings available at hardware stores.
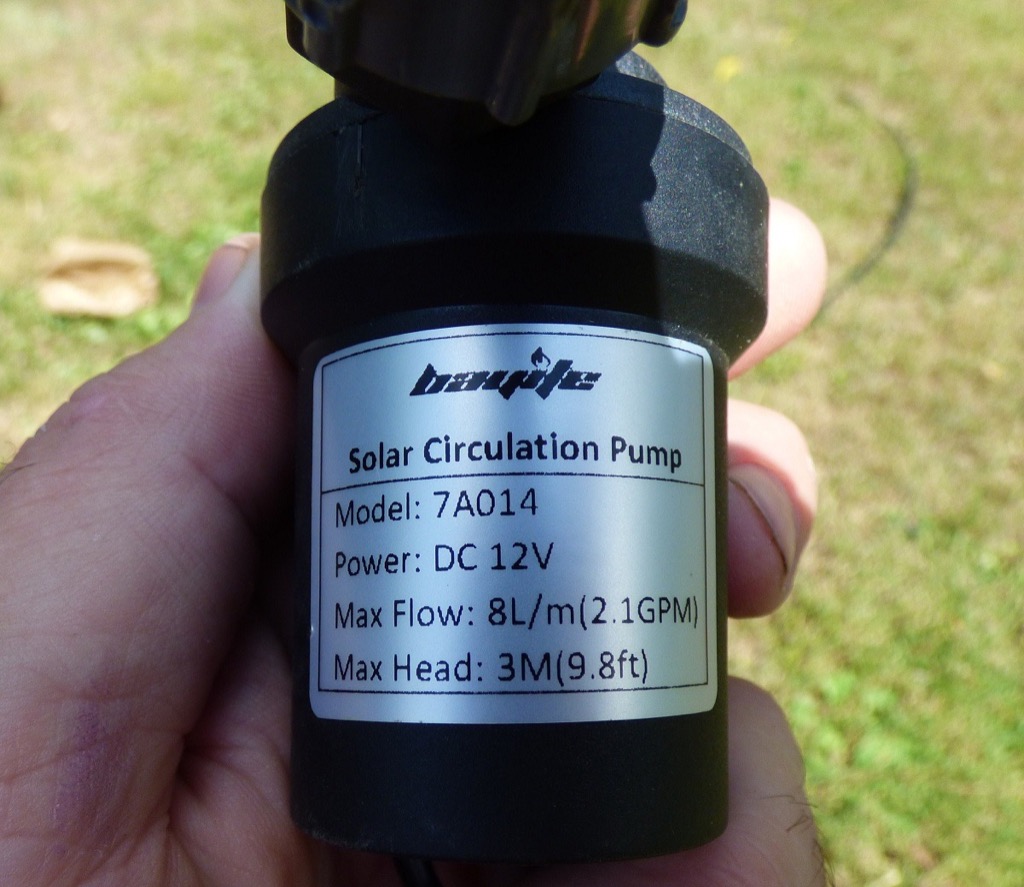
12-volt Water Pump – I prefer a small 12v hot water pump so I have the option of running it with a 115-volt adapter, directly off a small solar panel, or a 12v battery. Be sure the pump you use is rated for hot water as most of them are not. The two main characteristics I look for are long life (30,000+ hours) and low output (~2 gallons/minute). The section below, “A Quick Primer on Closed-Loop Water Systems” will explain more about how small pumps can accomplish so much and why you’ll probably want a closed-loop system.
Plumbing Fittings – You’ll need various ½” barbed fittings available at any hardware store to connect the irrigation tubing to the pump and your hot-water storage tank.
Lumber – You’ll need a box to hold the coiled irrigation tubing, constructed from treated 2 x 4’s and a sheet of ½” plywood or chipboard. To save money you can modify the box size to utilize any repurposed materials you may already have on hand.
Glazing Material – I used a recycled patio door but I recommend using a full sheet of plywood and corrugated polycarbonate greenhouse panels [2], available at HomeDepot and other locations.
A QUICK PRIMER ON CLOSED-LOOP WATER SYSTEMS
For this SWH to work effectively with a small pump it’s important to understand the concept of a closed loop.
One characteristic of any water pump is called “Max Head,” which refers to the maximum number of feet that pump can raise water in an open loop. An open loop uses two open-ended pipes or hoses with a pump in the middle to move water from one place to another, such as pumping water from your rain barrel into your garden. Any time the water isn’t circulating, as with a sump pump, you have an open loop. Water is very heavy so the small 12-volt pump in this SWH is only rated at 9.8 feet of maximum head, meaning in an open-loop system, the pump will struggle pumping water from the ground floor to the second floor of your house (+8’), and the third floor (16’+) is out of the question.
 [3]
[3]
On the other hand, with closed-loop system the pump can lift the water as high as you wish, within reason due to other factors such as drag. A closed loop works on the same principle as a Ferris wheel. A Ferris wheel is balanced so while it takes energy to move Fat Fred in the three o’clock position upwards against gravity, Heavy Hanna coming down from the nine o’clock position balances out the equation with gravity, leaving much less work for the Ferris wheel’s motor. Water in a closed-loop system works the same way. For every pound of water going up, a pound of water elsewhere in the system is coming down, balancing each other out energy-wise and allowing a very small pump to do the work.
When cycling water through a closed-loop SWH system, the pump takes water from the storage tank, sends it down the line to circulate through the SWH, then returns it to the storage tank. There’re no open lines in the plumbing or storage tank so we refer to it as a closed-loop system. Our tiny little 12v pump with a maximum head of only 9.8 feet, can now lift water 30’ if needed since the water falling back down 30’ on the other side of the loop will pull it along. Everything is balanced so the pump merely acts as a circulator. Keep this important concept in mind when designing the hot-water storage tank in your SWH system.
(To be concluded tomorrow, in Part 2.)