I know there have been many fine articles here at SurvivalBlog on firearms and accuracy submitted in the past, yet I feel as though I can contribute something unique and useful with my combination of tools and methodology…see what you think. For myself, there are a few tools I utilize perhaps above and beyond what most folks I have observed employ, and then other basic tools. The two items I would like to especially emphasize in this article, among others, are the chin rest bag for pistol sighting and the optical occluder for enhanced focus for both pistol and long gun iron sight alignment.
My Path to Accuracy
As a pretext before elaborating on the above-mentioned items, following are a few odd paragraphs about my evolution of interest, dare I say passion in arms history as the basis of my appreciation for the Second Amendment and a driving force for maximum accuracy from each iron-sighted firearm. As an example of continuing interest, I have disassembled a Winchester 1897 action. As I worked through cleaning and lubricating each part, I studied its function and interaction with the other parts. It is just fascinating to me.
I also worked for years at a blacksmith/machine shop that was opened by the owner in 1918. He and his co-owner nephew were still running it when I started there. My mother was a good friend of the nephew’s wife. She said I should go there for a job while attending community college as I was in between jobs. I asked: “What do they do there Mom?” She hesitated and then said: “Oh, they solder toasters and things like that.” Precious memories. There were only a few of us that worked at this oldest business in the town. The shop had many vintage lathes, mills, various welding apparatus, trip hammer, anvil, benders, shears, band saw, blacksmith’s forge, drill presses, etc. Metalworking only increased both my knowledge of and my fascination with tools, machining, heat treatment, alloys, and firearms.
Backing up further in time, my first discharge of a powder-burning arm was a Remington .22 Nylon 66 at the Long Beach Pike amusement park shooting gallery around 1965: five shots for a quarter. Their carnival booth air-powered “machine gun” BB guns were phenomenal too; shoot out the red star! They even had surplus WWII air-to-air anti-aircraft training machines that took dimes to operate…many dimes over time. Once you dropped in your silver, while standing on a stool, you placed your face against the eyepiece of a machine like an old-time motion picture multi-card player that you cranked with your hand at whatever speed you liked. It started up an actual reel-to-reel film of fighter aircraft approaching what I presume to be the bomber you were flying in. You had to turn two handles on either side of the viewer to either pan left-right or up-down. It was a real challenge to follow the fighter arcing through the sky at you. When the moveable crosshairs were lined up you pushed a red button on the right grip, and it simulated firing a machine gun at the enemy. When you got it right, it would ding-ding-ding a bell and flash a red light on top of the machine.
Around the same time Grampa, my mother’s father told me that he and his older brother worked a few years in the ammunition factory of the Peters Cartridge Company in Kings Mills, Ohio. [Before then,] when he was around ten years old. They installed the primers in centerfire cartridges. This was about 1907. In a hushed tone, he mentioned walking upright into and through the huge drainpipe that led into the factory on a Sunday (a day of worship no less) and filling their mother’s picnic basket with loose .22 long rifle cartridges, then with each of them holding the basket by the handle between them, strolling out the way they came in. The immense weight caused the handle to break free, he laughed. Under a nearby bridge, they would stick, over time, many boxes worth of strike-anywhere matches into the dirt bank and practice lighting them with the bullets from those Peters cartridges. Stories like this and shooting magazines that he gave me kindled my enthusiasm for U.S. firearms and ammunition makers. (Not the pinching part.)
At age 14, after a Hunter Safety course, I found myself on the range and over the shooting bench trying to get my scoped Marlin .22 caliber rimfire rifle bullet to strike a weed stalk (instead of the target) growing on bottom of the 25-yard line berm, without success. I just did not understand the concept of sight or scope adjustment very well, if at all. As a youngster influenced by western TV programs, I couldn’t help but notice the good guys were sure shots, never any sight adjustments! Why did I need to?
Sighting-In Methodology
Fast forward many years and I believe I have worked out a good system, particularly for pistols, my favorite class of firearm, although it works well for iron-sighted long guns (but with no need for a chin rest bag with a rifle). I use these pieces of equipment that are now essential to good iron-sight adjustment and, at a very limited cost.
My preferred method of aligning sights is over the bench, to eliminate variables that are inherent when trying to hold a firearm still without solid support. When in the field, at a range or at a shooting school, those variables are working quite nicely against me already. My basic formula utilizes the local range that gets me an awning-covered row of concrete shooting benches, an indisputably solid base to work from. A good portable bench does well also. I made one out of plate steel with pipe legs that we use out in the field occasionally. I wish now I had made it out of aluminum, due to the weight.
Tools to Get the Job Done
Pistol Rest and Leather Shooting Sandbag for the Chin!
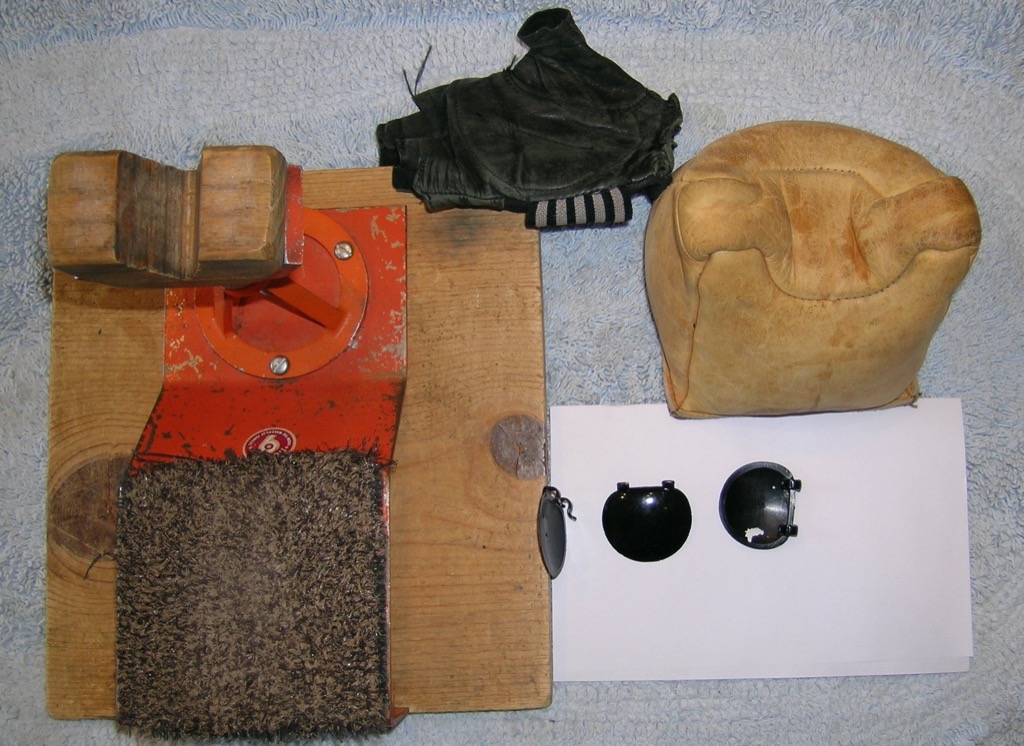 [1]Since I’ve never bought an expensive mechanical Ransom Rest, I have a very basic Hoppe’s pistol rest with vertical adjustment that I screwed to a wooden plank to increase its basal stability (pictured). But my big find in recent years is to use a leather shooting sandbag to rest my chin on when sighting pistols, the first of my two main topics of interest. Once the pistol sights were on the target, it seemed the biggest remaining variable was my head bobbing slightly behind the sights during the final press on the trigger before primer ignition. I have found that my chin on the sandbag has greatly stabilizes my sight picture and been a real benefit for shrinking group size. I also have several thin wooden blocks that I set under the chin bag for height adjustment, as necessary. In addition, thin foam pads are utilized to rest my elbows on to reduce magnum pistol recoil abrasion from the benchtop. These all allow me to focus more on sight alignment.
Optical Occluders
Because my eyes do not focus as well as they used to, my journey led to the second main topic of interest for this article, optical occluders. It is certainly true that bullseye shooters have used elaborate forms of occluders for many years. I also humbly herein advocate their use.
 [2]Whenever making adjustments to iron sights (long or short gun) over the bench I use an optical occluder placed on the outside of my prescription glasses, over my shooting eye. It helps immensely to drill a small hole through the occluder, to see through. (I had tried it briefly with no hole, to my ultimate dismay.) I obtained a package of these little plastic “eye patches” that have two small clips on them that slip on to the top-front of my shooting/prescription glasses. The clip-on occulders I use are cheap plastic and not fancy or especially stable on the thicker frame I have, but they do work well; your results may vary. Try a heated sewing needle to melt a hole. Another way is to try turning a drill bit with your fingers. I bore a hole of approximately 0.035 to 0.040 thousands of an inch in what I estimate to be the best location on the occluder to line up with my eye through the sights to the target. When viewing through the tiny hole, the result is a greatly increased focus of both sights and the target simultaneously.
As far as hole size to drill in the occluder, try different diameters. It is important that there be no plastic burrs left in the hole you drill, as it will reduce focus significantly. You can smooth out any burrs with the heated sewing needle. It is important to start with a very small hole to test and increase as necessary.
Using this modified optical occluder is much like a small hole diameter rear peep sight on a rifle or a camera that has a very small aperture setting for greater depth of field focus, from up close to infinity. This is the same principal experienced with the occluder. A bit of patience and testing helps you to get it in a comfortable place for eye-occluder hole-sight-target alignment, all while on the bench with chin on the bag. The clip-type occluder I have will slide, side to side on the frame of my glasses. With this done, I can now clearly focus on the front and rear sights while still being able to see the target sharply with my lens prescription. Improved depth of focus is best with the pistol arms extended as much as is practical on the bench.
Shooting Gloves
If I am shooting a magnum strength pistol, I typically use a shooting glove with the thin padding material in the grip area. I used to razz a friend who was a devotee of using this “sissy glove” since he shot almost exclusively a 7.5-inch SS Ruger Redhawk in .44 Remington Magnum; exceptionally well, I must confess. Then I tried one too…what a difference it makes in less felt recoil and slap on the hand and fingers. It thereby facilitates focusing on other important aspects of placing the shot accurately. I now deem it manly to wear them.
Results
 [3]By applying this sighting method with these implements, I have found that so many pistols and long guns I used to think were rather crude in their accuracy turn out to be delightfully accurate. With this combination of tools and practice, five-shot pistol groups under 1 ¼ inches at 25 yards with a variety of basic “target” type pistols, with adjustable sights are common.
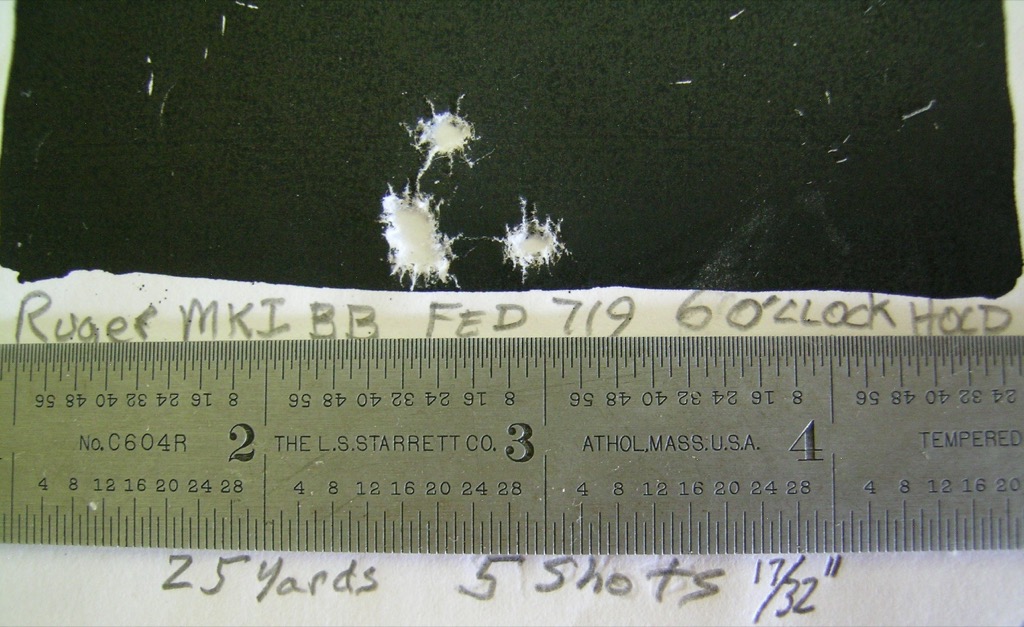
In my experience, this small group sizing does not, as expected, apply to semi-auto defensive type 9 millimeters or service pistols from the past that I own and or have tested, for accuracy. But at least you can still get them sighted in the best you can. On special occasions, a single five-shot group may be as small as 9/16 of an inch with a semi-auto .22 pistol, or rarely, an older S&W in .357 at ¾ of an inch. Groups over 1 ¾ inches are scarce with these pistols in my experience. I prefer point of aim sighting at the 6 o’clock hold on a target as the black and white edge delineation is clear, at least for me (see target picture). That way if you chose to hold center of mass on a conventional target, it should be spot on.
These are the objective results of just trying to eliminate as many variables as possible, wringing out the best a pistol or rifle is capable of offering. If there is someone with me after viewing an especially nice group, I like to say “It’s not me, it’s the pistol”; I’m just the variable that is trying to hold it still, align the sights, and press the trigger the same way every time. That is the challenge and the fun. You can do it too with a bit of an investment in equipment, time, and patience. I do not believe I have any particular skill, just a determination to see the best each firearm has to offer.
Odds and Ends
Besides concrete benches or portable benches, a pick-up tailgate or hood is OK for a platform if you can get both feet, body, arms, and chin stable and comfortable with an occluder in place, but the aforementioned benches are best. Beware that a cracked windshield is not impossible from the muzzle blast with a hot rifle round. An old rancher friend of mine stopped his truck at the sight of a coyote running around his cattle and braced his arms and rifle over the hood, led the target and made a perfect shot. He felt quite proud of his skill until he got back into the truck and looked through the newly cracked windshield.
Because of my desire for accuracy (along with pricing and availability) I have a subjective bias for Ruger MKI or MKII pistols with bull barrels (not the standard models). Having tested many brands of target .22 pistols that shot as well, maybe slightly better even with better trigger pulls, it is tough to beat the cost of the Ruger’s. Perhaps their best is the MKII Government Target Model. It is a plus if you can get one in the box with original test target. Stainless steel MKIIs with bull barrels are a nice option when you can find them. As for .22 ammo, I favor Federal 719. For .357s, I load H110 and use 140 grain jacketed bullets, with Federal magnum primers.
Putting it All Together
In summary, there you are at the range with hearing protection (I like plugs and muffs both when possible), safety glasses with your new occluder, a stable bench, and chair, feet spread fairly wide and planted, both arms (maybe with elbow pads) extended and lying on the bench. Now your newly employed chin bag (for pistol only) and the pistol or rifle lining up nicely with the target. I usually avoid caffeine and stay well hydrated before serious but fun testing. Relax for this work. Try not to blink with the report. Relax. Deep regular breathing is helpful and calming. You are the boss. Forget about recoil and once the sights are aligned and the press is complete, do not fight the recoil. Focus your unblinking eyes back on the target for follow through and think about where the shot may have gone. If it is a kicking rifle use a temporary slip-on butt pad: if it is a serious kicker use a slip-on and a piece of foam between shoulder and butt pad too. Fire off three times the same way as best you can. Check target and make corrections, as necessary. I try not to rush the correcting sight adjustment too quickly to achieve the desired point of aim and point of impact. Creep up on the correction adjustments if you have the time. Once you must adjust from an overcorrection of the sights with the screwdriver, the built-in variable of thread tolerance will create error or slop to varying degrees as you reverse directions. Be patient. Once you have the sights where you want them, try a five-shot group which is a good standard for measurement and comparison.
Once the firearm has been sighted-in, if by shooting offhand I miss my target, I know it is entirely my fault, because I understand both that the sights are aligned and the capabilities of each individual firearm (group sizes). I hope this helps my interested fellow blog viewers. You are a blessed group of people, and I am proud to be able to add something to so many great contributions.
FYI: I bought my occluders many years ago, from where I have no recollection. I did a web search (I never use “Gaagle”) for seeking information of any kind) and found this product that appears identical [4]. Looks like they sell them by six-pack for about $13. I have no interest in or connection to this company, but the site appears to be legit.