A Parts Organizer Helps You Several Ways
I find it a bit of a challenge keeping all of the thirty-plus AR-15 lower receiver parts organized when building a lower. The lower parts kits (LPKs) arrive packaged in many different ways. It’s a treat to have them come nicely blister packed or tray packed if you’re lucky enough get it that way or were willing to pay extra. But it is far more typical to have them arrive in one or more plastic poly bags packed in a larger bag or even in a blister pack like the example shown, from DPMS. Sometimes the bags are color-coded by function group but in my experience mostly they are not.
Regardless of the packaging, my assembly method always begins with making sure that the LPK I have is complete. That usually means opening all bags and laying everything out on a parts tray or pad. I also like to separate them by functional group such as the 3 mag release parts, the 4 parts for the bolt catch, etc. Multi-cavity parts trays are okay for this but fishing small parts out of a square cavity usually involves tweezers and some frustration. Magnetic parts tray can be useful, but you also get the unwanted bonus of having every steel tool and part on your benchtop sticking to it. I have searched repeatedly online and at gun shows for a better organizing method but with no joy. I finally decided to design and build my own. Perhaps I am looking for a solution to something others don’t think is a problem but now that is done, I am glad that I did it.
I definitely wanted something better than I had, so I began by listing the objectives I wanted to accomplish. I came up with these five things:
- Help confirm all parts are present.
- Group the parts in order of assembly
- Stage parts together by functional groups
- Allow me to accommodate interruptions
- Inexpensive and simple
 [1]After considering some alternatives and what materials I had on hand, I sketched out some ideas for a layout and experimented with alternatives in a graphics program. Since there are so many springs and pins, I decided to go with a piece of wood drilled with a bunch of small holes. It also allowed me to group the functional parts groups in approximate order of assembly. The order of assembly on a lower sometimes requires strict precedence such as trigger group, then hammer group then safety selector, then grip. Other times the order is flexible. For example, the pivot pin, detent, and spring can be done at any time. My experience has led me to always start with the trigger guard first so if I accidentally break off the ear where the roll pin installs, my now-broken lower receiver won’t be full of parts I will have to remove.
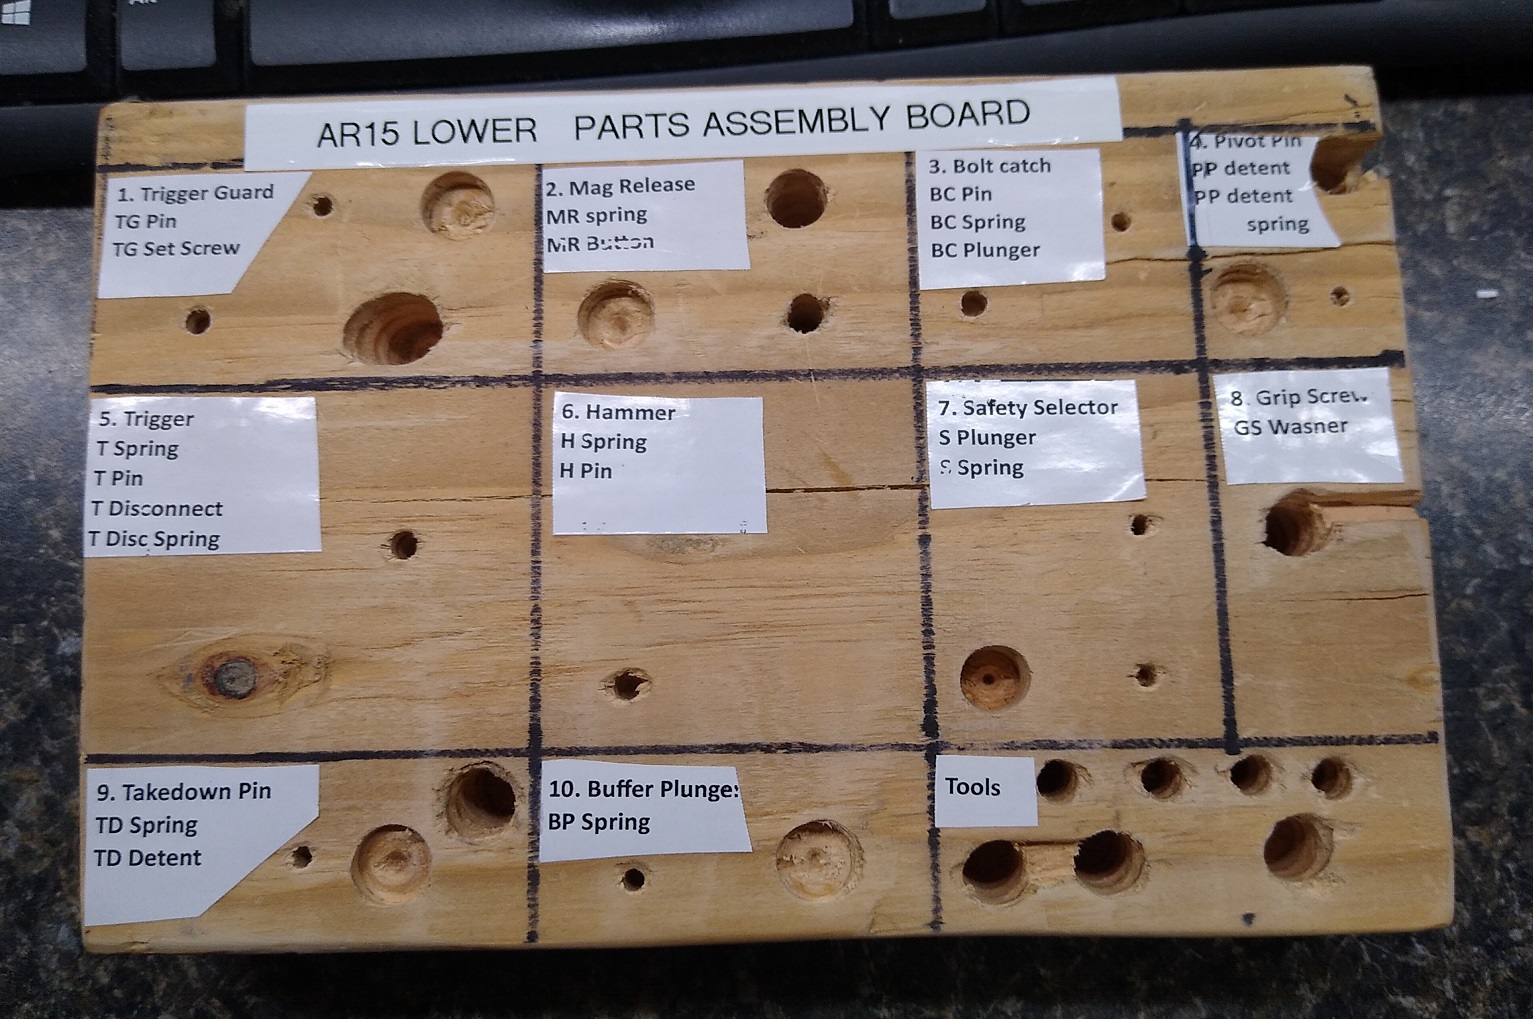
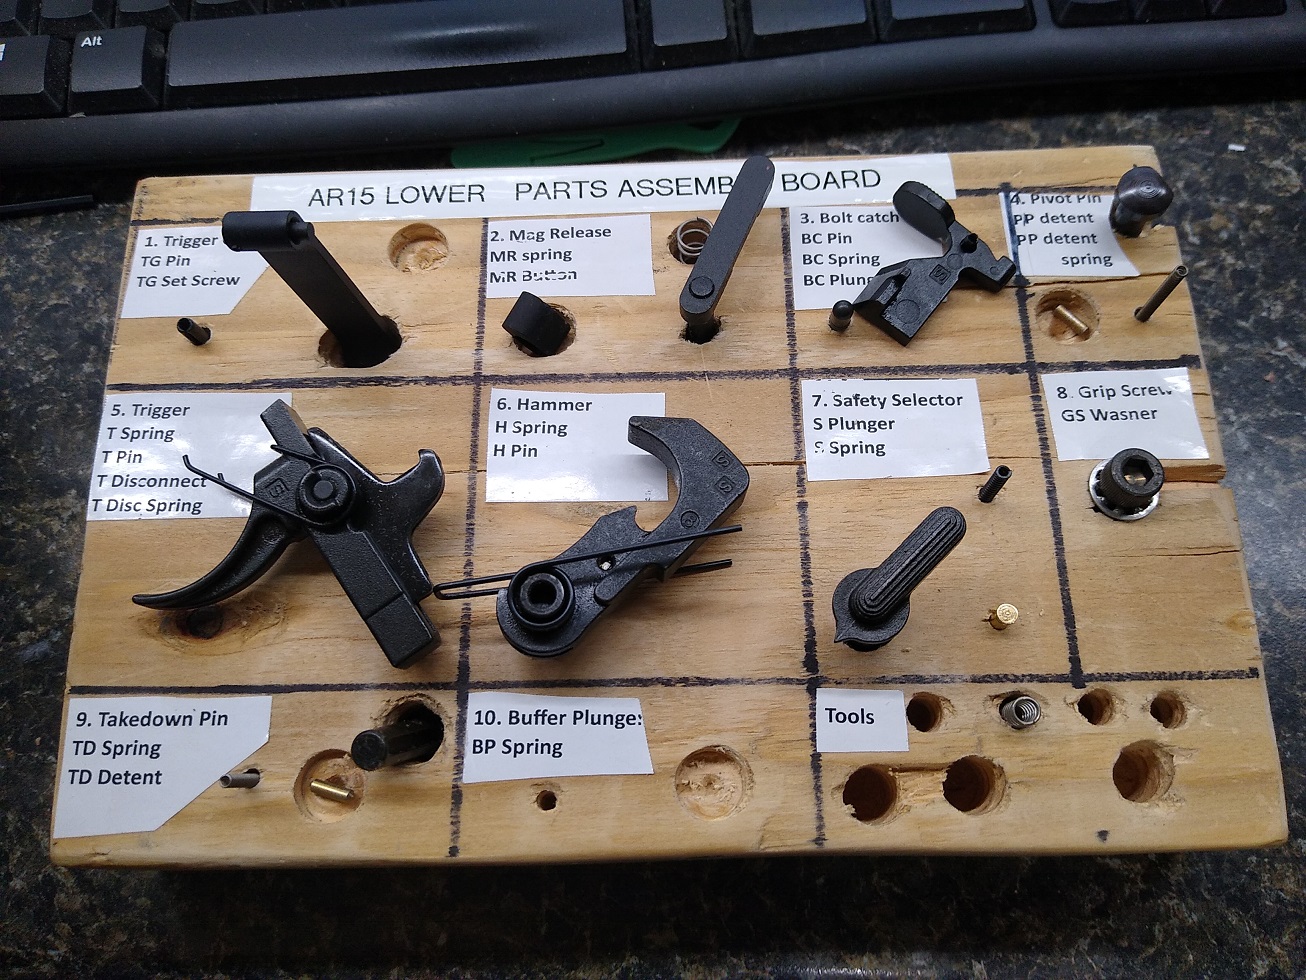 [2]Shown in the picture is what I came up with laid out in an order that has worked for me over many builds. It fits on an 8- inch length of 2 x 6. It’s not elegant and has a bunch of chipped holes for reasons I detail below but it was inexpensive and it works. I also added some holes to keep the small tools and punches I use handy when not in use. Obviously, I used a Sharpie for the lines. For the labels, I printed the layout template on an 8.5 x 11 sheet of blank label stock and cut it up to get the individual labels you see here. I used gloss label stock because it seems to conform well to the uneven surface of the wood. I pre-assembled the trigger, trigger spring, disconnector, and disconnector spring and use the trigger pin to hold everything together. The pin sticks out a bit and fits the hole which holds it on the board. Same deal with the hammer, spring, and pin. Here is what the board looks like with no parts. At a blank board, I can sit down the LPK, open all the bags, and stage the parts on the board. When I’m done, I know what’s here and if anything is missing. If everything is here, I now have it all staged and ready to go for my build.
Consider this an Open-Source design
I am sure you’ve already decided what you would do differently on yours. If so, have at it. In fact, let’s have some fun with it and see how much better we can do. If I build another one, I’d paint it white or varnish it before applying the labels for better contrast and to keep the oil from the parts from staining the wood. I would also start with a longer piece of 2 x 6 to avoid drilling so close to the edge. After drilling my holes I’d cut it to length and use sharper drill bits. Both of those choices will help to avoid chip-outs. I will also add a 3/8 hole in step 10 to accommodate the buffer detent spring where the detent can now slip over the top of the exposed spring (the templates below already accommodate that change).
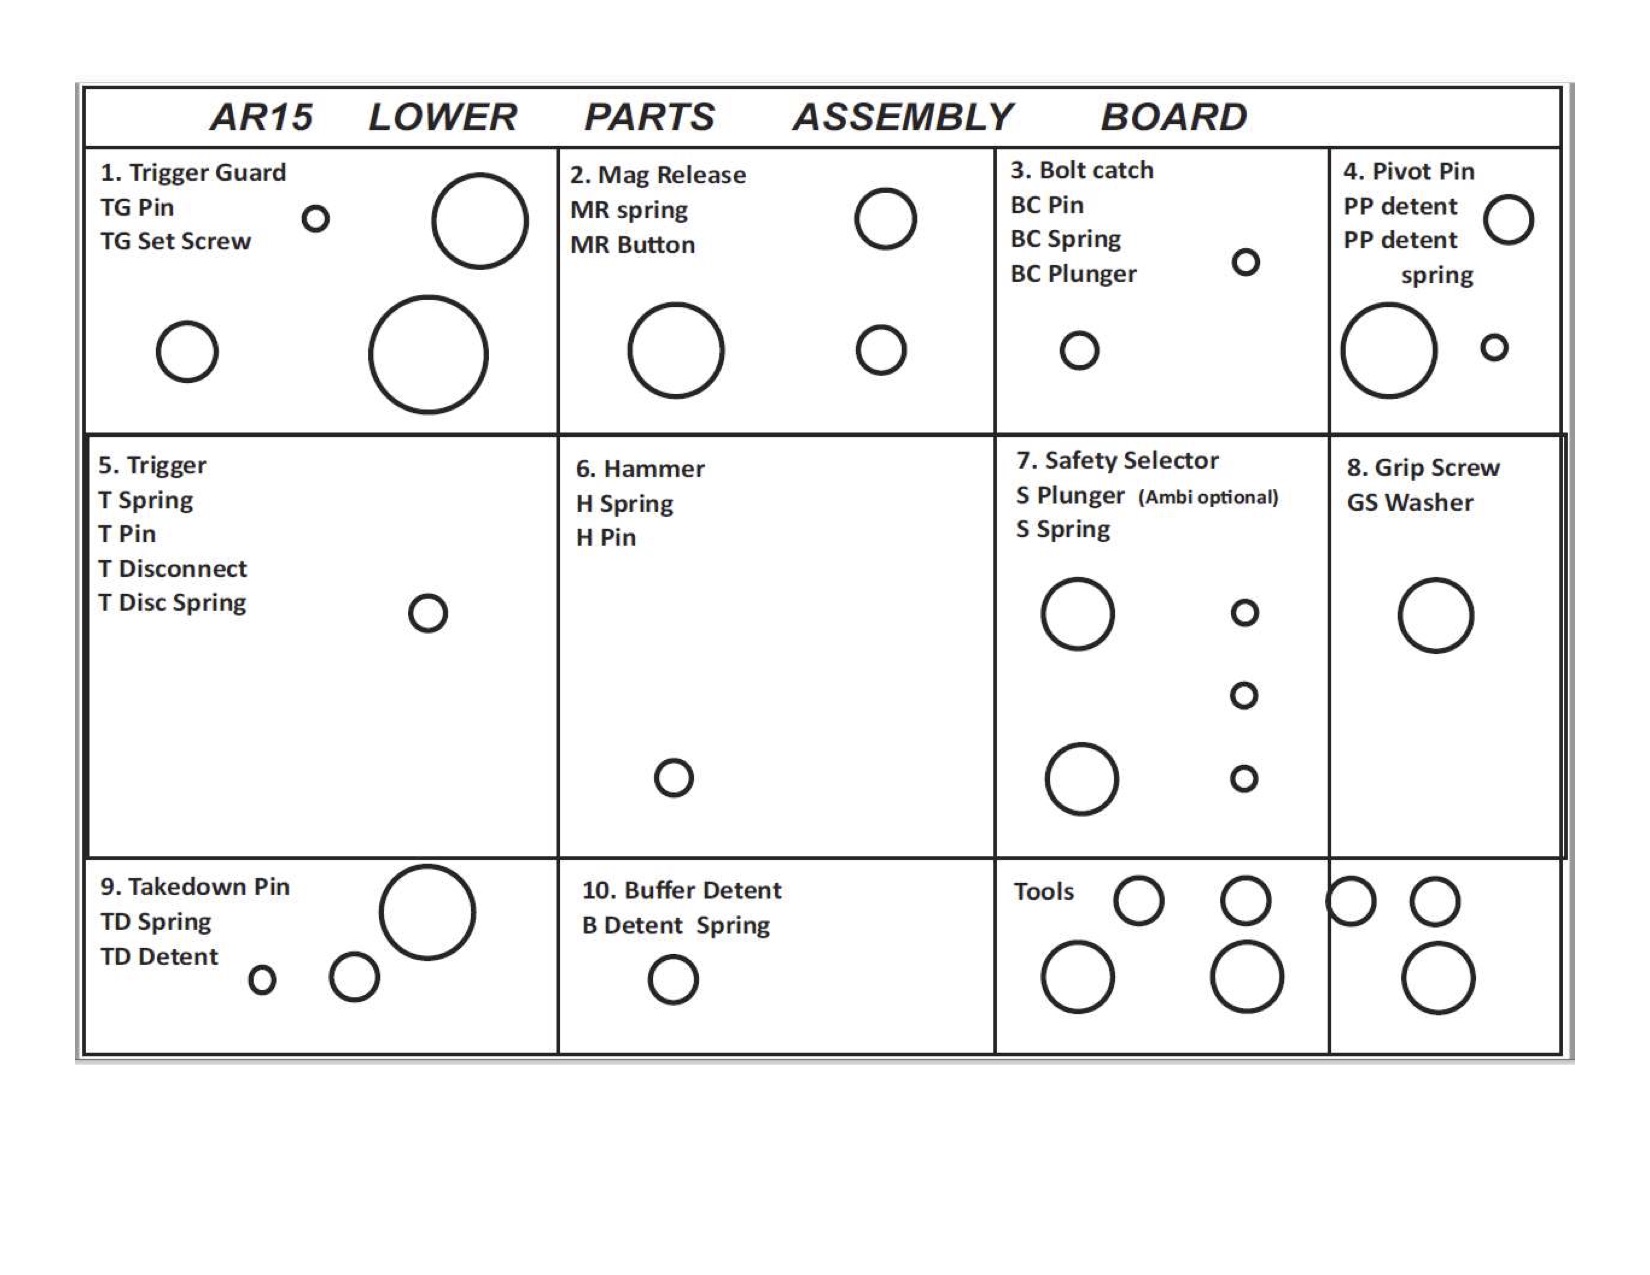
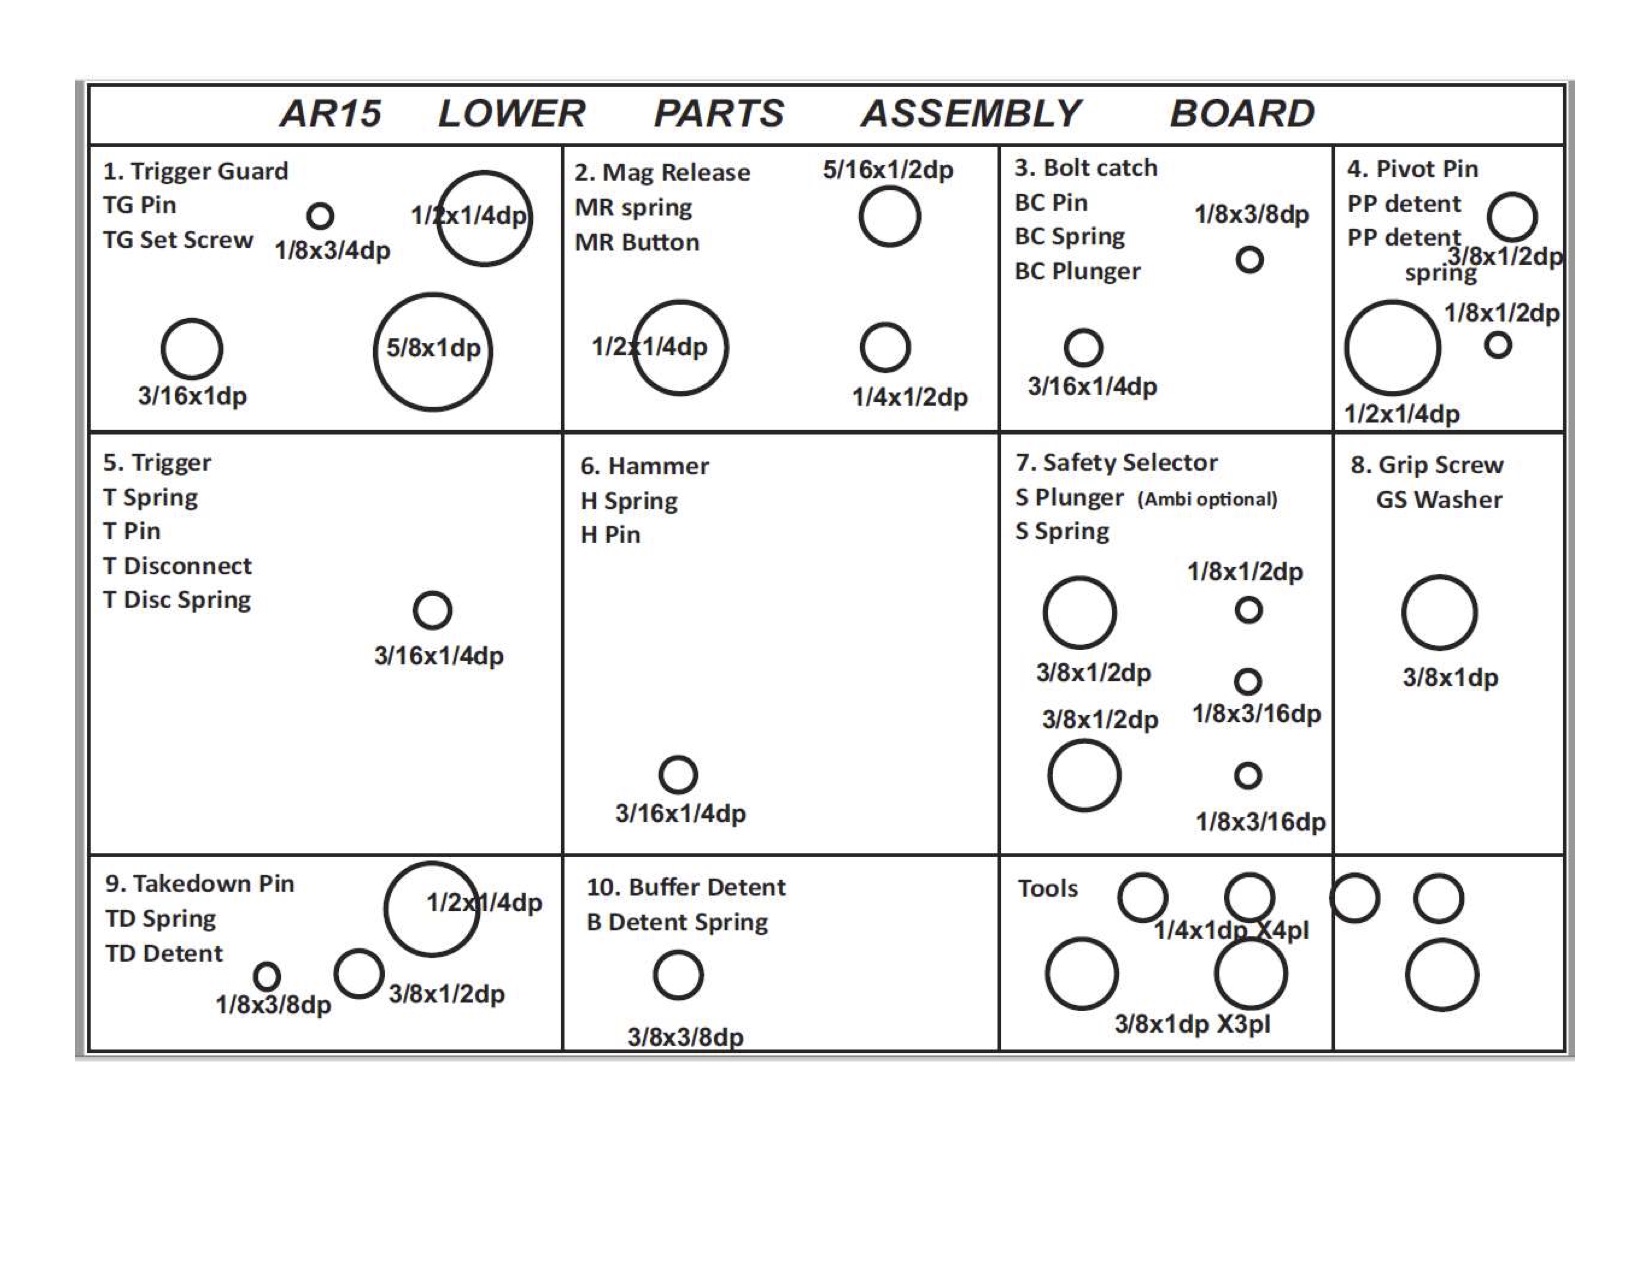
Since it’s now officially an open-source project I am glad to share my templates in pdf form. I have supplied two types of templates for the same layout. One is the label text and hole locations that can be copied onto label stock. A paper copy of this template is what I taped to the wood for a drilling template. The second template is a hole schedule that shows the diameter and depth of each hole. I tried to locate the hole centers on a grid as much as possible to simplify drilling. The hole sizes are all common drill sizes that range from 1/8 to 1/2 inch. You can click below and get the template you want.
Template 1 – Hole location and label text
 [3]
[3]
Template 2 – Hole size
 [4]
[4]
Final Notes
As you make changes and do upgrades, please remember to post them in the comment section so we can all benefit. Get your parts and do your builds while you can. The anti-gunners that infest Congress and the Biden administration are going to do all they can between now and 2022 to destroy your 2A rights. Make sure you can document when you purchased your scary firearms and parts. A photo of your stripped lower or firearm on top of a newspaper where both the serial number and newspaper date visible is pretty compelling if needed to document a date without compromising your OpSec. Good luck, be safe, and happy building.