


First, I better get an introductory disclaimer out of the way. I will be mentioning some different items and companies in this article. I am not associated with any of these companies, and do not receive any endorsements from these companies. These are simply products that I have found to work for me over the years. Now, we can get on to the main event.
About 10 years ago, a friend of mine got me interested in antique firearms. I’ve owned a few different ones over the years. Even JWR has started Elk Creek Company, to deal exclusively in pre-1899 antique firearms.
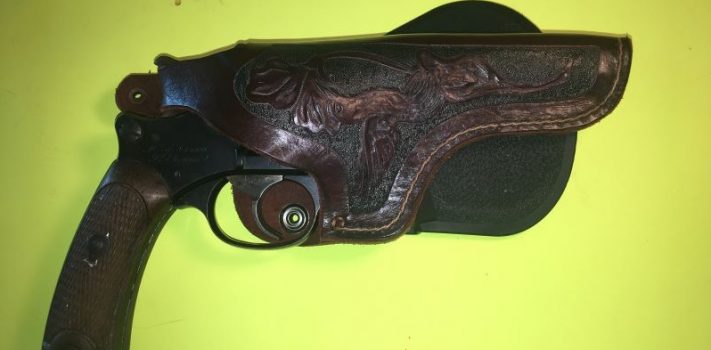
Now, the one thing that I’ve noticed over the years is that many antique firearms have survived in relatively good condition, but the same can’t be said for the holsters that used to carry them. Rarely have I ever seen an antique handgun for sale with its original holster, or any holster for that matter. An antique handgun can be a wonder just to hold, and feel the history contained within it, But if you actually want to carry it and use it, then you’ll need a holster. But where do you get a holster for a gun that’s 120 years old, or older?
Unless you have a DeLorean to go back in time, your choices are pretty limited as there are no manufacturers out there producing holsters for these firearms.
- You can purchase one of the many nylon mass-produced holsters on the market. Up here we see Uncle Mikes’s most often. These are a good quality, relatively inexpensive way to get a holster for an antique. The downside of this is that they are produced to fit a wide variety of firearms, and are custom only in the fact that they vary by frame size and barrel length of the firearm. They will fit, but not necessarily well, and may not have the options that you want or like.
- You could contact one of the many makers of custom Kydex. Being as the equipment to form Kydex is both readily available, and inexpensive, many “hobbyists” have this set up as a secondary source of income. A form-fitted Kydex holster for an antique would serve you very well for a carry option. If you are ordering one, the chances are that you can request the features that you want, and they are comparatively inexpensive. Personally, I just don’t care for the look of Kydex with an antique.
- You could order a custom leather holster from one of the many professional, or hobby makers out there. A quick web search will probably find somebody relatively close to you offering this service. They can also usually be found with a visit to a gun show. This will definitely allow you to order exactly what you want, and pretty much guarantee that you will receive the exact holster that you want. The downside of this is, of course, that this may take some time and be expensive.
- Build it yourself! That’s what I have chosen to do over the years, and I will try and walk you through the basic steps, and pitfalls, to be able to do this for yourself. The results can be both practical, and highly satisfying.
First, let me say that I am not a professional leather-worker, or even a hobbyist, for that matter. I started doing leatherwork when I was much younger, making new knife sheaths for knives that had either worn out, or lost their sheaths somehow. It was a good chance to learn what I did, and did not want in a knife sheath. I had made a couple holsters over the years, when I couldn’t find what I wanted, or couldn’t afford it. It was a matter of trial and error, often with a lot more errors than successes. Hopefully I can give a few pointers to help you avoid some of my mistakes.
WHERE DO WE START
First you need to decide what kind of holster, and what features you want. Do you want a simple belt holster? IWB? OWB? Drop leg? High rise? Small of the back? Military flap? Do you want a holster that can be attached to a shoulder rig, or to an existing gun belt? Fortunately for most of us, if you’ve owned handguns for any length of time, you already have certain preferences, or specific requirements that you want to see in a holster.
Second, use the Internet for research! Search online for what you’re looking for. Look at images of the different holsters available. Find what you like, and try and figure out how to adapt the design to your intended purpose. I’ve made lots of different holsters over the years, but for this article, decided to make a high ride, thumb break, belt holster with some personal touches.
TOOLS AND MATERIALS
Making a holster would be a lot easier if I had some professional leatherworking equipment, but I don’t. I have a few basic tools that I have picked up over the years, mostly from Tandy Leather. Making a holster with the tools that I have is both time and labor-intensive.
- Leather: I use 8 -10 oz vegetable tanned leather for my holsters. It’s heavy, sturdy, wet forms nice, and can be tooled, or carved. For this holster I used about one square foot of leather. I don’t really know the difference between shoulder leather and side leather, and all the other types. I just use any that’s heavy (8-10 oz) and on sale.
- Leather Dye: Tandy Leather carries Fiebing’s Leather Dye. It’s what they have, so it’s what I use. There are some pretty fancy dyes out there, but I just use the basic stuff – black, brown, saddle tan. I’m just not that fancy of a guy, but you can get very creative with some of the different dyes available.
- Glue: I use Lepage Heavy Duty Contact Cement from the local hardware store, but any contact cement will do.
- Thread: Waxed nylon sewing awl thread. You can use any heavy-duty thread, but I have found this to be about the best for my purposes. I’ve used heavy sewing thread, and even used fishing line on occasion. Whatever works, and whatever you have on hand.
- Knife: There are lots of fancy leather knives out there. Pick the one you like. I use a cheap small utility knife that I got at the local hardware store. It needs to be very sharp, so something with replaceable blades is a bonus.
- Needles: A plain old darning needle works just fine if you aren’t using it to actually punch through the leather. I buy them at the dollar store.
- Pens, pencils, rulers, etc. Pretty self-explanatory. I’m pretty sure we’ve all got these.
- Bristle Board, or light cardboard for your pattern. You can recycle used file folders for this.
- Leather Awl: For pre-punching your holes for stitching. I don’t own one. I use a Dremel tool with a small drill bit to punch my holes. Before I had a Dremel, I used a finishing nail and a hammer, with a wood backing. It’s slow, but it works.
- Snaps and a snap-set kit: There are ways to make a holster without snaps, but they make life a lot easier. They are inexpensive, and usually the tools to set the snaps come with them.
- Hole Punch: I bought a decent quality one a few years ago. It’s one of the rotary ones, and has paid for itself many times over. This is one of those tools that I think every prepper should have.
Those are all the basic tools you’ll need. I’ve made many knife sheaths and holsters with only these tools. The following is a list of additional tools that I have acquired over the years, and that I used in making the holster that is the subject of this article.
- Stitching Groover Set: This tool makes a groove in the leather for your stitches to sit in. It is adjustable, and lets you set the distance from the edge that you want your stitches. Mine are normally ¼” from the edge, but you may want them 3/8” or more.
- Spacer: This is a little wheel on a handle. You run it in the stitching groove to mark where you need to make holes for your stitches. It keeps everything nice and uniform. You can buy ones with replaceable wheels for different spacing of the stitches. It’s nice to have. For years I used to measure around the edges of my project with a ruler, making small marks every ¼” with a ballpoint pen. I didn’t even know these existed until I watched a few videos.
- Edge Beveler: You run this along the edges of the leather to take off the sharp edge and leave a nice rounded, smooth edge.
- Swivel Knife: This is what you use if you decide to do any “carving” of the leather. If you want to learn the basics of its use there are numerous videos that show how to do it.
- Basic Stamping Set: Use this along with the swivel knife to create shapes and texture in the leather. It’s surprising what can be done with very few basic tools and a little imagination. Let your creative side come out. You can also buy stamps to “tool” the leather, as opposed to carving. You can get basket weave stamps, or even barbed wire designs that you can impress on the leather.
- Leather Rivets and Rivet Setter: Much like the snaps listed above.
- Thumb Break Stiffener: this is a little piece of metal with a hole in each end. One end gets a snap. One end gets a rivet. Pretty much like its name – it stiffens the thumb break. I’ve made these before out of light metal, but for the cost it’s a lot less hassle to buy them.
CREATING A PATTERN/TEMPLATE
This holster will be for a Model 1892 Colt revolver in .41 Long Colt with a 4” barrel.
- Lay your bristle board on a flat surface
- Place your pistol on the bristle board
- Trace the outline of the pistol on the bristle board
- Carefully roll the pistol over on the frame. Try to keep it level and even.
- Trace the other side of the pistol on the bristle board
- Draw an outline about ½” outside of the outline and cut it out.
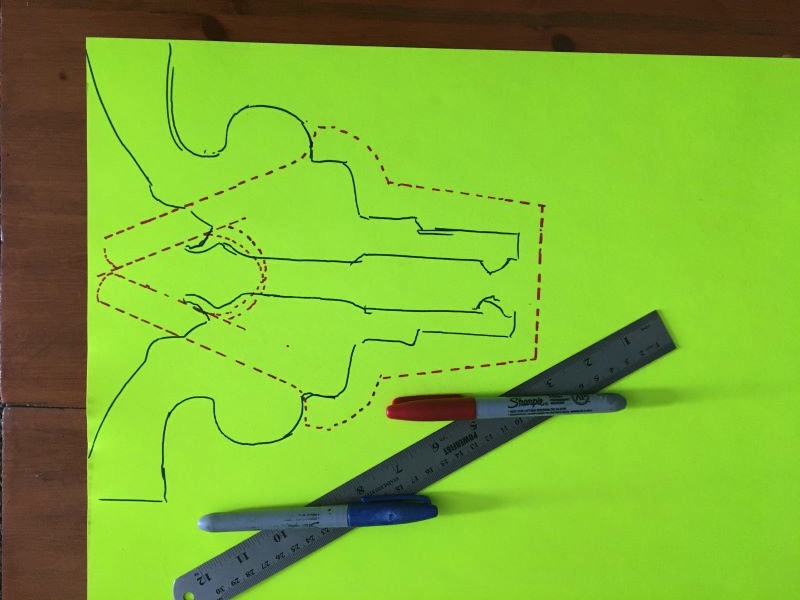
- Fit it to the pistol. You should have at least 3/8” of bristle board touching all around the pistol.
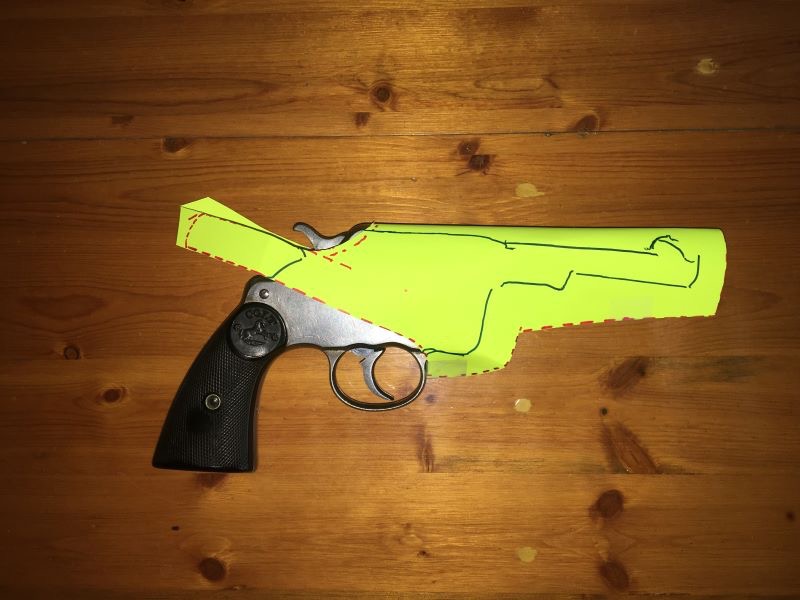
- If the pattern does not fit, or is not to your liking, then use the pattern to trace out another pattern on the bristle board, and make any required modifications. Keep doing this until you get a pattern that you like and that fits the gun properly. Do this again and again until it is right, no matter how frustrating. Don’t try and shortcut this step, because this will determine your success or failure for this entire project.
- Once you have gotten your pattern finalized, it is time to transfer it to your leather.
TRANSFERRING YOUR PATTERN TO YOUR LEATHER
- Make sure of your inside and outside of the holster. Write it on your pattern.
- Place your leather on a flat surface, good side down. You want to draw the pattern on the rough, backside of the leather where you won’t see the marks later.
- Place your pattern on the leather, using the area as economically as possible, to avoid unnecessary waste. Place the pattern on the leather with the “inside” up, towards you.
- I use a black ballpoint pen to trace around the pattern. Black will blend with the edges later, if there are any small marks left visible. The bristle board is stiff enough that it’s easy to trace around, and the reason that I don’t use lighter paper or other material.
CUTTING OUT THE PATTERN
Once the pattern is traced onto the leather, you now need to cut it out. A very sharp knife is a must. As stated above; I use a small utility knife. It’s important to use something like a cutting board, or other material without a grain, when you’re cutting the leather. I don’t recommend wood, as the knife may have a tendency to follow the grain of the wood, rather than the pattern, especially on curves. One small slip at this point can ruin the entire project. Cut slowly, and carefully, staying on your outline.
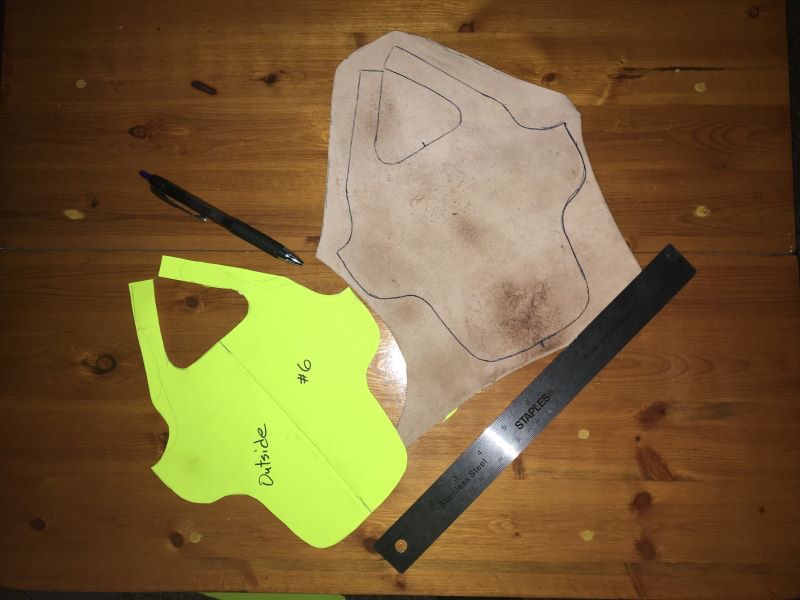
NOTE: In the photo above, you can see a #6 written on the pattern. Yes, even though I’ve done this before, it took six tries to get a pattern that I was happy with. The reason that I number them is because that when I’m doing this everything is in one place, and I don’t throw the patterns out right away. There is nothing worse than getting the pattern right, setting it down on the table, and then, somehow, picking up the wrong one and tracing it onto the leather. You don’t even realize what you’ve done until after the leather is cut, and it doesn’t fit the gun properly.
Once the leather is cut, you now need to fit it to the pistol and see if it fits properly. If you followed the pattern direction it should be awful close to what you want. Once you fit it to the gun, you can then take some measurements for any additional leather pieces that you may need. In this case, I decided to insert a welt where the trigger guard will rest. I made this by simply tracing the outline of the holster onto the leather, measuring 3/8” from the line and cutting it out. The one end is shaved down so that the leather will transition smoothly when it is glued/stitched. I also needed a belt loop. I could have used a flat belt loop, or a flat-angled loop, for a forward or backward cant to the holster. I decided on a straight belt loop with the top tucked under. This piece was also measured out and cut at this time. You can see all these pieces laid out in the next photo below.
(To be concluded tomorrow, in Part 2.)
I will probably never make a holster but was always fascinated by leatherwork
Nice article.
Here is a good custom leatherwork shop.
Gustavo Shoe Repair
Shoe Repair, Leather Goods Repair, Shoe Dyers
125 W Fry Blvd, Sierra Vista, AZ 85635
520-458-3077
This would be number 3 on the list. But…..chances are you’re going to have to ship your gun to him to get a proper fit.
A points regarding the pattern-making:
1. Circumference, Circumference, Circumference. Measure the circumference of each section of the item, with a non-stretchy string or tailor’s cloth tape. For example, the front sight and barrel, the frame and cylinder, and (if making a cover for the trigger guard), the cylinder, frame, trigger guard, and if applicable, the rear sight. (On a knife, the circumference at the guard is most vital.) Transfer these measurements to the pattern.
2. Measure the thickness of the barrel, the frame, and the trigger guard. Allow half that thickness in the forward direction, beyond the basic tracing of the item.
3. Ease. Add enough ease to the circumferences to make up for the thickness (and stiffness) of the leather. That would be at least 1/8″ per side, with 8-ounce leather.
4. Seam Allowance– while I want at least 1/4″ of material for seam allowance, I rarely give less than 1/2″. That allows for trimming the edges, and most of the time it is adequate for ease, as mentioned above.
If in doubt, leave a smidgen of extra material, and cut it off once the leather is actually formed around the item. As my grandfather liked to say, “If you cut it too short you can always splice it. [Umm,,,,] But it if you cut it too long, then what will you do?”
Excellent article, and thanks for sharing!
Cf, you’ve obviously done a lot more leather work than I have.
“Hole Punch: I bought a decent quality one a few years ago. It’s one of the rotary ones, and has paid for itself many times over. This is one of those tools that I think every prepper should have.”
Hey L.C., do these have any other uses around the homestead or did you mean just for punching leather?
Thanks for the article, makes me want to get into some leather work like I did a bazillion years ago on a very elementary introductory level. My dad helped me make a holster for my Daisy Colt 1911 lookalike BB gun, a sheath for my TL-29 knife, and we made some belts as well with all the carving on them. It was a lot of fun and seems like one more useful skill to learn for TEOTWAWKI.
We also used a gizmo like the one in this link for making the holes for sewing which was quicker and more uniform than using an awl.
https://www.amazon.com/Leather-Craft-Punches-Lacing-Stitching/dp/B0771KP73Y
Looking forward to part 2.
Well, they’re only good for punching holes, but not just in leather. They work on canvas, denim, and other heavy materials. Just a handy tool to have. (Especially for those out there that wind up losing weight and need a couple extra holes in their belt)
I just picked up a couple of those gizmos. They tell me they’re called “thonging or lacing chisels”. I’m going to give them a try, but I’m not sure how well they’ll work on curves – guess we’ll see.
Like you say – one more skill to add to the quiver. I’m not going to say I’ve got it mastered, but I can struggle through and get acceptable results.
Used to love doing leather projects as a kid. Tandy had craft supply stores. Wood burning , leather craft and all that.
The kids love all that store-bought Kydex stuff . It’s okay but prefer my old leather pancake holster.
Went pricing a leather holster a while back for an old wheel gun, YIKES !!!
Don’t know if I’ll ever make my own holster but it’s fun reading the article
The Lone Canadian cannot use a holster in Canada as hand guns must be locked in a container to and from the range and your home. No other usage of a hand gun is legally permissable.