(Continued from Part 2. This concludes the article.)
Results
 [1]
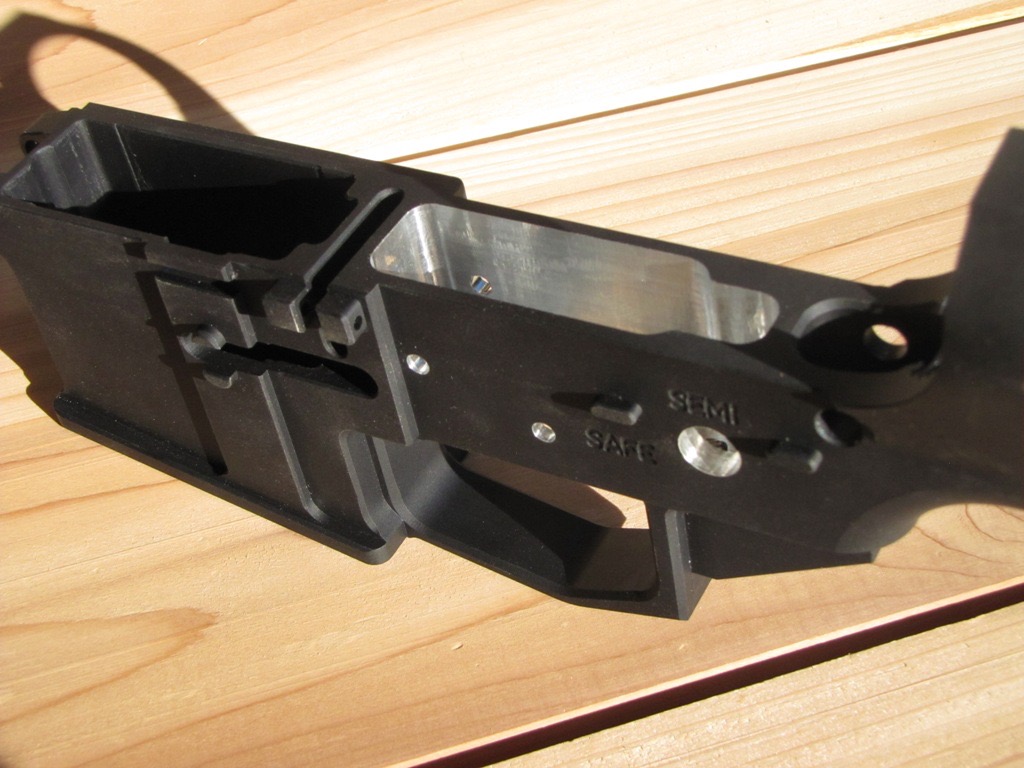
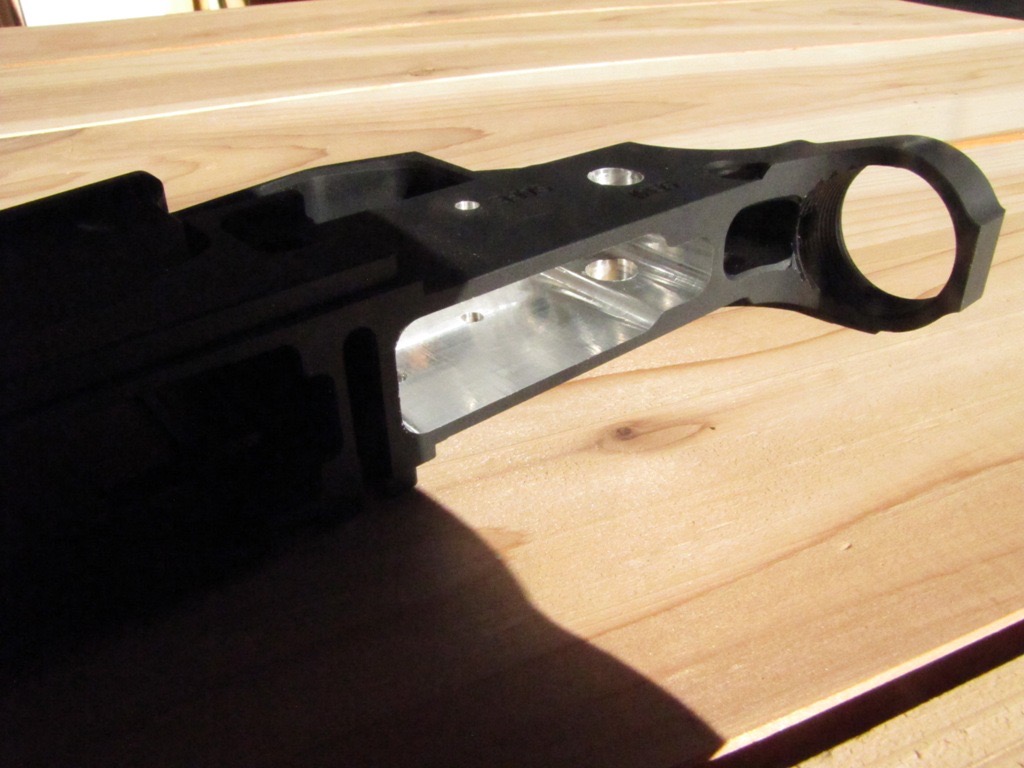
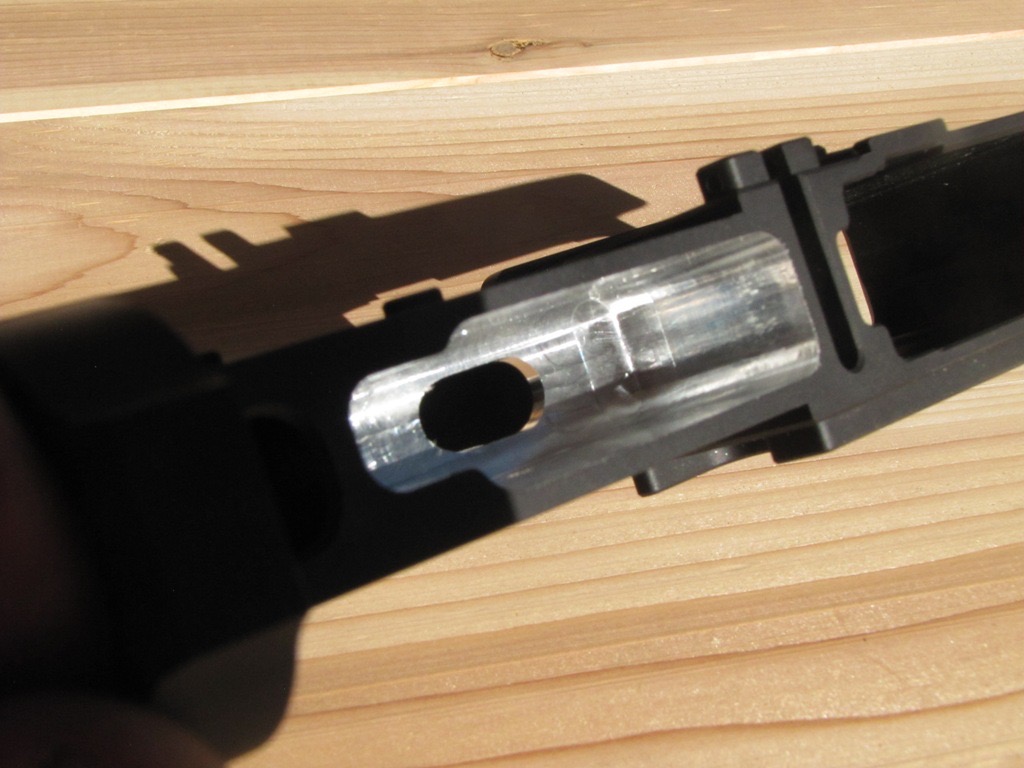
[1]I think my lower receivers turned out great (Photos 15, 16, 17 & 18). The machined edges are straight and sharp. The trigger pocket walls are smooth, almost mirror-like. There are slight tool marks from the end mill, but no touch up or sanding was done until after these photos were taken. Then I touched up the side holes and the opening for the trigger slot with some Aluminum Black by Birchwood Casey [2]. It’s quick and hides the raw aluminum edge.
I didn’t treat the entire inside of the trigger pocket, I think it looks cool and at any rate is completely hidden when the upper receiver group is attached. The lower parts kits were from Palmetto State Armory, and everything installed correctly with one exception that was my fault and was corrected as described shortly. Uppers were installed and the rifles were test-fired. There were no failures to fire, extract or eject.
 [3]
[3]The Easy Jig 2 was solid and robust. It seems like a very well thought out product. Some of the parts do double duty, like the side plates that rotate and reattach to mill either AR-15 or AR-10 lowers. The red buffer screw support does the same and also allows for attachment of your vacuum hose. And the drilling block inverts to drill the pilot hole or mill the trigger slot. There was very light wear on the top router plate from moving the router. There was a little wear in the measuring pockets from touching it with the end mill. Since these hash marks are engraved into the router plate, I don’t believe this will be an issue affecting function.
 [4]
[4]My results were consistent from one lower to another if I followed the directions. The jig allows the trigger pocket, trigger slot and side holes to be machined and drilled with great precision. All the lower parts installed just as if it was a factory produced 100% stripped lower receiver. I like that the jig doesn’t have to be disassembled to begin milling another lower receiver. Documentation supplied with the jig was also excellent. A 26-page manual and a 6-column quick reference guide are clearly written in good English and the many illustrations are precise and very helpful. There is a company video [5] and many other YouTube videos available.
I used 80% Arms for my source of 80% lowers. I felt that I might have the best results by buying the lowers from the company that made the jig. Their lowers are excellent quality in fit and finish.
80% Arms doesn’t sell firearms and they don’t work on completed lowers if you have a problem. However, they are responsive to questions and will offer remote help by phone or email. This is from their website under warranty [6]:
“80% Lower Replacement Program: In the remote chance you make a mistake while using an 80% Arms Jig that damages your 80% Arms lower, we will replace your lower at a 50% discount off of the list price.”
Where I went wrong
Okay, so this is supposed to be a learning process, right? We should learn from mistakes, so I’ll share mine.
First, I was on about my 4th milling pass on my first lower receiver, when the router seemed to get bouncy and loud and was vibrating excessively. I discovered that the end mill had loosened a little in the collet and was pulling downward. The milling process creates a downward force on the end mill. It wants to pull down and out of the collet so you must tighten the heck out of the collet nut. Take the outer collar off the router, lay the router on its side on your workbench, and use two wrenches, one on the shaft and one on the collet nut. Push both wrenches down toward the workbench. It must be very tight for a good milling job and for personal safety! (The Easy Jig 3 uses a new proprietary Speedmill [7] that threads directly onto the router, and should eliminate this problem.)
Second, on one lower I was nervous about milling too deep and damaging the bottom of the trigger pocket. I thought it would be good to leave a little extra metal at the bottom and that would make it stronger. What I discovered was that while the trigger group would install and the pins fit, the trigger wouldn’t function correctly, and the safety selector wouldn’t install at all. I had to remove everything I had installed from my lower parts kit, put the lower back into the jig and mill the trigger pocket to the correct depth. After cleanup and reinstallation, it worked perfectly. Moral: I can’t rewrite mil-spec.
Third, I forgot to move that “A” hole pin into the hole on the jig router plate before I made my first pass on a Generation 2 lower. I realized it about a second too late as I cut too close to the buffer tube. It wasn’t a loss, but I didn’t want to do that. Generation 1 lowers need this area to be milled out. I treated the area with Aluminum Black. It hardly shows and doesn’t affect function.
Fourth, there were some milling passes made just a little too deep. If you feel resistance to normal router movement on the plate, or vibration/chatter, or chips are larger than normal and flying out of the hole trying to hit you in the face, you’re probably taking too deep a cut. Stop the router immediately, remove it and visually inspect the trigger pocket. If you have made a partial pass, you will see the depth of the cut pretty easily. Also, check the end mill depth setting in the “A” or “B” pocket hash mark. You may have set it improperly, or the outer collar may have slipped on the router. Just set it correctly and continue. Make sure your router depth adjustment latch is tight.
Some tips for best results
Read everything available before starting, especially the jig manufacturer’s instructions manual. Watch videos. While some people don’t like to read directions and just “wing it”, there are many places where a misstep will damage the lower receiver, the cutting tools or cause danger to the operator.
Go slow. Be meticulous. Use slow speeds when drilling, light to medium pressure and cutting oil in the hole and on the drill bit.
When milling, check the tension on the router collet nut after a few router passes. Take the outer collar off the router to expose the collet nut. Inspect the end mill frequently to be sure it remains secure in the desired position in the router. Make sure the latch tension on the router is tight and holding the end mill from being pulled downward during milling. Make sure the router is flat on the jig plate with no side-to-side wobble before turning on the router motor.
Take small bites in the aluminum when milling. Too thin a pass is okay, but too thick is not! It may require 40 to 45 separate passes working downward through the trigger pocket to reach the bottom. Smaller passes create less vibration and leave a smoother surface with fewer tool marks. Constantly be alert and feel and listen to the router. Be aware of the size of the chips flying out of the pocket. Stop and investigate if changes are noted. Learn the difference in feel between a shallow cut and a deeper cut.
Clean chips from the trigger pocket, the top plate, bottom of the router and out of the measuring pockets so the hash marks are more visible after every pass. Using a shop vacuum connected to the buffer tube screw will help reduce chips in the pocket, work area and from hitting you in the face. More chips collect in the pocket the deeper you mill. It’s harder for the vacuum to remove them, so use the foam brush to lift and push the chips toward the vacuum nozzle.
Be sure to remove the block used to mill the trigger slot before repositioning the jig on to its side to drill the final 6 holes.
Wear eye and hearing protection. You may prefer to wear long sleeves.
80% Arms suggests using their Allen wrench put through the two holes in the buffer tube screw to tighten and loosen it. With my declining hand strength, I found that a 6” Phillips screwdriver with a handle worked better.
If you get tired or frustrated with the process, then take a break and come back with a fresh attitude.
Some Fine print
First, are these lower receivers compliant under federal law? Not all unfinished lowers are compliant. It is a little confusing because the Bureau of Alcohol, Tobacco, Firearms & Explosives (ATF) doesn’t recognize the terms “80% receiver,” “80% finished,” “80% complete” and “unfinished receiver”. They are industry terms, not statutory terms. So, each manufacturer of these lowers must submit samples and obtain a letter from ATF that their receiver is not a firearm. The determination letter for 80% Arms is found here [8]. The ATF actually gives 3 examples with photos [9] on their website of what features constitute a firearm in an unfinished lower receiver. For your well-being, be certain your source of unfinished receivers has a determination letter from ATF.
Second, now that your receiver is finished, do you need to put a serial number on it? Well, this gets tricky when you start researching, even on the ATF website.
So, here is one of the first things you find:
“Receivers that meet the definition of a “firearm” must have markings, including a serial number. See 27 CFR § 478.92, Firearm manufacturers marking requirements [10].”
However, this is referring to requirements for licensed manufacturers.
Here [11] is information from the ATF for those who are unlicensed making a firearm for their own personal use:
“11. Do I need a Federal firearms license to make a firearm for my own personal use, provided it is not being made for resale? Firearms may be lawfully made by persons who do not hold a manufacturer’s license under the GCA provided they are not for sale or distribution and the maker is not prohibited from receiving or possessing firearms. …… Additionally, although markings are not required on firearms manufactured for personal use (excluding NFA firearms), owners are recommended to conspicuously place or engrave a serial number and/ or other marks of identification to aid in investigation or recovery by State or local law enforcement officials in the event of a theft or loss of the privately owned firearm.”
So, it is up to you, the builder, to decide if you want to place a serial number on your lower. Serial numbers make things easier to track and trace. If you are worried about the possibility of theft and you think having a serial number will help law enforcement recover your weapon in the future, then by all means mark it. Alternatively, you might consider putting a mark in an inconspicuous place so that only you might identify it as your property.
CAN IT BE INHERITED, SOLD, OR GIFTED?
There is almost nothing on this issue on the ATF website. Information is confusing because some of it refers to licensed manufacturers. This excellent article [12] written by Richard Johnson at GunHolstersandGear.com addresses the issues of serialization and possible future transfer of a homemade firearm. What I especially appreciate about this article is the author’s correspondence with a Firearms Enforcement Specialist, L Babbie, with the U S Department of Justice, Bureau of Alcohol, Tobacco, Firearms and Explosives. Two emails from Specialist Babbie dated December 28, 2016 are included in full in the above article. By permission from Mr. Johnson, the following paragraphs are reproduced:
“A person who previously made a firearm for personal use is not prohibited by law from selling such firearm. Such seller needs to ensure that he/she is actually selling a firearm that was previously made for personal use and that he/she is not engaged in the business of manufacturing without a Federal firearm license (FFL). Making a firearm to gift to someone is not making a firearm for personal use. Your personally made firearms may be passed to your heirs. The private party sale of any firearm must go through a Federal firearm licensee (FFL) if the sale is to a person who resides in a State other than the State where the seller resides or if State law requires an FFL for private party sales when the seller and buyer reside in the same state.”
Mr. Johnson followed up this e-mail asking for confirmation about whether a serial number must be affixed to the lower receiver if it is sold. This is the response from Specialist Babbie:
“Firearm markings are only required by those who are licensed importers, licensed manufacturers, and those who make an NFA firearm for personal use. Those marks would be made at the time of import, manufacture, or when an NFA firearm was made for personal use. Under Federal law, no markings would be required under your circumstance.”
BOTTOM LINE
It all comes down to your intent when you finish the lower receiver. Do not make a firearm with the intent to gift it to a family member or friend, sell it or otherwise distribute it. Engraving a serial number is optional unless you live in a state like California that requires it. Years later, should your circumstances change and you decide to sell or gift the firearm, serializing is not required, and you must follow the laws in your state regarding a normal firearm transfer.
Flexibility of the AR PLATFORM
A very cool thing I learned about the AR platform is the huge number of different calibers that can be shot from an AR-15 or AR-10 lower. There are over 60 different calibers that can be fired using an AR-15 lower, limited mainly by overall length of the cartridge. Yes, it typically requires a different barrel, bolt/bolt carrier group and magazine. Still, the options are amazing: rimfire, centerfire, rifle and pistol calibers up to .50 caliber! (Not .50 BMG). Over 30 different calibers are compatible with the AR-10. Take a look at this amazing list on Wikipedia [13].
Note also that the AR-15 is mil-spec across the platform. With few exceptions, most parts from one manufacturer work with another. Not so with the AR-10. Palmetto State Armory PA-10 upper receivers will not fit on the 80% Arms lower receiver. 80% Arms AR-10 lowers will accept DPMS (Generation 1), CMMG, Aero Precision and Thunder Tactical uppers. Make sure of compatibility before you buy.
CONCLUSION
 [14]
[14]Finishing an 80% lower receiver will likely cost more than buying a 100% stripped receiver because of the cost of tooling. The cost of tooling is substantial, but the tools reviewed in this article are much less expensive than the CNC machines, milling machines, and large drill presses required in the past. The process reviewed above is easily within the capability of the average do-it-yourselfer. The jigs are in high demand today, and most are backordered. Look for used tools on GunBroker, Armslist, various gun forums, etc. Consider running a want-to-buy ad. And consider selling your jig after you have finished your lower receivers.
The window of opportunity for obtaining unfinished lower receivers may be closing soon. Look into accumulating parts to finish and assemble your firearm now even if your schedule won’t permit completion until later.
This project is utterly worthwhile. You will learn an incredible amount, gain confidence in your abilities, increase your gunsmithing ability to diagnose problems and problem solve, make repairs and change parts. You will celebrate with pride the professional results you can achieve with this method, making a firearm that may last for generations!
Comments Disabled To "Finishing an 80% AR Lower Receiver – Part 3, by 2A Advocate"
#1 Comment By Noah Body On September 21, 2020 @ 2:44 pm
BUDK.com has a complete AR-15 build kit, minus the lower receiver, for $500. And they sell a 80% lower with a jig kit, including bits, for $85. NFI, just seems like a good deal.
#2 Comment By Mark M On September 21, 2020 @ 9:18 pm
Regarding a paper trail I bought a Polymer80 kit that comes with the bits,all you need is a drill press and vise. I bought this at a gun show a couple of years ago with cash, this also needed a lot of dremel work. Next gun show bought the lower parts kit, cash, from another vendor but something would not fit, called Polymer80 and they asked if I bought [ the whatever the term was ], I said I have no idea, so ordered theirs on plastic. It went together fine, I thought most AR15 parts were the same. I already own an M&P AR15 so if someone does enough research they would find my spring kit. I guess I could say I got it for a spare, but then I would have to explain why I went to Polymer80. I am not overly worried about any of this yet but if I ever decide to build another it will be all cash. I did learn a lot about the platform. A buddy built one and had it engraved ” private build not for resale “, I did not mark mine
#3 Comment By Sean On September 23, 2020 @ 3:37 pm
Couldn’t help noticing that photos #17 and #18 have part of the lower receiver blacked out. Any comment?
#4 Comment By 2A Advocate On September 24, 2020 @ 5:35 am
Sean:
Just bright sunlight. The focus is on the fire control pocket. Photo 15 shows the whole lower.
#5 Comment By Steve On September 25, 2020 @ 5:33 pm
I really like the article and attention to detail. The instructions dovetail nicely with those the 80% lower site posts. Thank you for sharing your experience! Will use it when I do my lower.