Introduction
In the spring of 2020, it became apparent that the coronavirus posed a potential threat to public safety. The severity of the threat was unclear, so my wife and I, being reasonably well-prepared, decided that our family would ‘batten down the hatches’ until we could better assess the situation. Like many people, we learned a lot. We learned how prepared we were, and we learned how prepared we were not. We had never made a trial assessment of our ability to adapt to a situation like this, so it was an eye-opening opportunity to learn and improve. One of the biggest challenges for us was no longer regularly bringing home fresh produce. That lack prompted me to take the steps to learn how to grow microgreens, the immature seedlings of herbs and vegetables, and I’m writing this to share with you what I’ve learned.
If you frequent this web site, you will likely already have mentally played through a variety of scenarios wherein you might be unable or unwilling to leave your home. Or you might be unable to get anything from grocery stores or restaurants. Or you might have to wait months before you can start a garden, and then months more while you wait until harvest. But if you learn the techniques I describe below, you would be able to keep putting fresh produce on your table under such circumstances. Mere minutes after harvest, you can have some of the freshest, most visually appealing and nutritious produce you’ve ever had. The flavors of radish, mustard, sunflower, arugula, basil, all these and more may be easily had with only a little preparation and practice.
From seed to table in as little as a week, and all possible without setting foot outside your home. Learning to grow microgreens indoors may be one of the simplest and most enjoyable of the many things you do to provide for yourself and your family. The abundance of information about microgreens online was daunting but, once I had it pared down to the essentials, I was floored by how simple it was. My first crop was a hands-down success, and little has gone awry in the many times since that I have repeated the process. And the sheer quantity of produce we harvest for so little effort and expense is striking, particularly given the fact that microgreens originated in the realm of high-end restaurant cuisine.
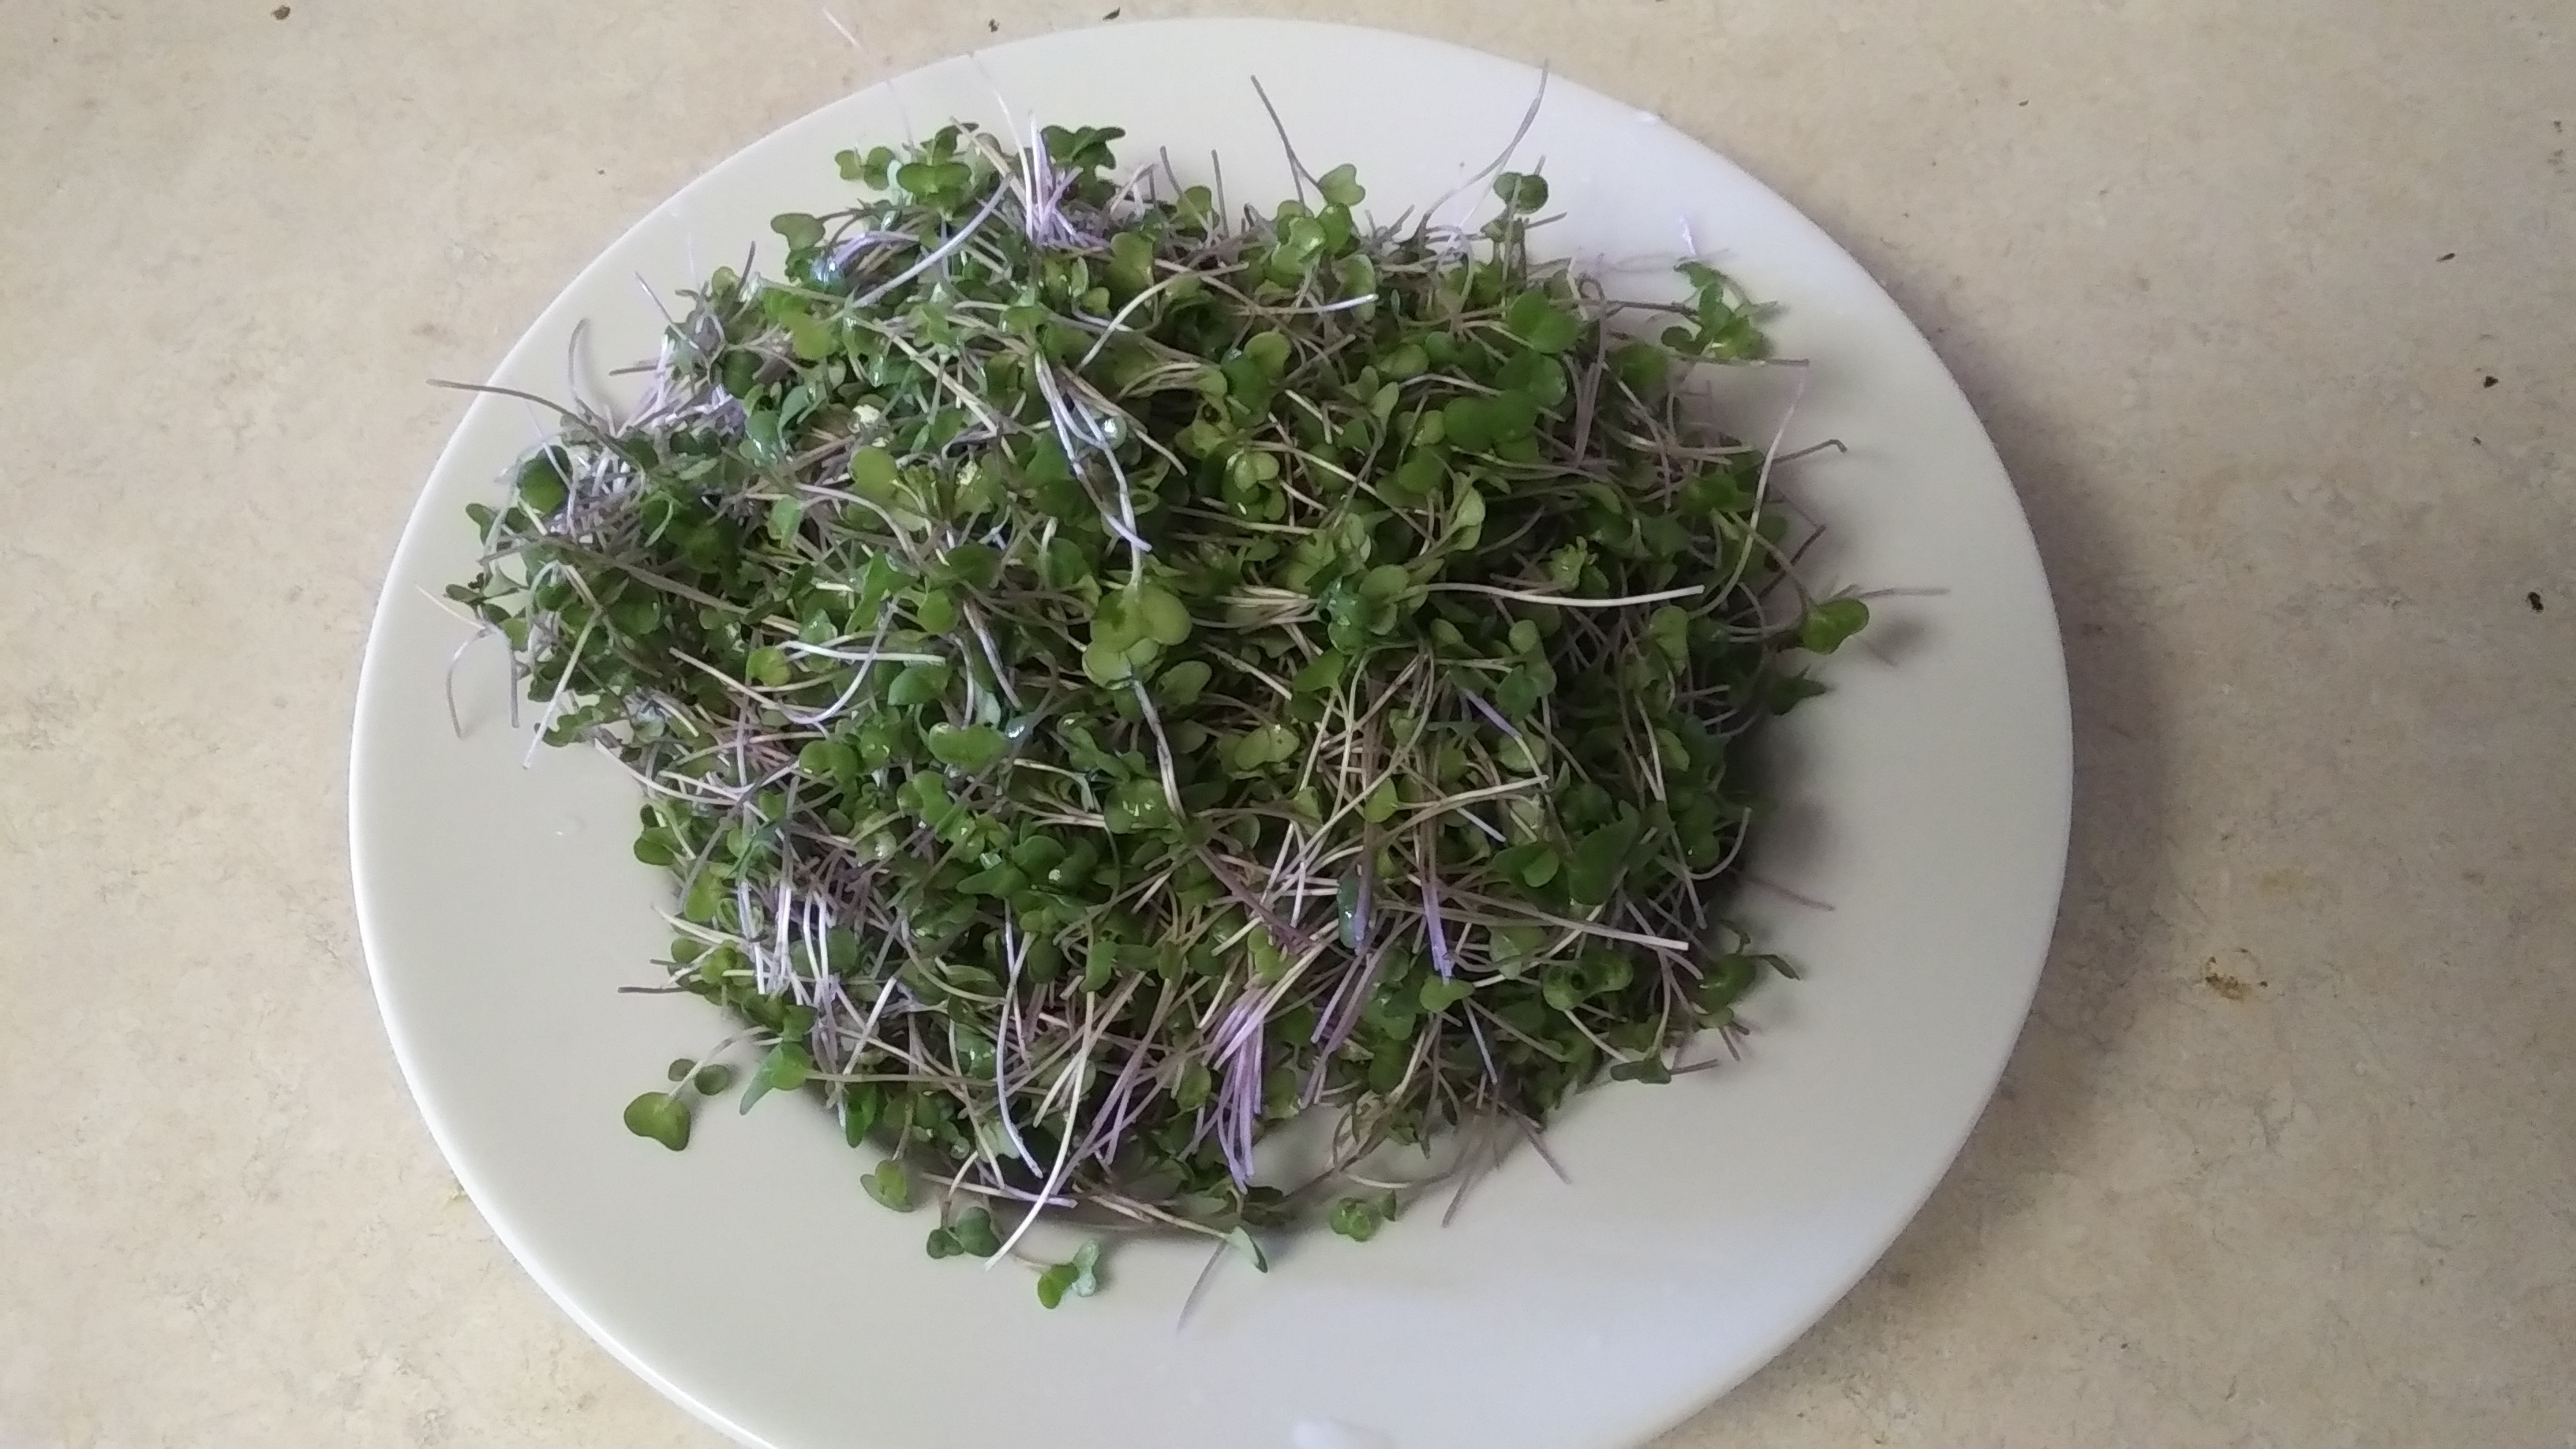
Read on, and by the end of this article you’ll know everything you need to know in order to easily and regularly deck your table with salads like the one shown in Figure 1.
Background
 [1]
[1]I enjoy instructional videos and am often adding to a lengthy mental list of projects I’d like to try. Microgreens made it to that list, and I must have talked about it quite a bit because a couple years before the coronavirus my wife gave me a half pound bag of mustard seed. But I never found the time to make a go of it. Then the coronavirus came, and there was not only time, but also necessity. We started a traditional garden in March. It was the right time of year but our seedlings did poorly, and it became evident that we would not be getting much out of our garden. We’d grown vegetables successfully in the past, but never from seed, and, before the coronavirus, with too many other commitments, regular gardening wasn’t a part of our lifestyle. We were rusty. We faced the fact that we would have to try again in the fall. But in the meantime, we made microgreens our plan B.
The Plan B Scramble
I went through a feverish week or two watching videos, reading blogs, making notes to determine what all I would need. I scrambled to get supplies, not knowing how long they would be available. Thirty or forty pounds of seeds, grow lights, potting soil, trays, fans, and more. Then, only after ordering all the materials, I came across the book Year-Round Indoor Salad Gardening: How to Grow Nutrient-Dense, Soil-Sprouted Greens in Less Than 10 Days [2] by Peter Burke. If only I had read Burke’s book sooner, I would have realized that I could have done without the lights, fans, and trays. Burke’s book shows the technique in its bare-bones simplicity, and I highly recommend it. Much of the information I encountered online was tailored for high-volume commercial growers who place a premium on maximizing yield. Still, I kept the lights and trays and fans and have not regretted them.
Among the materials for my indoor agricultural project that I was able to unpack the soonest were the grow trays and a five-pound bag of speckled peas, and so that’s where I started, and I’ve been growing indoors ever since.
The Speckled Peas
I stuck pretty closely to Burke’s instructions for this first crop, measuring the appropriate quantity of seed, rinsing them and soaking them for about 8 hours. The potting soil I’d ordered, Miracle Grow Potting Mix, hadn’t arrived, so I just scraped together a tub of dirt from the back yard. I gradually added water to the tub and mixed it as I went along, as per Burke’s instructions, until it was wet and coherent but nowhere near soggy, not dripping. The trays I’d purchased are called 1020 trays (their dimensions are 10 by 20 inches) and I had opted for the shallow variety (about 1.25 inches deep) without drainage holes. The moist soil was spread into the tray to a depth of about ¾ inch.
 [3]
[3]After soaking, the peas were drained and spread across the soil reasonably evenly. Burke at this point would wet newspaper and lay it across the top of the tray but, not having any newspaper, I scavenged some old linen dishcloths my wife had given me to use as shop rags. Got them thoroughly wet, like the soil, but not sopping wet, and spread them across the seeded tray. Over this went another 1020 tray, this one inverted, and then the whole thing went into the closet for three or four days.
 [4]
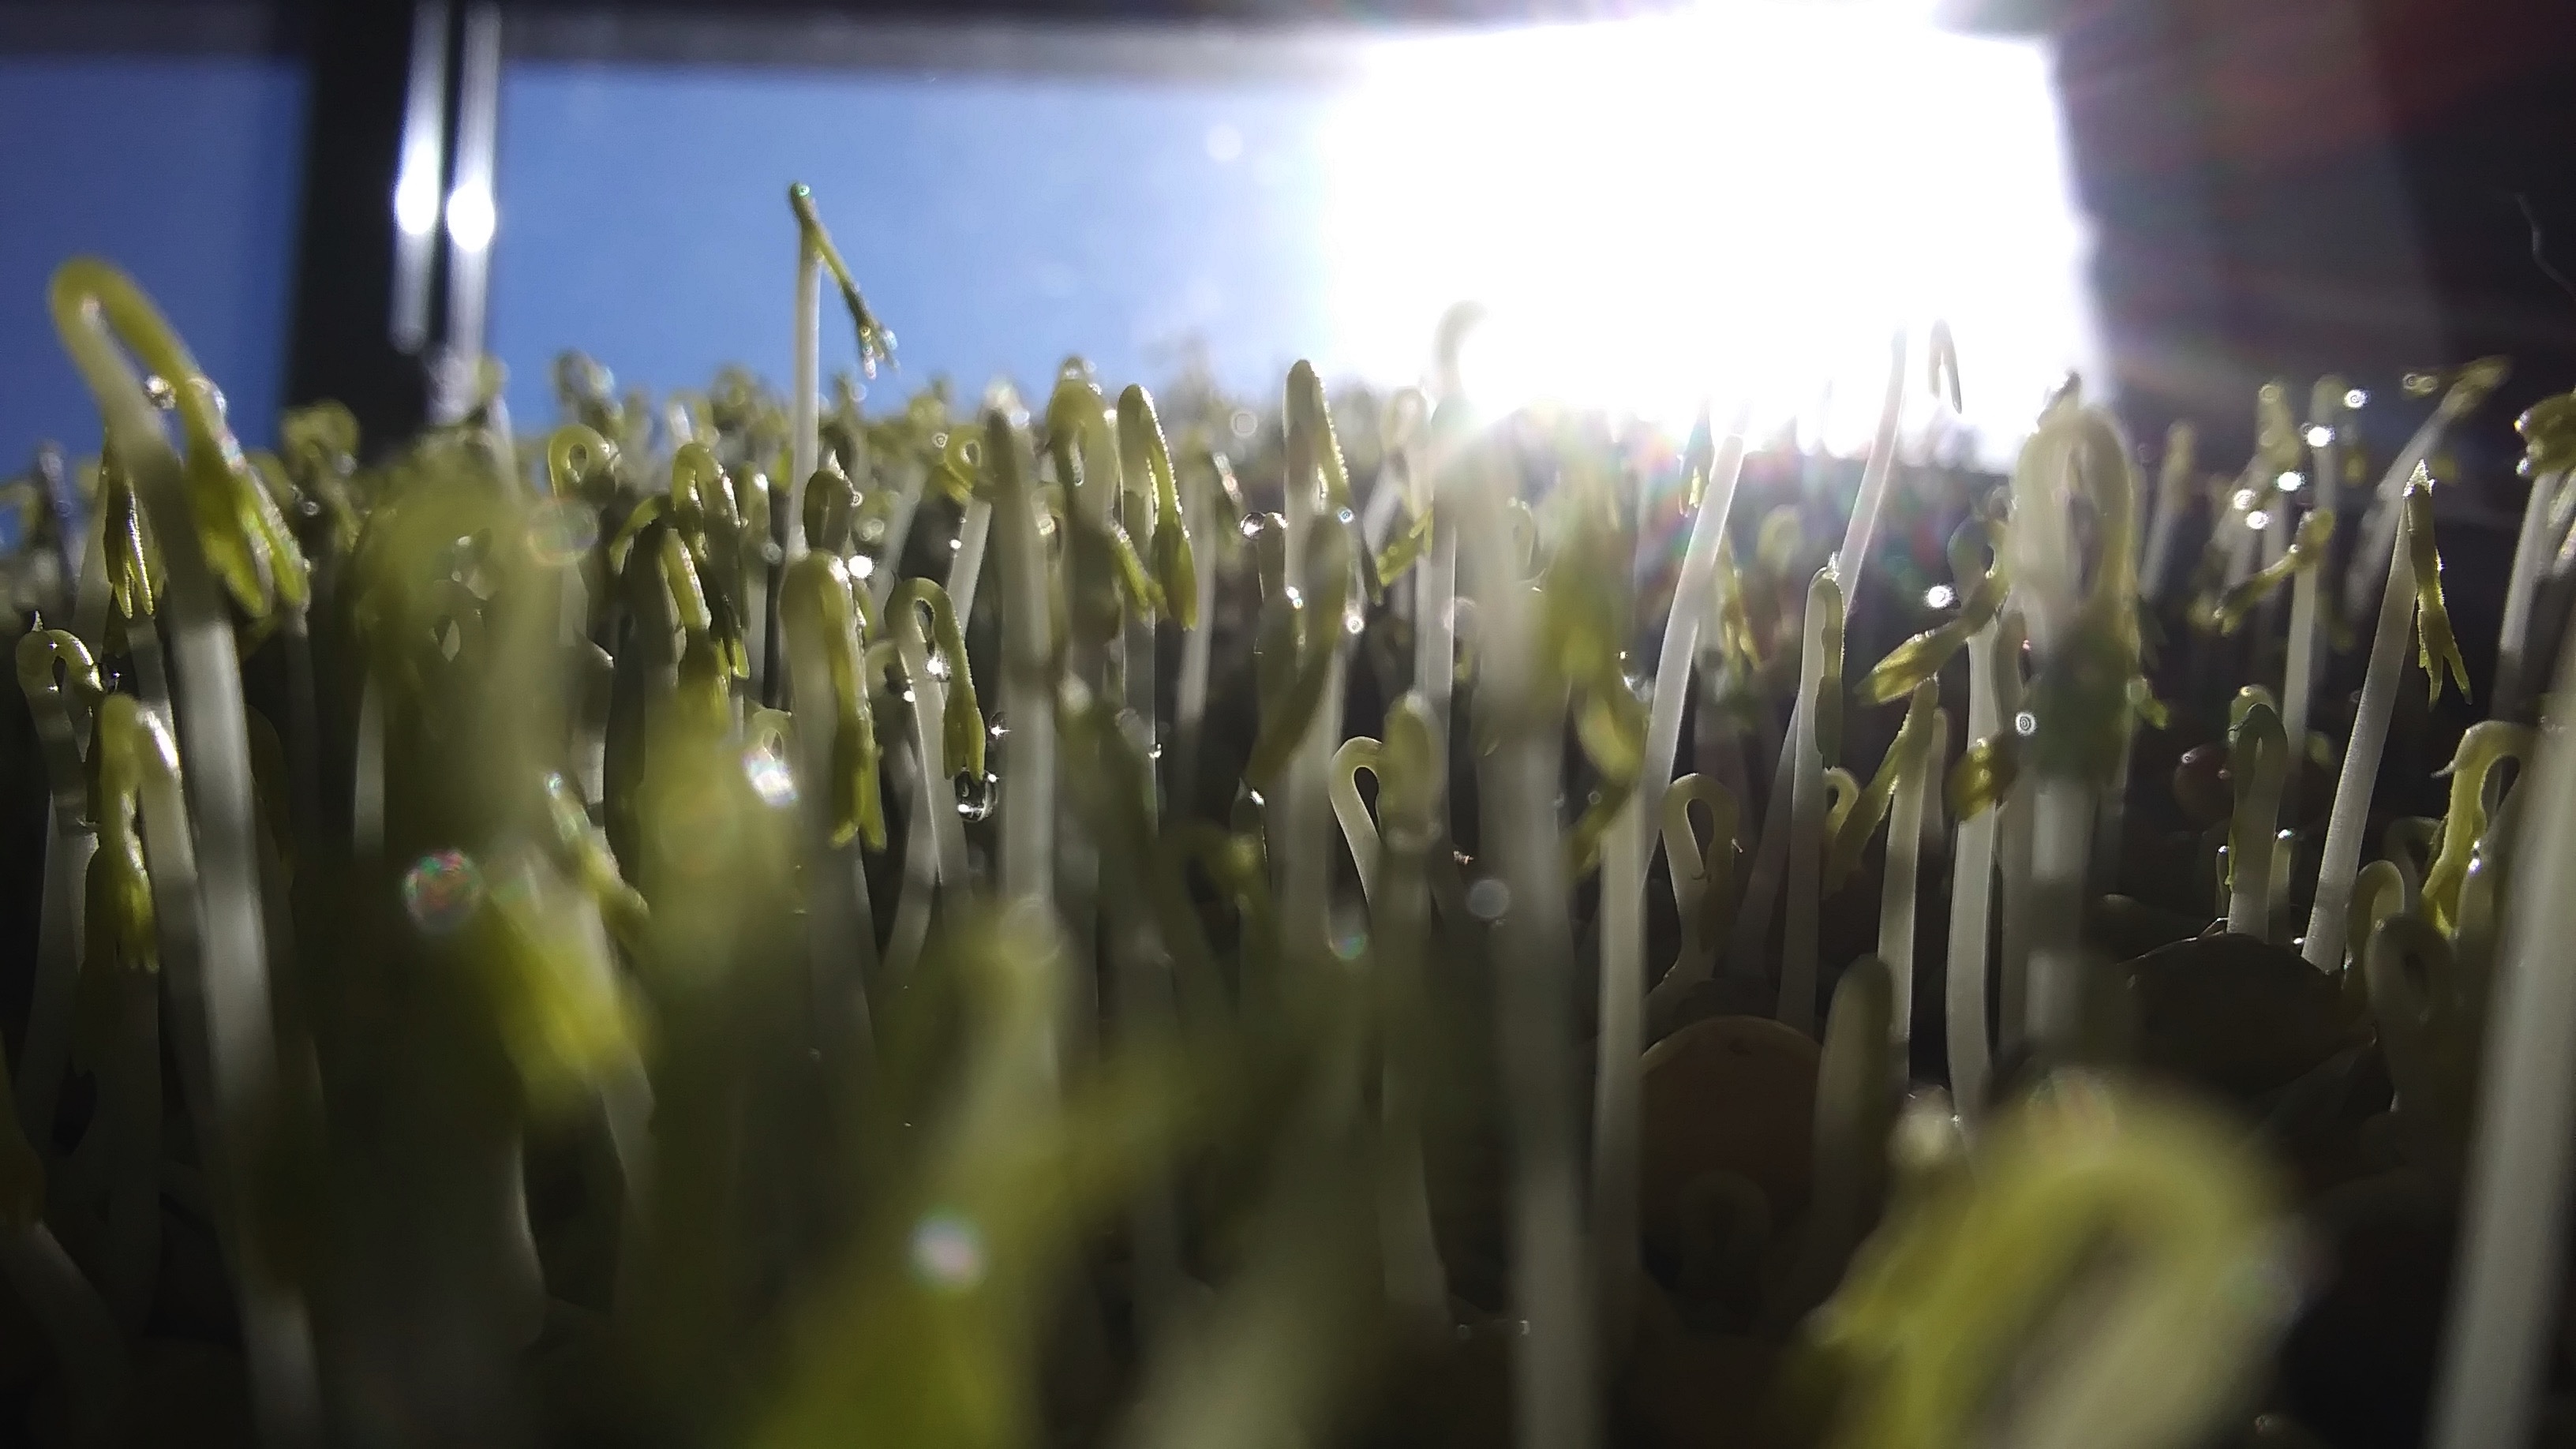
[4]On inspection the next day many of the seeds had already opened (see Figure 2). Pale, waxy appendages were apparent; some burrowed down while others stood upright. The next day those standing upright had developed a little shepherd’s crook at their tips where the leaves would later come in (see Figure 3). This went on another couple days until they had grown so tall that they were pushing the inverted 1020 tray off of themselves, and this was when I took them out and laid them on a bench by a window and gave them their first watering (see Figure 4).
 [5]
[5] [6]
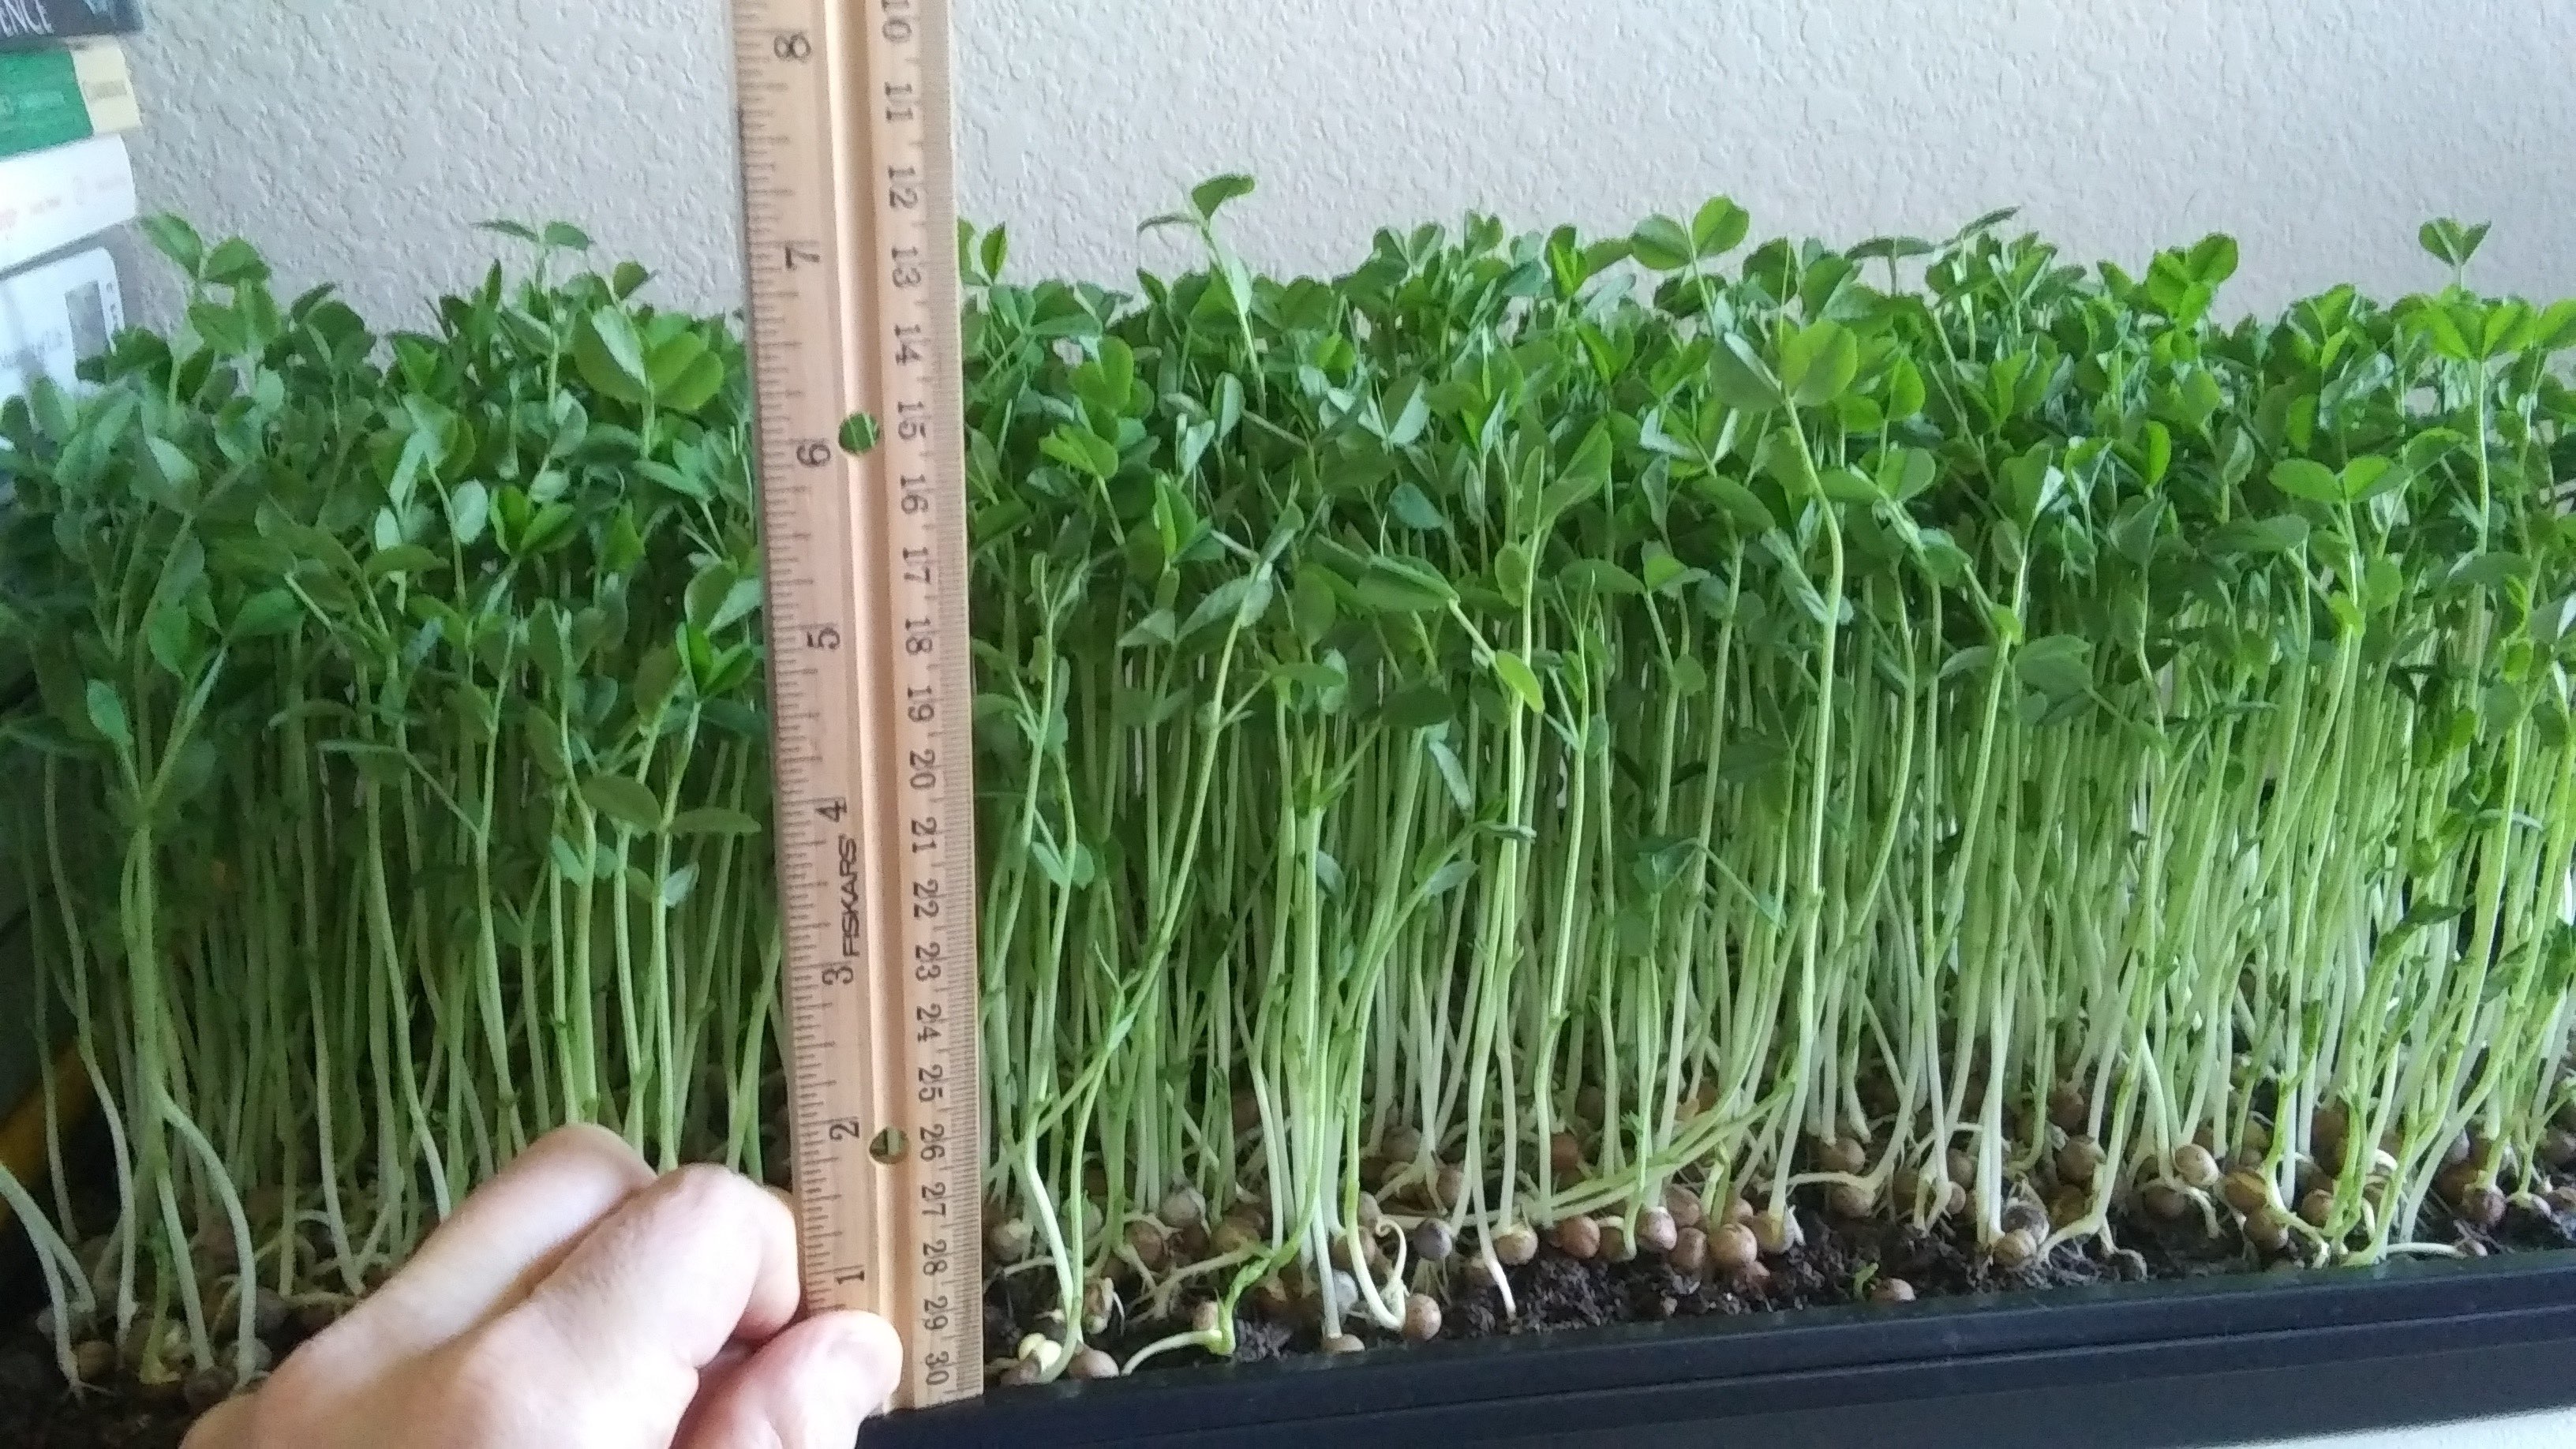
[6]Within a matter of hours, a very subtle luminous green color began to replace the waxy paleness, and not long after, the shepherd’s crooks began to arc upward and unfold their leaves in much the same way as a butterfly unfolds from its chrysalis (see Figure 5). A few days later we had pea shoots six inches tall, and that one 1020 tray fed our family of four each one large salad, the first fresh greens we’d had in weeks (see Figure 6).
 [7]
[7]I was amazed at how simple it had been and at how little effort and maintenance it had required. And when you lay something fresh like that alongside practically anything else you have on your plate it’s transformative. When times are tough and the world is rocky, there are a few very simple things in life which can be profoundly comforting, and this is one of them.
The Process, Step-by-Step
Since then I’ve grown arugula, basil, beet, buckwheat, kale, kohlrabi, lentil, Pak Choy, radish, Romaine, a ‘salad mix,’ and sunflower. With minor variation, the following steps apply to them all:
- Preparation
- Germination
- Blackout
- Normal Growth
- Harvest
Preparation: Spread dry soil evenly across the tray to a depth of about ¾ inch. I use an old 20 oz. can and fill it twice for a single 1020 tray. I’ve found it easier and less messy to water the soil after it’s spread in the tray. Seed is measured and then spread evenly across the soil, and thereafter misted with a sprayer bottle. No need to cover the seed with soil. Then newspaper, cloth, or plastic are laid over the seed to hold in moisture. A problem I had with the cloth I used initially was that many seeds would germinate and cling to it. I tried using plastic cut from 13-gallon trash bags and it has nearly eliminated the problem.
A single bag gives me about four sheets for the 1020 trays, and I have been washing and re-using these. A cover tray is then laid over this sheeting, and the whole thing is stuck in a dark cupboard or closet. The cover tray keeps the seeds in darkness and also helps retain the moisture. If you have nowhere dark to stow your trays, the inverted tray keeps it dark enough, although you may find that a little light comes in through the gap and the plants strain towards it.
Germination: For most of the species I’ve grown, germination occurs within a couple days. The seed needs only moisture and sufficient warmth. For larger seeds like pea and sunflower, pre-soaking reduces germination time.
Blackout: I encountered this term researching the process online; it’s simply the interval when the tray is kept in darkness. This is done to lengthen the stems. Technically blackout includes germination time. So, for example, if your information specifies that germination for a particular seed type is two to three days, with a blackout period of four to five days, then that’s a five-day period at most. After the seeds germinate, I remove the cloth or plastic sheeting but keep the plants in in the dark for, generally, a couple more days. Throughout germination and blackout, I might check on them once a day at most. The soil is moist enough to sustain them all the way through the blackout phase, and mold has rarely been a problem.
Normal Growth: When the shoots have been in the dark long enough to become reasonably tall (an inch or two), I’ll take the lid off. The more vigorous types, like radish, pea, or sunflower, will begin to move the lid themselves. When the lid comes off, I give them their first watering, gently, with the spray bottle. I try to make room for them at the window so that their first light is sunlight; later they’ll spend more time on the rack under grow lights.
During this last stage they’re watered once or twice a day, in the morning or evening or both, and kept in the light. The bigger the plants are, the more water they need. There have been a few times when I have been neglectful and have found that many of the microgreens have flopped over, limp, particularly along the edges of the tray; dehydration of the soil works inwards from the edges. You can compensate for this fact by watering more along the tray’s edges than in its interior. Eventually, you will have a sense of the need for water based on the weight of the try when you pick it up.
Harvest: Sometimes I harvest because the plants are looking too big and beginning to fall over, even with regular waterings; they’ve outgrown the tray. Sometimes the decision is a matter of taste; flavors change across the developmental spectrum, textures, too. When it’s time, I take a handful of the foliage and shear closely with kitchen scissors, paying attention that when I toss them into the waiting bowl or colander, I’m not including chunks of soil. As long as there’s no soil, washing the greens is limited to rinsing.
There are invariably still some seed hulls attached; many will rinse away. It’s only the larger ones, such as sunflower and buckwheat, that are unpalatable. The little ones go mostly unnoticed, and when I reflect that psyllium husk is sold as a supplement, I lessen my efforts to remove them.
(To be continued tomorrow, in Part 2.)
Comments Disabled To "The Secret Salad Garden – Part 1, by D.G."
#1 Comment By Randy On August 18, 2020 @ 10:09 am
Great start…looking forward to Part 2
#2 Comment By Bear On August 18, 2020 @ 10:28 am
Wow! You make it sound easy. I bet even I with my traditionally black thumb could do it. After all the kids planted lettuce seeds in a Bible lesson and I’ve been keeping those alive in their little plastic cups, making sure they get sun and such…
I will also pass this information also to a family member who pre-pandemic was very accustomed to grocery shopping the metropolitan/European way–stopping in the store for fresh everything every couple days! She has now shifted with some difficulty to getting grocery deliveries once per week and recently asked me to be on the lookout for seeds, as she has been unable to get sprouts for salads. Maybe, if we can start sprouting together at our homes, it might open the door a crack and I won’t be such a crazy doomsday-er for my cases of cans and my 25# sacks of flour… (And that’s just what’s out and visible because I USE it, lol. She’s never even seen the pounds of rice and beans packed away… )
#3 Comment By Michael On August 18, 2020 @ 12:06 pm
Wonderful – I was looking for a “real person” article on “sprouting”. I have a question that has been nagging me for years, as a newbie prepper, and advanced-beginner gardener: after using your “stock” of seed(s) that were purchased instead of home-grown, you then need to order more. And more. And more. Rinse and repeat.
Do you (or anyone) have a holistic approach to the cycle of reproducing the sprouting seed en masse themselves enough to keep one in sprouts all winter / all year, short, of course, of simply saying “grow the damn stuff outside in the quantities you need, man”?
Because that would be quite a lot of acreage; and such replenishment of bought seed would not be available in a SHTF situation
#4 Comment By Ani On August 18, 2020 @ 1:58 pm
@ Michael
it doesn’t take a lot of plants(or acreage) to produce seed for this homescale size project. This year(or next season) allow some of your lettuce, spinach, mustard, etc to go to seed. Save the seeds. Done!
#5 Comment By Michael On August 18, 2020 @ 2:33 pm
Ani –
Thanks for the reply. I have about 0.5 acre tillable land (not including some property line planting of blueberries, etc.) In addition to growing to have enough for the veggies themselves, how much acreage do you think any given specie of green for microgreen is necessary to be devoted to it to put away a “winters” worth i.e. October – April of consumable seed? The beans would probably be best in this regard – especially the pole varieties in re output per sq ft, but what of the brassicas, etc.?
Sorry to be imposing, I’ve been trying to do the math for years and failed
#6 Comment By Ani On August 18, 2020 @ 3:43 pm
@Michael
I don’t have exact figures but if you allow a single greens plant to go to seed you’ll be amazed by how many seeds you’ll get. Have you ever collected the seeds from just a single poppy flower? Incredible numbers. Same with tomatoes, squash etc. If you save the seeds from bean plants to reseed, remember that every seed in each pod will grow a new bean plant. Same thing with peas.
A book that has been around for awhile but is really informative is; The New Seed Starters Handbook “ by Nancy Bubel. I suggest you pick up a copy. It’s not too late to save some seed this year.
#7 Comment By Once a Marine… On August 18, 2020 @ 10:20 pm
Sing that song, Ani. We on this blog often debate what is the best investment. Gold, silver, lead, tools, fuel.
You just made the case for the enormous return on investment a single seed will give us.
I am letting many of my kale plants go to seed. Will also harvest dried beans when the time comes. Certainly the book you suggest is informative. In the m,eantime, neighbors, just google “saving seeds for whatever plant you desire”.
Beans and kale, are super simple. Books and websites approach more difficult seeds like tomato.
Carry on in grace
#8 Comment By Lisa in TX On August 18, 2020 @ 10:43 pm
Ani and Once a Marine,
Another great book is Seed to Seed: Seed Saving and Growing Techniques for Vegetable Gardeners by Suzanne Ashworth. I have it in my collection and use it on a consistent basis.
#9 Comment By Ani On August 19, 2020 @ 9:54 am
@ Lisa
Yes, that book is another good one. Good recommendation.
#10 Comment By Cabot On August 21, 2020 @ 2:08 am
Saving seeds depends on the crop and your climate because some plants are biennial – producing seeds every other year if they overwinter. These include beets, onions, turnips, cabbages and similar crops. For microgreens I would think that the novice could focus on annual crops like peas, radishes, sunflowers, pak choi and lettuce, among others. From my experience this year, a single radish plant can produce an abundance of seeds. I’m trying to keep track of some cultivars, but if I think a crop might have cross pollinated in a bad way, I will just save the seeds for sprouts, since the sprouts will be similar. Also, I bought 2 lbs of sprouting seeds earlier this year. I’m letting everything go to seed, but I don’t know how much volume/weight to expect. Hope this helps.
#11 Comment By Telesilla of Argos On August 18, 2020 @ 3:05 pm
Hello Michael!
There are some great easy-access videos on growing for seed. Will also share one example from our own garden… We added a patch of kale that was roughly 24 square feet, and produced THOUSANDS of seeds. It shouldn’t take much space, and hopefully you’ll be quickly producing more seeds than you can replant.
Wishing you every success!
#12 Comment By Ma G On August 18, 2020 @ 12:29 pm
Last summer I met a fellow who was growing larger quantities of the greens as a market basket business. He also sold small bags of the greens at the local farmers market. He said that he used coconut coir for his growing medium. Have you experimented with this medium?
#13 Comment By Telesilla of Argos On August 18, 2020 @ 3:07 pm
Hello Ma G!
We are very familiar with coconut based growing medium, and use it substantially in our hydroponics (passive and pump driven). We also use this product to make our own plant starter material. You can purchase it in “bricks”.
#14 Comment By Georgia On August 18, 2020 @ 1:07 pm
Love this post!! Thanks for sharing.
#15 Comment By CORD7 On August 18, 2020 @ 1:09 pm
Loved the simplicity and straightforward instructions. Great pictures too. Thinking about incorporating this into a winter use for salads and then a spring planting.
#16 Comment By Alan Wheelock On August 18, 2020 @ 1:50 pm
I found a youtube channel with a Dr Rhonda Patric and she talks about Broccli sprouts being the new super food.
#17 Comment By Ani On August 18, 2020 @ 1:56 pm
I’ve been doing this to grow mesclun type mixes instead of micro-greens. Pretty much similar techniques except you want to keep the mesclun exposed to the light as elongated stems isn’t what you’d want. I cover my seeds lightly and then water. I’m using a metal shelving unit with shelves wide enough to handle 4′ LED lights kept on a timer. I cover the seeds with either a piece of clear plastic or humidity domes until they start to germinate. It takes a fair number of flats to produce a lot of salad but still, it’s a good way to supplement the diet with fresh greens in the winter. And watching it grow when the ground is covered in snow……… priceless!
#18 Comment By Stealth Camper On August 18, 2020 @ 2:04 pm
Mister cheapskate here. If you could provide your source for seeds, I would greatly appreciate your kindness. I look forward to Part 2.
#19 Comment By Anon On August 18, 2020 @ 2:57 pm
I’m kinda a bacon and eggs guy. Don’t know that I have ever eaten sprouts. does not look good.
#20 Comment By oldman in NJ On August 18, 2020 @ 5:21 pm
Sausage lover Dave here. You should consider trying to broaden your palate, I have come to love sprouts, and it is a food that makes you feel healthy while you are eating it. Bean and alfalfa sprouts especially for me.
#21 Comment By Telesilla of Argos On August 18, 2020 @ 6:50 pm
Sprouts are especially delicious with sausage or bacon! Kidding, of course. Just couldn’t resist the fun of this!
#22 Comment By Telesilla of Argos On August 18, 2020 @ 3:10 pm
Hello DG!
What a great fun article and information. Really enjoyed it, and looking forward to the next installment! Will be watching for your thoughts about how best to manage humidity control related to microgreens and mold management. We’re fascinated with these, and think we’ll be growing our microgreens over the winter in-greenhouse because we have such high humidity across the summer months. Thanks so much for sharing what you’ve learned with all of us!
#23 Comment By Animal House On August 18, 2020 @ 4:21 pm
Thanks for this timely article. I just received an order of microgreen seeds from Johnny’s Seeds and I’m getting ready to plant them. This is just what I needed!!!!
#24 Comment By sewNurse On August 18, 2020 @ 4:24 pm
I am certainly no expert here as I have only done this once myself. About a year and a half ago, I took a class taught by a young man that was in the business of growing microgreens to sell.That night we planted sunflower seeds and everyone took home a tray. What I remember was they were planted in potting soil and the tray after watering was covered with a clear plastic dome. I do not remember having to cover them with any paper. They were placed in a dark closest and once they sprouted with a couple of leaves I moved them to a window to get light. Anon, they actually tasted very well. I have never enjoyed bean spouts, but these are different. From what I have read sunflowers are one of the ones most people enjoy. They also are suppose to have very high nutritional value. This summer when I visited the store where I had taken the class, I noticed that they had very little stock of these seeds. I don’t know if more people are doing this or if they were having trouble getting stock. Their seeds were not particular cheap. I am sure if you have access to your own seeds this would be the way to go. Adapt2030 has a link to a company called Truleaf Market that sells seeds but I have never used this company. You really don’t need grow lights etc. Just a dark closet and a light from a window later. Give it a try. You might be really surprised. Thanks for the great article DG. Looking forward to the next edition.
#25 Comment By Telesilla of Argos On August 18, 2020 @ 4:55 pm
Hello SewNurse!
You might enjoy some of the Curtis Stone Urban Farmer videos on microgreens. He has several on these, and there is at least some conversation about the various flavors and salad blends. The one we struggled with the most in terms of germination was the Red-veined Sorrel because it was very, very slow. Once it sprouted, it was there to stay.
#26 Comment By Wolf Alaska On August 18, 2020 @ 5:12 pm
D.G., I enjoyed your article and found it to be well written.
I’m making the following comments here because it seems to be the newest comment opportunity today. I hope this is OK by you and that JWR approves, also.
I only mean these comments to be informative, not political.
It came to my attention yesterday of certain aspects of the Joe Biden for President campaign’s policy positions. This information was gleaned from a letter to me from the NRA-PVF and my reading of the campaign’s positions published on the Joe Biden for President campaign’s web site. joebiden.com
The NFA of 1934 will have its authority extended to cover all semi-automatic firearms, including rifles and pistols. Each firearm will need to be registered in the same way as you would register a belt fed fully automatic machine gun. All the paper work, finger prints, photographs, background check and $200 tax would apply separately for each firearm you wish to register.
The same policy/law will apply to each magazine with a capacity in excess of 10 rounds. Each magazine will need to be registered using separate paper work and $200 tax the same as used to register a firearm.
Reporting, inventory, and inspection requirements of the NFA of 1934 will apply.
“This [plan] will give individuals who now possess assault weapons or high-capacity magazines two options: sell the weapon to the government, or register them under the National Firearms Act.”
Background checks will be required to buy a box of ammunition.
End the online sale of firearms and ammunition.
Give states incentives to set up gun licensing programs. …give states and local governments grants to require individuals to obtain a license prior to purchasing a gun.
There are many more important points made on the joebiden.com web site under the gunsafety topic. Title is: “The Biden plan to end our gun violence epidemic”
I hope SurvivalBlog readers find this information interesting. I have not seen these policies mentioned here, so I wrote this a public service to provide information.
Let’s Roll !
Wolf Alaska
#27 Comment By Bear On August 18, 2020 @ 11:13 pm
Thank you for the information, Wolf. Chilling indeed.
I’m going to go ahead and leave this here, as inspiration to all of us who, shall we say, STONGLY DISAGREE with Mr. Biden’s ideas on this topic. 🙂
[8]
#28 Comment By jima On August 19, 2020 @ 12:52 am
“Unintended Consequences” John Ross
#29 Comment By The Pickled Prepper On August 19, 2020 @ 5:35 am
Interesting how four years ago the rumor was that Trump would remove suppressors from the NFA rules and now Biden wants to add semi-autos to it. Makes it pretty clear who to vote for, as if I was ever in doubt.
I think (maybe it is wishful thinking) this is probably just election talk that would stand little or no chance of making it into law because this concept would be quickly crushed under its own weight.
First, this law would be challenged in court and would eventually make its way to the Supreme Court where they could actually overturn the entire NFA, making it legal for all of us to purchase suppressors, fully automatic weapons, short barreled rifles and “sawed off” shotguns. I think any serious gun grabber would probably want to avoid anything that would possibly give us the opportunity to challenge the underlying law and its constitutionality. If that happened, you can be sure I’d buy a couple dozen auto seers.
Second, this would swamp the BATFE. Could you imagine what it would take for them to go from less than 2 million NFA registrations per year to 100 times that all at once? Chaos would reign. Hell, it would probably take them five years just to get bids on the computer system they would need and to staff up accordingly.
Third, how are they going to register magazines that have no barcode? And if they do include magazines, that 200 million semi-auto rifle and pistols (the number is just a guess) would jump to over 1 billion. They would need the blockchain and RFID chips to track all that gear, and I don’t think that BATFE has the capability, the capacity, or the will to do it.
Fourth, under that proposal, if someone has 50 magazines, it would cost them $10,000 to register them. What are the odds of that happening? Recent history has shown us that far more people ignore registration laws than abide by them. Adding a cost burden like that would just increase the noncompliance to an even greater level. LIke Jima imlpied, read Unintended Consequences and see the potetial outcome.
I could go on, but I think you get the idea. This is an plan that sounds clever to someone 23-year-old policy dweeb on a Zoom conference call from his mom’s basement who think he knows guns because he plays Call of Duty on his Xbox. Try to implement the idea in the real world and it quickly falls apart.
That doesn’t mean we should not raise awareness and spread the word to fight this idea and the Biden/Harris ticket. We need to reach out to every recent gun buyer who bought a pistol and three magazines for self-defense and point out that voting for Biden could cost them $800 in registration fees.
#30 Comment By sewNurse On August 18, 2020 @ 5:48 pm
Hello Telesilla of Argos. I am a huge fan of Curtis. I would have loved to have taken some of his courses when he came into the south. Guess with Covid those aren’t happening much any more. I found some of the equipment he used in gardening to be very fascinating. There is so many different ways of gardening, and preserving out there, and I feel we are so fortunate to be able to click on videos to learn from others.
#31 Comment By Anonymous On August 18, 2020 @ 6:04 pm
Thank you for the article! I intend to purchase this book by the end of the week. Thank you for the tip on Curtis Stone.
#32 Comment By Lisa in TX On August 18, 2020 @ 10:52 pm
Thank you DG for the most informative article. I will be looking forward to the next installment!
I have been thinking about “sprouting” for a while know but have never attempted it before. I’ve been too focused on “outside” gardening but I never realized it could be as simple as your instructions! I am definitely going to try this.
#33 Comment By Preacher On August 19, 2020 @ 1:45 am
One more thought for microgreens/sprouting: If you know some of the varieties of edible ‘wild’ plants, you could consider harvesting the seeds ‘in the wild’ to re-start agriculture. For example, all the Amaranth species grow large amounts of seeds (some varieties up to 3-4 lbs. per plant), and Chenopodium species likewise. You might even start in the supermarket with a bag of commercial grain Amaranth or Quinoa (a Chenopodium variety), though these might be (heat-) treated — I’ve found sprouting will work with some, and not with others. All your (whole) beans, peas and lentils can be tried.
#34 Comment By David Andrew On August 19, 2020 @ 1:50 am
I live in Florida…sand for soil. I can’t grow ANYTHING. But even ‘I’ might be able to do this. Looking forward to part 2.
#35 Comment By Ani On August 19, 2020 @ 9:59 am
@ David
I have one word for you. Compost. Lots of it. Add enough and you’ll be amazed by what you can grow there.
#36 Comment By Albert On August 19, 2020 @ 7:52 am
Thank you for a very useful addition to the wealth of knowledge available here on Survivalblog.