One of my favorite garden bounties every year is the blackberry jam I get from my beautiful 100’ row of thornless blackberry vines. I love my blackberries for many reasons: they’re one of my few pest-free crops, they’re perennials, and they’re linked to my Swedish grandfather who was a master horticulturist and berry grower for over half a century. I also get a feeling of not only craftsmanship, but companionship with my grandpa when I’m out working with the vines: tying up this year’s growth, propagating new plants from tip runners, harvesting the berries, and cutting out the two-year stems at the end of the summer.
But the best part of all, aside from grazing fresh blackberries on the hoof, is enjoying my seedless blackberry jam.
While I’ve never outgrown Peanut Butter & Jelly sandwiches, the 30+ pints of jam I average each year mostly end up in places other than peanut butter sandwiches. I use it to flavor my home-made yogurt, it’s great on waffles and pancakes, and percentage-wise, I probably use the most to flavor my frozen lemon-cucumber-protein smoothies that get me through the hot summers without air conditioning. I share some with friends and neighbors and they’d never let me through the front gate at the family reunion without jars of jam for everyone.
I’m going to present a few radical ideas on how to max out your canning batches, as well as how to create your own jam recipe, and I can assure you they are perfectly safe to try at home. I’ll be using the example of my blackberry jam recipe which I spent five years perfecting, but the general ideas will work with any canning recipe you have. You may need to play around with your recipe to get it just right. With jam, the worse that can happen is that you’ll not end up with the exact consistency you were shooting for, in which case, there are lots of other uses for it. But that happens in any given year anyway, for reasons which I will point out. With the methods I’ll show you, you’re actually more likely to have consistent batches from year to year. So friends, preppers, and canners, lend me your ears.
No Cups, Use a Scale
The first radical idea I want to present is that you use a scale for your canning instead of cups. Weight is exact. Cups are slower and less accurate, and a “cup” varies from one manufacturer to another.
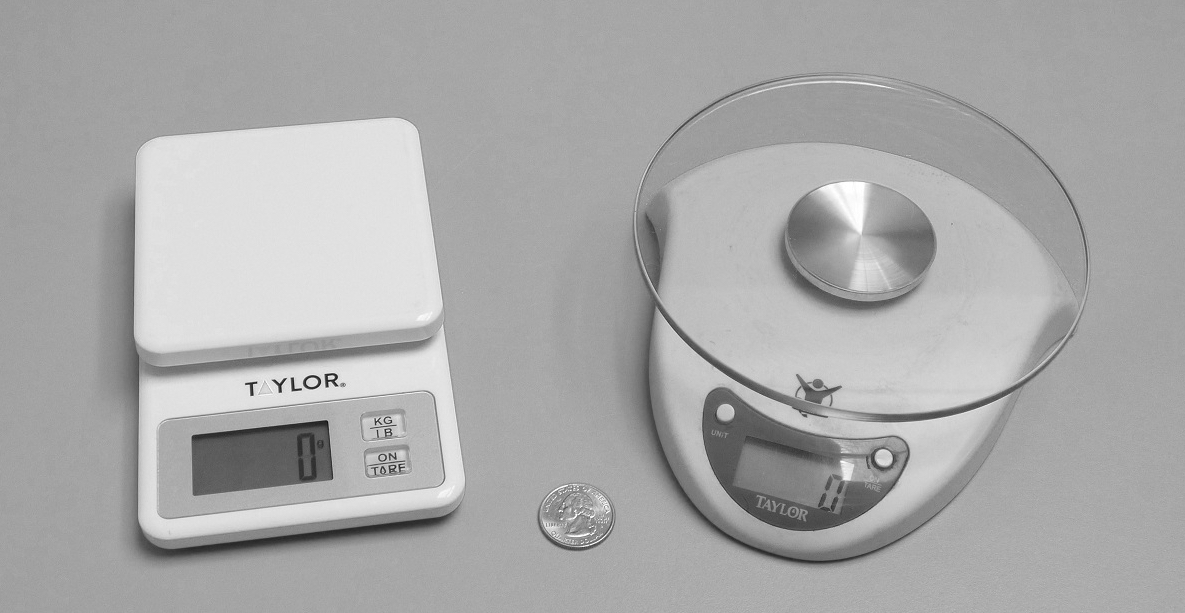 [1]When I first learned to bake bread, I added the ingredients together exactly like the recipe called for. It was too dry. I added more water. Now it was too wet. Back and forth. Before my first loaf of bread was even in the oven I said to myself, “This is really dumb.” Now my recipe is by weight. I weigh out the flour, weigh out the water, and it turns out perfect every time. Electronic kitchen scales average around $16 (here’s Amazon’s best-seller [2]) but you can find cheaper models. Most of you probably already own one.
Most boxes of pectin warn you against making more than one batch of jam at a time. We’re going to ignore those warnings because if we weigh the ingredients instead of using cups, and follow the other tips in this article, we can make 11 pints of jam at a time. The whole purpose of our method is to max out the number of pints we can fit in our canner for each batch. This not only allows us to save time but also energy costs. In my particular case, it also means I can make 32 pints of jam in three batches instead of six. My feet hurt just thinking about standing at the stove making six batches!
Jamology 101, Why Jam Gels
Before I go any further, let me mention a few quick basics of Jamology 101.
The main reason jams and jellies don’t need to be processed in a pressure canner is because the botulism-causing bacteria we home canners worry about cannot survive in an acidic, high-sugar environment found in most jams. Sugar not only sweetens the jam but it also absorbs water which helps in the gelling process and determines the final consistency of our jams. We add lemon or lime juice because the acid helps separate the natural pectins found in fruits so they can help the gelling process as well.
When you think of how crunchy a green peach is that’s because the cell walls are still full of pectin. As the peach ripens, the pectin breaks down, the peach softens and becomes much more pleasurable to eat. If you keep that in mind as you are picking fruit for your jams and jellies, adding in a few not-quite-ripe fruit will help the gelling process along. Using 100% dead-ripe fruit will make it harder for the added pectin alone to get the job done. If you’ve ever wondered why some years you get a good set and other years not, the ripeness of the fruit could be the biggest reason.
Creating Your Own 11-Jar Recipe
When I first started making blackberry jam, I followed the recipe from the box of pectin. It left much to be desired so I set out to create my own recipe. The standard was my grandma’s raspberry jam that I grew up with. It had real ZING! That’s what my jam needed to have if anyone was going to take me seriously as a jam-meister. The recipes I was finding lacked lemon juice so I added that for zing. You’ll notice I’m not adding powdered armadillo teeth or things that are not normally found in jam recipes so this is perfectly safe experimentation.
For sugar, I needed some guidelines to stay within for gelling purposes. Using recipes from three brands of pectin, and standardized fruit weights from KingArthurFlour.com, I was able to determine the following proportions of fruit to sugar by weight:
- MCP: 1.19 unit of fruit per unit of sugar = 46% sugar
- SureJell: 0.96 unit of fruit per unit of sugar = 51% sugar
- Hosier Hill Farms: 0.60 unit of fruit per unit of sugar = 62% sugar
Since MCP’s recipe uses only 46% sugar, I knew my own recipe could go as low as 46% and still be safe.
Pectin is high priced when bought in single-batch boxes. In addition, each brand has a different weight (1¾-2 oz), and they vary in ingredients. So, rule number one with pectin is to never mix brands in a batch of jam. And for the frugal-minded, it’s best to buy pectin in bulk. The best deal I’ve found is Hoosier Hill Farms [3] in a 2 lb. bag which averages around 55¢/ounce, about half of what a single-batch box costs.
Skip Grandpa’s Ounces and Pounds, Use Grams
The second radical idea I want to propose is that you use grams when weighing out your ingredients instead of ounces and pounds. They’re so much easier to work with as you’ll see in a moment. I put pounds in parentheses just so you have a ballpark idea of what we’re talking about. I have the lemon juice measured out in cups since, on a full recipe, that’s the easiest way to measure it out, but the grams are needed for that partial batch.
My final recipe:
Recipe for 11 pints of Seedless Blackberry Jam
- 3,400 grams of strained blackberry puree (=7½ lbs)
- 3,000 grams of sugar (=6.61 lbs)
- ½ cup (118 grams) lemon juice
- 112 grams pectin
- 1 T butter
Again, the reason you want to use grams on your scale is that they’re so easy to work with. I don’t even think of them as grams, it’s just a target number on the scale that I am trying to hit.
I pick blackberries every other day and freeze them until the end of the harvest so I can make jam all at once. I know from experience that I’m going to get the first two 11-pint batches, but how much of the third batch will I get?
Here’s where the beauty of using grams comes in. On the third batch, I’ve strained the remaining blackberries and discover I only have 2,686 grams of blackberry puree, 714 grams short. No problem! Luckily I have a calculator handy. By dividing 2,686 by the 3,400 grams needed for a full batch, I can figure out what percentage of a batch I can make.
2,686 ÷ 3,400 = 0.79
Since I know I can only do 79% of a full batch, I simply multiply all my other numbers by 79% and my recipe is good to go.
- 3,000 grams of sugar x 0.79 = 2,370 grams
- 118 grams of lemon juice x 0.79 = 93 grams
- 112 grams of pectin x 0.79 = 89 grams
- 1 T butter
If you were to try that with pounds and ounces, it turns into a huge mess in a hurry. If you were to try that with cups…well, you just wouldn’t even try. (The butter is only to keep the foam down while you are stirring the pot so keep it at 1 T.)
The thing to keep in mind is, the units are irrelevant, they’re just numbers on a scale so it’s not important if they’re grams, grains, troy ounces, or Jorj units. They’re targets we’re trying to hit as we are pouring ingredients into a bowl. It’s just that simple. When I’m pouring the sugar, I’m not even thinking about grams, all I’m thinking as I’m watching those numbers count higher is that I have to hit 2,370 and then stop.
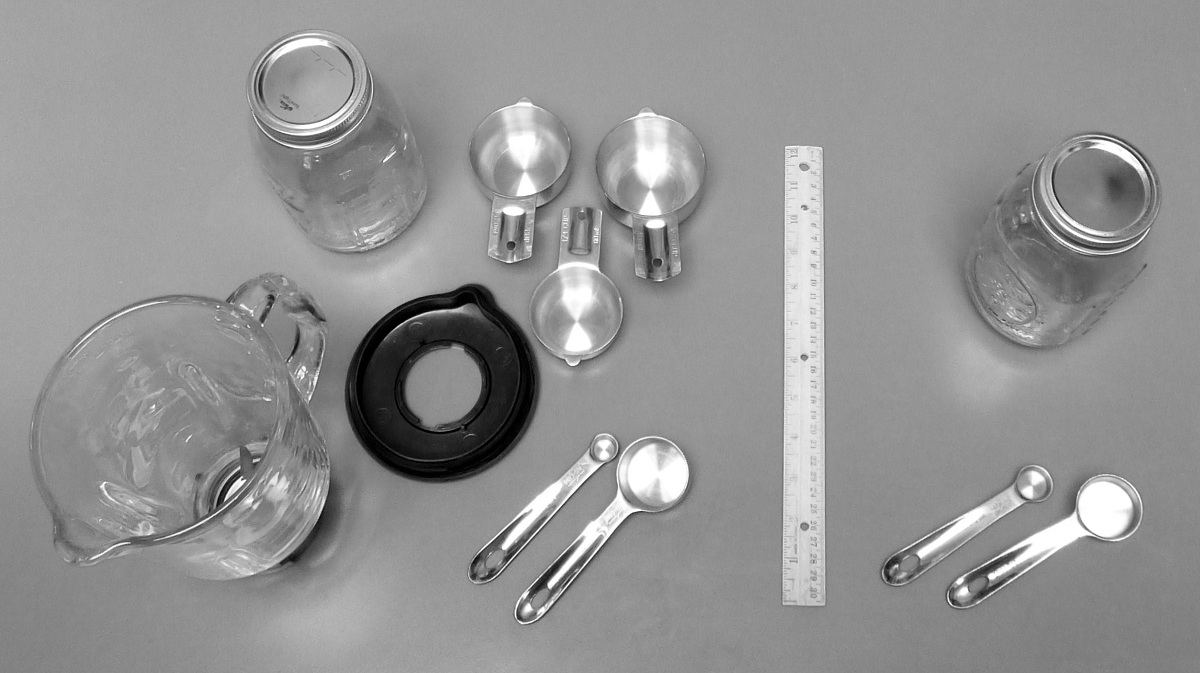 [4]There are lots of reasons for learning to cook using weight instead of the traditional cups and measuring spoons. Here’s a visual example below. On the left, I gathered together the items for making a salad dressing as instructed in the recipe. On the right, making the same recipe by weighing the ingredients instead of measuring them out. Much less to clean up! You can go to KingArthurFlour.com [5] to help convert many cooking ingredients over to grams.
Max Out Your Canner to Save Time and Energy
The reason why we’re making an 11-pint batch in the first place is because that’s how many jars the most common 21-quart, enameled, Ball water-bath canner holds. If you take the basket out, which only holds 7 pint-size jars due to raised dividers, you can get 4 more jars in. In mine, 11 Ball/Kerr jars will fit 9 around the outside and 2 in the middle. With generic jars, only 8 are going to fit around the outside and one in the middle. Now that you know how to do the jam math, it’s easy to get your particular canner out, see how many pints it will hold, and then customize your jam, pickle, salsa, or whatever recipe for that number of jars. Is math beautiful or what?
Some will warn you against having the jars sitting directly on the bottom of your canner instead of in the basket. As long as your canner has a corrugated bottom, don’t worry, I’ve never had a jar break. Those raised rings allow bubbles to escape as water boils under the jars. If the bottom of your canner has a surface flat enough to fry pancakes on, you’ll need a Plan B. Either some sort of a trivet on the bottom or you may be lucky enough to have a canner with a rack that looks like a flat, round, bread-cooling rack. You just want to avoid dividers which limit the number of jars you can fit in.
It all boils down to trying to maximize your canner space after you’ve gone to the trouble and expense to heat up all that water. It also saves time and propane since the more jars you can fit in, the less water it takes to cover the jars.
To make my 32 pints of blackberry jam using traditional one-box-of-pectin batches, would have taken six batches. Instead, I did it in three. I was pretty tired by the time it was over. There was no way I could have done six in the same day. And to do three one day, then have to clean it all up and do three more the next day, would have been a huge psychological hurdle.
I also have 11-jar recipes for my pickled three-bean salad, bread and butter pickles, and salsa. It makes my canning much more efficient and enjoyable to get the pints done in 11-jar batches. You can also apply these same rules to increase the number of jars on your quart-jar batches as well. Since so many canning recipes say “makes 5-6 pints,” a good starting point is to just double the recipe and see if you get 11 pints. As you are measuring out the ingredients, “4½ cups green beans,” weigh the 4½ cups of beans in a bowl and write that number (563 grams) in your recipe book next to “4½ cups.” Do that with each ingredient and the next time you use the recipe, it will go much more quickly using the grams you’ve written in the margin.
Photographic Reminders
 [6]One last thing I do is to take photos of my setup. The example below shows me how to set up my strainer, seed catcher, puree catcher, and scale, with an index card telling me how many grams of puree I need per batch. The inset photo reminds me how far to rotate the strainer. If it’s set too tight, the seeds bind up the scroll inside and it quits working. I keep this printed sheet right in the box with my Squeezo strainer.
I hope you’ve picked up a few pointers that can make your home canning more efficient. The more efficient we get at it, the more likely we are to do more canning and to become more self-reliant in the process. If we’ve learned nothing else so far in 2020, it’s that the more we can depend on ourselves and what we can produce and grow at home, and less on national food-supply chains, the better off we’ll all be in the future.
When I finish a batch of canning, looking at all the jars sitting there on the counter after a long hard day, I feel so… empowered! My tired aching muscles bulge a little and I go to bed with a smile on my face, feeling just a little more confident that, come what may, I’m going to kick butt when TEOTWAWKI gets here. I hope your self-reliance skills make you feel the same way and inspire you to learn even more and to share that knowledge with others. And have fun canning this year!
Comments Disabled To "Large-Batch Canning & Jam Making, by St. Funogas"
#1 Comment By Lisa in TX On July 1, 2020 @ 11:56 am
St. Funogas, you have given me the perfect opportunity to ask a question I have been wondering for years. When it comes canning time, I am very concerned about things not turning out “right” due to using “old ingredients”. By that I mean, a bottle of Pickling Spices from last year, a box of Pectin from last year, etc. so I always end up buying new when starting to can. (if/when it does hit the fan, this is one area I’m going to be in trouble! )
You mention buying Pectin in bulk. Could you tell me what the shelf life is? What is the best way to store it?
Thank you for sharing this article with us. I always enjoy your comments and articles!
#2 Comment By St. Funogas On July 1, 2020 @ 3:36 pm
Hi Lisa, I pretty much ignore all expiration dates on everything I buy. If something tastes or smells off, then I toss it in the compost pile. On most spices, they typically have volatile oils in them to give them their flavor. Over time, those evaporate (every time you open the jar) so the worst thing that can happen is that they are not as flavorful as they could be. I just add more in most cases, but if the flavor is really lacking, then I toss those. If your pickling spice still smells strong, it should be usable.
On pectin, the Hoosier Farms I just bought in January (to be sure the supply chains weren’t interrupted) has an expiration date of next year. I have used boxed pectin that was a few years old and never had any problems. If your pectin and pickling spice is only a year old, I am guessing it will be perfectly fine.
Since expiration dates are not even required by federal law (except baby formula), my guess is that food companies add them to scare you into buying more of their product by throwing away perfectly good food.
Good luck with your canning this year! 🙂
#3 Comment By Lisa in TX On July 1, 2020 @ 7:58 pm
Thank you! I agree that the expiration dates are “junk” to put it nicely. I was just always worried about all the time (prep and canning) for it to go south on me! You have given me confidence that I can store things longer now (if I can find them!) I think TX is on the verge of a shut down again. My little hamlet has now started requiring face masks in public. 🙁
#4 Comment By Once a Marine… On July 2, 2020 @ 3:30 pm
Oh, StF, you are singing my song, “grazing fresh blackberries on the hoof”
I have too few to make more than a couple pints of jam, so these weeks I have been munching blackberries, mulberries, and serviceberries on our humble homestead.
They all are being bountiful at the same time. Oh, my.
Carry on, in grace
#5 Comment By Tucker from CO On July 1, 2020 @ 12:15 pm
Please do a part 2,3 & 4 with your other recipes. I plan on saving this post. Many of the new breed of sourdoughs are using scales as well.
Thanks
#6 Comment By Dan On July 1, 2020 @ 12:18 pm
My grape and blackberry vines did not survive planting. Sad, but will try again. Thank you for this article.
#7 Comment By St. Funogas On July 1, 2020 @ 4:20 pm
Hi Dan, keep trying! I started out with a single blackberry plant and three years later I had a 100′ row. The first year I didn’t use a trellis so that the vines were sprawling on the ground. I did tip layering propagation by burying all the tips in the soil once they got to be 4-6 feet long. They will be rooted by the end of the summer. I also buried some of the vines in the middle, weighted with a rock, which also rooted. The second year I did more tip cuttings and ended up with so many plants for the third year that I not only got my 100′ row with a 7′ trellis but sold some and gave some away. An even quicker method is to just cut the vines into pieces in root those in water or soil. The roots will come out where there was a leaf coming off the stem so be sure the very bottom of the stem has a leaf node. You’ll want to remove that leaf.
Good luck on your next try. 🙂
#8 Comment By Sheila Saffold On July 1, 2020 @ 12:25 pm
Great ARTICLE! I have been canning for years and learned something.
#9 Comment By CORD7 On July 1, 2020 @ 12:53 pm
Nothing better in the morning than homemade bread with homemade preserves and a cup a joe.
All the years struggling with volume measurements came to an end with the simplicity of a scale. Amen
Thanks for the recipe ratios ~
#10 Comment By just fish On July 1, 2020 @ 1:48 pm
Thank you St. Funogas.
Once again, this is a read with a re-read required.
King Arthur Flour is a great resource. We were not aware of Hoosier Hill Farms.
When we get to a point where we cannot make a full batch we will blend in another fruit.
We made a batch of blueberry peach that was really nice.
I know exactly what you are saying about the feeling of companionship with your Grandpa.
I have fond memories of working in the garden with my Aunt. She had the best smile when she was picking vegetables.
I often think about how she would work the land and I believe she would approve of our gardens.
#11 Comment By St. Funogas On July 1, 2020 @ 4:02 pm
Hi Just Fish, I’m glad you feel the connection with your aunt when you’re gardening. 🙂
I’m just a big sentimental slob and one fall I was feeling guilty about cutting my raspberry vines to the ground like I do each year. My grandpa, now gone, used to take such care tying his up and cutting out the two-year old canes, just like I do with my blackberries. One fall when I was feeling particularly guilty, I heard my grandpa say to me in his Swedish accent, “That’s okay, you be the blackberry meister and I’ll be the raspberry meister.” I get all blubbery just thinking about it.
#12 Comment By KB On July 1, 2020 @ 2:05 pm
Great article! What type of blackberries do you have? Our Navajo thornless sadly just got anthracnose. A 100′ row of blackberries is such a treasure!
#13 Comment By St. Funogas On July 1, 2020 @ 2:25 pm
Hi KB, I have Cherokee, related to Navajo, and they’re very productive. I haven’t had any disease problems. Anthracnose is a tough one to deal with, good luck with those. 🙂
#14 Comment By jima On July 1, 2020 @ 2:08 pm
Great article, even though i will probably never make blackberry jam.
#15 Comment By St. Funogas On July 1, 2020 @ 2:35 pm
Hi jima, blackberry jam was just an example, the concept will work with any canning recipe. Weighing the ingredients is a time saver because instead of taking five actions to measure out 4½ cups of green beans for my three-bean salad, I can do it in one step by weighing them. The smaller I cut the beans, the more ounces will fit in a cup due to less air space, so that will cause variation in the recipe from year to year. By using weight, the canning process not only goes more quickly, but recipe will turn out the same every year.
In my pickled three-bean salad, there are a total of 23 measuring steps if I use cups, but that gets reduced to 8 steps measuring by weight.
#16 Comment By benjammin On July 1, 2020 @ 2:48 pm
My last jam session was apricots. That was some of the best jam I ever had. What else do you can?
#17 Comment By St. Funogas On July 1, 2020 @ 3:50 pm
Hi Benjamin, I’m extremely jealous! Apricot is probably my all-time favorite jam. My grandpa had an apricot orchard and both jam and dried were to die for. I brought two apricot trees back from my last trip out west and one of them didn’t make it the second year. I also brought some pits back with me which I planted, and they are growing in their second year, to be grafted next spring with cuttings from my surviving tree.
I also can raspberry jam, three-bean pickled salad, tomato sauce (boiled down 40%), potatoes (the plants die back early here when it’s too warm in the root cellar so they get canned), bread and butter pickles, apple/green tomato chutney (excellent on all kinds of food from eggs to meats, and make a great chip dip too), salsas, and I want to start canning chili. Right now I use a process I call “pseudo canning” where I ladle the boiling chili into jars and after the lids seal and it cools down a bit, I put it in the fridge with the date on the last jar. My small pressure cooker makes 5 quarts so that’s 10 meals. As an experiment, once I left a pint jar in the fridge to see how long it would take for the lid to pop up (indicating that bacteria had multiplied enough to produce gasses) and it took five months. I generally finish the 5 quarts in less than a month and have never died, so it’s a safe process. I’d like to make larger batches and can them in my pressure cooker so that’s next on the list.
#18 Comment By CAL On July 1, 2020 @ 3:11 pm
St. Funogas,
Excellent article. You have answered so many questions I have had over the years. I have made my jam without pectin for years because I have had a hard time verifying if it is gluten free which is a requirement in our household. By adding some less ripe fruit I should have a much easier time getting the jam to gel.
#19 Comment By St. Funogas On July 1, 2020 @ 3:54 pm
Hi CAL, that’s definitely something I want to do more experimenting with, no pectin. I have an orange marmalade recipe that uses no pectin because there is so much in the peels. I also boarded with an old lady once who extracted her own pectin from apple peels. All these no-pectin methods are a must for a TEOTWAWKI situation.
I think I’ll try your method this year on a small batch and add in more unripe fruit than I normally do. Thanks for the idea.
#20 Comment By alittlebird On July 1, 2020 @ 3:11 pm
Thank you for the grams idea!! I will use that from now on. Also if you don’t have a rack for your canner, I have put in a dish cloth or small dish towel in the bottom. It keeps the jars off the bottom without wasting space.
#21 Comment By St. Funogas On July 1, 2020 @ 4:23 pm
Good tip!
#22 Comment By JW On July 1, 2020 @ 8:15 pm
This works for making custard or flan or quiche in a water bath (bain marie) also. No more banging glass cups while the water boils, the dishcloth makes it much quieter.
#23 Comment By Telesilla of Argos On July 1, 2020 @ 3:12 pm
St. Funogas, thank you! We will be watching for news of your book title, and cannot wait to purchase a copy. What a delightful article, and we learned so much. We just cannot thank you enough for the generosity of your sharing. The stories of the connection of these experiences to family memories makes it all just that much more wonderful. In fact we were on the edge of canning relish, and we were contemplating the peaches when your article posted to the SB! Now we are going to talk seriously about converting to weight measures in grams among other adjustments.
On another front… We look forward to news of progress on your greenhouse project, and hope that’s going really well for you! Ours is partially in-ground, and we have learned lots through the first year+ of this growing environment. If anything we have learned can help you and other SB readers, we are delighted to share. Our hope is that the garden bounty (and its preservation) will be multiplied because of the efforts of all those who contribute here.
#24 Comment By St. Funogas On July 1, 2020 @ 4:07 pm
Hey T of A, I learn so much from SB readers and have applied so many of the things I have learned, what a great resource. I wish I had discover SB years ago. I always love your greenhouse stories, and Avalanche Lily’s, among others. I have all the glass for my greenhouse, I just can’t decide if I want to build it onto the south side of the house, over the east deck, or freestanding. Each one has its pros and cons. Hopefully I’ll come to a decision soon!
#25 Comment By Telesilla of Argos On July 1, 2020 @ 5:17 pm
Hello St. Funogas!
What a fun update. Each of these options has an advantage to be sure, and you might discover that once you have the “first” greenhouse in place, you’ll decide to add another. When we were building our greenhouse, we met a farmer who said that no one ever builds a greenhouse and then decides that they have too much space. It was very, very funny — and we know from first hand experience, that this is also true!
The outside dimensions of our greenhouse cover just over 1100 square feet (inside is close to this), and we wonder about placing another one of these — perhaps specialized for the unique needs of citrus, or maybe for microgreens. Our existing greenhouse includes hydroponics (multiple different applications from Kratky to gravity fed and pump-driven), raised self-wicking beds, and raised soil-to-ground beds. We have worked on multiple strategies related to seasonal heat management (suppressing the heat in the hottest part of the summer, and keeping the greenhouse comfortably above freezing in the winter). If anything we have learned can help you and others, we’re delighted to share.
Whatever you decide, we are wishing you EVERY SUCCESS! …and we look forward to the stories as these unfold in the journey!
#26 Comment By St. Funogas On July 2, 2020 @ 2:10 am
Hey T of A, I’m looking forward to your greenhouse article! 🙂
#27 Comment By sewNurse On July 1, 2020 @ 3:13 pm
Some years ago, I took a cooking class taught by a lady whose career had been food editor for several magazines. She had been schooled in what I think she called food chemistry, or it may be what we call food science today. One of the things that stuck in my memory was that she said that if our recipes were not turning out well, it was because our measurements were off. Every time that I cook a pound cake the flour is sifted and measured three times. Weighing would be even more accurate. It is amazing the difference in the amount that you start with and the amount you end up using in the cake batter. Thanks for a very informative article. I will be making peach jam in the next couple of weeks. For those of you that like jellies and juices, I highly recommend a steam juicer. Just wash the fruit and place in the pot. Almost no work at all.
#28 Comment By Tunnel Rabbit On July 1, 2020 @ 4:36 pm
St. Funogas is always a good read, cause he is always ‘jamming’ ‘(jamming’ is a term equivalent to ‘rock’n’ as it applies to jazz music, ala’ ‘jam session’.). I also grew up eating peanut butter and jelly or jam sandwiches, unfortunately I’ve had to give up the jam part. If there is a no sugar recipe, I might be able to tolerate a gram or two. In the interim, I’d could try a fruit spread, skipping the raw sugar and pectin. There has got to be more than one way to ‘jam’.
#29 Comment By Mary On July 2, 2020 @ 1:58 am
Ball makes a low sugar/no sugar pectin for jam making. It’s what I’ve used for many years and have had great results (with the low sugar option). I just can’t rationalize recipes that use almost as much sugar as fruit!
#30 Comment By Elli O On July 1, 2020 @ 4:41 pm
You REALLY are a saint. I have been canning for almost 5 decades and i never thought about weighing the ingredients! Can’t wait to try it this year. Thank’s for sharing your knowledge!
#31 Comment By N S On July 1, 2020 @ 5:06 pm
Thornless Blackberry Vines? I’m just guessing here, but those must be a hybrid from your grandpa! I have searched and searched for what I call “blackcaps” an offshoot of the usual black chinaberry that grows wild in many areas. My Grandpa (in Maine) had them along the backside of his house and were the sweetest berry ever tasted, but they still had thorns on the vines. Aside from Blueberrys, next Raspberry’s, the Blackberry tops all for adding to any meal, breakfast, lunch, or dinner. Sure would like to find some thornless ones, or even starts from somewhere. Any hints where I can find them? I’m not to the canning portion yet but working on it….. Very interesting article. Stay well!
#32 Comment By St. Funogas On July 1, 2020 @ 5:32 pm
Hi N S, here’s one source with a good price. If you google “Cherokee Blackberries,” you should get all the thornless varieties named for Native American tribes. These were all developed by the University of Arkansas. I’m not specifically recommending Cherokee but if you do a search for that variety you should find the others as well, and hopefully they will indicate which one will do best in your area. You can probably find a nursery closer to home as well.
[7]
#33 Comment By St. Funogas On July 1, 2020 @ 5:26 pm
Footnote:
I bought some generic jars at Walmart a week or so ago to put honey in. When I got home, I was happily surprised when I looked at the bottom of the jar and discovered “USA,” but also Anchor Hocking instead of Walmart’s normal Golden Harvest and no-name “China” canning jars. When I measured the Anchor Hocking pints, the circumference was actually an 1/8th of an inch smaller than Ball/Kerr, meaning I can fit 11 of those in my canner as well. Three cheers for Anchor Hocking.
#34 Comment By TeresaSue On July 1, 2020 @ 6:04 pm
Wonderful article! We just put in a few thornless blackberries this year. We’re hoping our winters don’t kill them.
I have a scale I use, but it is not digital, I might have to spring for one as I hate doing those tiny little batches.
Thank you!
#35 Comment By St. Funogas On July 1, 2020 @ 6:05 pm
Footnote 2:
Here’s another cool trick you can do with grams.
I’ve always been leery of most of the rain gauges you can buy because the top opening is so small it affects accuracy.
The most accurate gauge you can make costs nothing. All you need is a 5-gallon bucket and a scale to weigh the water. Because the buckets nest inside each other, the top is larger than the bottom so you can’t just stick a ruler in the bottom after a rain to see how many inches you got. On my bucket, you’d be 21% off.
First, measure opening of your bucket in millimeters (found on most plastic 12″ rulers). Measure the inside edge to the inside edge at the widest point. Find that number on the chart below to find out what your constant will be. My bucket is 284 mm wide so my constant is 1609. That means when I weigh the water after a rain storm, I divide the total grams by 1609 and that will tell me how much rain I got, accurate to hundredths of an inch. If I get 3269 grams of water in my rain gauge, I divide by 1609 and I get 2.03 inches, or, 2 and 3/100ths inches. The 1609 is written on my calculator with a sharpie so I don’t have to remember it. You can also write it on the sheet you keep track of rainfall on.
The other cool part is, when you get snow, you let it melt first (or weigh the snow directly) and then you can very accurately know how much rainfall that amount of snow converts to.
Your bucket diameter – Your constant:
280 mm – 1564
281 mm – 1575
282 mm – 1586
283 mm – 1598
284 mm – 1609
285 mm – 1620
286 mm – 1632
287 mm – 1643
#36 Comment By RKRGRL68 On July 1, 2020 @ 6:09 pm
St Funogas,
I loved this article!! I just ordered an electric kitchen scale like you suggested. Duh, I should have thought of it as my counters (actually the whole house) kinda tilts so measuring in glass cups is so goofy!
I’m still purchasing frozen fruit and I totally cheat using a Ball jam making machine but at least I’m making jam, (and I totally jam out to my rock music while I’m doing it)!!
Thank you for sharing this with all of us, I love the way you write and the way you explain things.
Thank you also for yesterday’s comments, I really respect you for actually saying all of the things that I have in my head but was too afraid to say out loud!! Patriots should NEVER be silenced! Unfortunately for the couple in St. Louis protecting their own private property with their own LEGAL weapons while the crazy, looting, mad at everything and anyone mob stomped through the neighborhood, are being absolutely ostracized by our crappy left wing media.
I hope you have a Rockin great day!
#37 Comment By St. Funogas On July 2, 2020 @ 2:05 am
Hey RKRGRL68, thanks for the compliments. I haven’t heard of a jam-making machine so I’ll have to google that one. And it’s not cheating as long as you get some jam out of it and have fun in the process.
I lived in a tilting house once, so I can understand your experience. I couldn’t even lay a pencil on the kitchen table without it rolling off. Once I got used to it, it wasn’t that big of a deal. 🙂
#38 Comment By R. Thomas On July 1, 2020 @ 8:44 pm
Is the jam recipe the same if we leave the seeds in? Here in southern Oregon we are about to have a bumper crop of blackberries. Ours are wild and have thorns. Long sleeve shirts, lots of buckets and a ladder to lean against the berries are my picking tools. Blackberry jam on the shelf is a bonus in our prep supplies.
#39 Comment By St. Funogas On July 2, 2020 @ 1:56 am
Hi R. Thomas, the recipe can remain the same if the seeds are in but it will probably turn out a little more firm than you like. On my thornless plants, the seeds amount to 29% of the berry so after screening, I only have 71% of the fruit left. So, if you leave the seeds in the pectin ratio will wind up higher, and thus the jam may be stiffer than normal. It’s something you can test out easily enough. If you make a batch and it’s too firm, then cut back on the amount of pectin on the next batch.
I made 55 pints of jam one summer with wild blackberries and when the three-week picking season was over, my arms looked like I had been in a fight with three cats in a pile of razor wire. But, the flavor can’t be matched, it was great stuff. Good luck with your wild blackberries this year and it would be interesting to hear how the jam turns out if you decide to follow this recipe.
#40 Comment By Saul On July 2, 2020 @ 1:13 am
Where I live blackberries are everywhere. They are so prolific that I could easily fill a five gallon bucket in a few hours. I have said before that in the month or two blackberries are ripe I could probably pick enough to feed myself for a year. Blackberry jelly/jam is OK but I wonder if there are other ways to preserve them (not freezing either) than jelly?
#41 Comment By St. Funogas On July 2, 2020 @ 2:01 am
Hi Saul, I know they can be dried as well as freeze dried but I have never tried either way. I have a bumper crop this year so I guess I better try drying some in my solar dryer, just to see how they turn out. They are very high in vitamin C so it may be a good way to get ones daily dose.
#42 Comment By Saul On July 2, 2020 @ 7:27 pm
I have tried dehydrating and they don’t do so well over time. Frozen seems to work except once you start to thaw them they will quickly turn to mush. You can thaw them and quickly eat them but that seems to be your only choice. And of course the problem with freezing large amounts of blackberries is that they take up a lot of space. My point in all of this is that they are such an excellent food source; free and plentiful for two months or so, that it is a shame there is no good way to preserve massive amounts of them. I thought about canning them in plain water but I suspect you would end up with a slightly berry tasting mush. Maybe I’m just not doing it right either in the dehydrating or the freezing. Any ideas?
#43 Comment By joyce On July 21, 2020 @ 4:41 am
St.Funogas…as i was getting to ready to make jam with the 3 cups wild black raspberry puree i managed, I noticed you mentioned making raspberry jam. Would you share your recipe…ready to convert to the grams needed, (big smile.) Thanks!
Then moving on to choke cherry…
Back to work, well maybe sleep at this hour.
#44 Comment By GritsInMontana On July 3, 2020 @ 6:15 am
One of my responsibilities in childhood was to pick the blackberries early each morning before the birds got them all. We used them in a myriad of ways. Some ideas:
Blackberry cobbler, blackberry chutney to serve with meat, blackberry liqueur, blackberries tossed into homemade vanilla ice cream as it is being churned, blackberry sorbet or granita (this is so simple to do with just some simple syrup, berries and a shallow pan) and blackberries tossed into a beautiful green salad with carrots and beets. And, while it may sound weird, I like blackberries, blueberries, or huckleberries cooked down into a cream sauce. Just make your roux of butter and flour, then add a couple handfuls of berries and cook them down. From there, it just takes a small splash of cream to make your sauce just perfect and you’re ready to serve it over a filet of pan seared salmon.
I wish I had your “problem” with all those blackberries! How wonderful! 😉 Hopefully the thornless blackberry bush I bought recently will survive it’s first Montana winter.
#45 Comment By VT On July 4, 2020 @ 3:49 pm
Grits, +1 on Blackberry Liqueur, here we have a Polish style that is excellent-we nicknamed it cough syrup so if you had a cold drink a couple shots and throw a extra blanket on and be cured the next morning.
#46 Comment By Strelnikov On July 2, 2020 @ 1:47 am
My dad was an agronomist and had a large patch of Doyle thornless blackberries that he tended with care (his mother was Norwegian). He got them from some place in Texas and waited several years to get them after he ordered them. I remember going out to his patch and eating so many of them, they were delicious! I have a few plants in my garden but don’t have the space to grow the amount he had.
#47 Comment By Mary On July 2, 2020 @ 2:02 am
Ball makes a low sugar/no sugar pectin for jam making. It’s what I’ve used for many years and have had great results (with the low sugar option). I just can’t rationalize recipes that use almost as much sugar as fruit!
#48 Comment By Chocoholic On July 2, 2020 @ 4:15 pm
I like sweets, I admit it I am a chocoholic. I like sugar in my coffee and sweet jellies and jams on toast. I sometimes, while looking for candy or other sweets in the store, stray into the section with sweets that have no sugar and kind of wonder about them. I am more afraid of those chemicals used to make you think they are sweet then I am of sugar. My food storage also contains sugar, lots of sugar (instant energy). Last night I cut up two pounds of strawberries and of course put into it about half a cup of sugar. The sugar draws out some of the liquid and makes a sweet syrup to eat along with the strawberries.
#49 Comment By Wise Girl On July 2, 2020 @ 2:21 am
Thanks so much for the article, Saint! As soon as I finished reading it I jumped up and layered my black raspberries on cookie sheets for the freezer. Gonna save them for batches 2-4 in order to work smarter instead of harder! I already have one batch under my belt this season but I’m really excited about trying your method!
#50 Comment By John330 On July 2, 2020 @ 5:25 pm
Pomona Pectin has no expiration date and doesn’t require any sugar to set. I have just started using it this year, and i have been impressed with the ease of use, taste and set. Blueberry jelly recipe called for two cups of sugar instead of seven like most pectins. It is worth researching.